We’re tagging along with the Zoo Crew this week as they take a few more adventures before retiring with the 2023-24 Annual Catalog. I’m going to miss these guys! The stamps and designer papers have offered so many fun design opportunities.
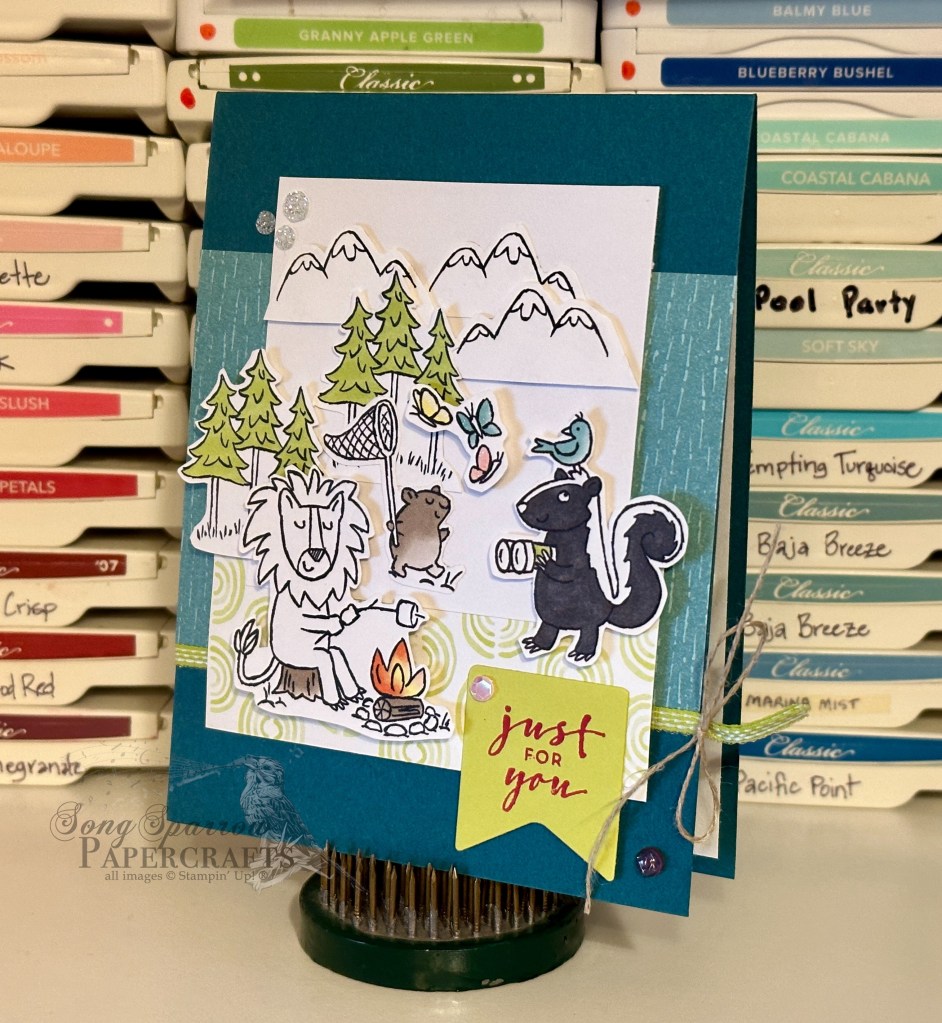
Today’s card has us gathering with friends around a campfire. We get started with a base of Pretty Peacock cardstock. The focal section of the card consists of a background of two patterns of designer series paper — Inked Botanicals and Bright & Beautiful — and a piece of white cardstock. Using the outdoor adventure sheet of the Zoo Crew designer series paper, I fussy cut several characters, as well as groups of trees and several mountain ranges, to build this scene. Dimensionals help give the scene depth. The sentiment from Charming Sentiments is stamped on Lemon Lime Twist and diecut with the Zany Zoo banner die. A strip of the ribbon duo tied off with linen thread, along with the bits of sparkle from the sequins, tinsel gems, and glitter sequins, finish things off by moving the eye across the design.
Tune in tomorrow to see what our zoo friends get up to next!
This week, the Zoo Crew is taking us on one last adventure before they retire with the 2023-24 Annual Stampin’ Up! Catalog. These guys are so easy to incorporate into designs. I’m still a little surprised that this crew of adorable critters isn’t carrying over into the new catalog! Maybe we can all petition for them to stay on as Online Exclusives. *grin*
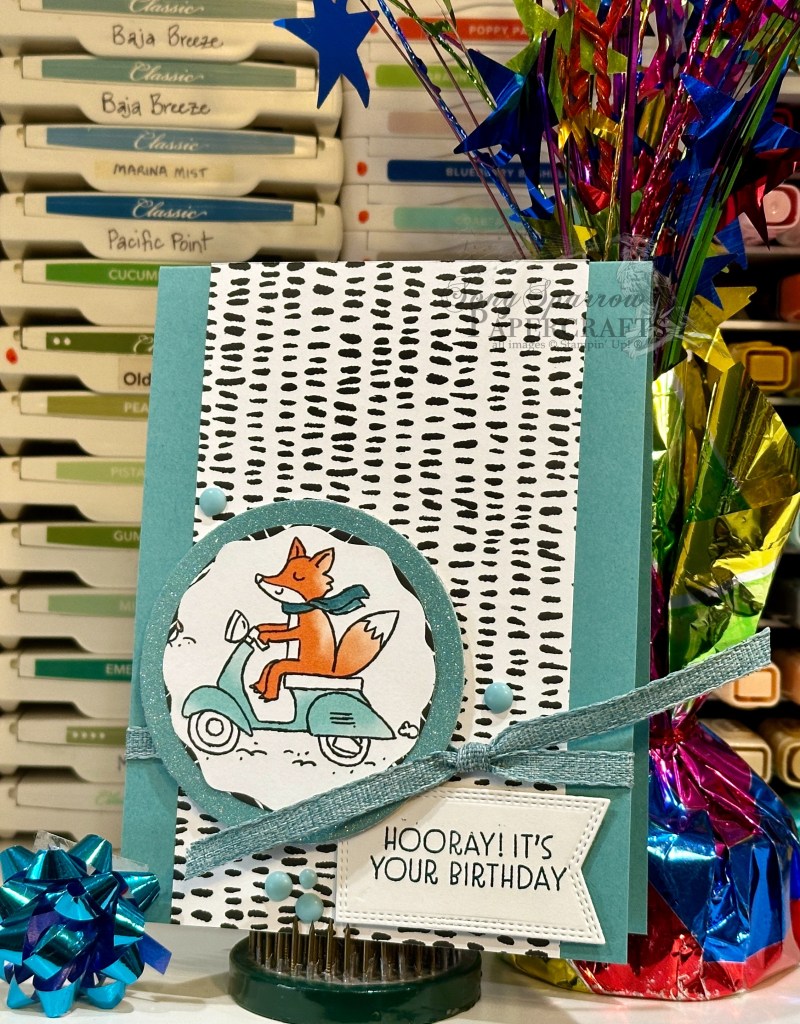
Today, the fox is riding in to bring some birthday wishes. We get started with a base of Lost Lagoon cardstock. The background panel is a piece of the Zoo Crew designer series paper cut so that there is a half-inch border on either side. Our cute fox is punched from the DSP using the Decorative Circle punch and matted with a slightly larger plain circle punched from a different sheet of the DSP. Both are then matted on a piece of the Lost Lagoon soft shimmer paper that has been punched with the 2 3/8-inch circle. The sentiment from Hot Air Balloon is stamped on white cardstock and then diecut with the Nested Essentials dies using the extension method, which gives just a smidge of added length to the banner to allow for the whole sentiment. I tied some Lost Lagoon bordered ribbon around the card and tucked it behind the focal image panel and then added some rainbow adhesive-backed dots to create a visual triangle between the focal image and sentiment.
Today’s layout is inspired by my upline and Luv 2 Stamp team leader Patty Bennett. One of the things I love about this card layout is how quickly everything comes together. This is a go-to in my sketch book. Do you have any go-to layout favorites?
I hope you’ll join me tomorrow for another wild Zoo Crew adventure!
Products used in today’s card: Lost Lagoon, Basic White cardstock Zoo Crew, soft shimmer DSP Hot Air Balloon stamps Decorative circle, 2 3/8” circle punch Nested Essentials dies Lost Lagoon bordered ribbon Rainbow adhesive-backed dots Dimensionals Adhesives
This week, we’re headed into the wild with the Zoo Crew. The Zany Zoo suite will be retiring with the current catalog, and I’m just a little sad about it. I love all of these fun critters and all of the many adventures they’ve had. So we’re tagging along for one last ride before the 2023-24 Annual Catalog retires.
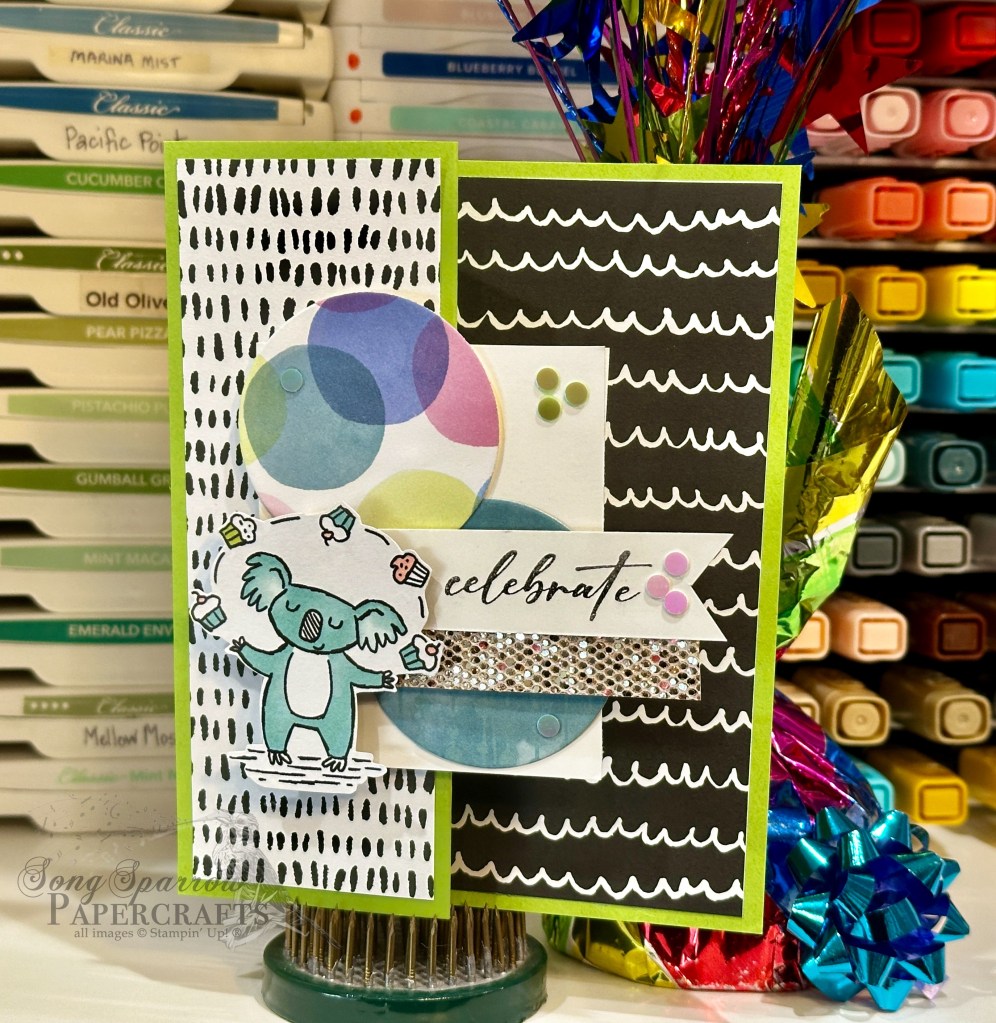
What better way to celebrate a birthday than with a juggling koala?! Today’s fun fold card begins with a base of Granny Apple Green cardstock. The Zoo Crew designer paper provides our neutral black and white base panels, as well as our main character on the focal panel. The focal panel consists of a small panel of white cardstock, along with two circles punched from Bright & Beautiful and Hello Irresistible designer paper packs. The sentiment from Something Fancy is stamped on white cardstock and then cut with paper snips into a banner. A small strip of More Dazzle specialty paper adds some sparkle. The koala is elevated on dimensionals to ensure it stands above the scene and draws the eye to the action. The iridescent discs bring the eye to our focal panel and add some visual interest.
Tune in tomorrow to see what our zoo friends get up to!
Products used in today’s card: Granny Apple Green, Basic White cardstock Zoo Crew, More Dazzle, Hello Irresistible, Bright & Beautiful DSP Something Fancy stamps Circle punch Iridescent discs Dimensionals Adhesives
We’re wrapping up our week in the fields and flowers with a sneak peek of some product from the NEW 2024-25 Annual Catalog that Stampin’ Up! will release in May. The Unbounded Love suite includes gorgeous papers, stamps, dies, and embellishments.
No one really likes to have to send sympathy cards, but I do love knowing that I have designed a very personal card with the recipient in mind.
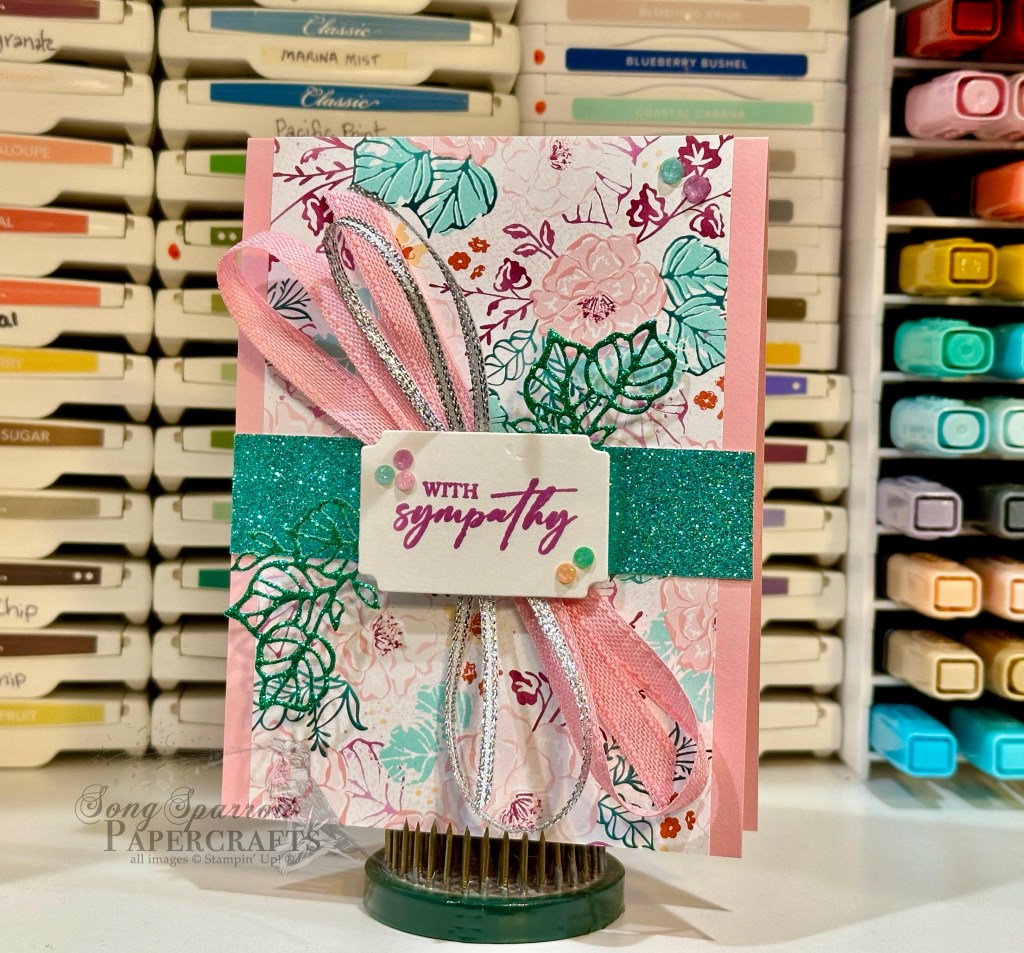
This design begins with a base of the NEW Pretty in Pink In Color cardstock. The focal panel is a sheet of the Unbounded Beauty floral paper pack. I really wanted this stunning paper to take center stage, so I kept the remainder of the card design very simple. A strip of the new Summer Splash In Color glimmer paper serves as the backdrop for the sentiment panel. The sentiment from the new Unbounded Love set is stamped in the new Petunia Pop ink on white cardstock and diecut with the coordinating Unbounded Love dies. The leaves are cut from the new Shy Shamrock In Color glimmer paper. A twist of the new Pretty in Pink bordered ribbon and silver trim and a few new In Color shimmer gems finish things off and really help draw the eye to the sentiment.
Next week, I’m planning to take things to the zoo — the Zoo Crew, that is. I hope you’ll come along as we bid farewell to one of my favorites from the 2023-24 Annual Catalog!
Products used in this card design: Pretty in Pink (coming soon!), Basic White cardstock Unbounded Beauty, 2024-26 In Color glimmer DSP Unbounded Love stamps & dies Pretty in Pink bordered ribbon, silver trim 2024-26 In Color shimmer gems Dimensionals Adhesives
We’re finishing off our frolic in the fields with a look at some brand NEW product that will be available in the 2024-25 Annual Catalog releasing in May.
The Thoughtful Journey 6×6 paper pack offers a whole array of watercolor images in soft tones. There are floral landscapes and beautiful abstract backgrounds. These papers will lend themselves to any number of occasions with ease.
Today’s card is a very clean and simple design. The base is white cardstock with a single strip of designer paper offset to the right side. I chose the lovely thistle pattern with soft tones of Petunia Pop and Pretty in Pink — two of the NEW In Colors. The sentiment from Simply Zinnia is stamped in Petunia Pop and heat embossed with clear embossing powder on a strip of vellum. A strip of white diagonal trim is tied around the bottom of the sentiment in a simple square knot. I finished things off with a small paper butterfly and shimmer gems in the new 2024-2026 In Colors.
Join me this afternoon as I give a quick preview of another NEW bundle of products from the upcoming 2024-25 Annual Catalog called Unbounded Beauty.
Products used in this card: Basic White, vellum cardstock Thoughtful Journey DSP (coming soon!) Simply Zinnia stamps White diagonal trim Clear embossing powder 2024-26 In Color shimmer gems Dimensionals Adhesives
Things have really begun to green up in our area and I’ve begun making treks to my favorite garden center to fill my patio pots. I really love having a yard full of color! For our growing area, I have to choose plants that not only like our mild springs but that really love the sweltering heat of summer. And one of my all-time garden favorites is zinnias. They come in a wide variety of colors, are fairly bug resistant, and don’t mind the Texas heat one bit — winner!
When Stampin’ Up! released the Flowering Zinnias suite in the latest Online Exclusives, I immediately fell in love with the designer paper. I wasn’t quite so sure about the stamps or dies. If I’m being honest, I didn’t immediately like the stamps or dies because I felt like they were a little too fussy and I was intimidated by the thought of trying to use them. But I was soon convinced that I needed them when I began seeing all of the drop-dead stunning designs my fellow stampers were making with them.
Believe me when I tell you that this card looks way more complicated than it actually is to assemble. The dies really do do all of the work for you. And just look at the stunning results!
We start with a base of Flirty Flamingo cardstock. I next diecut a quarter panel of the same and then embossed using the Zinnia embossing folder. This panel is cut slightly smaller than the card base. I then began diecutting flowers from Real Red and Calypso Coral cardstock using the Simply Zinnias dies. The flower centers are a combination of Pumpkin Pie and Daffodil Delight. Next are the leaves, which have been diecut from Shaded Spruce and Old Olive. The smaller flowers are diecut from Lemon Lolly. The sentiment from Perennial Postage is stamped on white cardstock and then diecut using the soon-to-release Unbounded Love dies.
The embossed Flirty Flamingo panel is adhered directly to the card base. I next assembled the flowers. To assemble, I used dimensionals between the two flower petal layers. A large Zot glue dot secures the orange center to the top layer of petals and then I used a fine tip glue pen to add adhesive to the circle of small flowers that sits atop the flower center. For the smaller budding flowers, a glue dot adheres the flower to the stem.
To complete the card, I began by adhering the sentiment to the center with dimensionals. The red flowers come next and are also adhered to the card front using dimensionals. The leaves are layered underneath the flowers and secured with glue dots. The Calypso Coral flower is secured directly to the card base with a large Zot glue dot to give dimension to the look. The small stem of accent flowers is secured with a single dimensional, while the flowers themselves are held in place with glue dots. Shiny sequins finish off the design with some flare and a bit of sparkle.
I’ll be bringing you some BONUS content tomorrow of brand NEW product as we take a romp through the meadow using the gorgeous Unbounded Beauty and Thoughtful Journey products. You won’t want to miss it!
Products used for today’s card: Flirty Flamingo, Real Red, Calypso Coral, Pumpkin Pie, Daffodil Delight, Lemon Lolly, Shaded Spruce, Old Olive, Basic White cardstock Perennial Postage stamps Simply Zinnia, Unbounded Love (coming soon!) dies Zinnia embossing folder Shiny sequins Glue dots Dimensionals Adhesives
This week, we’re touring fields and flowers as we explore some of my favorite Stampin’ Up! products. And stopping to smell the lavender from yesterday’s lovely hillside was just too tempting. In fact, today we have a whole bouquet.
From top to bottom, the Perennial Lavender suite in the January Mini Catalog is one of my favorite releases to date. There is not one single element in the suite of products that leaves me wondering what I’ll do with it, which is honestly pretty rare for me. Portions of this suite of products will be fully retired when the new Annual Catalog releases. So if you’ve been on the fence about buying this suite, time is of the essence before portions of it are gone for good!
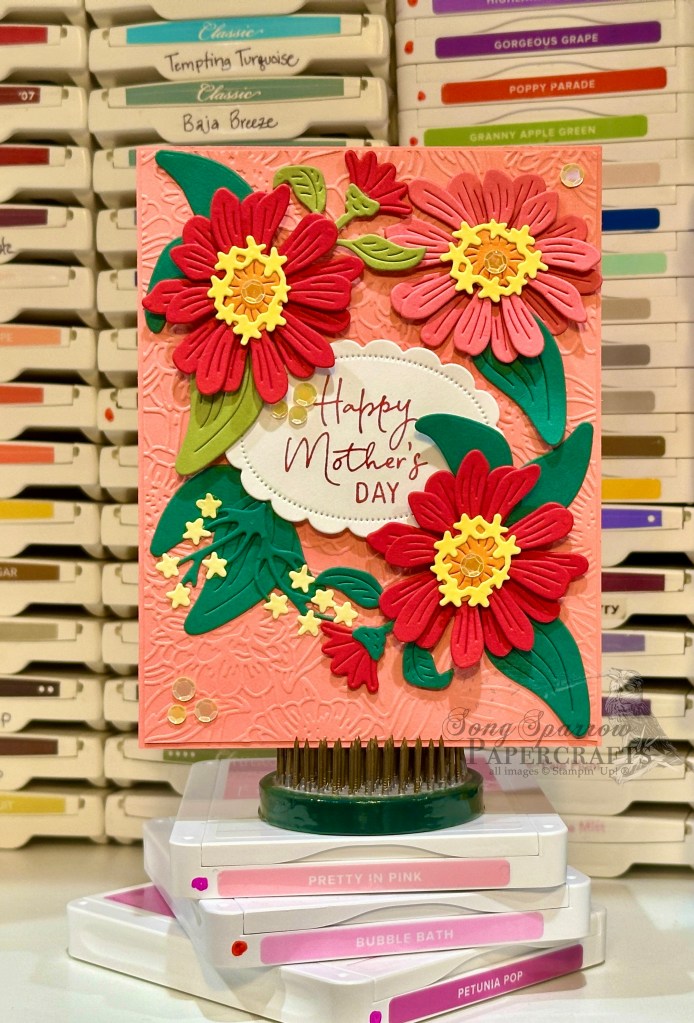
Being that Mother’s Day is just around the corner, it seemed fitting to design a card perfect for the occasion. Today’s card design begins with a base of Highland Heather cardstock. The focal panel base is a sheet of the Perennial Lavender designer series paper, and I have distressed the edges with my paper trimmers to give it a well-worn look. The lavender bunch is stamped on white cardstock using the Painted Lavender stamp set and then diecut using the coordinating die set. To give the fronds of lavender a more realistic look, I used three different shades of purple — Highland Heather, Gorgeous Grape, and Fresh Freesia. The flower bunch is tied together with linen thread. The sentiment from the Perennial Postage set is stamped on white cardstock and diecut using the Thoughtful Expressions dies. I cut a coordinating mat from white glimmer paper using the next die size up. I added a paper butterfly to further soften the feel of the card and finished things off with classic matte dots and purple shimmer gems.
Later today, we’ll be enjoying another fresh bouquet. I’ll hope you’ll pop back by to check it out!
Products used in today’s card: Highland Heather, Basic White cardstock Perennial Lavender, white glimmer DSP Painted Lavender stamps & dies Perennial Postage stamps Thoughtful Expressions dies Paper butterfly Classic matte dots, purple shimmer gems Linen thread Dimensionals Adhesives
As promised, I’m back! Thanks for hanging with me as I worked to get my husband settled in back home for a few days before we head back to the hospital for the next big surgery. Hats off to all of the full-time caregivers out there — it’s definitely a big job!
I’m super excited to get back to scheduled programming and take a stroll through the hills and fields of flowers. I’m going to showcase some of my favorites from the current and soon-to-release Stampin’ Up! lineup. I hope you’ll plan to come along for the whole trip!
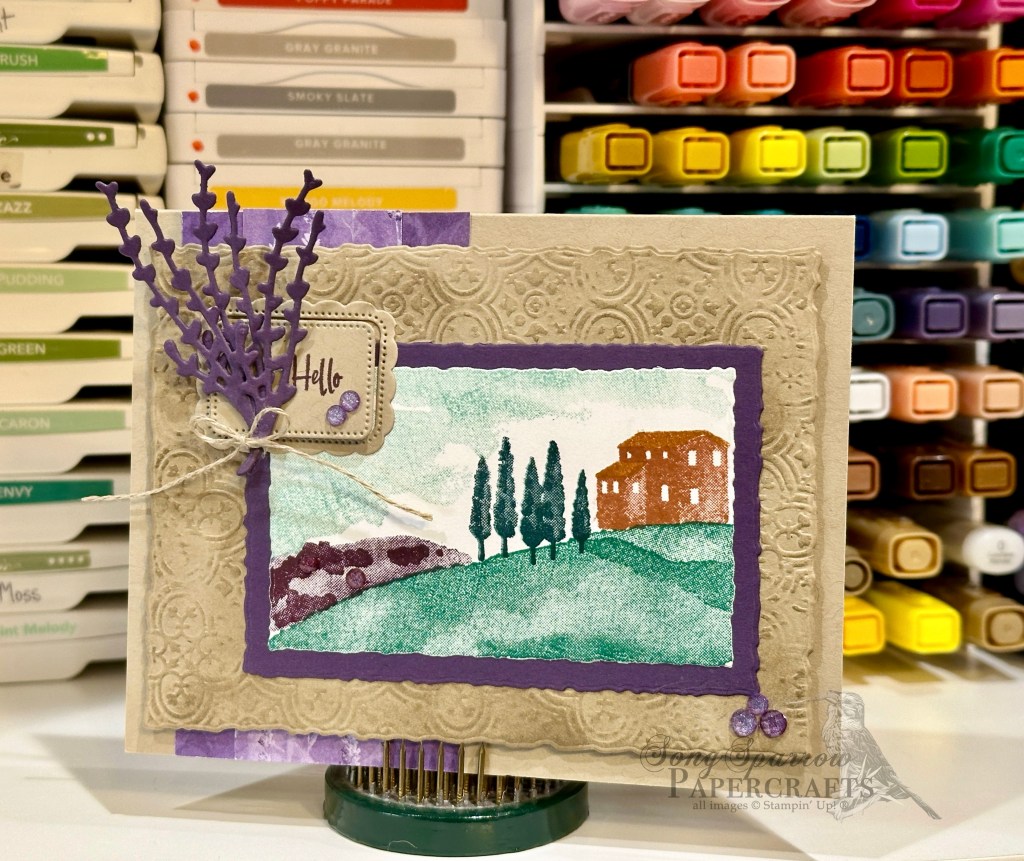
Today, we’re walking the Hills of Tuscany, using the stamp set by the same name. This lovely stamp set is on the Last Chance list, and I’m sad to see it go! But this is a set that will definitely be staying in my crafting stash for making beautiful landscape scenes.
Now, let’s take a closer look at how today’s card came together. I chose to have a lavender theme for this landscape. We get started with a base of Crumb Cake cardstock. The back panel of the focal section of this card is a quarter-sheet of Crumb Cake that has been diecut with the largest Deckled Rectangles die and then machine embossed with the Distressed Tile embossing folder. To help the beautiful embossed detailing stand out a bit more, I gave it an aged look by sponging Crumb Cake ink over the top. It’s also elevated with dimensionals to give depth to the design. The focal panel mat is Gorgeous Grape cardstock that has been diecut with the Deckled Rectangles dies, while the focal panel is a sheet of white cardstock diecut with the nesting rectangle from the same set of dies. The focal panel landscape scene is stamped using the Hills of Tuscany stamp set.
The sentiment panel is diecut from Crumb Cake cardstock using the soon-to-release Unbounded Love dies. The lavender bunch is diecut from Gorgeous Grape using the Painted Lavender dies and tied together using linen thread. The frame is adhered directly to the focal panel, while the sentiment portion is popped up on dimensionals to ensure the sentiment isn’t lost in the scene.
Two strips of the Perennial Lavender designer series paper behind the focal panel finish off this design. They serve to begin the eye’s journey across the card front. Notice how the purple elements form a visual triangle across the card front as your eye passes from this strip of DSP to the sentiment panel to the field of lavender in the landscape to the gems in the bottom-right corner.
TIP: when you overlap stamped images from this stamp set, it creates darker areas that add depth and shading. Notice the darker green path in the hill that was created in this fashion. I still have a lot to learn when it comes to this technique, but I have enjoyed experimenting with the layering. Should we make this an episode of Terrific Tuesdays? I would love to know your thoughts!
Products used in today’s card: Crumb Cake, Gorgeous Grape, Basic White cardstock Perennial Lavender DSP Hills of Tuscany stamps Deckled Rectangles, Unbounded Love (coming soon!) dies Distressed Tile embossing folder Purple fine shimmer gems Linen thread Dimensionals Adhesives
It’s that time again — time to clear the shelves to make room for more terrific new Stampin’ Up! products. And for you and me, that means opportunities for savings!
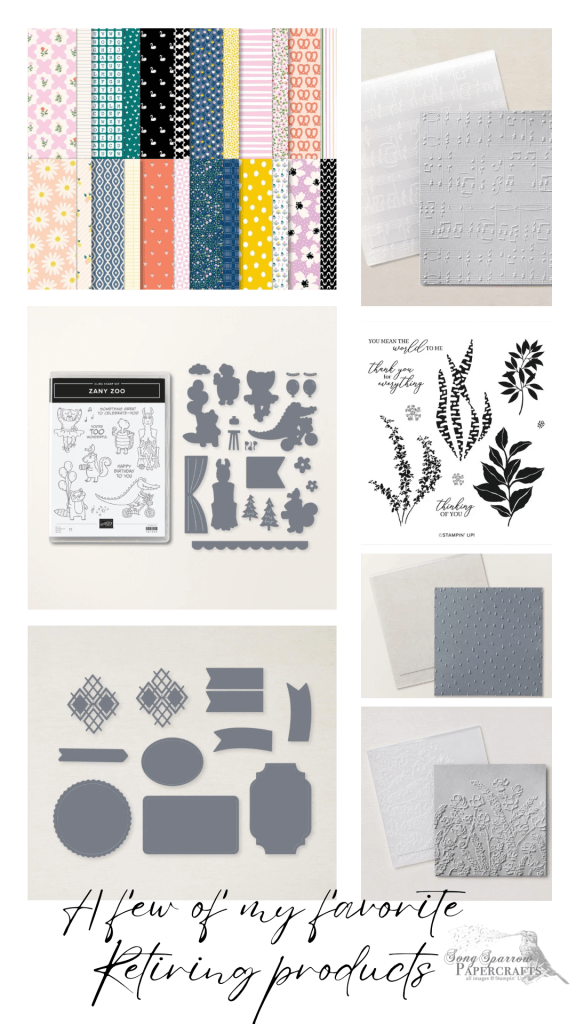
Last chance products include products that will be fully retired with the release of the new Annual Catalog in May. Last chance products also include stamps and dies that will no longer be offered as bundles and will instead have to be purchased separately. Check out all of the Last Chance products here.
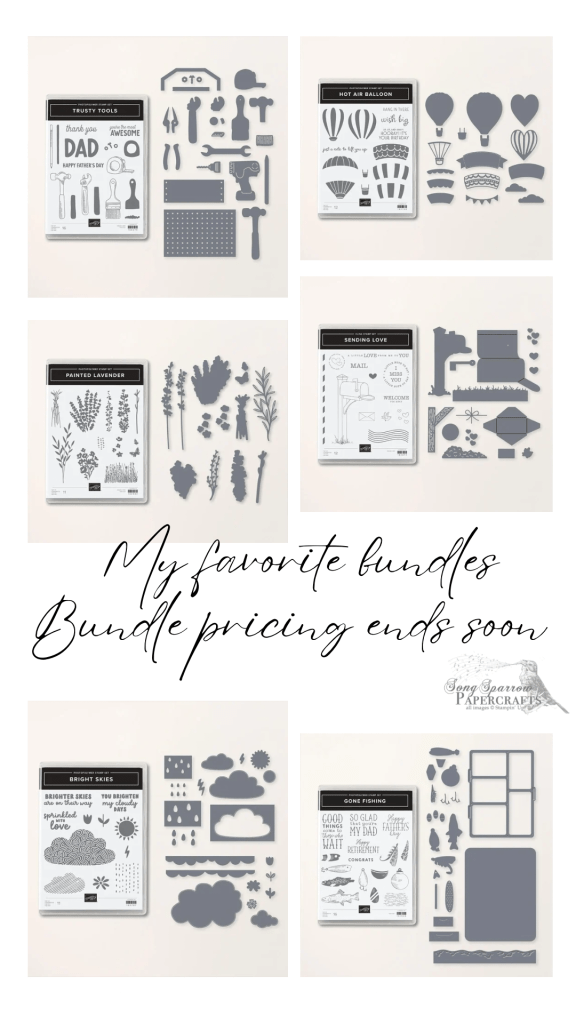
Need a few ideas? These versatile bundles are a must-have for my craft room. Once the new catalog releases, they will be available for purchase separately. So grab them now while you can take advantage of the bundle pricing!
As with any new catalog release, there are always things that I’m sad to see go. These are just a few of my favorites that are retiring, and quite a few of them are marked down to move!
Had your eye on some things in the Annual Catalog? Now is the time to add them to your crafting stash, especially if they’re retiring. Check out all of the Last Chance products here.
I look forward to returning to planned content later this week as we’re set to come home from the hospital sometime soon. So I hope to get back in the craft room to finish up a few projects for you.
Happy Tuesday, everyone! Thanks for stopping in today. My hubby had surgery and recovery is going a bit slower than anticipated. So we’re taking a little detour from touring fields of flowers for the next day or two, but we’ll get back to it once we’re able to return home.
Over the last several years, I’ve had several opportunities to sit in hospital waiting rooms awaiting word on family members having surgery. And I’ve found it helpful to have things to do to help take my mind away from worrying about all of the what-ifs of surgery. One of the things I have really enjoyed doing to pass the time is assembling Stamipn’ Up Kits.
You may be wondering how on earth I’ve managed to assemble cards in a hospital. Well, the beauty of SU! card kits is that they include everything you need to put together at least 3 different card designs. All you need to throw in your bag is some adhesive and paper snips!
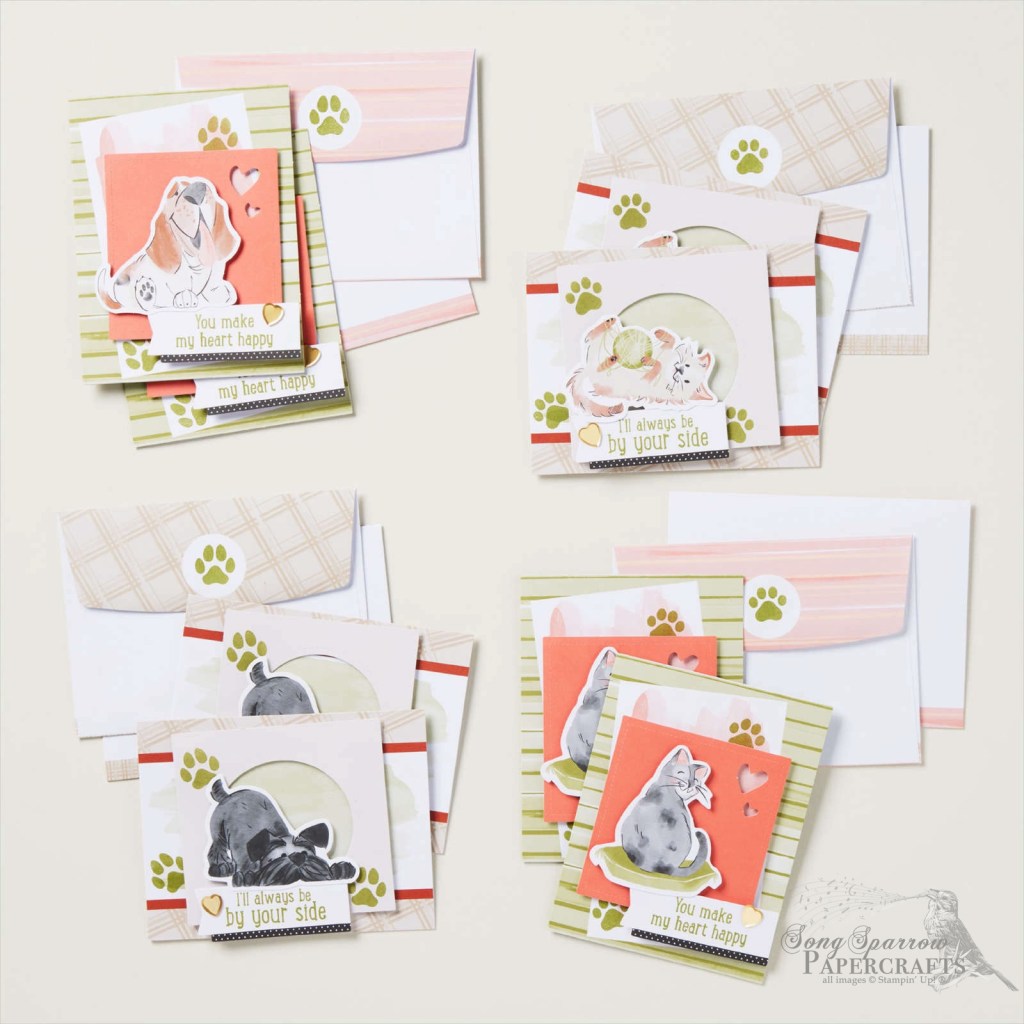
While in the waiting room for my husband’s surgery, I finished assembling cards from one of the newest SU! kit releases called By Your Side. This adorable kit is purrrrfect for all of the animal lovers in your life!
The kit includes everything you need to create 4 different card designs. And, of course, you can punch things up with extras, like ribbon or twine or embellishments if you want.
One of the things I love about the SU! Kits is that the designs are simple to put together. You have all the supplies you need, and the kit comes with instructions for assembling each of the different cards. But you can also easily adapt and change designs to suit.
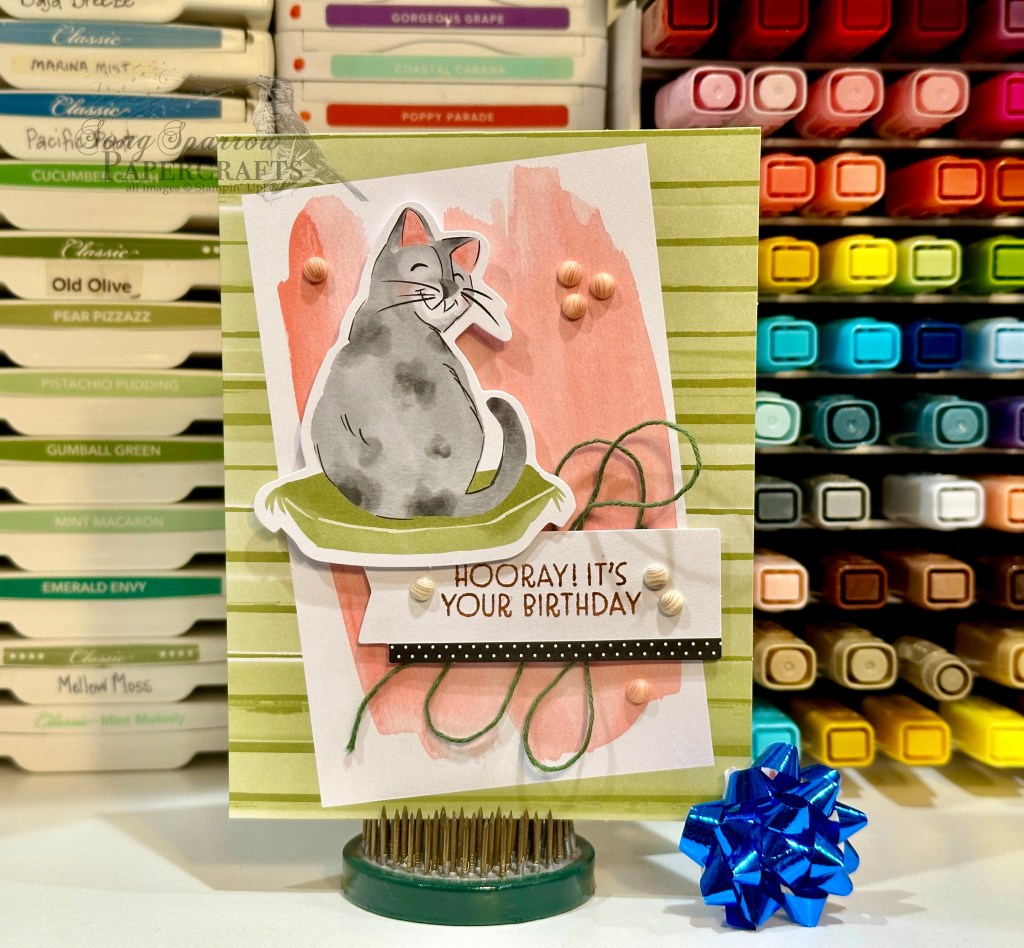
Here’s a sample design variation. My son needed a birthday card for one of his friends who is a huge cat lover. So I substituted the birthday sentiment from the Hot Air Balloon stamp set and added some twine and embellishments to make this super cute birthday design.
I have a number of variations to share with you that are simply the cat’s meow. I’ll share them in my socials once we get home and settled in — maybe a little later this week.
Think this is a cute kit? Interested in having one yourself? You can pick one up anytime in my online store. Simply click here and you’ll go straight to it!
Products used in today’s featured card: By Your Side Kit Hot Air Balloon stamps Twine Swirl dots