Coming Soon · Holiday Mini Catalog · Sketchy Fridays

Sketchy Fridays: Cheer All Year

This week has come and gone in a flash! We’ve survived the first full week of school and are starting to feel like we’re getting back into the school year rhythm. Definitely looking forward to the weekend and having some down time!

And speaking of Fridays, it’s time for another installment of Sketchy Fridays, where each week we’ll be using a card sketch to design our featured card. Right now, we’re working through a full series of designs using the card sketches found on page 22 of the current Stampin’ Up! Annual Catalog.

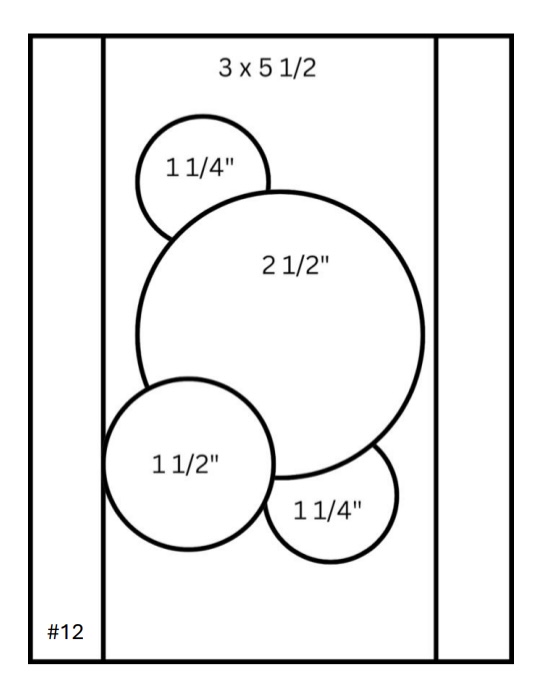
This week’s card is based on Sketch #12 and features several products from the new Stampin’ Up! Holiday Mini catalog that launches on September 6th.

We get started on our card today with a base of Cherry Cobbler cardstock. Our background panel consists of a mat of Festive Glimmer paper and a sheet of the gorgeous new Season of Elegance patterned paper. Our focal images are diecut from Cherry Cobbler using the Peaceful Season dies. On our larger square, I’ve heat embossed the sentiment from Peaceful Season in gold. The word Christmas is diecut from Festive Glimmer Paper and Gold Foil using the Peaceful Season dies and then adhered with dimensionals. Our larger square is adhered with dimensionals to ensure the sentiment is front and center. A twist of gold trim and some drusy embellishments draw extra attention to our sentiment. I added a few earth tones shimmer gems around the cluster of focal images to help the eye pass across the design.

One of the fun things about sketches is remembering that they’re a starting point for your design. You can stick to the spirit of the sketch without compromising on an idea for using something a little different. Take, for example, the circles in the sketch. For this card, I wanted to showcase the new Peaceful Season dies, which does not have any circles, but look how beautifully the rounded squares work here in this layout. Dare to color outside the lines the next time you’re using a sketch. You’ll be glad you did!

Tomorrow, we’ll be in the evergreens. I hope you’ll pop by and check it out!

Products used in today’s card:
Cherry Cobbler cardstock
Festive Shimmer (coming soon!), Season of Elegance (coming soon!), gold foil DSP
Peaceful Season stamps & dies
Gold embossing powder
Drusy embellishments, earth tones shimmer gems (both coming soon!)
Gold trim
Dimensionals
Adhesives

Coming Soon · Holiday Mini Catalog

Joyful ephemera

This week, we’re getting a sneaky peek at some of the upcoming products that will release with the new Stampin’ Up! Holiday Mini catalog, which officially goes live on September 6th. Today’s card features some of the new ephemera packs. What are ephemera packs, you might wonder? Well, the packs in the current lineup offer colorful words, images, and/or sentiments that are preprinted and ready to be added to your card. They’re a wonderful way to make beautiful cards when you are short on time.

For today’s card, we’re using a combination of the new Joyful Images Ephemera and Joyful Sayings Ephemera. We’re pairing them up with the new Take a Bow designer series paper pack and Sketch #5 from the Stampin’ Up! Annual Catalog. Let’s take a closer look at how it all comes together.

We get started with a base of Garden Green cardstock. Our striped banner background element is a sheet of the new Take a Bow paper that is diecut with the Nested Essentials banner dies using the extension method. The green spotted background element is another pattern included in the Take a Bow paper pack and is diecut using the largest square in the Nested Essentials set using the extension method. This panel serves as the backdrop for the focal images of evergreens and an elk from the Joyful Images pack. These adhered to the background panel with varying layers of dimensionals. Our sentiment comes from the Joyful Sayings pack and an evergreen sprig and pinecone are added to tie everything together. The sentiment is matted with a banner of Festive Glimmer paper and then adhered on the focal panel with dimensionals. A faux bow of Cherry Cobbler & Gold satin ribbon behind the focal panel adds another pop of red. A few Earth Tones shimmer gems add sparkle and draw the eye across our card design.

This card came together in a jiffy and I love having the ephemera packs on hand to make cute cards on the fly. I chose a more neutral theme for today’s card, but the pack has images that would make cute Christmas or winter-themed cards. We’ll take a closer look in the coming weeks.

Tomorrow we’re diving into the Season of Elegance suite, and I think you’re going to love it! Pop in and check it out.

Products used in today’s card:
Garden Green cardstock
Take a Bow, Festive Glimmer DSP (both coming soon!)
Joyful Images, Joyful Sayings ephemera (both coming soon!)
Cherry Cobbler & Gold satin ribbon (coming soon!)
Earth Tones shimmer gems (coming soon!)
Dimensionals
Adhesives

Coming Soon · Holiday Mini Catalog

Good Courage

Happy Wednesday, everyone! Halfway through the week we already are. As I mentioned on Monday, it’s been run-run-run around here as we adjust to our schoolyear routine. On that note, you may have noticed that I haven’t released a new Terrific Tuesdays video the last 2 weeks and that is why. We’ve focused on family time and getting adjusted to the new routine. I’m working on some new fun folds that I look forward to sharing with you in the next episode, so have no fear, new content is coming!

But for now, this week we’re sneak peeking into the new Stampin’ Up! Holiday Mini catalog that goes live on September 6th. And today’s card design features a new bundle called Nests of Winter, which includes coordinating patterned paper, stamps, dies, embossing folder, shimmer gems, and linen thread. I really love when the dies and paper can be used together, and our card today showcases that beautifully. So let’s take a closer look.

We get started with a base of Shaded Spruce cardstock. Our background panel consists of two different patterns from the Nests of Winter paper pack. I paired the Garden Green stripe with the white birch pattern. I used the Winterly Treetops dies to diecut the bird elements. One of the patterns in the paper pack includes them both, and I liked the look of them both together on one card. Our sentiment from the Courage & Faith set is stamped in black on white cardstock and then diecut using the Greetings of the Season die. I carefully placed the oriole over the pre-punched hole in the die. I placed a twist of Shaded Spruce satin & sheer ribbon behind the sentiment panel to make our color palette more cohesive and added a few drusy embellishments to add sparkle and draw the eye across our design.

This suite would pair perfectly with the sketches in the Annual Catalog. And BONUS, there’s a whole new set of sketches in the Holiday Mini catalog, too! And I look forward to sharing more of this suite with you so you can appreciate just how wonderful it is.

Tomorrow we’re going wild with ephemera. Tune in to see how you can shortcut your way to beautiful cards!

Products used in today’s card:
Shaded Spruce, Basic White cardstock
Nests of Winter DSP (coming soon!)
Winterly Treetops (coming soon!), Greetings of the Season dies
Courage & Faith stamps
Shaded Spruce satin & sheer ribbon (coming soon!)
Drusy embellishments (coming soon!)
Dimensionals
Adhesives

Coming Soon · Holiday Mini Catalog

A Friend Like You

Well, the kiddo had a great first day of school yesterday and now we’re just working on getting back into the schoolyear routine. Anyone else feel like that gets more challenging as they get older? For now, I’m just trying to stay afloat and keep all of the balls in the air. So things will be a little less predictable here in Song Sparrow land this week.

Speaking of this week, we’re on to a new card design series. Each day this week, we’re going to taking a sneak peek at items that will be offered in the upcoming Stampin’ Up! Holiday Mini Catalog. And today, we’re looking at another pack of gorgeous patterned paper called Splendid Autumn. This 6×6 paper pack is another in the line of watercolor paper designs and, just like the packs that have come before it, Splendid Autumn does NOT disappoint! Each and every sheet is just stunning. And today, it’s standing front and center in this clean and simple card design. So let’s get a closer look at how this comes together.

We start with a base of Blackberry Bliss cardstock. I chose the bridal wreath wildflower patterned sheet from the Splendid Autumn designer series paper pack as the focal panel. The sentiment from the new stamp set called Winterly Tree Tops is stamped on white cardstock and then diecut using the new set of dies called Peaceful Season. I added some Blackberry Bliss gems to the center of each design on each end of the sentiment for a little added sparkle. Before adhering the sentiment with dimensionals to the focal panel, I added a faux bow of Cajun Craze and Garden Green linen thread behind. A few extra iridescent faceted gems and a little butterfly diecut from Graceful Greenery vellum diecut with the Painted Lavender die finish things off nicely.

I’ll be showing you more of the newest patterned papers in the coming weeks, but what do you think of this teaser? Is this paper not just beautiful?! Tune in tomorrow as we take a look at another soon-to-release paper pack, along with its coordinating stamp and die set. You really won’t want to miss it!

Products used in today’s card:
Blackberry Bliss, Basic White cardstock
Splendid Autumn DSP (coming soon!)
Winterly Tree Tops stamps (coming soon!)
Peaceful Season (coming soon!), Painted Lavender dies
Natural Tones linen thread (coming soon!)
Regal foiled dots (coming soon!), iridescent faceted gems
Wink of Stella
Dimensionals
Adhesives

Coming Soon · Holiday Mini Catalog

Thinking of You Always

Welcome to a bright, new shiny week, crafty friends! It’s started off a busy one here for sure, hence the lateness of my post. Today is the first day of school in our school district. Don’t you find it funny when you’ve spent weeks with your kid picking out new clothes for school and kid then decides to wear things he’s worn a hundred times?!

This week, I thought it would be fun to tour the box of preorder goodies I just received for the Stampin’ Up! Holiday Mini catalog. So each day, I’ll be bringing you a sneak peek of items that will be available in my online store on September 4th. Ready??

We’re getting started today with some gorgeous designer series paper called Regal Winter. This paper pack is full of gorgeous floral images in hues of Berry Burst, Blackberry Bliss, Cherry Cobbler, Night of Navy, Pretty Peacock, Shaded Spruce, and Wild Wheat. And it’s even prettier in person! I have soooo many ideas running in my head for this paper, and I decided to start simple with one of my favorite fun folds. So let’s see how this barn fold comes together.

We get started with a base of Blackberry Bliss cardstock. This is scored so that our short edges meet in the center of the standard-sized card front. Our focal panel is matted in textured gold paper and I chose a sheet of floral pattern in Blackberry Bliss from the Regal Winter pack. Our sentiment panel is matted in a base of gold mercury vellum that has been diecut using the Greetings of the Season dies. The sentiment from the new stamp set called Winterly Tree Tops is stamped in black on white cardstock and is then diecut using the Unbounded Love dies. I tucked some gold greenery stems behind the sentiment panel, which are diecut from gold foil paper with the Painted Lavender dies. A twist of the new Blackberry Bliss & Gold textured ribbon helps tie things together. I added a few of the new drusy embellishments around the sentiment for extra sparkle and pizzazz, and let me just say, they call these gems drusy for a reason! (drusy: dru·​sy  zē usually -er/-est covered with minute crystals containing cavities lined with crystals)

Tomorrow, things are going to feel a little more like Autumn. I hope you’ll pop in and check it out!

Products used in today’s card:
Blackberry Bliss, Basic White cardstock
Textured gold, gold foil, mercury vellum, Regal Winter (coming soon!) DSP
Winterly Tree Tops stamps (coming soon!)
Greetings of the Season, Unbounded Love, Painted Lavender dies
Blackberry Bliss & gold textured ribbon (coming soon)
Drusy embellishments (coming soon!)
Dimensionals
Adhesives

Product List
Back to School

Lunch Box Lovin’

Today we’re rounding out our back-to-school card design series with a cute set of little notecards that a dear friend of mine once referred to as lunch box lovin’. As the name might imply, these notecards are intended to be slipped inside a lunch box to let your kiddo or special someone know that they are loved and on your mind. I mean, who doesn’t love to get an unexpected pick-me-up in the lunchbox?!

A few months ago, I showed the cute cards that can be made using the Stampin’ Up! kit called By Your Side. This adorable pet-themed kit, whick will make 8 cards, includes a whole array of cats and dogs and ultimately leaves you a number of extra four-legged friends to use later. And these extras serve as the starting point for today’s featured project.

This coming week is the start of school in our district, and it’s another year of middle school for the kiddo. No longer part of the new kids on campus but not the top of the heap either, it’s that awkward middle year. So needless to say, there are still plenty of nerves surrounding a new school year. And I thought it might be nice to slip the kiddo a little note in the lunch box a few times this week to help him get through the first week jitters.

Our lunch box lovin’ cards all feature one of the cute leftover critters from the By Your Side kit, along with a sentiment panel and a few other leftover elements. The notecards vary in size based on the pieces I had left and how they looked once I started laying things out. I chose a piece of cardstock to serve as the base for each notecard and selected colors that would be a good neutral backdrop for each. The back of each card is blank for a quick note.

Leftover kit elements or Memories & More packs are perfect for these types of quick and simple projects. Just plop and go in a sketch and you’ve instantly got completed projects to bring smiles to long faces!

And speaking of smiles, who’s looking forward to some Holiday Mini Catalog sneak peeks? Tune in next week as we start dreaming of fall colors and cooler weather!

Back to School · Sketchy Fridays

Sketchy Fridays: Packed for Success

How is it Friday already?! Anyone else feel this way? Our last week of summer has just flown by. We’ve shopped for school clothes and last-minute supplies, cleaned out the backpack and started fresh for the year, set next week’s lunch box menu, and squeezed in some random fun. What do you typically do with your kiddos for their last week of summer break?

For this week’s Sketchy Fridays, we’re taking a little detour from the Annual Catalog and, instead, are taking a page from my personal sketch book. Our sketch is a little unconventional, but then again, so is today’s card!

Today, we’re continuing our back-to-school theme, and I just love how this card design came out! I knew that I wanted to make a design that included a backpack, but I definitely didn’t have a backpack image in my current product stash. So I started looking at everything a little differently as I sorted through sets again. And that’s when I realized that I could use the sled die from Sophisticated Sled die set to make it happen. Let’s take a closer look!

Our card gets started with a base of Basic Black cardstock. I wanted the focal panel to look like a wall in a classroom. Although difficult to see here, the focal panel is a quarter sheet of black cardstock that has been trimmed slightly on each side and then raised with dimensionals. I used the Bright & Beautiful patterned papers to help me create this look with the bottom of the wall being the striped pattern. And then I wanted the top portion to look like a bulletin board, so the star pattern is serving as the decorative border around the bulletin board and our printed sentiment is the inspirational message from the teacher.

To create our backpack, we’ll start with a quarter sheet of Pretty Peacock cardstock and use the top portion of the sled die to cut our backpack. Be sure to save all of the negative space pieces to serve as backpack pockets, and we’ll trim any portion of the bottom of the sled off to keep the look of a backpack. Using the die itself, I traced around the outside of the portion I used to cut the backpack and then fussy cut on my trace marks to create a base to which I adhered all of my pieces. This also creates a more realistic look of a stuffed backpack. I used my glue pen to adhere the outline portion and then I used several layers of glue dots on each of the “pockets” to adhere them and give them the look of having items inside. Using the letter “i” from the Alphabet a La Mode die set, I cut the handle for the backpack and adhere it using tear & tape. I used the handle for the toolbox from the Trusty Toolbox die set to create the backpack straps. The backpack is adhered to the background with dimensionals. I added a few stars cut from silver foil with the Merriest Trees dies to finish off the design.

Isn’t this the most fun? Our inside sentiment says “reach for the stars” so everything ties together nicely. I just love how it turned out!

I hope you’ll tune in tomorrow where we’ll be making some Lunchbox Lovin’. You won’t want to miss it!

Products used in today’s card:
Basic Black, Basic White, Pretty Peacock, Crushed Curry cardstock
Bright & Beautiful, Silver foil DSP
Sophisticated Sled, Trusty Tools, Merriest Trees dies
Dimensionals
Adhesives

Product List
Back to School

Color With Greatness

This week, we’re putting on our creative hats to make back-to-school designs. Why do I need my creative hat? Well, for me personally, my current stash of products (as in, not retired products) doesn’t make it easy to stick to this week’s theme without a little ingenuity. And today, we’re combining the Trusty Tools set with Filled With Fun to create our desktop of color. Let’s see how we can make this one happen.

We get started with a card base of Crumb Cake cardstock. Our focal panel background consists of two layers of patterned paper — the bottom from Take to the Sky and the top from Nature’s Sweetness — and is cut to leave a very small border of the card base peeking around on each side. We cut a focal point out of the top layer of our background panel with the Spotlight on Nature dies and then adhere our two focal panels together with dimensionals. To create the storage box for our paint brushes, we use the wagon fencing from the Filled With Fun die set to cut Crumb Cake cardstock and then tuck the box in the center of the circle. Our paintbrushes are diecut using the Trusty Tools dies. The handles are cut from textured metallic gold while the bristles are cut from Smoky Slate. A dab of paint is stamped in primary colors on the end of each set of bristles. We tuck our paintbrushes into the storage box and adhere with several layers of dimensionals to give the look of multiple planes of view. Once again, I turned to my trusty printer to provide my custom sentiment and diecut it with the Everyday Essentials die using the extension method. The sentiment is adhered with dimensionals, as well. I added a few splatters of paint that were diecut from Real Red and Daffodil Delight cardstock using the Bright Skies dies. A few dollops of rhinestone jewels add just the right amount of sparkle across the card front to help the eye glide easily across the design.

Tomorrow we’ll be packing up some tools for success. I hope you’ll tag along and check it out!

Products used in today’s card:
Crumb Cake, Smoky Slate, Real Red, Daffodil Delight, Basic White cardstock
Take to the Sky, Nature’s Sweetness, Gold textured metallic DSP
Trusty Tools, Filled with Fun, Bright Skies, Everyday Details, Spotlight on Nature dies
Trusty Tools stamps
Rhinestone jewels
Dimensionals
Adhesives

Product List
Back to School

To a Sharp Year

Welcome in to this wonderful Wednesday! We’re halfway through this week and about halfway through our back-to-school design series. I hope you’ve been enjoying things thus far. Today, we’re keeping things on the simple side with a design using the Trusty Tools stamps and dies. Let’s dive in and learn more about how this card comes together.

We get started with a card base of Cajun Craze cardstock. Our focal panel is a piece of white cardstock that has been cut down on either side to allow a border of our card base to shine through. Using the Trusty Tools stamps, I stamped a pencil on Crushed Curry cardstock and then diecut with the coordinating die. I colored the erasers with Stampin’ Blends to give a realistic look. Using the smaller heart die from the Friends for Life die set, I drew a heart in the center of the focal panel to serve as a guide while adhering the pencils to the focal panel. Once again, I’ve used my printer to print a sentiment that I created to fit the card theme. The sentiment, and its mat of Peach Pie glimmer paper, is diecut using the Friends for Life die set. A layer of dimensionals behind the sentiment gives it a nice rise above the busy focal panel. And we finish things off with a few shiny sequins.

Of the back-to-school designs thus far, this one is by far the one that has come together the quickest. This would be a super cute card to accompany a small gift to teachers on the first day, don’t you think?

I hope you’ll tune in tomorrow when we paint the halls with greatness!

Products used in today’s card:
Cajun Craze, Crushed Curry, Basic White cardstock
Peach Pie glimmer paper
Trusty Tools stamps & dies
Friends for Life dies
Stampin’ Blends
Shiny sequins
Dimensionals
Adhesives

Product List
Back to School

Welcome Back

As we enjoy our last week of summer break here in our area of North Texas, I felt it was appropriate to have this week’s theme revolve around back to school designs. The fun and challenging thing about this particular theme is that I don’t actually have a ready supply of images or sentiments to easily work out designs. So this week is all about putting on the creativity hat.

Today, we’re heading to the garage to modify the Trucking Along truck into a school bus. Yep, that’s right. We’re splicing and dicing to lengthen our truck. So let’s talk about how this design comes together.

We get started with a base of Lost Lagoon cardstock. The background panel of our full focal panel is a quarter sheet of Pool Party cardstock. Our mountainous terrain in the background is a piece of Pretty Peacock that has been diecut using the long cloud die from the Bright Skies die set and cutting on an angle to give the look of a hill. Our trees are also diecut from Pretty Peacock with the Frosted Forest evergreen dies.

To make our school bus, we start with a stamped image of the truck from Trucking Along on Crushed Curry cardstock, which is then punched with the coordinating truck punch. I separated the cab from the bed with paper snips and then joined them back together with a small strip of Crushed Curry and filled in the outline with a black pen. Using the cab as a guide for the shape of the back of the bus, I traced and then cut a separate piece of Crushed Curry for the back of the bus. The lights and stop sign are all red iridescent discs. The bus is then adhered over our mountain with dimensionals to help it stand apart.

Our sentiment is another one that I set up in Word and printed on white cardstock with my printer. I used a larger cloud die from the Bright Skies dies to cut it out, along with a few smaller clouds to add behind. A spot of sunshine beams through in Crushed Curry compliments of the sun dies in the Bright Skies set. I finished things off with a hint of shine in the white sequins from the sequins trio.

What do you think? Did our chop shop bus fit the bill? Tomorrow we’re heading back to the drawing board, and I hope you’ll pop by!

Products used in today’s card:
Lost Lagoon, Pool Party, Pretty Peacock, Crushed Curry, Basic White cardstock
Trucking Along stamps & punch
Bright Skies, Frosted Forest dies
Iridescent discs, sequins trio
Dimensionals
Adhesives

Product List