Coming Soon · Sketchy Fridays

Sketchy Fridays: Smile!

This week, we’re getting some sneaky peeks at some of the brand new product that will be launching next week. And today we’re making another trip to the garden as we combine some new products with a sketch for Sketchy Fridays.

For those of you who are new here, Sketchy Fridays is a weekly series where we’re using a card sketch to design our featured card. Right now, we’re working through a full series of designs using the card sketches found in current Stampin’ Up! catalogs.

This week’s card is based on Sketch #3 from the Stampin’ Up! Annual Catalog. Today’s design features the Florals in Bloom suite that will release next week. This week, I’m staying pretty true to the sketch. I simply flipped the side where the focal panel is affixed.

We get started with a base of Blackberry Bliss cardstock. I used the Pattern of Friendship die on the front panel to add a little texture in the background. Our background panels are a combination of Florals in Bloom and Petunia Pop glimmer paper, and these are all adhered directly to the card front. I tied a piece of Fresh Freesia velvet ribbon around the card front before placing the focal panel. The focal panel base is a white circle cut using the Spotlight on Nature dies. Using the Pretty Florals dies, I cut some flowers from the Florals in Bloom paper and then affixed them to the circle using a combination of dimensionals and glue dots. The sentiment panel is cut from vellum using the Something Fancy dies. The sentiment from Sweet Blooms is stamped in Blackberry Bliss ink and then heat embossed with clear embossing powder before being adhered to the focal panel with glue dots. We finish things off with two tone sparkle gems across the card front.

Tomorrow we’re going to have our sentiments take center stage. I hope you’ll drop by and check it out.

Products used in today’s card:
Blackberry Bliss, Basic White cardstock
Florals in Bloom (coming soon), In Color glimmer, vellum DSP
Sweet Blooms stamps (coming soon)
Pretty Florals (coming soon), Spotlight on Nature, Something Fancy, Pattern of Friendship dies
Clear embossing powder
Fresh Freesia velvet ribbon
Two tone sparkle gems
Dimensionals

Coming Soon

Amazing

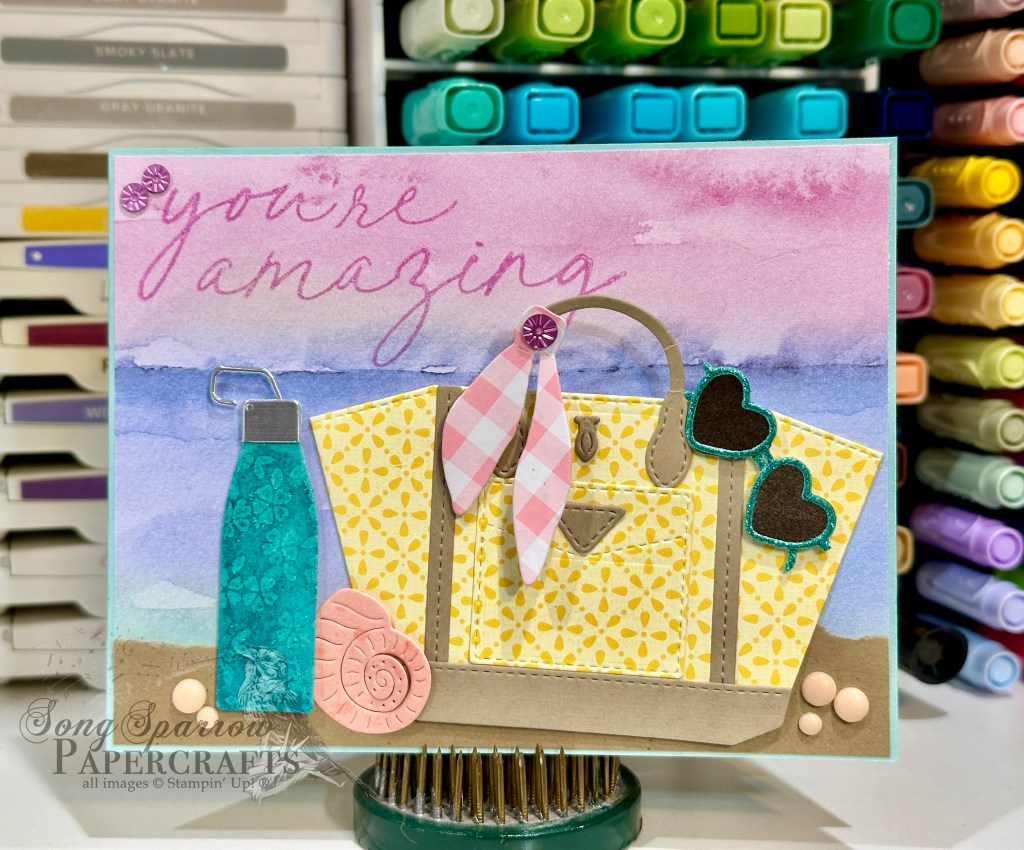
This week, we’re exploring some of the new products that will be launching next week in the online store. Today we’re getting a look at the Notes & Totes bundle. This fabulous set not only makes super cute cards, but it also allows you to make cute little gift bags perfect for a tube of chapstick and a piece of chocolate! Today, I’m also using super fun technique that Sarah demonstrated several months ago — embossing over glimmer paper!

We get started with a base of Pool Party cardstock. I’m using a sheet of the Thoughtful Journey paper as the backdrop for this little beachy scene. To create the sand, we’re using a strip of Pecan Pie cardstock and then tearing it at the top to give it the look of beach sand. I stamped the sentiment from Scenic Adventure in Fresh Freesia in the top corner. Our beach bag is a combination of Floral Delight and Crumb Cake cardstock and diecut using the Notes & Totes dies. The cute sash is a small scrap of Wildflower Birthday with a starburst sequin serving as the decoration on the knot. The sunglasses are cut from Basic Black and Shy Shamrock glimmer paper and then affixed to the top edge of the bag with a dimensional. To add some beachy interest, we’re adding a conch shell and water bottle. The shell is cut from a sheet of Beautiful Bokeh. The water bottle is cut from a sheet of pastel ombre glimmer paper and silver foil and has a subtle raised pattern that is created by stamping the florals from the Notes & Totes set in versamark and then heat embossing with clear embossing powder. To help the pattern stand out and give a more decorative look to the bottle, I used a blending brush and Pretty Peacock ink to go over it and then added some wink of stella. It’s adhered next to the shell on some dimensionals. I added a few rainbow dots in the sand to finish everything off.

We’re going to be taking a stroll through the garden tomorrow. Pack your gloves and a cutting basket!

Products used in today’s card:
Pool Party, Pecan Pie, Crumb Cake, Basic Black cardstock
Thoughtful Journey, Wildflower Birthday, Floral Delight, Beautiful Bokeh, Silver foil, In Color shimmer, Pastel Ombre glimmer DSP
Notes & Totes bundle (coming soon)
Scenic Adventure stamps (coming soon)
Clear embossing powder
Wink of Stella
Rainbow dots, starburst sequins
Dimensionals

Coming Soon

The Best Dad

This week, we’re getting a sneak peek at some of the newest products that Stampin’ Up! is set to release next week. And today we’re once again pairing up some current products with what’s soon to come to create this super cool scene. I love the sunset mountain hues of blues and purples, and the Splendid Autumn paper pack has some terrific sheets to choose from to create our scene using the Scenic Adventure bundle.

We get started with a base of Misty Moonlight cardstock. A sheet of the Splendid Autumn paper serves as our sunset backdrop for the mountain scene and is matted with a sheet of the Thoughtful Designs specialty paper. I used the Scenic Adventure dies to cut mountains and trees from coordinating scraps of the Splendid Autumn papers. I also added the ripples of the lake in the foreground with the dies, along with the faint stars and moon in upper-right corner. And I stamped some clouds in the distance using the Scenic Adventure stamp and Pool Party ink. The mountains and trees are layered with dimensionals to give depth to the scene and Wink of Stella gives the perfect amount of subtle twinkle to the the tops of the trees and mountain, the ripples in the water, and the moon in the sky. The sentiment from She’s the Greatest and He’s the Greatest is stamped in Misty Moonlight on white cardstock and diecut with the smaller Sentimental Framing die. I added some blue linen thread behind the panel before adhering to the card front with dimensionals. We finish things off with two tone sparkle gems in opposing corners to ensure the eye passes over the whole design.

Next, we’ll be taking it to the beach. Pack your flip flops and come along!

Products used in today’s card:
Misty Moonlight, Basic White cardstock
Splendid Autumn, Thoughtful Designs DSP
Scenic Adventure bundle (coming soon)
She’s the Greatest, He’s the Greatest stamps
Sentimental Framing (coming soon) dies
Natural tones linen thread
Two tone sparkle gems
Wink of Stella
Dimensionals

Coming Soon

Thinking of You

Howdy, everyone! Welcome to another sneak peek of some of the new products that are set to release next week. Like yesterday, today we’re combining a little bit of old and some new to create a super clean and simple design that you can put together in less than 5 minutes. If you’re like me, you need one of those designs every once in a while.

Today, we’re combining the beautiful Splendid Autumn designer series paper with the new foiled paper called Flower Garden foils and a new stamp set called Sentimental Framing. This stamp set is 100% sentiments perfect for all sorts of occasions.

Let’s get started on our card. We’re going to begin with a base of Blackberry Bliss cardstock. Our focal panel is a sheet of the Splendid Autumn paper that is cut with the largest Textured Notes die and then matted with a sheet of the pink-hued Flower Garden foil specialty paper. I heat embossed the sentiment from the Sentimental Framing stamp set directly onto the patterned paper using some white embossing powder. I tied some iridescent trim just above the sentiment. I really love how the ribbon pulls in the more subtle colors of the sunset in our scene. I added a few purple shimmer gems for just a touch of sparkle and to help guide the eye down and across our card design.

Next up, we’re going to be taking a look at a new set that builds some beautiful scenes and is perfect for more masculine designs!

Products used in this card:
Blackberry Bliss cardstock
Splendid Autumn, Flower Garden foils (coming soon!) DSP
Sentimental Framing stamps (coming soon!)
Textured Notes dies
Iridescent striped trim
Purple shimmer gems

Coming Soon

Just Breathe

Happy Monday, everyone. It was a busy weekend around here with all sorts of different activities. I feel like I need a weekend from my weekend!

This week, we’re getting some little sneak peeks at some upcoming releases. Did you know that next week Stampin’ Up! will be releasing new Online Exclusives and a new annual catalog?! Today’s design is the perfect combination between old and new as we pair the Thoughtful Journey designer series paper with the new Sentimental Framing dies and Scenic Adventure stamps in this very clean and simple design.

We get started with a base of Petunia Pop cardstock. The sheet of flowering thistle paper from the Thoughtful Journey paper pack is cut using the new Sentimental Framing dies. The decorative frame is adhered to the card base with dimensionals while the center section is adhered directly to the card base to give a layered effect. The sentiment from the new Scenic Adventure stamp set is stamped in Pretty Peacock on white cardstock and diecut with the frame from the Enduring Beauty set. A twist of Fresh Freesia seam binding ribbon is adhered behind the sentiment panel at the base of the focal panel. The smaller flowers and leaves are cut from Mossy Meadow and Fresh Freesia cardstock using the Enduring Beauty dies and adhered behind the corner of the sentiment panel. Some starburst sequins finish things off with a pop of color and a patterned twinkle.

Tune in tomorrow for another sneak peek of products coming next week!

Products used in today’s card:
Petunia Pop, Basic White, Mossy Meadow cardstock
Thoughtful Journey DSP
Scenic Adventure stamps (coming soon!)
Sentimental Framing (coming soon!), Enduring Beauty dies
Starburst sequins
Fresh Freesia seam binding ribbon
Dimensionals

florals

So Lucky

We’re rounding out our walk through the garden this week with a trip to the country. Today’s card design features the Country Flowers set by Stampin’ Up!, which is currently on the Last Chance list, and a card layout I spotted in a recent post shared over at Stampin’ Through the Catalog. I adapted the layout and color palette to fit the products I wanted to use.

We get started with a base of Gray Granite cardstock. I also cut a quarter panel and then ran it through the embossing machine with the Distressed Tiles embossing folder before cutting it down to a smaller size for the focal panel backdrop. This small embossed strip is matted with a piece of gold textured paper to help it stand out against the tone-on-tone card base. I layered a piece of the Nature’s Sweetness foiled paper on top. For the focal panel, I cut a piece of Misty Moonlight with one of the middle circles from the Spotlight on Nature die set and then heat embossed the sentiment from Country Flowers in white. The teapot from Country Flowers is stamped in Gray Granite onto the lighter woodgrain pattern from the Country Woods paper pack, while the flowers are stamped on white and then colored with a combination of Stampin’ Blends before cutting out the floral bunch with the coordinating Country Flowers die. The teapot and flowers adhered to the focal panel with dimensionals and the focal panel is then adhered to the center of card front with dimensionals, as well. I added some gold ribbon on the teapot and someiridescent faceted gems to the floral centers to finish off the arrangement. Some drusy embellishments finish things off with the perfect touch of sparkly goodness.

I hope you’ll tune in this week as we get a look at some of the new goodies that are set to launch in a little over a week!

Product List
florals

Too Kind

Were you able to check out all of the crafty goodness that the Luv 2 Stamp Group brought during our Instahop on Thursday? It’s totally worth checking out! Link in my post from Thursday. Meanwhile, it’s been a busy couple of days here and that has totally cramped my crafty time, as you may have noticed by my absence yesterday. But sometimes we just have to roll with the punches and go with the flow. And that’s okay.

This week, we’re making our way through the garden and today we’re stopping to enjoy the spring wildflowers. We’re keeping it super simple with today’s card design by using the Mixed Media Florals Memories & More pack. Here in Texas, the strips of grass along a lot of the major highways are beginning to be covered in wildflowers. This is all thanks to Ladybird Johnson’s wildflower project back in the 1970s, and I must say that I just love her for it! And I love that the State has worked hard to maintain all of the wildflower seedlings from year to year with their carefully timed mowing (or lack thereof, as appropriate) to ensure that the flowers reseed. So if you’ve ever wondered why Texas has some of the prettiest right-of-ways in the country, you can tip your hat to Ladybird!

Our design today starts with a base of Basic Black cardstock. The focal panel is one of the notecards from the Mixed Media Florals Memories & More. I wrapped some natural tones linen thread and Daffodil Delight satin ribbon around the top to bring out the greens and yellows in our focal panel. The sentiment is from the Wanted To Say die set and is cut from black cardstock and red glimmer paper from the Festive pack. I added a ladybug from the sticker sheet and a few yellow and white Starburst sequins to complete our scene and tie all of the colors in the design together.

Tomorrow we’re going to wrap up our garden series with a trip to the country and I hope you’ll come along!

Product List
Fun Folds · L2S Group Instahop

Heart Aflutter

Although I’m not much a fan of the allergies that accompany the advent of spring, I’m a huge fan of all things becoming new again. I love the early spring flowers — irises, daffodils, and primrose — the budding trees and the first influx of butterflies.

This week, we’re walking through the garden of our crafty collection and working with florals in our stash. Today, I’m combining the Stampin’ Up! Thankful Garden collection with Beautiful Butterflies. And what better way to showcase both than with a fun twist on a two-panel fun fold!

I wanted this design to have a fun twist on the usual layers you might incorporate into a more conventional two-panel fun fold design. And most especially, I wanted to give a more realistic look to a fluttering butterfly.

To accomplish this idea, I incorporated a sheet of acetate as the outer flap. This does two things — first, it allows the florals to remain center stage, and second, it gives the illusion of the butterfly coming in to light on the garden of flowers. Tip: I save the sheets of acetate from new photopolymer stamp sets to use later (act as window sheets).

So we get started with a base of Basic Black cardstock. I really love how this provides a nice but neutral contrast for the focal elements of the design. The focal backdrop on the card front is a sheet of the Lovely Garden designer series paper. I used paper snips to fussy cut two flowers from a separate sheet of the paper to add dimension to the flowers in the garden. One is adhered directly to the front card base on the left side and the other is reserved for the acetate panel. I wrapped some Fresh Freesia velvet ribbon around the bottom of the patterned paper, which acts to hide, if you will, the bottom of the acetate panel when the card is fully closed. I added pink sequins from the sequins trio to several of the floral centers for a bit of interesting dimension to the garden of flowers. The sentiment from the Layers of Beauty set is stamped in black on white cardstock and then diecut with the largest Beautiful Butterflies decorative banner and adhered to the bottom of the panel with dimensionals and finished with a pink Blooming Pearl on either side.

The acetate panel wraps around the front card panel from the inside of the card. The inside message panel and decorative paper cover where the acetate panel is affixed to the card base. A bone folder helps give a deep score line to the acetate so that it folds and lies flat more easily. Using the Beautiful Butterflies dies, I cut the base of the large butterfly from the sheet of aqua-hued Pastel Ombré glimmer paper and then cut the detailed piece from black cardstock to make the butterfly look similar to a Ulysses swallowtail. It’s adhered to the acetate panel with glue dots. The flower cut from the Lovely Garden paper is adhered with glue dots onto the acetate so that it perfectly aligns with the flower on the front card panel underneath. I added pink Blooming Pearls to the flower’s center and then added a few peacock sequins from the sequins trio to either corner of the acetate to tie the full design color palette together.

Today’s card is a part of the Luv 2 Stamp Group Instagram Hop, which goes live at 9 AM Pacific Time (PST).  Click here to head over to my Instagram feed at 9 AM Pacific/11 AM Central and check out what the other demos in our L2S Group have created for you today! 

Product List
florals

Butterfly Garden

We’re tiptoeing through the craft garden this week as we focus on our stash of floral Stampin’ Up! goodies. Today, we’re combining the Layers of Beauty bundle with Beautiful Butterflies to create this beautiful all-occasion card. I stepped out of my comfort zone a little bit as I played around with applying a light ink wash to my stamped panel using blending brushes and I even threw ink a little ink resist for grins.

We start today’s design with a base of Blackberry Bliss cardstock. Using the Beautiful Butterflies embossing folder, I machine embossed just the front panel of the card base. The focal panel is a white panel stamped with a combination of the Layers of Beauty stamps to create a patterned paper. I used the coordinating decorative masks to lightly fill in the center rose image with a combination of Fresh Freesia, Blackberry Bliss, and Shy Shamrock inks. I added some smaller butterflies in three corners with white embossing powder. And then I set about applying a light application of Blackberry Bliss and Pretty Peacock wash to the edges of the panel, leaving the center image mostly uncovered. The focal panel is adhered to the card base with dimensionals. A paper butterfly approaching the roses completes the garden scene. I added a twist of metallic ribbons to the top — a combination of Pretty Peacock, Blackberry Bliss, and Gold striped mesh ribbon (set to release in May). Two tone sparkle gems and rhinestones add some sparkle and draw the eye across the card design.

I wasn’t sure if I was going to go through with this card design because I didn’t feel very confident with the color wash panel. But sometimes you just have to keep going until you get all of the right elements in place to make it all come together.

Tomorrow we’re going to be hopping with the Luv 2 Stamp Group. I hope you’ll drop in and see what garden goodness awaits!

Product List
florals

You Mean So Much

This week we’re tiptoeing through the garden as we use beautiful floral products from the Stampin’ Up! lineup. Today we’re featuring part of the Lovely Garden suite using the diamond fun fold. I love this particular fold because it gives lots of opportunity to showcase beautiful patterned paper.

We get started with a base of Crushed Curry cardstock. I used two different patterns from the Lovely Garden paper pack as the backdrops for the inside and outside card panels. The diamond panel is a combination of textured gold specialty paper and a sheet of foiled paper from the Nature’s Sweetness paper pack. The focal image from the Thankful Garden stamp set is stamped in black on white cardstock and then colored using the decorative masks and a combination of Shy Shamrock and Daffodil Delight inks before being diecut with the coordinating die. For a little added visual interest, I stamped, colored, and diecut the smaller flower a second time and then popped it up on the full floral stem. The stem is adhered to the diamond panel with dimensionals. The sentiment from the Enduring Beauty set is stamped in black on white cardstock and then diecut with the smaller sentiment die from the Mixed Labels set. I tucked a twist of gold thread behind the sentiment panel before adhering it at the bottom of the diamond panel with dimensionals. A few gold textured dots serve as floral centers and eye-catching sparkle in opposing corners.

Tomorrow we’ll be stopping to smell the roses. I hope you’ll plan to come by and sit a spell.

Product List