Welcome to the weekend. I hope you enjoyed some weather as lovely as we did here today. It was spring in every way — warm temps, breezy, and sunny. We got some spring cleaning done both inside and outside today.
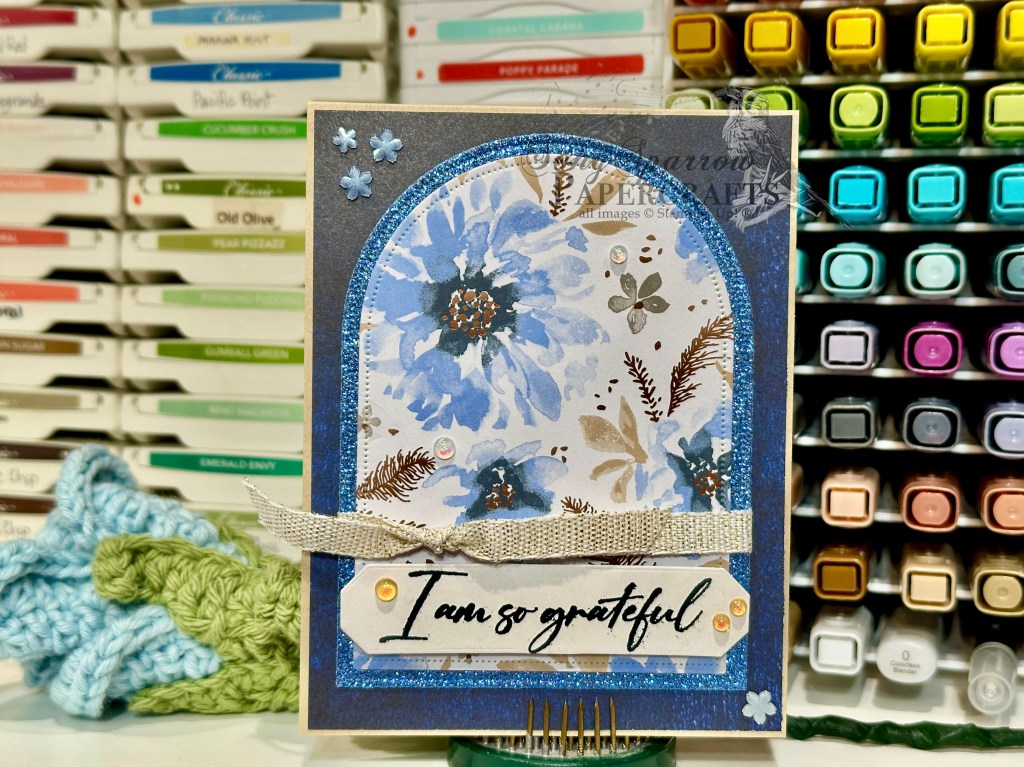
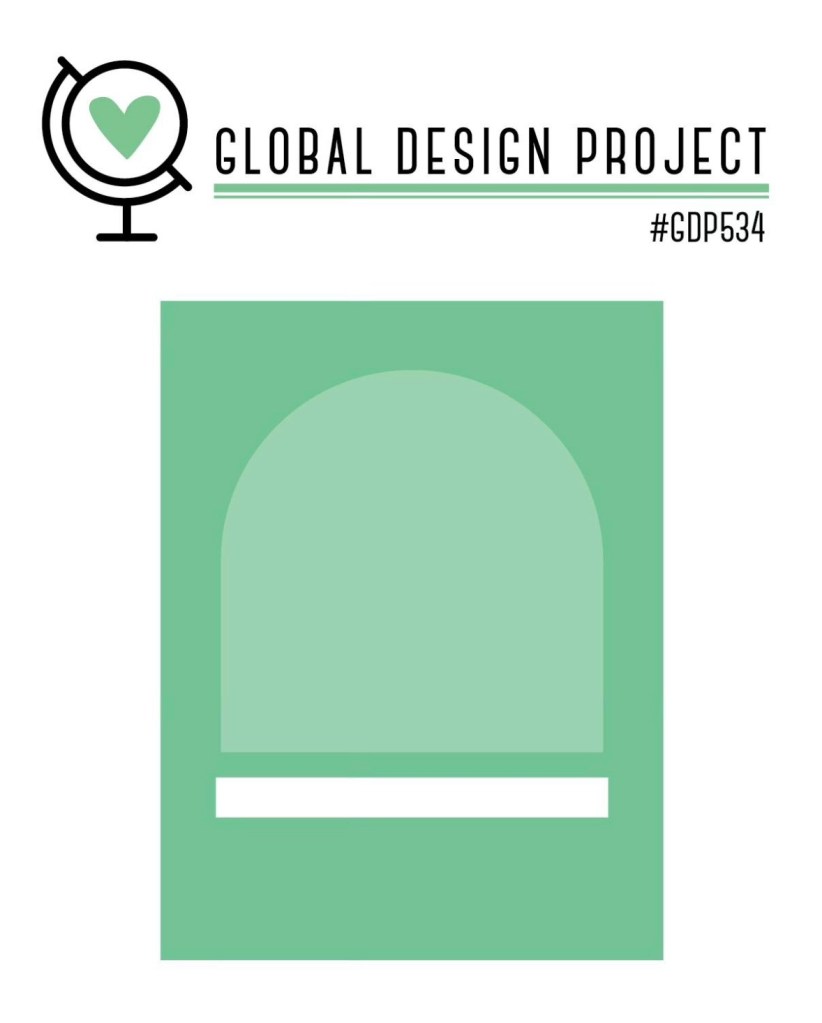
And speaking of spring, this week we’ve been using all the spring flowers to create our projects and using a sketch as design inspiration. Today we’re pairing up the Delicate Dreams paper with a sketch from the gold folks over at the Global Design Project.
We get started with a base of Crumb Cake cardstock. our background panel comes from the Nature Walk paper pack. I used the Everyday Arches dies to create our focal panel. Our mat is a sheet of Misty Moonlight glimmer paper from the Peaceful Garden glimmer pack and then our focal panel is from the Delicate Dreams pack. The panel is wrapped with some white & gold ribbon tied in a decorative knot. The sentiment from the Sentimental Framing stamp set is stamped in Secret Sea on white cardstock and then diecut with the Word of Beauty dies and then adhered at the base of the focal panel with dimensionals. We finish things off with opal rounds and hues of blue flowers.
Thanks for hopping along with me this week. I hope you’ve enjoyed this series.
TGIF — am I right friends? It’s been a long week, but we all made it! I must say I’m lamenting the fact that’s it’s Friday just a little bit, but that’s because my kiddo is gone for the next week. It sure will be quiet around here!
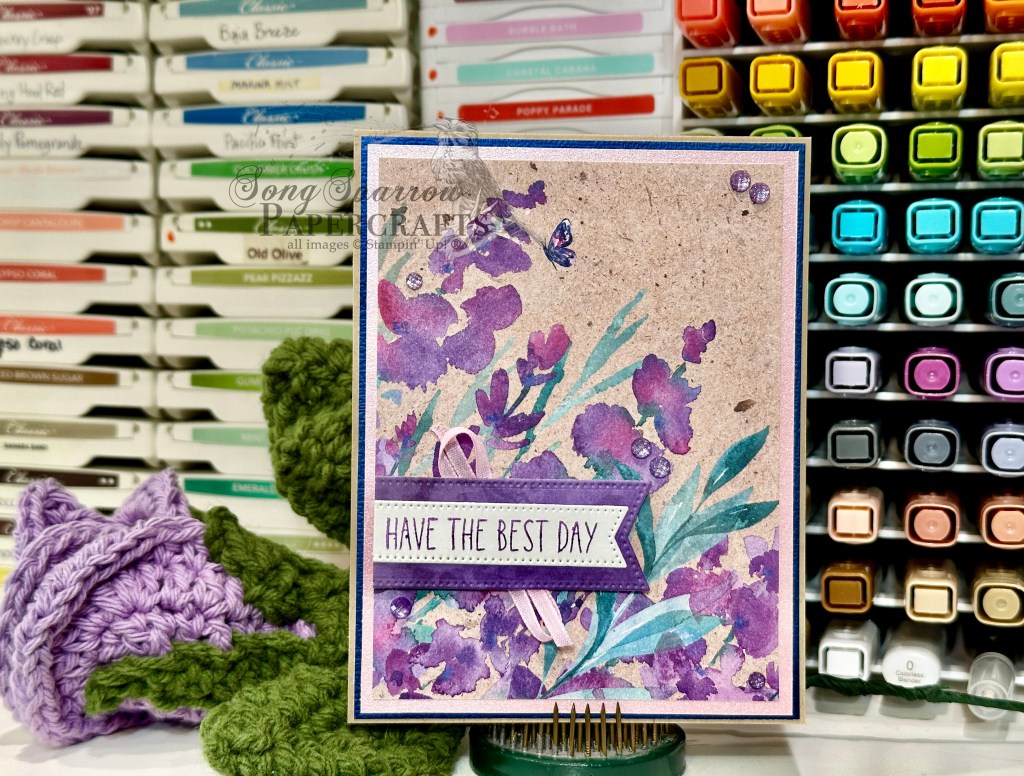
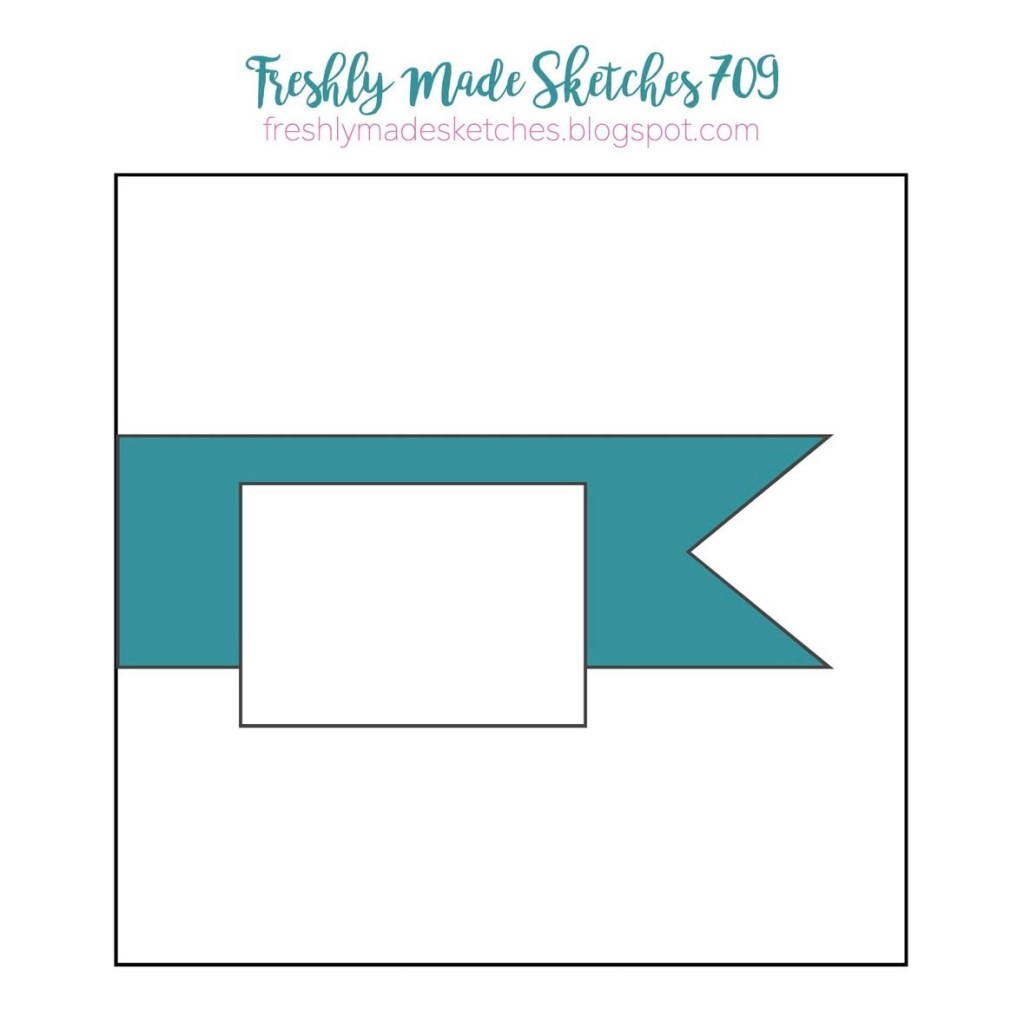
This week, our design them has circled around spring and we’ve been using sketches to get the ball rolling. Today we’re bringing out an oldie but goodie. We’re pairing up the Perennial Lavender paper with a sketch from the good folks over at Freshly Made Sketches.
We get started with a neutral base of Crumb Cake cardstock. Our focal panel from the Perennial Lavender pack is double matted with a combination of garden textures foil paper and shimmer paper. The combination of the dark blue and light pink really bring out the darks and lights of the floral pattern sheet. The banner is cut from a purple sheet from the pack using the Stylish Shapes banner die, which serves as the perfect backdrop for the sentiment. The sentiment from the Cutest Crew stamp set is stamped in Gorgeous Grape on a white banner cut with the smaller banner die from the same set. The two banners are adhered together to form one panel and are then adhered over the pink ribbon with dimensionals. We finish everything off with a scattering of purple shimmer gems.
We’ll be wrapping up our series tomorrow and I hope you’ll drop by to see what pairing finishes things off.
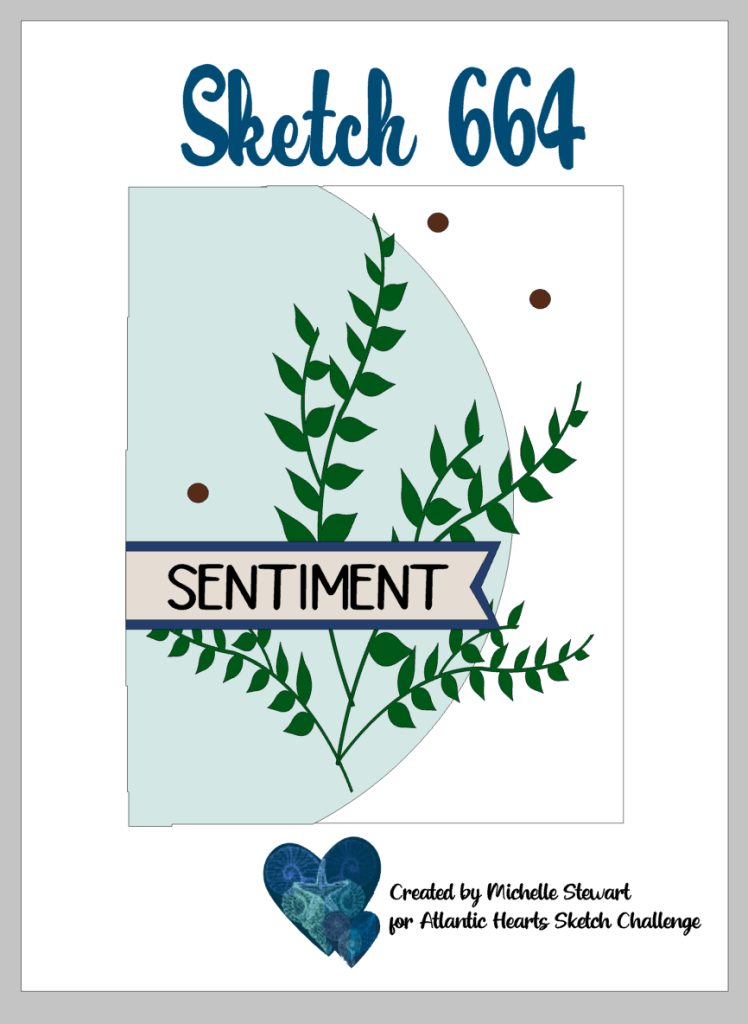
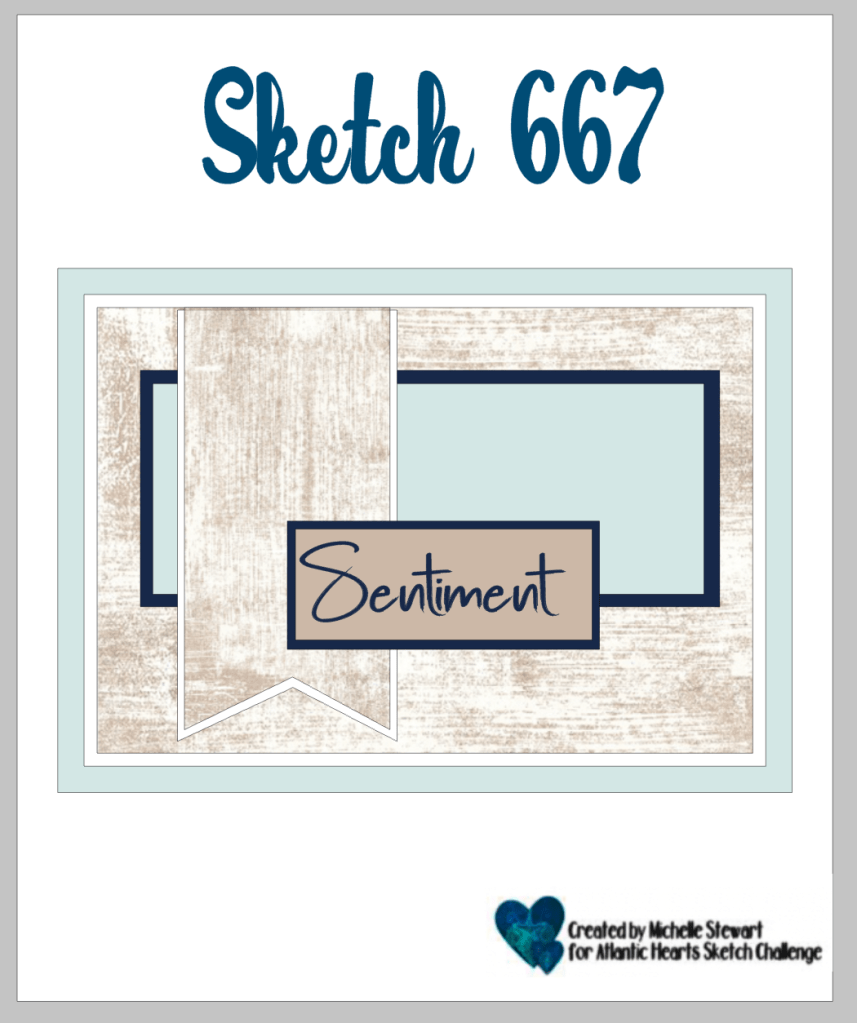
Welcome back! I’m sure glad you stopped by today. This week, our design theme is inspired by spring and we’re pairing up our spring theme with a sketch each day to make it super easy to pull together a card each day. Today we’re using the Peaceful Garden patterned papers and pairing it with a sketch from the folks over at Atlantic Hearts Sketch Challenge.
We get started on our card with a base of Secret Sea cardstock. I chose a more neutral pattern from the Peaceful Garden pack and then a sheet that would compliment my chosen focal image. I placed the busier Secret Sea floral pattern on the bottom and then have the neutral Crumb Cake pattern as the half circle on top. The Layers of Beauty image is stamped in black on white cardstock and then the leaves and daisy centers are colored with Stampin’ Blends. The centers of the roses have a touch of Wink of Stella for a little twinkle. Our focal image is adhered onto the card front with dimensionals. The sentiment from the new Rolling Waves set is stamped in Secret Sea on a white banner that has been cut with one of the smaller banner dies from the Stylish Shapes set. The sentiment is mounted over some Old Olive rickrack with several layers of dimensionals. We finish things off with a few Old Olive sparkle dots.
This one is truly easy to make and such a stunner! I’m going to try it with some other larger floral images in the stash! I hope you’ll drop in tomorrow to see what goodies come to the party next.
Welcome in on this wonderful Wednesday! I’ve been confused about what day of the week it is all day today. I’m pretty sure I’ve called it every day of the week but Wednesday. Not sure what exactly has me turned upside down, but hopefully I’ll keep things straight tomorrow!
This week, we’re exploring the crafty stash to create some spring-inspired cards and we’re using a new sketch each day to get started. Funny enough, Texas weather has decided to send us back to winter and we’re expecting temps back down close to freezing tomorrow morning. This week has truly been a don’t like the weather? just wait a minute kinda situation! So needless to say, I’m dreaming of all the pretty flowers I’ll be buying over the weekend.
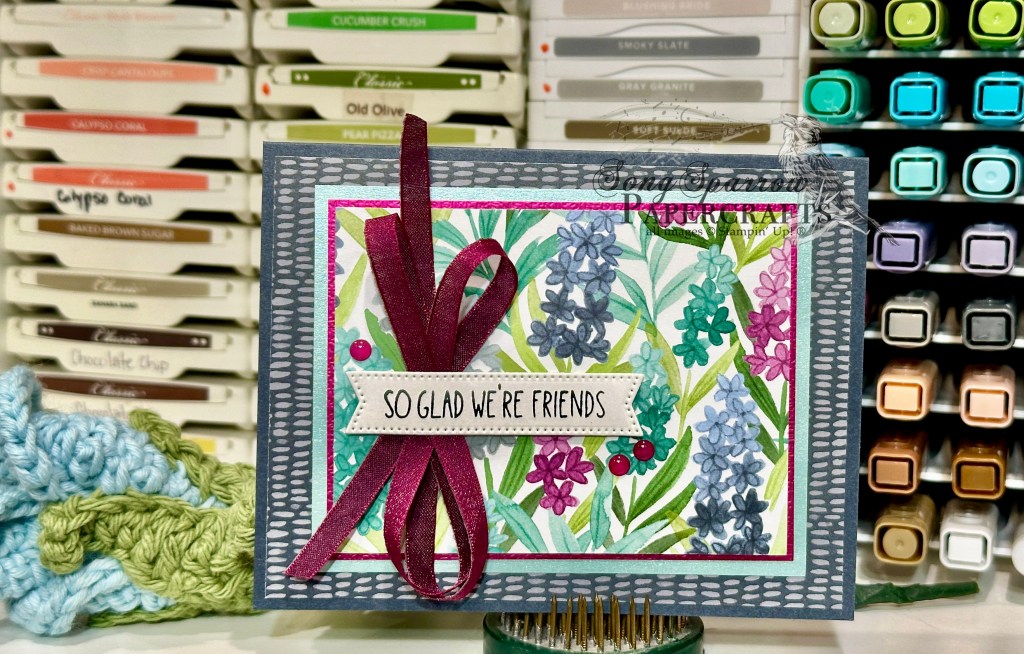
Today we’re pairing up the Florals in Bloom paper with a sketch by the good folks over at Atlantic Hearts Sketch Challenge. We get started with a base of Secret Sea cardstock because I really love how the contrast provides an extra pop for our focal panel. The background pattern is a sheet of the Secret Sea patterned paper from the Florals in Bloom pack. Our focal panel is double-matted with a combination of Pool Party shimmer paper and some Berry Burst garden textures specialty paper. I love how this combination really pulls out the colors in the floral pattern sheet of the Florals in Bloom that sits in the center. I used a double twist of the new Berry Burst shiny ribbon as the drop-down element and backdrop for the sentiment. The sentiment is from the new Cutest Crew stamp set and is stamped in Secret Sea on white cardstock and then cut into a banner shape with the Stylish Shapes die. We finish things off with some Berry Burst garden epoxy dots.
I took some liberties with today’s sketch. What do you think of this variation? Can you see where I made some swaps? Do you ever go off the reservation from your inspiration piece? I hope you’ll drop in tomorrow to see what combo we play with next!
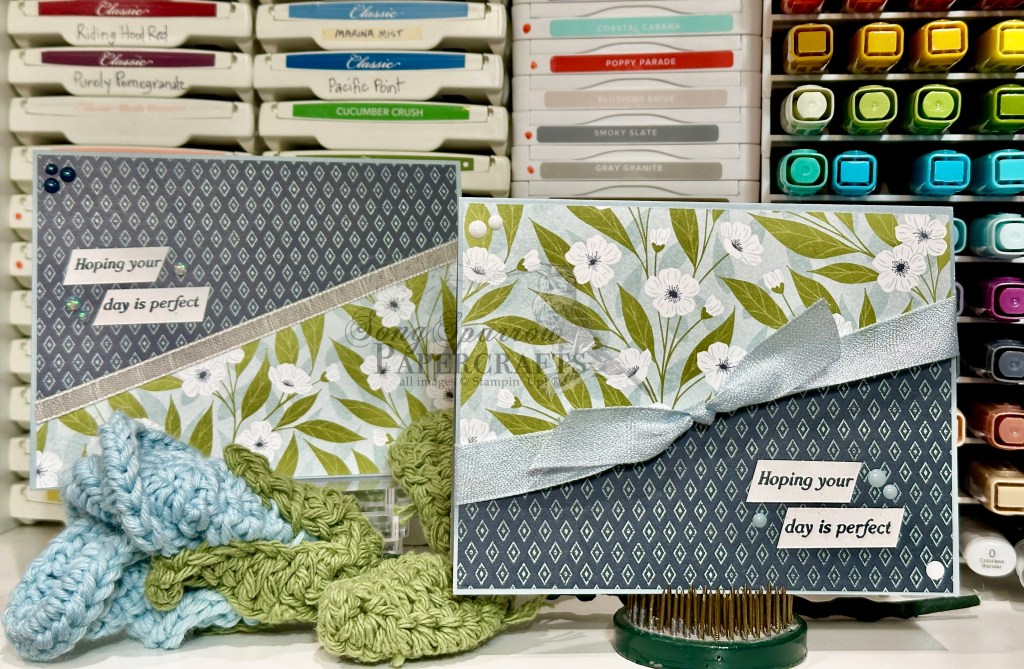
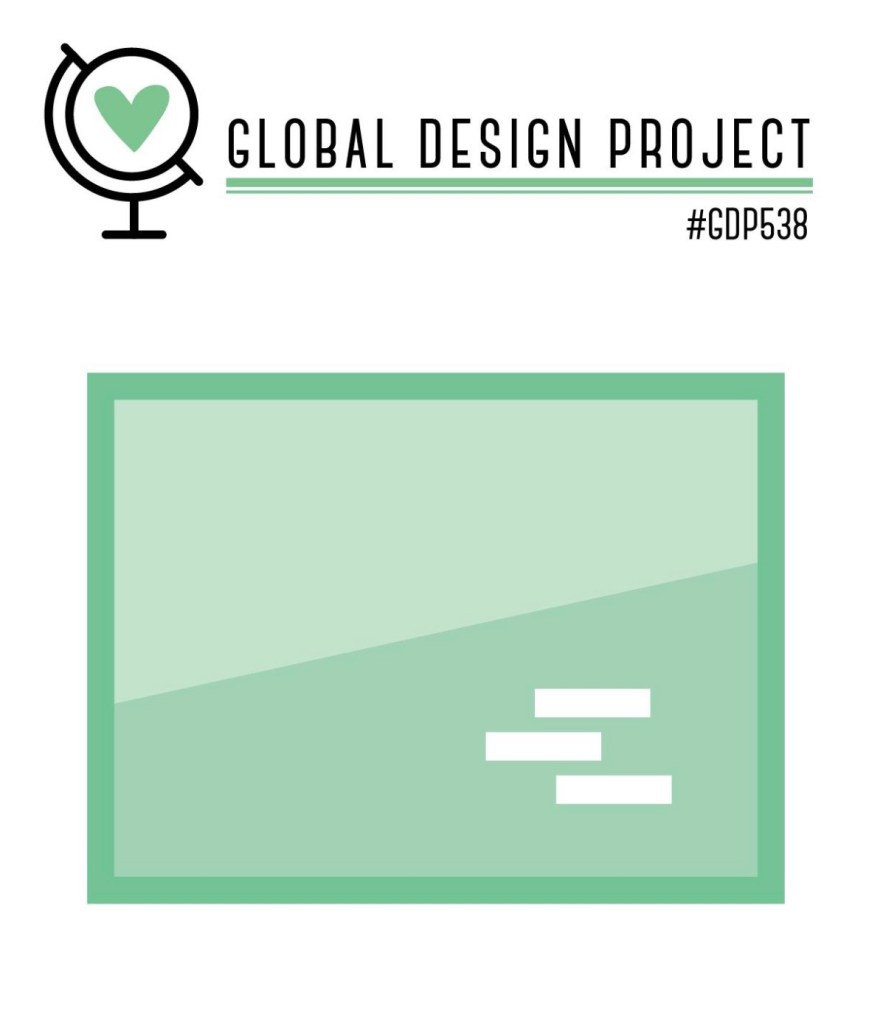
Welcome back, friends! It’s quite the rumbly Tuesday here in our area as another line of spring storms is due to push through. But that’s okay because we’re bringing our own sunshine this week as we make more spring-inspired designs. This week, we’re pulling spring-inspired products from the crafty stash and pairing them up with a daily sketch. Today we’re using our Lovely Blossoms paper and Sketch 538 from the good folks over at Global Design Project. What I love about today’s sketch is it’s a two-for — two cards at once!
We get started with a base of Cloud Cover cardstock. I chose two separate patterns from the Lovely Blossoms paper pack — the Secret Sea diamond pattern sheet and the small white floral pattern. Each pattern piece is cut to fit the card front on its own and then cut on the diagonal. We then mix and match our two patterned halves to create our two card fronts. I used ribbon to add a pop of interest between the two sections and decided to mix it up a bit between the two cards — one of the Cloud Cover wide ribbon and the other is Gray Granite trim. The sentiment from the new Rolling Waves stamp set is stamped in Secret Sea on white cardstock and then cut apart to create our two-part sentiment. I liked the contrast of the white sentiment panel with the darker Secret Sea pattern, so the sentiment stayed with that pattern across the two designs. We finish things off with some embellishments — moody palette glossy dots and opal rounds.
If you’re looking for a great way to turn out a lot of really cute cards for your stash, this sketch should be in your go-to stash! I hope you’ll pop in tomorrow to see what combo we put together next.
Howdy, friends, and welcome in on this fantastic Monday. We’re super thrilled to all be home together today for a work & school holiday. And it just so happens to be a gloriously sunny day here in North Texas. It’s supposed to be near 80-degrees today — crazy for February! We’ve already gotten in our bowling for the day and the boys have headed out to see if the fish are biting. Do you have today off? What are you getting up to?
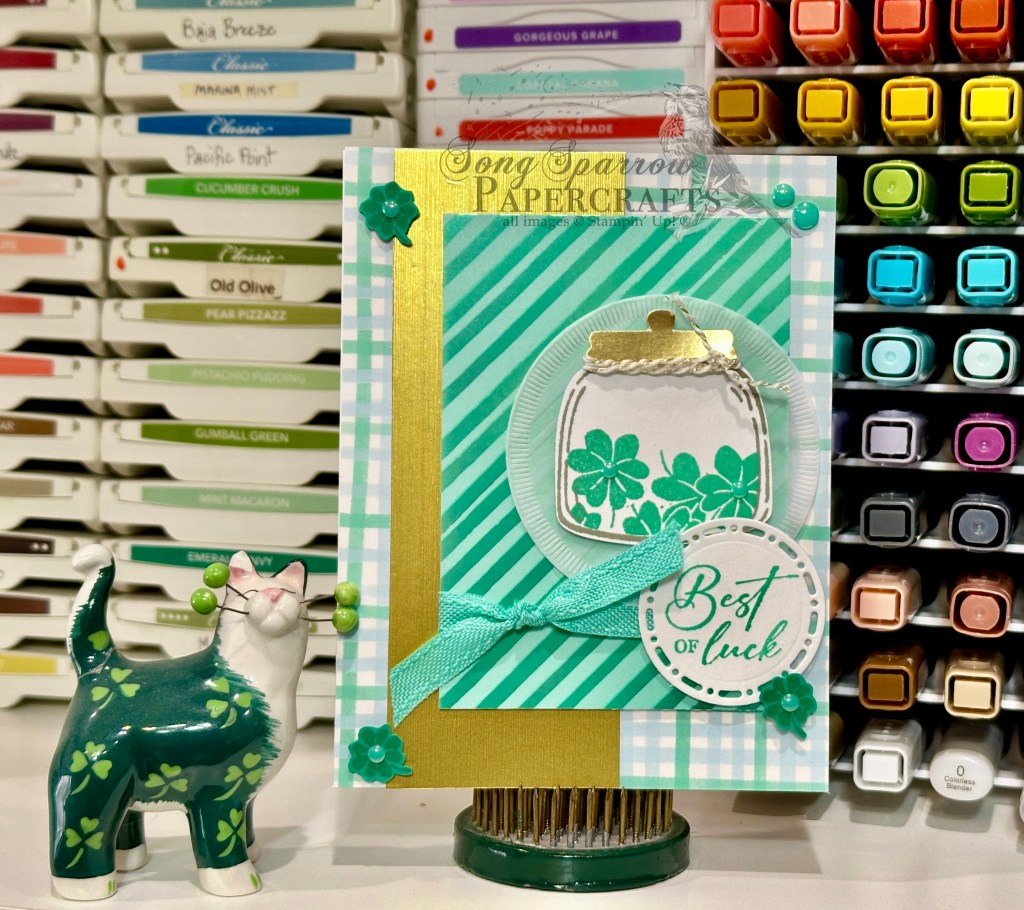
As we start this new week, we’re also beginning a new theme for the week. It’s all about the luck this week. And today we’re pairing up some of the new specialty papers from Stampin’ Up! — Pleasant Patterns & Easter Joy — with the Sweet Jar stamp & punch bundle to create today’s lucky design.
We’re using a sketch from the gals over at Global Design Project for this card. We get started with a base of white cardstock, which provides the backbones on which we build our design. A sheet of the plaid Easter Joy paper covers the full card front and gives us the backdrop for our design. Textured gold specialty paper serves as the vertical strip down the left side, while a sheet of green striped paper from the Pleasant Patterns paper pack sits front & center. The center striped panel is wrapped in Shy Shamrock bordered ribbon before it’s adhered to the card front with dimensionals.
Now we build our focal point, which is a combination of image and sentiment. The jar image from the Sweet Jar stamp set is stamped in Smoky Slate on white cardstock and then filled with all the luck in the form of oodles of shamrocks from the Sweet Jar stamp set stamped in Shy Shamrock ink. We’re keeping all the luck in the jar with a gold lid and an extra bit of white & gold baker’s twine tied around the top. Our jar o’ luck is adhered with dimensionals to a circle of vellum that has been cut with the Spotlight on Nature dies. The sentiment from the Unbounded Love stamp set is stamped in Shy Shamrock also on a smaller circle of white cardstock cut with the Spotlight on Nature dies. A few extra shamrocks are stamped tone-on-tone on Shy Shamrock cardstock and fussy cut with paper snips and then adhered with dimensionals to form a visual triangle. We finish things off with some In Color pearls for a splash of extra color and sheen.
I hope you’ll tune in tomorrow to see where we find our luck next!
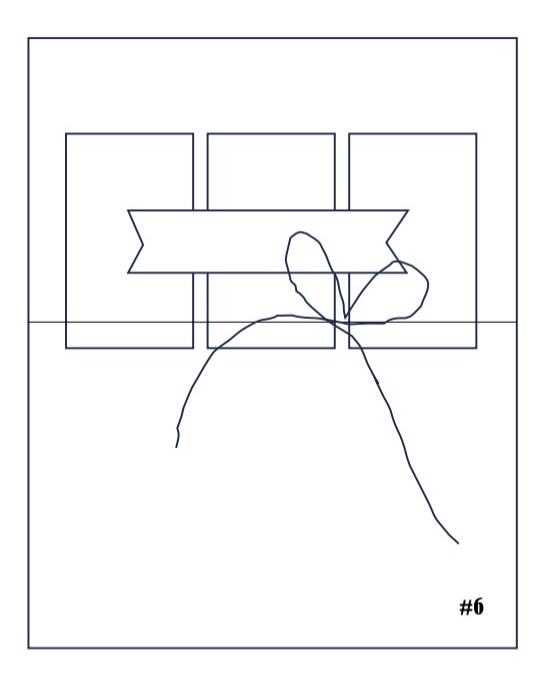
We’re going to close out our week of working with the new Stampin’ Up! Hugs for Love bundle with today’s bonus card. I’m pairing it up once again with the Timeless Plaid paper, which is also a new release, and using Sketch #6 from the new January Mini catalog.
We get started with a base of Boho Blue cardstock. The background panel is a sheet of the Timeless Plaid in blue. I used the reverse side of the Pool Party plaid sheet from the same pack as the center background elements and punched the shapes using the To the Point Label punch. Although it’s difficult to see in the photo, there are very faint lines of Pool Party in the blue plaid sheet, making the Pool Party plaid sheet the perfect compliment to really draw out those subtle stripes. The sentiment panel is stamped on white using the Hugs for Life outline stamp and the sentiment from the Heart Shaped stamp set. The panel is punched with the To the Point Label punch. I tied some Night of Navy linen thread around the background panel and passed it underneath the sentiment panel. I added some rhinestone basic jewels and industrial trinkets to finish things off.
Next week is all about birthdays. I hope you’ll pop in!
Products used in this featured design: Boho Blue, Basic White cardstock Timeless Plaid DSP Hugs for Love bundle Heart Shaped stamps Natural Tones linen thread Industrial trinkets, rhinestone basic jewels Dimensionals Adhesives
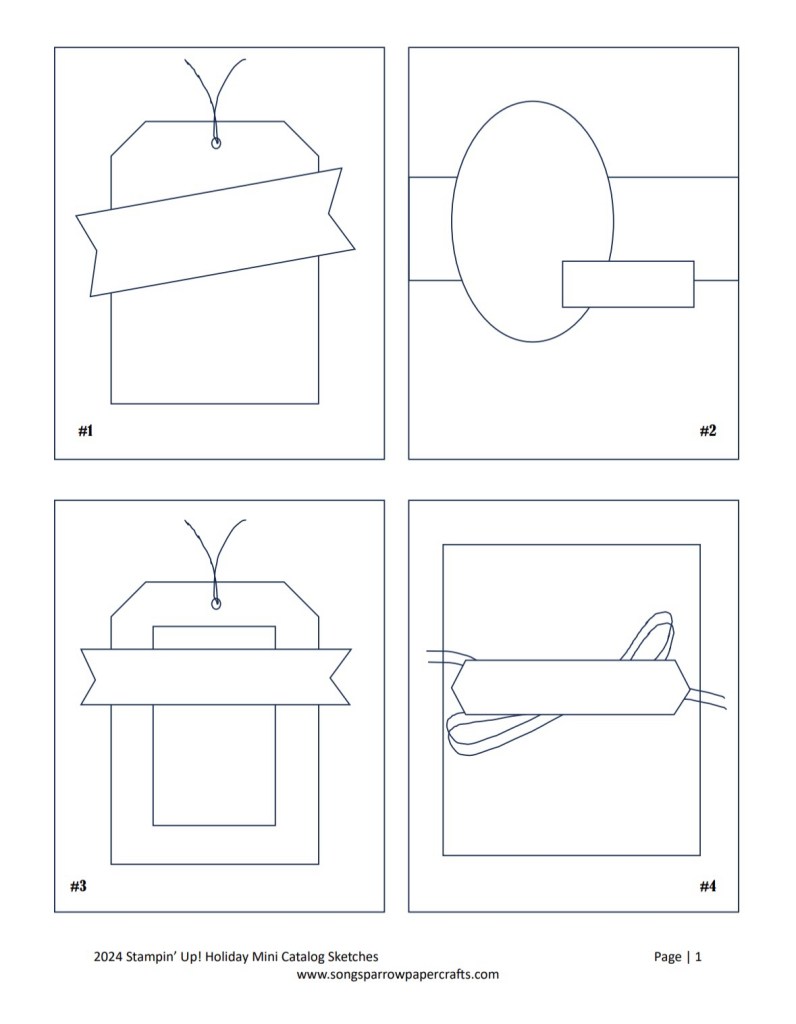
I love a good sketch, and if you’ve followed along here for any length of time, you’ve heard and seen me refer to sketches I’ve used to make various cards. There are all sorts of places where you can find card sketches and you can even start your own sketch book based on card layouts you see and like. These are two things that I’ve been doing for years. But what I love is that Stampin’ Up! has begun to include a collection of sketches in catalogs.
There are quite a number of demonstrators who have turned the collection of sketches in the 2024-25 Annual Catalog into a large-scale file (letter-sized) that they’ve shared amongst their fellow demos and with their customers. I got mine from Frenchie Stamps and love the larger format because it helps me better visualize where I’m going with design and obviously because it’s much easier on the eyes. *wink wink*
Up until now, however, I have not seen any of the new sketches included in the Holiday Mini catalog in a larger format. So I’ve spent some time over the last week doing just that. About half of the sketches included in the catalog are for gift tags. But did you know they can easily be converted to card fronts? You will see each of those tags included as a card layout in this sketch collection file — to help you better visualize how each of the tags can become a card. But you’ll note that each of the tag sketches is otherwise completely unchanged outside of the outline of a card front.
You can download the full collection of 20 sketches included on page 16 of the 2024 Stampin’ Up! Holiday Mini catalog by clicking on the link below.
This week is all about autumn, and we’re using unique combinations of Stampin’ Up! products to make some beautiful card designs.
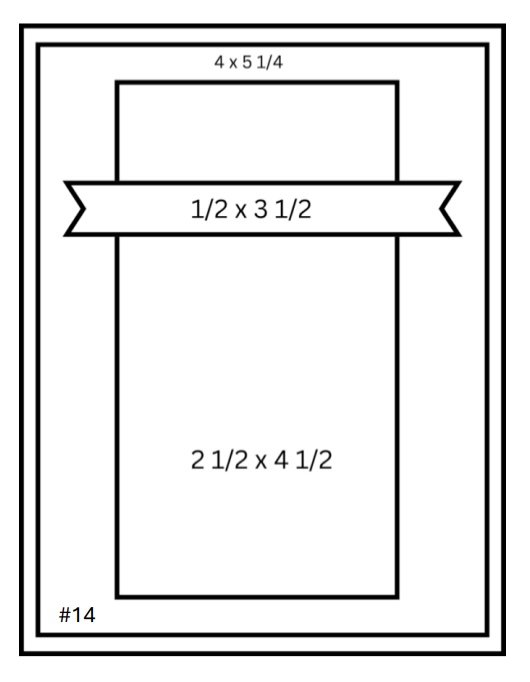
And it’s already time again for another installment of Sketchy Fridays, where each week we’ll be using a card sketch to design our featured card. Right now, we’re working through a full series of designs using the card sketches found on page 22 of the current Stampin’ Up! Annual Catalog.
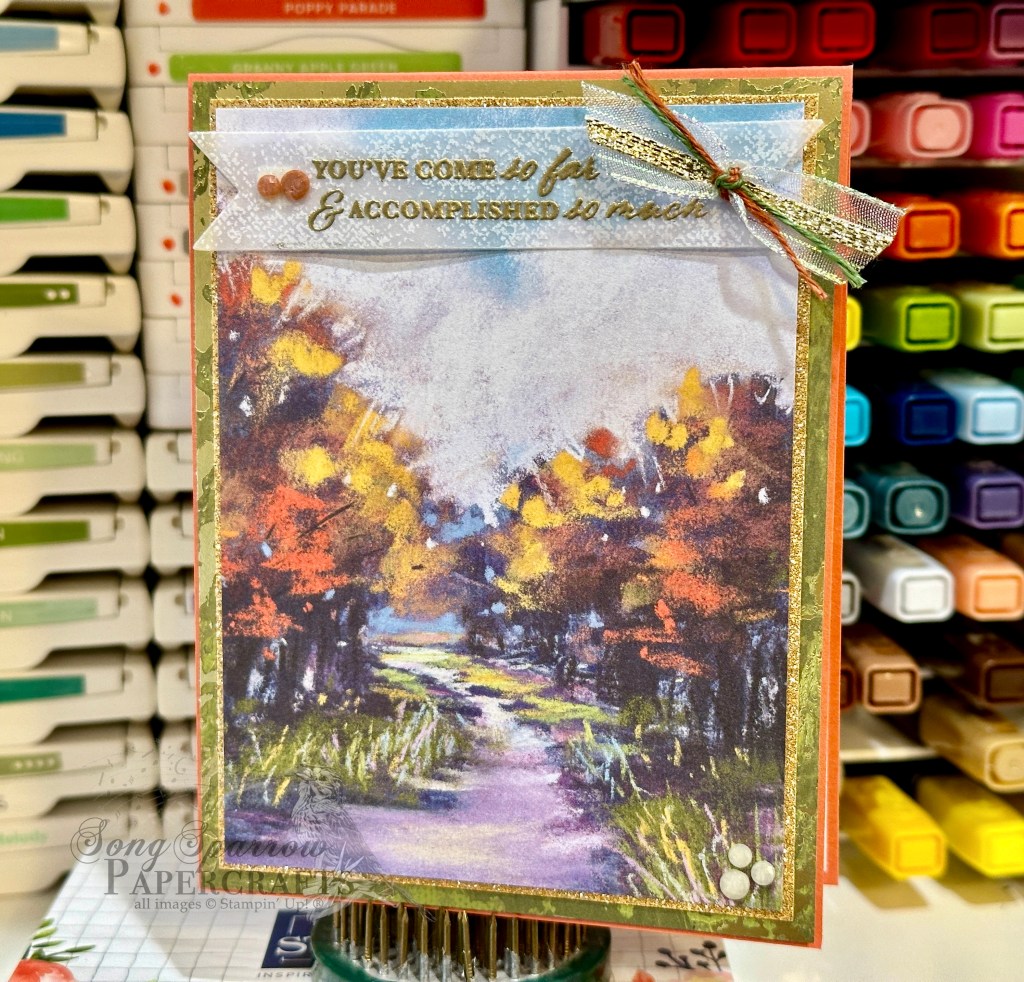
This week’s card is based on Sketch #14 and features the gorgeous Splendid Autumn designer paper from the new Stampin’ Up! Holiday Mini catalog.
As I was thumbing through the papers in the Splendid Autumn paper pack, I was looking for a sheet that would lend itself to an unexpected combination of products. When I saw this beautiful sheet of the groves of trees separated by a stream with its hues of greens and purples, along with the usual fall foliage colors, I knew I had found the sheet I was looking for.
The beauty of today’s Sketch #14 is it lets us use this gorgeous paper as the focal point and then support it with mats as complements. We get started with a base of Calypso Coral cardstock. I love how this base color makes the oranges in the trees pop over the golden hues. Our sheet of Splendid Autumn is matted in two different colors. We use a very thin mat of Peach Pie glimmer paper right up against the Splendid Autumn, and it’s such a nice complement to the golden hues in our paper. Then we’re using a larger secondary mat of Old Olive Season of Elegance designer paper. Just look at how this brings out the grass along either side of our creek that’s reflecting our gorgeous dusky sky. And in person, the sparkle of the gold foiling in this sheet plays along perfectly with the glimmer paper. The sentiment from Wonderful Thoughts is heat embossed in gold on a sheet of white vellum from the Graceful Greenery vellum pack and then diecut using the Greetings of the Season dies using the extension method to give us a full banner. We finish things off with a twist of ribbons, including iridescent striped sheer ribbon, gold trim, and two colors of linen thread from the new Natural Tones pack, and a few of the new Earth Tones shimmer gems in opposing corners for a little sparkle.
I hope you tune in tomorrow as we round out our All About Autumn card series. I’ll be bringing you another emboss resist project, as well as a BONUS post showing how you can make a simple easel project that packs a big punch!
Products used in today’s card: Calypso Coral cardstock Season of Elegance, Splendid Autumn, Graceful Greenery vellum, Gold textured DSP Wonderful Thoughts stamps Greetings of the Season dies Iridescent striped ribbon Gold trim Natural Tones linen thread Earth Tones shimmer gems Dimensionals Adhesives
I don’t know about you, but I can’t believe that we’re wrapping up the month of August and marching right into September already! I mean, it’s Labor Day weekend. Whaaaaaa?! I feel like the older I get the faster the time seems to fly by.
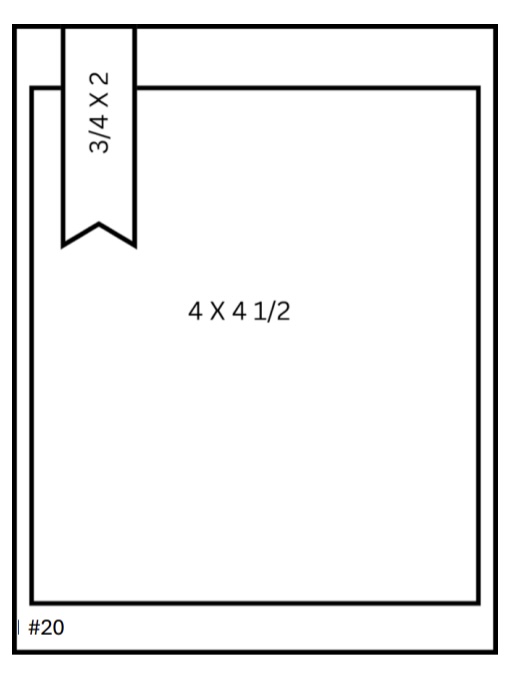
And speaking of time flying by, it’s time again for another installment of Sketchy Fridays, where each week we’ll be using a card sketch to design our featured card. Right now, we’re working through a full series of designs using the card sketches found on page 22 of the current Stampin’ Up! Annual Catalog.
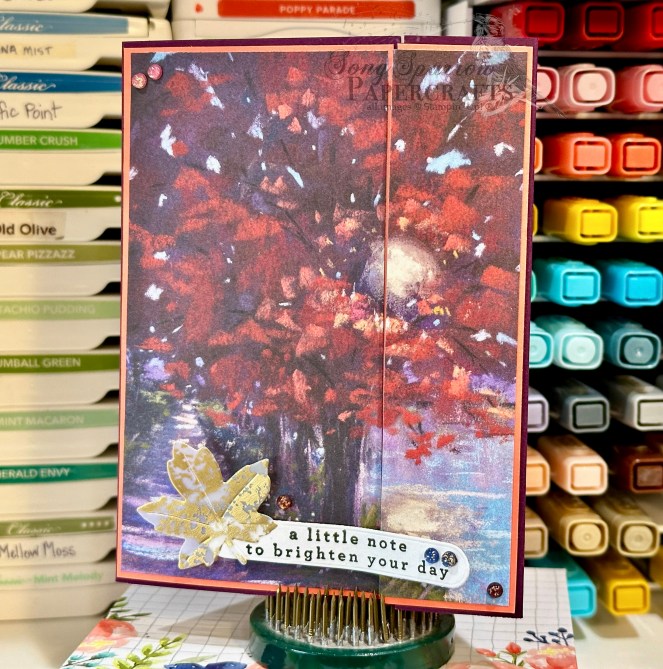
This week’s card is based on Sketch #20 and features the gorgeous Splendid Autumn designer paper from the new Stampin’ Up! Holiday Mini catalog that launches on September 4th.
This paper pack just turns out sheet after sheet of stunning designs, and I’m loving each and every one. I’m pairing up a fun fold shared by my upline Patty Bennett with Sketch #20 from the Annual Catalog. I’ve taken the liberty of changing the orientation of the sentiment piece. And that’s the best thing about using a sketch — it gives you a place to start and then you tweak things to work for you.
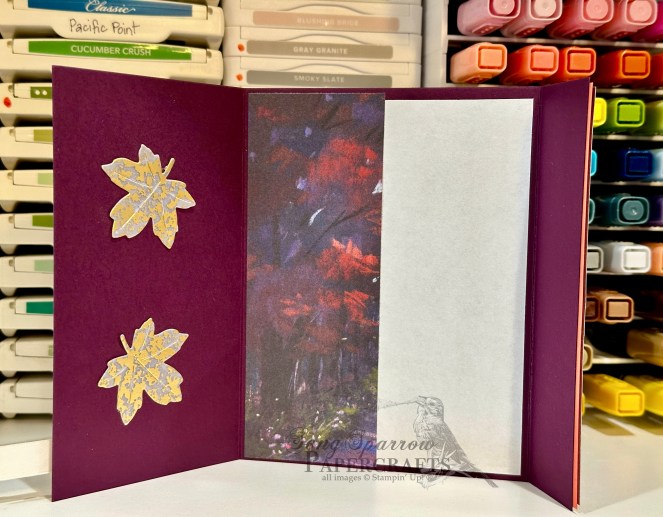
So our fun fold starts with a base of Blackberry Bliss cardstock. Rather than scoring in the center, we score and fold at 3-inches and 7.25-inches to give us our front fold with a standard-sized inside message panel. I decided to double mat the gorgeous sheet of Splendid Autumn patterned paper and used Flirty Flamingo to bring out the pinky-orange hues of the leaves. I cut and mounted the patterned paper so that the panels meet to form a complete picture when the card is closed. When open, there is a small border of Flirty Flamingo visible on the left panel and a slight overhang of the Splendid Autumn sheet on the right panel. The sentiment from Changing Leaves is stamped in black on white cardstock and then diecut using the Greetings of the Season die. I diecut a leaf from gold mercury vellum using the Autumn Leaves dies and adhered to the sentiment panel. The sentiment panel is mounted to the left panel of the card front using dimensionals. We finish off the card front with an assortment of regal foiled dots, which release next week. I felt like it was a shame to waste the remainder of the Splendid Autumn sheet, so it serves as the decorative strip next to the message panel on the inside of the card. I added a few additional gold mercury vellum leaves to tie things together.
I loved this fun fold because it offered the perfect opportunity to showcase a gorgeous sheet of paper. When I have paper that’s so pretty that I don’t want to cut it, I search for layouts like this one that let me put it on full display. Give it a try the next time you have a sheet of paper too pretty to cut up!
Tomorrow, we’re closing out our In the Woods card series with a fall sunset. I hope you’ll stop by and check it out!
Products used in today’s card: Blackberry Bliss, Flirty Flamingo, Basic White cardstock Splendid Autumn (coming soon!), gold mercury vellum DSP Changing Leaves stamps Autumn Leaves, Greetings of the Season dies Regal foiled dots (coming soon!) Dimensionals Adhesives
![Crumb Cake 8-1/2" X 11" Cardstock [ 120953 ]](https://assets1.tamsnetwork.com/images/EC042017NF/120953s.jpg "Crumb Cake 8-1/2\" X 11\" Cardstock [ 120953 ]")
![Basic White 8 1/2" X 11" Cardstock [ 166780 ]](https://assets1.tamsnetwork.com/images/EC042017NF/166780s.jpg "Basic White 8 1/2\" X 11\" Cardstock [ 166780 ]")
![Delicate Dreams 12" X 12" (30.5 X 30.5 Cm) Specialty Designer Series Paper [ 167498 ]](https://assets1.tamsnetwork.com/images/EC042017NF/167498s.jpg "Delicate Dreams 12\" X 12\" (30.5 X 30.5 Cm) Specialty Designer Series Paper [ 167498 ]")
![Peaceful Garden 12" X 12" (30.5 X 30.5 Cm) Glimmer Paper [ 165929 ]](https://assets1.tamsnetwork.com/images/EC042017NF/165929s.jpg "Peaceful Garden 12\" X 12\" (30.5 X 30.5 Cm) Glimmer Paper [ 165929 ]")
![Sentimental Framing Photopolymer Stamp Set (English) [ 165475 ]](https://assets1.tamsnetwork.com/images/EC042017NF/165475s.jpg "Sentimental Framing Photopolymer Stamp Set (English) [ 165475 ]")
![Everyday Arches Dies [ 164629 ]](https://assets1.tamsnetwork.com/images/EC042017NF/164629s.jpg "Everyday Arches Dies [ 164629 ]")
![Words Of Beauty Dies (English) [ 167089 ]](https://assets1.tamsnetwork.com/images/EC042017NF/167089s.jpg "Words Of Beauty Dies (English) [ 167089 ]")
![Secret Sea Classic Stampin' Pad [ 165285 ]](https://assets1.tamsnetwork.com/images/EC042017NF/165285s.jpg "Secret Sea Classic Stampin' Pad [ 165285 ]")
![Hues Of Blue Flowers [ 165930 ]](https://assets1.tamsnetwork.com/images/EC042017NF/165930s.jpg "Hues Of Blue Flowers [ 165930 ]")
![Opal Rounds Assortment [ 163298 ]](https://assets1.tamsnetwork.com/images/EC042017NF/163298s.jpg "Opal Rounds Assortment [ 163298 ]")
![White With Gold 3/8" (1 Cm) Ribbon [ 166979 ]](https://assets1.tamsnetwork.com/images/EC042017NF/166979s.jpg "White With Gold 3/8\" (1 Cm) Ribbon [ 166979 ]")
![Stampin' Dimensionals [ 104430 ]](https://assets1.tamsnetwork.com/images/EC042017NF/104430s.jpg "Stampin' Dimensionals [ 104430 ]")
![Perennial Lavender 12" X 12" (30.5 X 30.5 Cm) Designer Series Paper [ 162593 ]](https://assets1.tamsnetwork.com/images/EC042017NF/162593s.jpg "Perennial Lavender 12\" X 12\" (30.5 X 30.5 Cm) Designer Series Paper [ 162593 ]")
![Garden Textures 12" X 12" (30.5 X 30.5 Cm) Specialty Foil Sheets [ 167125 ]](https://assets1.tamsnetwork.com/images/EC042017NF/167125s.jpg "Garden Textures 12\" X 12\" (30.5 X 30.5 Cm) Specialty Foil Sheets [ 167125 ]")
![Pastels Shimmer 12" X 12" (30.5 X 30.5 Cm) Specialty Paper [ 167198 ]](https://assets1.tamsnetwork.com/images/EC042017NF/167198s.jpg "Pastels Shimmer 12\" X 12\" (30.5 X 30.5 Cm) Specialty Paper [ 167198 ]")
![Cutest Crew Photopolymer Stamp Set (English) [ 167146 ]](https://assets1.tamsnetwork.com/images/EC042017NF/167146s.jpg "Cutest Crew Photopolymer Stamp Set (English) [ 167146 ]")
![Stylish Shapes Dies [ 159183 ]](https://assets1.tamsnetwork.com/images/EC042017NF/159183s.jpg "Stylish Shapes Dies [ 159183 ]")
![Gorgeous Grape Classic Stampin' Pad [ 147099 ]](https://assets1.tamsnetwork.com/images/EC042017NF/147099s.jpg "Gorgeous Grape Classic Stampin' Pad [ 147099 ]")
![Bubble Bath 1/8" (3.2 Mm) Faux Linen Ribbon [ 167075 ]](https://assets1.tamsnetwork.com/images/EC042017NF/167075s.jpg "Bubble Bath 1/8\" (3.2 Mm) Faux Linen Ribbon [ 167075 ]")
![Purple Fine Shimmer Gems [ 162611 ]](https://assets1.tamsnetwork.com/images/EC042017NF/162611s.jpg "Purple Fine Shimmer Gems [ 162611 ]")
![Mini Stampin' Dimensionals [ 144108 ]](https://assets1.tamsnetwork.com/images/EC042017NF/144108s.jpg "Mini Stampin' Dimensionals [ 144108 ]")

![Secret Sea 8 1/2" X 11" Cardstock [ 165624 ]](https://assets1.tamsnetwork.com/images/EC042017NF/165624s.jpg "Secret Sea 8 1/2\" X 11\" Cardstock [ 165624 ]")
![Peaceful Garden 12" X 12" (30.5 X 30.5 Cm) Designer Series Paper [ 165917 ]](https://assets1.tamsnetwork.com/images/EC042017NF/165917s.jpg "Peaceful Garden 12\" X 12\" (30.5 X 30.5 Cm) Designer Series Paper [ 165917 ]")
![Layers Of Beauty Bundle (English) [ 163519 ]](https://assets1.tamsnetwork.com/images/EC042017NF/163519s.jpg "Layers Of Beauty Bundle (English) [ 163519 ]")
![Rolling Waves Photopolymer Stamp Set [ 167142 ]](https://assets1.tamsnetwork.com/images/EC042017NF/167142s.jpg "Rolling Waves Photopolymer Stamp Set [ 167142 ]")
![Granny Apple Green Stampin' Blends Combo Pack [ 154885 ]](https://assets1.tamsnetwork.com/images/EC042017NF/154885s.jpg "Granny Apple Green Stampin' Blends Combo Pack [ 154885 ]")
![Daffodil Delight Stampin' Blends Combo Pack [ 154883 ]](https://assets1.tamsnetwork.com/images/EC042017NF/154883s.jpg "Daffodil Delight Stampin' Blends Combo Pack [ 154883 ]")
![Old Olive 3/8" (1 Cm) Specialty Rickrack [ 167006 ]](https://assets1.tamsnetwork.com/images/EC042017NF/167006s.jpg "Old Olive 3/8\" (1 Cm) Specialty Rickrack [ 167006 ]")
![Clear Wink Of Stella Glitter Brush [ 141897 ]](https://assets1.tamsnetwork.com/images/EC042017NF/141897s.jpg "Clear Wink Of Stella Glitter Brush [ 141897 ]")
![Sparkle Dot Essentials [ 166991 ]](https://assets1.tamsnetwork.com/images/EC042017NF/166991s.jpg "Sparkle Dot Essentials [ 166991 ]")
![Florals In Bloom 12" X 12" (30.5 X 30.5 Cm) Designer Series Paper [ 165175 ]](https://assets1.tamsnetwork.com/images/EC042017NF/165175s.jpg "Florals In Bloom 12\" X 12\" (30.5 X 30.5 Cm) Designer Series Paper [ 165175 ]")
![Berry Burst 1/4" (6.4 Mm) Shiny Ribbon [ 167126 ]](https://assets1.tamsnetwork.com/images/EC042017NF/167126s.jpg "Berry Burst 1/4\" (6.4 Mm) Shiny Ribbon [ 167126 ]")
![Garden Epoxy Dots [ 167124 ]](https://assets1.tamsnetwork.com/images/EC042017NF/167124s.jpg "Garden Epoxy Dots [ 167124 ]")
![Cloud Cover 8 1/2" X 11" Cardstock [ 165621 ]](https://assets1.tamsnetwork.com/images/EC042017NF/165621s.jpg "Cloud Cover 8 1/2\" X 11\" Cardstock [ 165621 ]")
![Lovely Blossoms 12" X 12" (30.5 X 30.5 Cm) Designer Series Paper [ 167168 ]](https://assets1.tamsnetwork.com/images/EC042017NF/167168s.jpg "Lovely Blossoms 12\" X 12\" (30.5 X 30.5 Cm) Designer Series Paper [ 167168 ]")
![Cloud Cover 5/8" (1.6 Cm) Textured Ribbon [ 167182 ]](https://assets1.tamsnetwork.com/images/EC042017NF/167182s.jpg "Cloud Cover 5/8\" (1.6 Cm) Textured Ribbon [ 167182 ]")
![Gray Granite 1/4" (6.4 Mm) Variegated Trim [ 167511 ]](https://assets1.tamsnetwork.com/images/EC042017NF/167511s.jpg "Gray Granite 1/4\" (6.4 Mm) Variegated Trim [ 167511 ]")
![Moody Palette Glossy Dots [ 167180 ]](https://assets1.tamsnetwork.com/images/EC042017NF/167180s.jpg "Moody Palette Glossy Dots [ 167180 ]")
![Mini Glue Dots [ 103683 ]](https://assets1.tamsnetwork.com/images/EC042017NF/103683s.jpg "Mini Glue Dots [ 103683 ]")

![Pleasant Patterns 12" X 12" (30.5 X 30.5 Cm) Specialty Designer Series Paper [ 166950 ]](https://assets1.tamsnetwork.com/images/EC042017NF/166950s.jpg "Pleasant Patterns 12\" X 12\" (30.5 X 30.5 Cm) Specialty Designer Series Paper [ 166950 ]")
![Easter Joy 12" X 12" (30.5 X 30.5 Cm) Specialty Designer Series Paper [ 166939 ]](https://assets1.tamsnetwork.com/images/EC042017NF/166939s.jpg "Easter Joy 12\" X 12\" (30.5 X 30.5 Cm) Specialty Designer Series Paper [ 166939 ]")
![Shy Shamrock 8 1/2" X 11" Cardstock [ 163795 ]](https://assets1.tamsnetwork.com/images/EC042017NF/163795s.jpg "Shy Shamrock 8 1/2\" X 11\" Cardstock [ 163795 ]")
![Vellum 12" X 12" (30.5 X 30.5 Cm) Specialty Paper [ 167099 ]](https://assets1.tamsnetwork.com/images/EC042017NF/167099s.jpg "Vellum 12\" X 12\" (30.5 X 30.5 Cm) Specialty Paper [ 167099 ]")
![Textured Metallic 12" X 12" (30.5 X 30.5 Cm) Specialty Paper [ 163772 ]](https://assets1.tamsnetwork.com/images/EC042017NF/163772s.jpg "Textured Metallic 12\" X 12\" (30.5 X 30.5 Cm) Specialty Paper [ 163772 ]")
![Sweet Jar Bundle (English) [ 165507 ]](https://assets1.tamsnetwork.com/images/EC042017NF/165507s.jpg "Sweet Jar Bundle (English) [ 165507 ]")
![Smoky Slate Classic Stampin' Pad [ 147113 ]](https://assets1.tamsnetwork.com/images/EC042017NF/147113s.jpg "Smoky Slate Classic Stampin' Pad [ 147113 ]")
![Shy Shamrock Classic Stampin Pad [ 163808 ]](https://assets1.tamsnetwork.com/images/EC042017NF/163808s.jpg "Shy Shamrock Classic Stampin Pad [ 163808 ]")
![Unbounded Love Photopolymer Stamp Set (English) [ 163378 ]](https://assets1.tamsnetwork.com/images/EC042017NF/163378s.jpg "Unbounded Love Photopolymer Stamp Set (English) [ 163378 ]")
![Spotlight On Nature Dies [ 163580 ]](https://assets1.tamsnetwork.com/images/EC042017NF/163580s.jpg "Spotlight On Nature Dies [ 163580 ]")
![Shy Shamrock 3/8" (1 Cm) Bordered Ribbon [ 163787 ]](https://assets1.tamsnetwork.com/images/EC042017NF/163787s.jpg "Shy Shamrock 3/8\" (1 Cm) Bordered Ribbon [ 163787 ]")
![2024 2026 In Color™ Flat Pearls [ 165266 ]](https://assets1.tamsnetwork.com/images/EC042017NF/165266s.jpg "2024 2026 In Color™ Flat Pearls [ 165266 ]")
![Black & White & Gold Baker's Twine [ 166005 ]](https://assets1.tamsnetwork.com/images/EC042017NF/166005s.jpg "Black & White & Gold Baker's Twine [ 166005 ]")


 Designer Series Paper")
")
")


 Designer Series Paper")
 Specialty Designer Series Paper")
 Specialty Paper")
 Specialty Designer Series Paper")
")


 Striped Trim")
 Trim Combo Pack")


 Specialty Designer Series Paper")
")

