Masculine Designs · Trucking Along

Just Beachy

Today, we’re wrapping up our week of touring some of the Stampin’ Up! sets that lend themselves to making great Father’s Day cards. And it seemed only fitting that we finished off with the “truck that broke the internet.” If you’ve followed along here for a little while, you’ve heard me mention this before. For those who are new, when the Trucking Along bundle was first released by Stampin’ Up!, it was so popular that it sold out in hours on release day and quickly sold out each of the next several times it came back in stock.

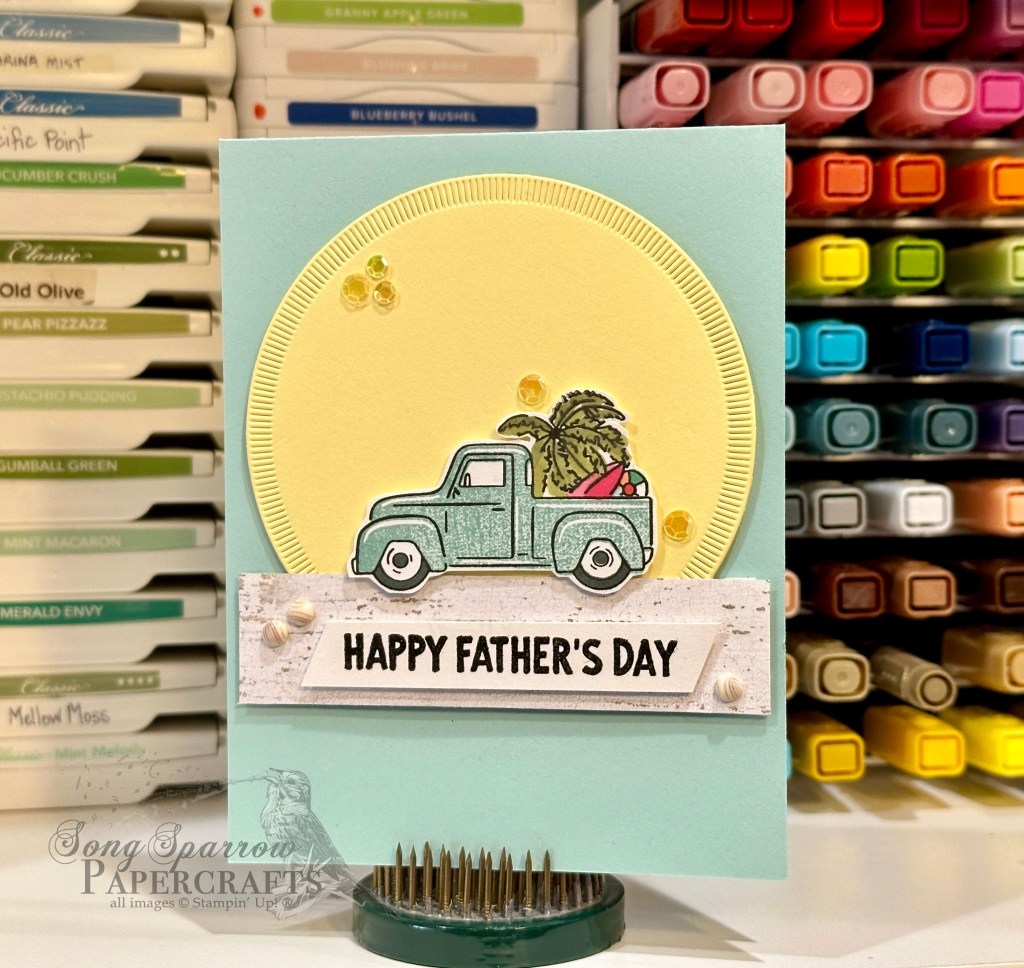
So today’s card features the Trucking Along bundle and a super cute design layout that I’ve borrowed from fellow demo over at Stamp It Up With Jaimie. For the beach lovers or the fellas who just love some summertime fun, this card design screams of summer relaxation.

We get started with a card base of Pool Party cardstock. A piece of Lemon Lolly is diecut using one of the largest circle dies in the Spotlight on Nature die set. I thought the radiating edges represented a big sun really well. Our sand is represented by a strip of the white woodgrain pattern paper from the Country Woods paper pack. I chose to make a one-layer focal image using the Trucking Along stamps and filled our truck with the beachy accoutrements. The truck is filled in with the coordinating filler stamps, while the items in the truck bed are colored with Stampin’ Blends. Everything is fussy cut and then adhered to the background panel with dimensionals. The sentiment from Trusty Tools is stamped on white cardstock and then cut with a combination of paper trimmer and snips and then adhered in the center over the “sand.” Everything is finished off with the swirl dots and shiny sequins embellishments.

This card comes together in no time flat and could easily be adapted for other occasions, like birthday, graduation, etc. And it’s perfect for any recipient, whether guy or gal. I love having designs like this in my inspiration folder for those times when I need a card I can put together quickly but delivers on the cute and fun!

I hope you’ve enjoyed all of the Father’s Day cards we’ve made this week and maybe got an idea or two for the fellas in your life. Tune in next week as we unwrap the Country Flowers bundle.

Products used in today’s card:
Pool Party, Lemon Lolly, Basic White cardstock
Country Woods DSP
Spotlight on Nature dies
Trucking Along, Trusty Tools stamps
Stampin’ Blends
Swirl dots, shiny sequins
Dimensionals
Adhesives

Dies · Masculine Designs

Father’s Day in the Grove

We’re continuing our tour of Stampin’ Up! products that help us make the perfect Father’s Day cards. And today, we’re enjoying a quiet walk in the woods with the two grove sets — Grassy Grove and In the Grove. I really love these two sets because they allow you to create a whole myriad of beautiful scenes. I spent a lot of time in the woods growing up, and it’s fun to paint these pictures of memories in cards.

I wanted to give a lot of realism to this scene, so I combed through my designer paper stash to find just the right sheets for the background and leaves, and I found the Meandering Meadows paper pack to be the ticket.

We get started with a card base of Early Espresso cardstock. The background panel for our woodsy scene is a sheet of Meandering Meadow designer paper that, to me, very much resembles a morning sky. It’s been diecut with the largest Deckled Rectangles die. Next, using the grove of trees die from the Grove die set and the largest Deckled Rectangle simultaneously, I cut a quarter sheet of Early Espresso cardstock. This serves as the base for the leaf panel, which will sit above it for depth of field. Adhere this to the Meandering Meadow base. Using a sheet of green patterned paper from the Meandering Meadow paper pack, I diecut another grove of trees — this time without the Deckled Rectangle border. From this sheet, remove all of the branch portions of the green paper. Then cut this panel to size so that the Deckled Rectangle edge of the Early Espresso mat is revealed around the edges once the two layers are adhered together. Apply dimensionals to the back of the green panel and then adhere to the Early Espresso mat, ensuring that you line up the leaves of each layer precisely. From Crumb Cake cardstock, diecut a rabbit, squirrel, and deer using the Grove and In the Grove die sets. Adhere between your two tree layers using glue dots. Stamp the sentiment from Trusty Tools in Early Espresso ink on Crumb Cake cardstock and diecut using the Happy Little Things Banner die. Adhere at the center of the base of the focal panel using dimensionals.

Tomorrow we’re going to be trucking in some Father’s Day fun. I hope you’ll stop by and check it out!

Products used in today’s card:
Early Espresso, Crumb Cake Cardstock
Meandering Meadow DSP
Trusty Tools stamps
Grove, In the Grove dies
Dimensionals
Adhesives

Masculine Designs · Take to the Sky

Plane and Simply the Best

Howdy, crafting friends. Welcome to another sparkly day filled with crafty fun. This week, we’re pulling out a whole host of Stampin’ Up! products to make some masculine cards. And with Father’s Day around the corner, it only seems appropriate to make a few masculine cards to honor the special dads in our lives.

Today, we’re keeping things on the simple side with this high-flying design. You’ll notice that the bulk of this card is comprised of the new Take to the Sky designer paper. Did you know that there is a full sheet of perfect focal images included in the Take to the Sky designer series paper pack? Simply cut them apart and you have an instant focal point for your cards! Let’s take a closer look at how this design comes together.

We get started with a base of Misty Moonlight cardstock. Our background panel consists of a base of Night of Navy cardstock that has been machine embossed with the Softly Sophisticated embossing folder — a retired Sale-a-Bration product from earlier this year. I loved that the pattern resembled a topography map, which is the piece of patterned paper from Take to the Sky that I’ve paired with it here. The current So Swirly embossing folder would work equally as well here for the same reason.

Our focal panel consists of a mat of Mossy Meadow cardstock for the perfectly pre-printed panel from the Take to the Sky paper. To dress up the pre-printed panel and tie it with our theme, I diecut the pair of propellers from silver foil specialty paper using the Adventurous Sky dies. An Industrial Trinket serves as the propeller hub. To complete the illusion of our plane flying in the sky, I stamped clouds on vellum using the Adventurous Sky stamps and then diecut them with the coordinating die. They’re affixed to our focal panel and sentiment panel using glue dots. The sentiment panel is diecut from the navigation map paper using the Everyday Details dies and the sentiment from the Adventurous Sky stamp set is stamped in the center. The sentiment panel is adhered using dimensionals so it stands above the scene. White transparent dots finish off our card and help draw the eye diagonally across the design.

Tomorrow we’re going to rummage through the tool box. I hope you’ll pop in and see what shows up!

Products used in today’s card:
Misty Moonlight, Night of Navy, Mossy Meadow, vellum cardstock
Take to the Sky, Silver foil DSP
Adventurous Sky stamps & dies
Everyday Details dies
Softly Sophisticated embossing folder (retired)
Transparent dots
Dimensionals
Adhesives

Gone Fishing · Masculine Designs

Best in the Box

Happy Monday, everyone! We were thankful to have a few days of beautiful weather here in North Texas — with sunshine anyway. This summer we’ve done the abrupt gear shift from lovely spring to straight into the fire. But we were glad to see a string of dry days nonetheless. And we did our best to make the most of it. How about you?

This week, we’re going to be looking at a whole host of wonderful Stampin’ Up! products that you can use to honor the dads in your life. Today, we’re getting started with the Gone Fishing stamps and dies.

There are so many things that you can do with the combination of stamps and dies. And today’s card shows the most straight forward way — filling a tackle box. I don’t know about you, but I grew up fishing with my family. And it was always a treat when we could choose something to use from dad’s tackle box!

We get started with today’s card with a base of Crumb Cake cardstock, which won’t be visible when your card is closed. I chose a patterned background from the (now retired) Let’s Go Fishing designer paper pack. As you can see, only a tiny portion of the background pattern peeks out from behind the tackle box, so any subtle pattern will do. Next up, we diecut the tackle box from Basic Grey cardstock using the Gone Fishing dies. The tackle box is comprised of the base and topper dies. By using dimensionals to adhere to the two layers to the card front, you’ll get a realistic look into your tackle box from top view.

TIP: Don’t throw away the squares that are cut with the tackle box topper die. Save them to use as sentiment panels on other cards. You’re welcome! *grin* (Genius idea from my upline Patty Bennett!)

Now comes the fun part — filling your tackle box. On white cardstock, I stamped some of my favorite lures and tackle from the Gone Fishing stamp set. I chose minnows, a spoon, and a bobber. I used the detail stamps to fill in each image with some color. Then I diecut each one using the coordinating die. For added detail, I chose to remove the stamped hooks on the minnows and spoon and replaced them with hooks diecut from silver foil specialty paper, which gives the hooks a more realistic look. I added an additional spinner element to the spoon with the silver foil wing.

Now we fill the remaining bins in our tackle box. I assembled two peg-style bobbers. Using the larger bobber die, I cut white cardstock and then used the smaller portion to cut Real Red. The white pieces serve as the base for the red element. The bobber peg is cut from Crumb Cake and affixed to the back of each bobber. I used a twist of linen thread to represent fishing line behind one of the peg bobbers and added a few sinkers, diecut from silver foil, to the bin for a complete bobber setup. I adhered one bobber with a dimensional for a realistic look to the bin. From the silver foil specialty paper, I also diecut two larger spoons and a small triangular turning element. I tied them together using linen thread. The sentiment from the Gone Fishing stamp set is stamped on white cardstock that is diecut using the Autumn Leaves dies with the extension method. The sentiment is adhered over the tackle box to catch the eye. The scene is finished off with some Industrial Trinkets to catch the eye and draw it across the full scene.

This super cute design can be adapted with any sentiment to make a masculine card perfect for just about any occasion. And while it looks complicated to put together, it really does come together in a snap!

Tomorrow, we’ll be taking to the sky for our next design. And you won’t want to miss tomorrow’s episode of Terrific Tuesdays either — we’re going to learn a neat (and quick) fun fold and how to use the die extension method! I hope you’ll buzz by and check it all out!

Products used in today’s card:
Crumb Cake, Basic Gray, Real Red, Basic White cardstock
Let’s Go Fishing (retired), Silver Foil DSP
Gone Fishing stamps & dies
Autumn Leaves dies
Linen thread
Industrial Trinkets
Dimensionals
Adhesives

Friends for Life

Thank You, Friend

Happy weekend, all! We have officially completed our first week of summer break here, and we’ve enjoyed just bummin’ around, for the most part. Between the rain and the start of the Texas summer heat, it hasn’t been the best week to be outside. But we’ve made the best of things and found plenty of other things to occupy our time. The kiddo really loves to bowl, and we renewed our Kids Bowl Free subscription for this summer. This cool program allows you to pay a flat fee for the summer to bowl 2 games each weekday with your kiddo(s) at your local participating bowling alley. It’s an absolute steal and we’ve thoroughly enjoyed this program for going on 5 years now. Wanna learn more? Check it out here.

I’ve also made plenty of time to play around in the craft room this week, as well. And today, we’re finishing up our look at the projects we can create using the Stampin’ Up! Friends for Life stamps and dies. I kept things simple today with a take on a design posted over on the Stampin’ Through the Catalog page. This clean and simple design combines Friends for Life and Softly Said sets to make this lovely card. This design caught my eye for its simplicity. You can easily turn out a number of these and swap out sentiments to fit the occasion.

We get started with a card base of Basic White cardstock. While a standard sized card, the cardstock is cut down the long edge rather than the short edge, giving you a score at the top. The paint smudge die gives us our background and is a combination of Summer Splash, Calypso Coral, Petunia Pop, Peach Pie, and Pretty in Pink cardstock. Each smudge is oriented a different direction and is slightly offset for some visual interest. The sentiment backdrop is white cardstock that has been debossed with the leaf-print die, cut out with the open heart die, and then lightly smudged with Pretty in Pink ink to really bring out the debossed pattern. A twist of the white diagonal trim is adhered behind the heart, which is placed over the backdrop with dimensionals. The sentiment from Simply Said is stamped in black on white cardstock and then fussy cut with paper snips before being adhered with dimensionals. The design is finished with the white and pink sequins from the Sequins Trio set.

In case you missed this week’s Terrific Tuesdays video where I demonstrated how to deboss using your dies, you can catch the quick tutorial by clicking here.

I hope you got some ideas from this week’s cards featuring the Friends for Life bundle. Next week’s theme is Father’s Day and we’ll be using a whole host of different sets to make some great cards. I hope you’ll drop by and check them all out!

Products used in today’s card:
Summer Splash, Calypso Coral, Petunia Pop, Peach Pie, Pretty in Pink, Basic White cardstock
Simply Said stamps
Friends for Life dies
White diagonal trim
Sequins trio
Dimensionals
Adhesives

Friends for Life

Hey, Happy Birthday

We happen to be big Duck Dynasty fans around here. So it’s not uncommon to hear us quote the show from time-to-time or use some of the famous catch phrases, like “Hey, Jack” or something similar. Today, I’m pairing the Friends for Life bundle with the Saying Hey set, which always just makes me think of Si from DD. *grin*

In seriousness though, today we’re making a more masculine design using the Friends for Life set by pairing it with some other great Stampin’ Up! products. This shaker card birthday design is sure to make any recipient feel special!

We get started with a base of Pretty Peacock cardstock. This is a standard sized horizontal design. The mat for the focal panel is a sheet of Mossy Meadow cardstock. The shaker panel base layer is a sheet of the Meandering Meadow designer paper diecut with the largest Deckled Rectangles die. The cover layer is diecut with the leaf-patterned heart from Friends for Life and the largest die from the Deckled Rectangles set. A piece of acetate is affixed behind the heart, and then to create the area to house the shaker pieces, a box is fashioned around the backside of the heart using foam strips. TIP: I save the acetate sheets from new stamp sets once I’ve placed them in cases. It’s amazing how quickly you accumulate a stash! I used a combination of green and yellow frosted dots and shaker pieces inside the foam square. To affix the front shaker panel to the back, I added additional foam strips around the exterior of the front panel and then adhered the two layers together.

For the sentiment, I began by wrapping linen thread around the base of the shaker panel. The frame from Heartfelt Hexagon is stamped on Crumb Cake cardstock using Pretty Peacock ink and then the Hey sentiment from Saying Hey is stamped using the masking tape technique to avoid stamping the punctuation. This panel is punched using the coordinating Heartfelt Hexagon punch. The paint smudge panel is diecut from the remaining portion of the Meandering Meadow designer paper and then Happy Birthday is stamped in a single line across the panel. The two are then affixed to the front of the card in an overlapping fashion. A few Pretty Peacock sequins across the card front finish things off.

I hope you’ll join me tomorrow as we wrap up our series using the Friends for Life stamps and dies.

Products used in this card:
Pretty Peacock, Mossy Meadow, Crumb Cake cardstock
Meandering Meadow DSP
Acetate sheet
Friends for Life, Heartfelt Hexagon, Saying Hey stamps
Friends for Life, Deckled Rectangles dies
Heartfelt Hexagon punch
Linen thread
Sequins trio
Foam strips
Adhesives

Friends for Life · Fun Folds · Gifting

Happy Birthday, Friend

Today we’re continuing to explore all the many ways we can use the Friends for Life bundle by Stampin’ Up! to create fabulous projects. I don’t know about you, but I like to have birthday cards of all kinds on hand for those moments when I need to grab a birthday card on the run. And today’s design is a two-for-one — a gift and a beautiful card!

This gift card design is a modified version of the Slide Up Gift Card Holder by fellow demo Jackie Bolhuis over at Klompen Stampers. I simplified the design to have a slide out gift card holder rather than the slide up version Jackie makes, but both are equally as wonderful for providing a lovely way to give a gift card. What I really loved about this design is it offers so much visual interest. From a beautiful card front that serves double duty as the gift card pocket to the ample space on the inside to dress things up, you have plenty of opportunity to express your creativity.

We get started with a base of Pretty in Pink cardstock. The cardstock is halved on the long edge for this design, but rather than scoring in the center, you’ll instead score at 3 3/4-inches and 9 1/4-inches. That gives you a center portion of standard size and then a flip-up flap and smaller bottom flap for the card front. The smaller flap should be adhered to the card base on either side to create the small pocket, which will be visible when the card front is closed. I chose a sheet of the Flowering Zinnias designer paper as the background panel and cut it so that a small border shows on each of the front panels. The fun background image is the large heart from the Friends for Life die set. I cut a Pretty in Pink heart and used the center portion as the background for the Pretty in Pink glimmer hearts. For the glimmer hearts, nestle the leaf heart die inside the large heart die when diecutting. I then used both the outside and inside hearts on top of the Pretty in Pink solid heart. The sentiment panel is diecut from Pretty in Pink using the smudge banner and then the sentiment is stamped tone-on-tone toward one end. The word friend from Friends for Life is stamped in Pretty in Pink on white cardstock and then diecut with the coordinating die. The sentiment is adhered to the card front with dimensionals .Two small hearts are diecut from white glimmer paper and used as eye-catching accents for the sentiment. The card front is finished of with a few In Color shimmer gems.

The inside of the card is finished to coordinate with the card front. The top flip panel has a piece of the Flowering Zinnias designer paper. Two shimmery banners diecut from glimmer paper and cut using the Filled with Fun dies bring festive fun to this top panel. The inside sentiment from Filled with Fun is stamped on white cardstock diecut using the Autumn Leaves dies. TIP: In order to get the banner long enough for the sentiment, you’ll want to use the extension method.

The gift card holder itself is a pocket within a pocket. It’s made two-sided so that the portion visible through the card front disappears into the background. A tug on the Pretty in Pink bordered ribbon reveals the gift holder and the gift card in the pocket on the reverse side. Each side has a piece of the Flowering Zinnias paper to coordinate with the rest of the card, along with a repeat of the happy birthday sentiment. I chose to keep the inside of my card very simple, but you can see where you could really dress it up.

I hope you’ll join me tomorrow for a more masculine inspired design.

Products used in today’s gift card:
Pretty in Pink, Basic White cardstock
Flowering Zinnias, In Color glimmer, White glimmer DSP
Friends for Life, Filled with Fun stamps
Friends for Life, Autumn Leaves, Filled with Fun dies
Pretty in Pink bordered ribbon
In Color shimmer gems, In Color resin dots
Dimensionals
Adhesives

Friends for Life

Hey

We’ve made it to the middle of the week. And here in North Texas, we just might need a boat to get about town. We’ve had so much rain over the last several weeks and just keep getting more. Everything is absolutely soaked and it seems we’re maybe stuck in this wet weather pattern for a while longer. I know we’ll be wishing for this rain come July, but for this brief moment, it wouldn’t be so bad if we had a day or two without it!

But how about some bright and cheery cards to bring us out of our blues? This week, our featured Stampin’ Up! bundle is called Friends for Life. This terrific bundle includes photopolymer stamps and coordinating dies. And today’s card is a clean and simple design that uses a fun technique called die debossing, where we use our dies to both cut and make an impression at the same time. Click here for a brand NEW Terrific Tuesdays video where I show you how it’s done.

We start today’s card with a base of Peach Pie cardstock. I also cut a quarter-sheet of Peach Pie for the debossed background panel. The twig of leaves is diecut from Summer Splash cardstock using the Friends for Life dies. By making a sandwich of Summer Splash, the twig die, and Peach Pie, you are able to cut and deboss at the same time. I trimmed the Peach Pie panel to ensure that a 1/8-inch border of card base shows on each side. Using the Heartfelt Hexagon stamps, stamp the double border on white cardstock in Summer Splash ink. Then stamp “hey” from the Saying Hey set in Summer Splash in the center of the hexagon, making sure you cover the ending punctuation with a piece of tape. Punch your sentiment panel using the Heartfelt Hexagon punch. Once you have determined the placement of your sentiment panel, stamp a small twig of leaves in the blank space of the debossed background panel. Affix the diecut twig using a glue dot. Then affix your hexagonal sentiment panel on top using dimensionals. Finish with Summer Splash In Color resin dots.

This card design is simple to replicate and could easily be adapted for any occasion by simply modifying color scheme and/or sentiment. Have you tried the die debossing technique? What did you think?

Products used in today’s card:
Peach Pie, Summer Splash, Basic White cardstock
Friends for Life stamps & dies
Heartfelt Hexagon stamps & punch
Saying Hey stamps
In Color resin dots
Dimensionals
Adhesives

Friends for Life

Excited For You, Friend

This week we’re exploring all of the wonderful ways we can use the Stampin’ Up! Friends for Life stamps and dies. Do you ever use your stamps to make your own backgrounds? Today, we’re going to do just that.

I was feeling in the summer mood as I chose the color palette for this card, so I chose a trio that reminds me of rainbow sherbet—Peach Pie, Flirty Flamingo, and Coastal Cabana.

We get started with a standard card base of Coastal Cabana cardstock. Our background panel consists of three separate elements—two mats and a stamped background panel. The bottom mat is Flirty Flamingo diecut using the largest Perennial Postage die. The next mat is Peach Pie diecut using the second-largest Deckled Rectangles die. The stamped background panel is white cardstock, which has been stamped on the diagonal using the ink smudge stamp from Friends for Life in an alternating color pattern of Peach Pie, Coastal Cabana, and Flirty Flamingo. This panel is adhered to the card base with dimensionals.

Our focal section is layered with diecuts from Friends for Life. The base consists of Summer Splash and Peach Pie glimmer paper diecut using the smudge banner and adhered directly to the background panel. Next up is the heart diecut from Flirty Flamingo and then another smudge banner. Part of the sentiment is stamped tone-on-tone on the Flirty Flamingo banner. The heart and sentiment banner are adhered with dimensionals. A faux bow of striped iridescent ribbon is twisted behind the sentiment banner for some eye-catching shimmer. The word “friend” is cut from white glimmer paper and also adhered with dimensionals. I finished things off with In Color shimmer gems and a dot for the i using a white transparent dot.

Tune in tomorrow to see how we’re going to use our detail stamps and dies to add some pizzazz to a clean and simple design.

Products used in today’s card:
Coastal Cabana, Flirty Flamingo, Peach Pie, Basic White cardstock
Friends for Life stamps & dies
Perennial Postage, Deckled Rectangles dies
Striped iridescent ribbon
In Color shimmer gems, transparent dots
Dimensionals
Adhesives

Friends for Life

You Are Loved

Happy shiny new week, friends! We had some more crazy, wet weather here over the weekend. So we didn’t get as much time in the great outdoors as we would ordinarily prefer. But we made the most of our sunny breaks with fun family time over the first few days of official summer break.

This week, we will be working with a brand new product bundle from Stampin’ Up! called Friends for Life, which includes photopolymer stamps and coordinating dies. Like so many SU! products, this bundle pairs smashingly well with a whole host of other items in the current catalog.

Today’s card design works with a monochromatic color palette. These 4 shades of blue-green are next to one another on the SU! color wheel. And we pair the Friends for Life bundle with the Leaf Collection and Softly Said stamps to turn out this stunner.

We get started with a base of Lost Lagoon cardstock. The background image panel is a quarter-sheet of Lost Lagoon that is stamped tone-on-tone using the Leaf Collection background stamp. This panel is matted with Pretty Peacock. Both the background panel and the mat are cut down to ensure that a very thin border of the card base is showing once both are adhered to the base.

Next, we diecut our complementary image pieces starting with the Pretty Peacock leaf-print heart from the Friends for Life set. I used both the heart outline and the print together when diecutting this piece. I cut a second heart outline from Pretty Peacock to make the center backing piece for the leaf-print heart. The two sets of leaves from Friends for Life set are diecut from Summer Splash cardstock and adhered behind the heart. A twist of Pretty Peacock & Gold metallic trim add a little sparkle to the focal section of the card.

The sentiment from Softly Said is stamped tone-on-tone on Coastal Cabana cardstock. Each word is then cut out using paper snips. The word “loved” is adhered with dimensionals to the paint smear die from the Friends for Life set that is diecut from Pool Party cardstock, while the other block-cut words are adhered askew over the heart using dimensionals. The design is finished off with a combination of Summer Splash In Color shimmer gems and ombré matte decorative dots.

Tomorrow we will be making our own designer paper using the Friends for Life stamps. I hope you’ll come check it out.

Products used in today’s card:
Pretty Peacock, Lost Lagoon, Coastal Cabana, Pool Party, Summer Splash cardstock
Friends for Life dies
Leaf Collection, Softly Said stamps
Pretty Peacock & gold metallic ribbon
In Color shimmer gems, ombré matte decorative dots
Dimensionals
Adhesives