Changing Leaves · Coming Soon · L2S Group Instahop

Words Fail

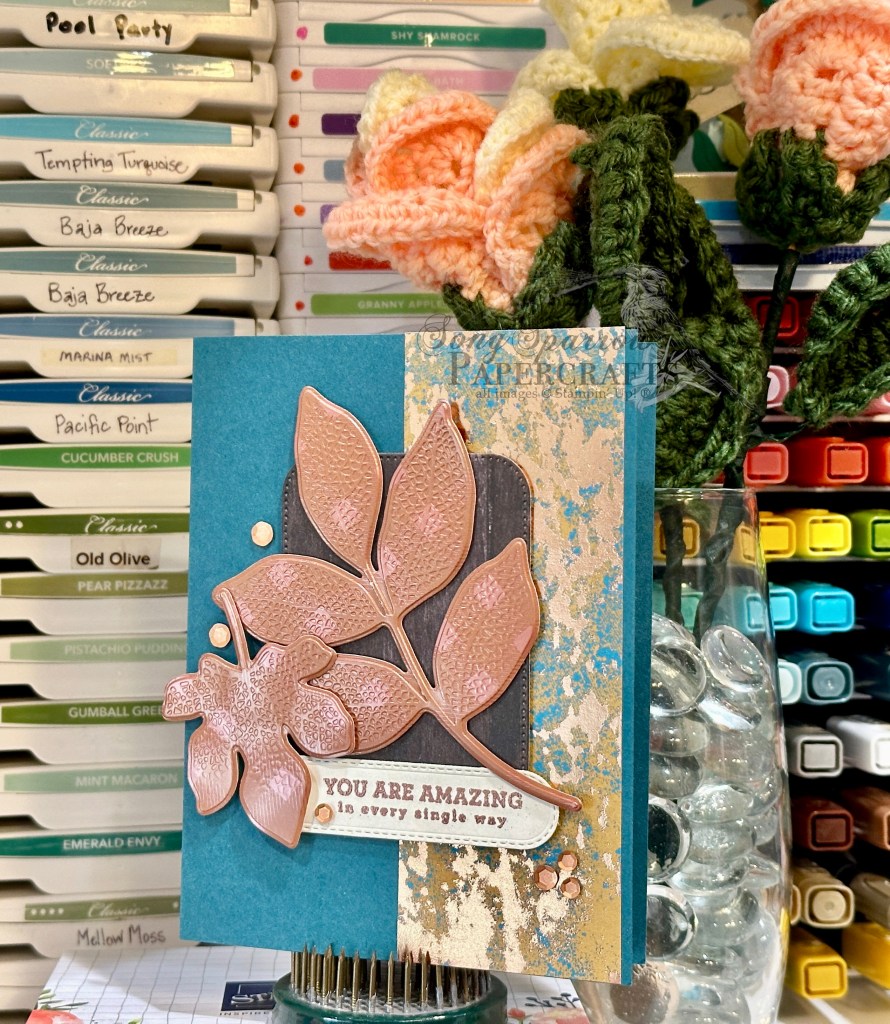
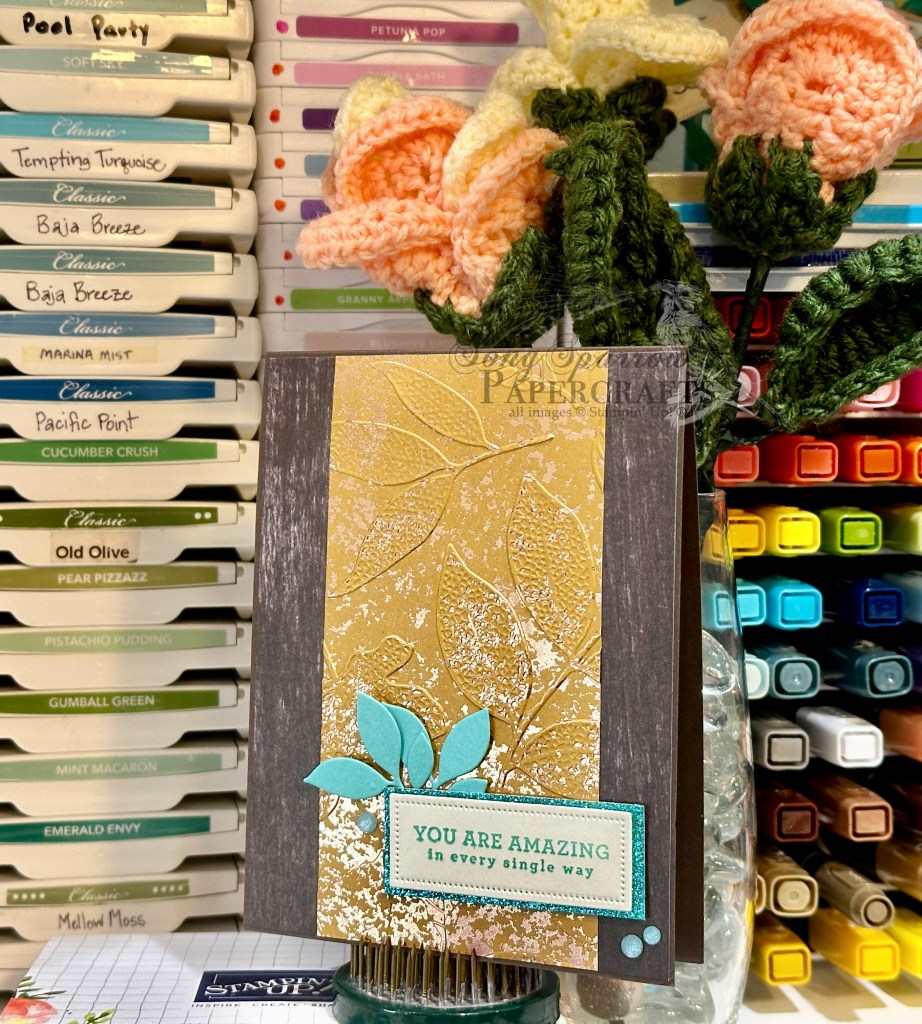
This week we’re taking a sneak peek at the upcoming Online Exclusive by Stampin’ Up! called Changing Leaves. This bundle of products includes a stamp set, dies, and hybrid embossing folder. I love all of the detail included in the images in this set, and I’ve enjoyed thinking outside the box when designing with it. This set, although full of gorgeous fall foliage images, lends itself to all sorts of fun designs that don’t immediately make you think of fall. And today’s card is another example. So let’s get started.

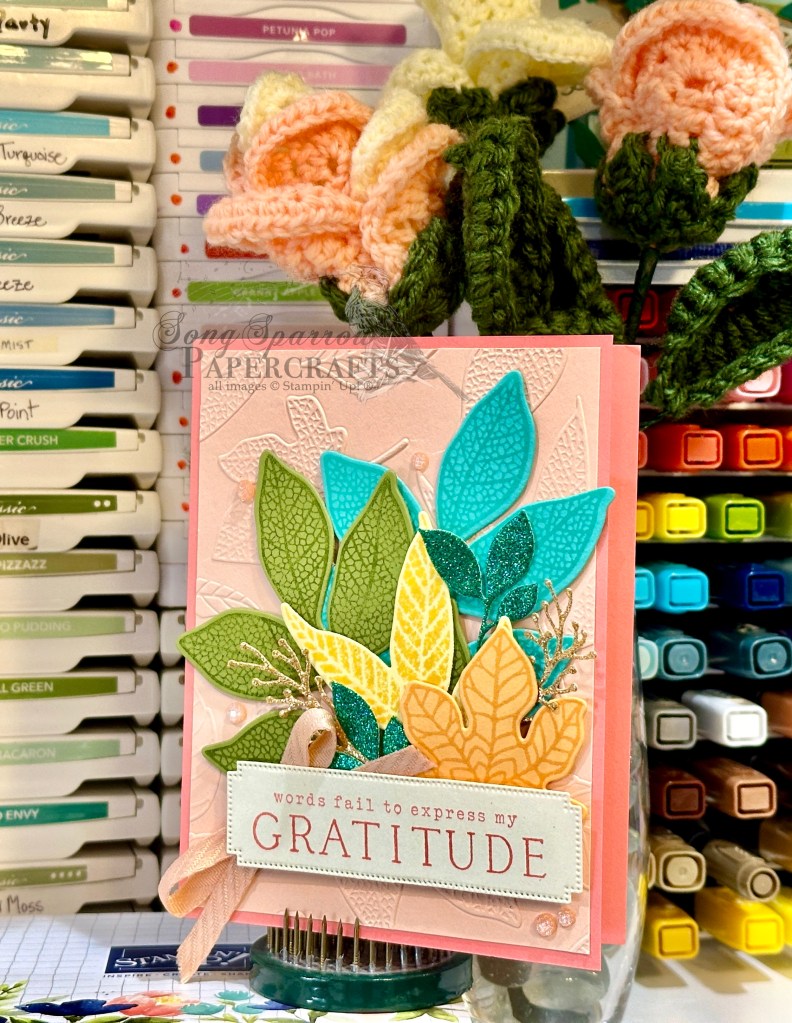
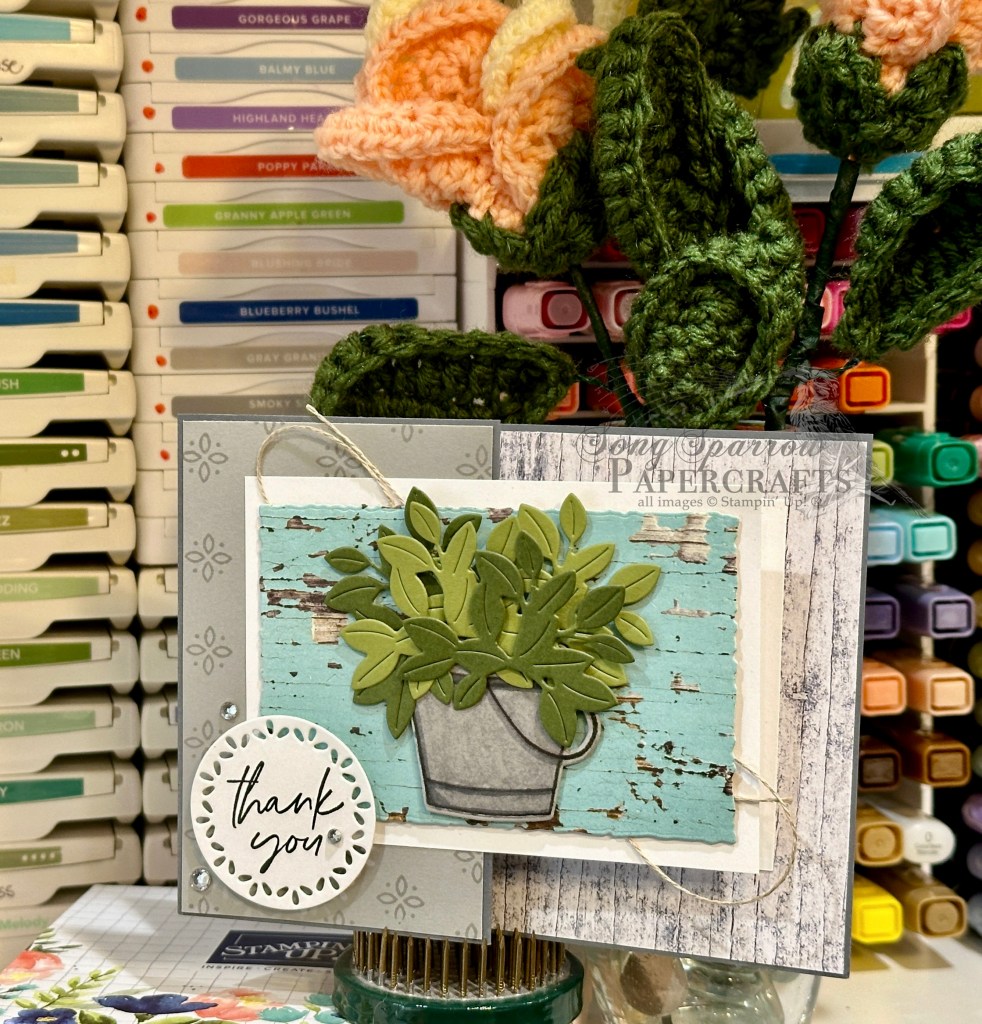
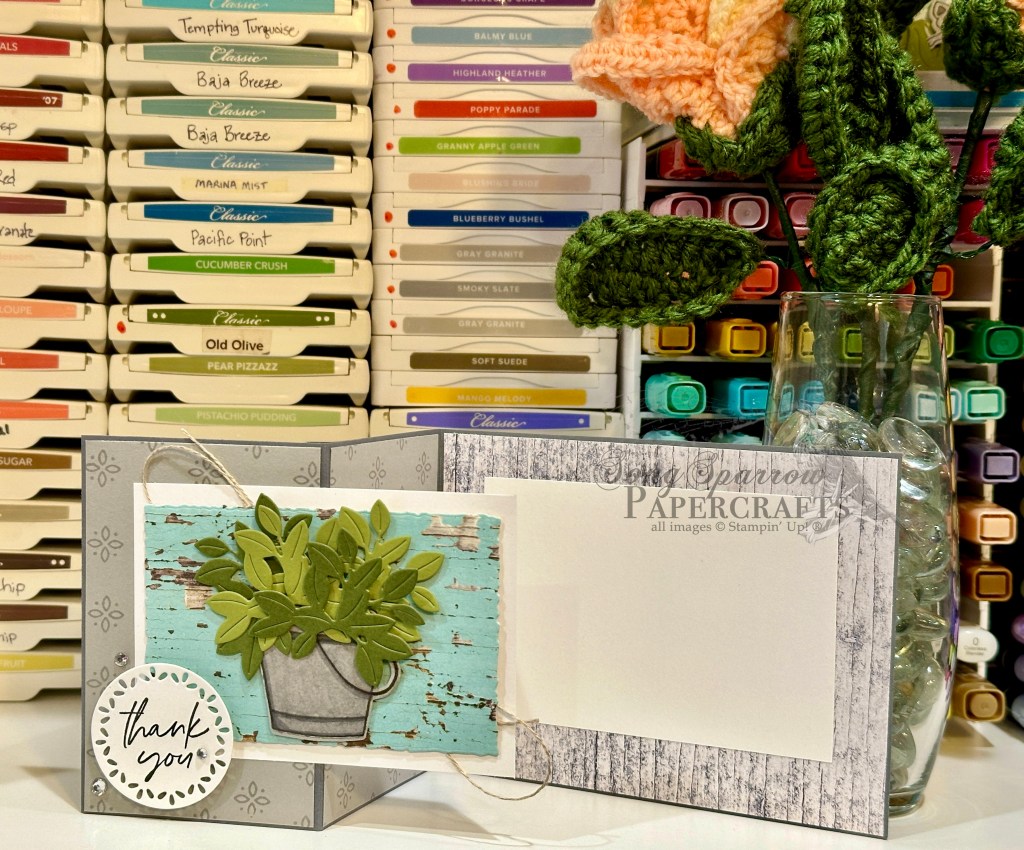
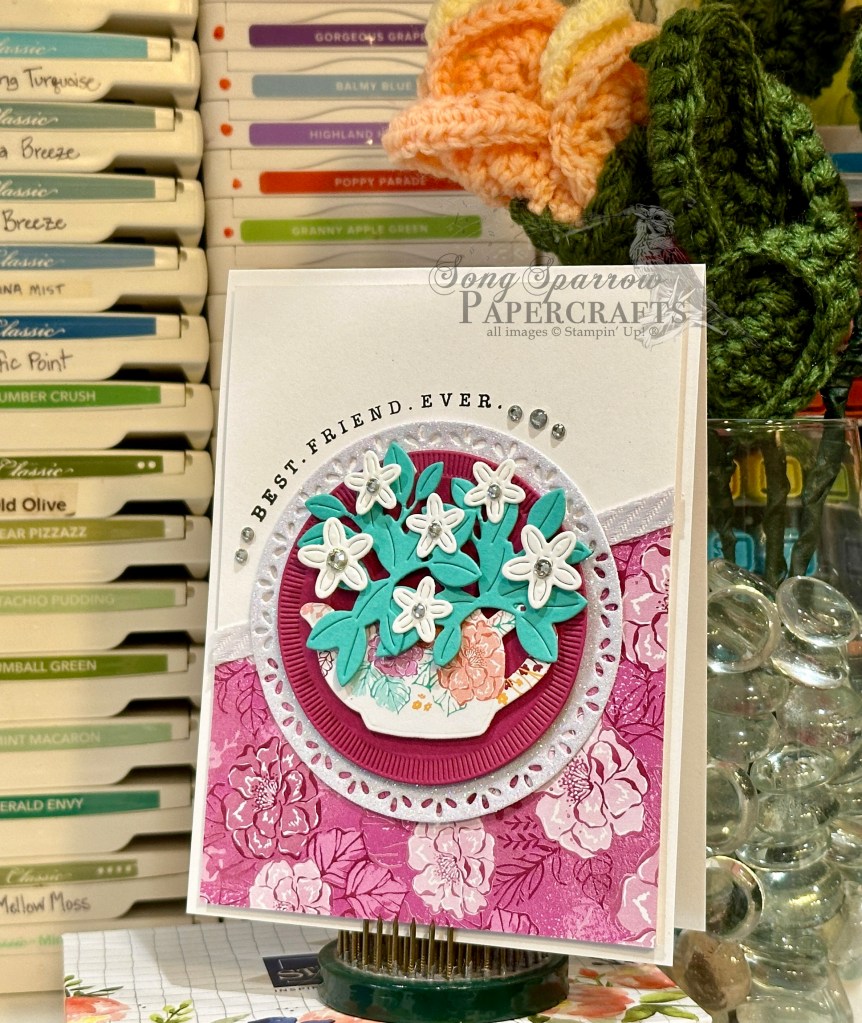
I wanted a light and bright color palette for this thank-you card. I did let Mother Nature do a little of the talking with the choices in leaf color but then I worked to fill in with some fun complimentary colors. Our card begins with a base of Flirty Flamingo cardstock. The background panel is a quarter panel of Petal Pink embossed with the soon-to-release Changing Leaves embossing folder. I cut this panel down a bit to have a nice border of Flirty Flamingo all around. Our focal images are a whole smattering of stamped and diecut leaves from the soon-to-release Changing Leaves stamp set. All of the images are stamped tone-on-tone. Two of the larger leaves are stamped on Old Olive and Summer Splash with the two smaller leaves stamped on Lemon Lolly and Peach Pie. I added a few sparkly elements with the Peach Pie and Summer Splash foliage tucked in the mix. The sentiment from Simply Zinnia is stamped on Very Vanilla cardstock and diecut with the Autumn Leaves die set using the extension method. (For more on using the die extension method, check out this quick tutorial.) I tucked a faux bow of Petal Pink diagonal trim behind the sentiment panel and added a few Peach Pie shimmer gems across the card front for added sparkle.

Today’s card is a part of the Luv 2 Stamp Group Instagram Hop, which goes live at 9 AM Pacific Time (PST). Click here to head over to my Instagram feed and check out what the other demos in our L2S Group have created for you today!

Products used in today’s card:
Flirty Flamingo, Petal Pink, Very Vanilla, Lemon Lolly, Old Olive, Peach Pie, Summer Splash cardstock
In Color Glimmer paper
Changing Leaves stamps, dies, hybrid embossing folder (coming soon)
Autumn Leaves dies
Simply Zinnia stamps
Diagonal trim
In Color shimmer gems
Dimensionals
Adhesives

Product List
Changing Leaves · Coming Soon

Couldn’t Have Done It Without You

It’s hard to believe we’re already halfway through this bright and shiny week. I’m having such a good time working with the brand new Online Exclusive from Stampin’ Up! called Changing Leaves, which releases just one week from TODAY! This new bundle includes a photopolymer stamp set, which happens to be my favorite kind of stamps! And it also includes coordinating dies and a hybrid embossing folder. If you’re not familiar with a hybrid embossing folder, check out yesterday’s blog post where I have a video showing you all about it!

But without further adieu, let’s get to today’s card, shall we? I think the fun thing about any stamp set is finding unique ways to use it. When sitting down with a leaf-themed set, my mind naturally walks down the path to fall. But you know what? You don’t HAVE to make a fall card just because your stamp set has images of leaves. And today’s card does a little thinking outside the box to show you how you can use this gorgeous new bundle of leaf images and make something that doesn’t scream fall.

So we get started with a card base of Summer Splash cardstock. I embossed a full quarter panel of Summer Splash using the soon-to-release Changing Leaves embossing folder and adhered it to the card front. (You could simply emboss the card front itself if you want to lighten up the layers and card weight.) On a quarter sheet of white cardstock, I stamped the Hey sentiment from the Saying Hey stamp set in Summer Splash and then cut the strip with my paper trimmer. On the remaining portion of the white cardstock, I stamped the sentiment from the soon-to-release Changing Leaves stamp set and then punched it out with the Heartfelt Hexagon punch and adhered to the sentiment strip. The full sentiment panel is then adhered to the card front. Using the soon-to-release Changing Leaves dies, I diecut a set of leaves from Shaded Spruce and then a twig from Pretty In Pink shimmer paper. These are adhered to the sentiment panel with glue dots. A bow tied with the white diagonal trim is then adhered on top so tha it looks like a tied greenery bunch. A few Pretty in Pink shimmer gems on either side of the sentiment add a bit of sparkle and draw your eye across the card design.

Isn’t this a super fun design? Swap out colors and sentiments and you can have a quick and easy card for just about any occasion! Tune in tomorrow when we get a closer look at our Changing Leaves stamps. You won’t want to miss it!

Products used in today’s card:
Summer Splash, Shaded Spruce, Basic White cardstock
In Color glimmer paper
Changing Leaves stamps, dies, embossing folder (coming soon)
Saying Hey stamps
Diagonal trim
In Color shimmer gems
Glue dots
Adhesives

Product List
Changing Leaves · Coming Soon

Amazing Leaves

Welcome to another fabulous day and another sneak peek at the new Stampin’ Up! Online Exclusive bundle called Changing Leaves. This brand new bundle is set to launch on July 3rd and includes a set of photopolymer stamps, coordinating dies, and a hybrid embossing folder. Today, we’re taking a closer look at that gorgeous hybrid embossing folder and putting it to work.

We get started with a card base of Pretty Peacock cardstock. A strip of the Pretty Peacock Oxidized Copper designer paper serves as a backdrop for our center focal point. The base of our focal point is a sheet of the Early Espresso woodgrain paper from the Country Woods designer paper pack that has been diecut using the Nested Essentials set and then adhered to the card base using dimensionals. The gorgeous leaves are diecut from a sheet of the Copper Clay Tartan Foil specialty paper using the soon-to-release Changing Leaves hybrid embossing folder, which both cuts and embosses at the same time, and then adhered to the focal panel with dimensionals. The sentiment from the soon-to-release Changing Leaves stamp set is stamped in Versamark on Very Vanilla cardstock and then heat embossed with copper embossing powder. The sentiment is then diecut using the banner die from the soon-to-release Changing Leaves die set. A few copper sequins are scattered across the card front to draw the eye diagonally down the card.

Want to see this beautiful new hybrid embossing folder in action? Check out today’s episode of Terrific Tuesdays and watch this card come together from start to finish:

Need something easy and maybe not so fall-ish? Tune in tomorrow to check out a unique thank-you card. You won’t want to miss it!

Products used in today’s card:
Pretty Peacock, Very Vanilla cardstock
Oxidized Copper, Country Woods, Tartan Foil DSP
Changing Leaves stamps, dies, hybrid embossing folder (coming soon!)
Nested Essentials dies
Copper embossing powder
Neutrals sequins
Dimensionals
Adhesives

Product List
Changing Leaves · Coming Soon

Amazing in Every Way

Welcome to a bright and shiny new week, everyone! This week, we’re going to be taking a sneak peek at a brand NEW Stampin’ Up! Online Exclusive bundle that launches in just a little over a week. Eeek — I’m so excited! The upcoming Online Exclusives release has a little bit of everything, including some holiday items. And all this week, I’ll be showing you the gorgeous Changing Leaves bundle, which includes a set of photopolymer stamps, coordinating dies, and a hybrid embossing folder. So let’s get started!

For today’s design, I wanted to keep things super simple. And in particular, I wanted to highlight the beautiful embossing folder with its detailed leaf prints and a few of the coordinating leaves in the die set.

So we get started with a card base of Early Espresso cardstock. A sheet of the Early Espresso woodgrain pattern from the Country Woods designer series paper pack serves as the backdrop. The center panel is a sheet of the Copper Clay Oxidized Copper specialty paper that has been machine embossed using the soon-to-release Changing Leaves hybrid embossing folder. The sentiment from the soon-to-release Changing Leaves stamp set is stamped in Coastal Cabana on Very Vanilla cardstock and then diecut using the smallest frame from the Everyday Details die set. The sentiment is matted with a piece of the Summer Splash In Color Glimmer Paper and adhered with dimensionals. Two sets of leaves from the soon-to-release Changing Leaves die set have been diecut from Coastal Cabana cardstock and tucked behind the sentiment panel. I finished things off with a few In Color Shimmer Gems.

Like what you see so far? Tune in tomorrow for a closer look at the Changing Leaves hybrid embossing folder!

Products used in today’s card:
Early Espresso, Coastal Cabana, Very Vanilla cardstock
Country Woods, Oxidized Copper, In Color Glimmer DSP
Changing Leaves stamps, dies, hybrid embossing folder (coming soon!)
Everyday Details dies
In Color shimmer gems
Dimensionals
Adhesives

Product List
Botanicals · Clean and Simple · Country Flowers

Bunches of Thanks

This week, we’ve been using the Country Flowers bundle by Stampin’ Up! to make some lovely cards. Today, we’re rounding out the series with a clean and simple design. This is a layout that could be used over again and would work beautifully with a larger floral image, as well.

We get started with a card base of Basic White cardstock. Our focal panel is a pairing of Pretty Peacock and Moody Mauve cardstock. I stamped a repeating floral image in Versamark using the Country Flowers stamp set. The sentiment from Something Fancy is stamped in black on white cardstock and then diecut using the Unbounded Love set, which is then matted with a circle diecut using the Spotlight on Nature set. A pair of faux bows using Pretty Peacock & gold metallic ribbon and iridescent striped ribbon are adhered by the sentiment panel. To draw the eye across the design, I’ve used pink and peacock sequins from the Sequins Trio for some sparkle.

I hope you’ve been inspired by this weeks Country Flowers designs. Tune in next week as I give you a sneak peek at one of my favorite upcoming Online Exclusives bundle set to release on July 3rd!

Products used in today’s card:
Basic White, Pretty Peacock, Moody Mauve cardstock
Country Flowers, Something Fancy stamps
Unbounded Love, Spotlight on Nature dies
Pretty Peacock & gold metallic ribbon, iridescent striped trim
Sequins trio
Dimensionals
Adhesives

Product List
Botanicals · Country Flowers

Best Friend Tea

This week, we’re exploring all of the ways we can use the Country Woods suite by Stampin’ Up! to make beautiful projects. We have focused on the Country Flowers bundle, along with the Country Woods designer series paper. Today, we’re headed to tea.

One of the things that I enjoyed sharing with my grandmother was a love of tea sets. Anytime we found ourselves in a shop with tea sets, whether big or small, we couldn’t help but oooh and aaaah over them. We were most fond of the sets with intricate floral patterns. And that has inspired today’s card design — right down to the designer papers that stand front and center.

We start our card today with a base of white cardstock. The main panel sits on a quarter panel of white cardstock that has been cut a wee bit smaller than the card base itself. The lovely floral pattern from the Unbounded Beauty designer paper pack serves as the backdrop for the focal panel with a top of diagonal trim to draw on the patterns in the paper. The asymmetry of this floral panel really draws the eye up the card to the center focal panel.

Our focal panel begins with a base of white shimmer paper that has been diecut with the Spotlight on Nature dies. The mat for the focal image is Berry Burst cardstock diecut with the radiating circle from Spotlight on Nature die set. Our teapot is diecut from a sheet of the Unbounded Beauty paper pack using the Country Flowers dies. Note the white space at the bottom of the teapot, which gives this patterned vessel a very lifelike feel. The lovely foliage is spilling out the top of the teapot and has been cut from Summer Splash and white cardstock using the greenery and flower dies from Country Flowers with the flower centers being various sizes of rhinestone basic jewels. The sentiment from Country Flowers is stamped around the panel with rhinestones on either side to really draw the eye in.

I really love how this card makes me feel like I’ve sat down at my grandmother’s kitchen table for tea and a chat. It only seemed fitting to have the sentiment reflect friendship. Don’t you just love it?!

Tomorrow we’ll be wrapping up our walk through Country Flowers. I hope you’ll pop in and see how we round things out.

Products used in this card:
Basic White, Summer Splash, Berry Burst cardstock
Unbounded Beauty, white shimmer DSP
Country Flowers stamps & dies
Spotlight on Nature dies
White diagonal trim
Rhinestone basic jewels
Dimensionals
Adhesives

Product List
Botanicals · Country Flowers · Fun Folds

Country Flowers Sympathy

Welcome back, everyone! This week, we’re taking a tour of the country — Country Flowers, that is. We’re making an assortment of cards using products from the Stampin’ Up! Country Woods suite. Today’s card is a fun fold that features the Country Woods paper and Country Flowers bundle.

I really love the Barn Fold and once I discovered a little modification where your designer paper covers the center fold so the card front background looks totally cohesive once closed, I was even more sold on this fun fold! The Country Woods designer paper pack includes a whole host of woodgrain patterns and they come in any number of colors and textures. When I ran across the sheet of Petal Pink woodgrain, I knew it would be perfect for today’s card.

We get started with a card base of Petal Pink cardstock that is cut to open front and center, literally. The sheet of Petal Pink woodgrain serves as our backdrop for the front panel. The focal panel in the center has a base of white woodgrain, also from the Country Woods pack, that is diecut using the Spotlight on Nature set. The sentiment panel is diecut from Petal Pink cardstock with the Autumn Leaves die using the extension method. (You can watch a Terrific Tuesdays video tutorial on the extension method here.) The sentiment from Country Flowers is heat embossed in copper. Behind the sentiment panel are layers of iridescent striped ribbon and Petal Pink diagonal trim. And then nestled behind and around the sentiment are flowers and greenery that have been stamped or diecut using the Country Flowers bundle. I used Stampin’ Blends to color the flower bunches, and the greenery is diecut from Soft Sea Foam cardstock. Layers of dimensionals give the center focal panel lots of depth. The design is finished off with Petal Pink foiled gems scattered across the card front to draw the eye up and across the design.

With a simple sentiment substitution, you could easily make this a birthday or wedding design, or even a thinking of you. The possibilities are only limited by what’s in your stash!

Tomorrow, how about some tea? Stop in and join me for a cuppa — with some flowers, of course!

Products used in today’s card:
Petal Pink, Soft Sea Foam, Basic White cardstock
Country Woods DSP
Country Flowers stamps & dies
Spotlight on Nature dies
Copper embossing powder
Stampin’ Blends
Iridescent striped ribbon, Petal Pink diagonal trim
Petal Pink foiled gems
Dimensionals
Adhesives

Botanicals · Country Flowers · Fun Folds

Buckets of Thanks

This week, we are looking at all the ways we can use parts of the Stampin’ Up! suite of products called Country Woods. In particular, we’ve been focusing on the Country Flowers bundle, which includes stamps and coordinating dies, and the Country Woods designer series paper. Today, we continue with a brand new fun fold design.

Today’s fun fold is called the Front Panel Z-fold. What I love about this particular fun fold is that you can make it as simple or as complicated as you want. For this card design, I went somewhere in the middle. This design requires a little fussy stamping and some die cutting but all-in-all comes together pretty quickly once you get the hang of it. You can download the full PDF tutorial for today’s card, which includes a complete materials list and measurements, by clicking here. But for now, let’s take a closer look at how this card comes together.

Our card front consists of the smaller panels of the Z fold. Using the small detail stamp from the Country Flowers stamp set, we stamp a repeating pattern tone-on-tone on Smoky Slate cardstock. I chose a very symmetrical pattern and used a sheet of grid paper along with grid lines on my stamp block to accomplish this. This stamped panel is then cut into two smaller panels that are just a tick smaller than the card base. We cut a second quarter panel of white cardstock to make an identical sized mat that is adhered on the outermost fold to precisely overlay the inside message panel.

We start with a card base of Basic Gray cardstock. Our card base is of standard size and scored to give us our Z panel. The full-sized panel is our inside message panel, while our Z fold serves to give us a look inside with the overlapping front focal panel. For the inside panel, we cut a sheet of the gray woodgrain panel just a little smaller. The inside message panel is a quarter sheet of white cardstock that has been cut to size and then adhered to the center of the woodgrain panel. Be sure you only adhere to the outermost small panel so that your card will open. Next, we diecut a piece of the Pool Party woodgrain pattern from the Country Woods paper pack using the Deckled Rectangles die set. Using a glue dot, a faux bow is adhered diagonally across the front white mat and then the Deckled Rectangle piece is adhered over it using dimensionals. Using the Country Flowers stamps, stamp a bucket in black ink on Smoky Slate. I used Stampin’ Blends to provide shading and shadowing to the bucket, then diecut the bucket using the coordinating die from the Country Flowers die set. The greenery is cut from Old Olive and Mossy Meadow cardstock using the die from Country Flowers. The bucket and greenery are adhered with layers of dimensionals to give realistic visual planes. The sentiment from Something Fancy is stamped in black on white cardstock and then diecut using the Spotlight on Nature die set. The sentiment is adhered over the corner of the image panel using dimensionals. To draw the eye to the sentiment, rhinestone basic jewels are placed in a triangle around the sentiment panel.

Want to watch how this card comes together? You can watch the full episode of this week’s Terrific Tuesdays where we walk through the making of this card:

Tune in tomorrow for another fun fold design that showcases the beautiful greenery in the Country Flowers bundle. You want want to miss it!

Products used in today’s card:
Basic Gray, Smoky Slate, Old Olive, Mossy Meadow, Basic White cardstock
Country Woods DSP
Country Flowers stamps & dies
Something Fancy stamps
Deckled Rectangles, Spotlight on Nature dies
Stampin’ Blends
Linen thread
Rhinestone basic jewels
Dimensionals
Adhesives

Botanicals · Country Flowers · sketches

Buckets of Birthday Flowers

This week, we’re using portions of the Stampin’ Up! Country Woods suite to make all sorts of lovely card designs. We’re also using inspiration from fellow crafters as a jumpstart for our designs. Today, we’re taking a sketch from my sketchbook as inspiration for our layout.

When I see card layouts I really love, I try to make a quick sketch or save a photo of the inspiration card. There are many times that I love a card and immediately think of stamps and dies in my own stash that will work with that layout. Great layouts are like that — they can be used over and over and give you completely different looks based on the products you use.

For today’s card, we get started with a card base of Blackberry Bliss cardstock. The background panel consists of two layers. The mat is Pretty in Pink and the foreground is a piece of Moody Mauve that has been machine embossed using the Eyelet embossing folder. The focal panel base is a piece of the lighter grey woodgrain pattern from the Country Woods designer paper pack that has been diecut using one of the larger Spotlight on Nature circles. The milk tin and floral bunches from Country Flowers have been stamped on white cardstock and then colored with Stampin’ Blends. The tin and flowers are adhered to the focal panel with dimensionals with the florals just a smidge higher than the tin they are resting in. A bow of striped iridescent ribbon sits just underneath the flowers at the top of the tin. The sentiment from Something Fancy is heat embossed in white on black cardstock and then cut into a thin strip with the paper trimmer. A few Berry Burst sequins from the sequins trio are placed to draw the eye across the design.

Pop in tomorrow to see what else we do with the Country Flowers.

Products used in today’s design:
Blackberry Bliss, Pretty in Pink, Moody Mauve, Basic Black, Basic White cardstock
Country Woods DSP
Country Flowers stamps & dies
Spotlight on Nature dies
Something Fancy stamps
Embossing powder
Striped iridescent ribbon
Sequins trio
Dimensionals
Adhesives

Botanicals · Country Flowers

Flower Market Love

This week, we’re taking a closer look at a portion of the Country Woods suite by Stampin’ Up! In particular, we’ll be focusing on the Country Flowers bundle, which includes photopolymer stamps and coordinating dies, and the Country Woods designer series paper. There is so much to love about this suite of products, but what really drew me was the feeling of a slow, summer afternoon swinging on the porch, which is how I felt when I first saw the images and papers. Perhaps it’s because I grew up in the country, and the milk tin and flowers and woodgrains all had that country feel to them. But whether you like a rustic, country feel or not, these products are — like everything Stampin’ Up! designs — so very versatile and lend themselves to all sorts of styles.

Today, I’m borrowing a design from fellow demo Susan Wong. I love how she used the woodgrain paper to “build” a door and then how she stacked the milk tin full of flowers in front. I don’t happen to have the Country Lace designer paper, but I made my own patterned sheet to mimic the sheet in the inspiration layout by stamping a repeating pattern using the small detail stamp, and I think it turned out to be an okay substitution.

So we get started with a card base of Smoky Slate cardstock. The background panel, as I mentioned, is a hand-stamped pattern using Smoky Slate ink and the small detail stamp from the Country Flowers stamp set. I decided to use the darker blue woodgrain sheet from the Country Woods paper pack to make the door. For the milk bucket, I decided to use one of the lighter woodgrain patterns from the DSP pack and stamped the image on top in Basic Gray ink, adding a handle with a Stampin’ Blend. I used some leftover scraps of Meandering Meadow designer paper to cut the leaves and flowers and then used rainbow dots for the flower centers. The flower market sign on the door is made using a small die from the Unbounded Love die set and the sentiment from Country Flowers. A small piece of linen thread and a metallic gem serve as the hanger. The sentiment from Country Flowers is stamped on white cardstock and then cut with paper snips. Two rhinestones help draw the eye to the sentiment.

It’s so fun bringing inspiration designs to life. And this week, we’re going to be doing just that. I hope you’ll tag along with me as we make a whole array of beautiful cards with Country Flowers.

Products used in today’s card:
Smoky Slate, Crumb Cake, Basic White cardstock
Country Woods, Meandering Meadow DSP
Country Flowers stamps & dies
Unbounded Love dies
Linen thread
Metallic gems, rainbow dots, rhinestone jewels
Dimensionals
Adhesives