Happy Saturday, friends! It’s been a busy day here as we’ve made preparations for our first deep cold snap of the season. And in true Texas fashion, that means that today was hot and sunny! *snicker*
Today we’re rounding out our trekking through the outdoors series. And what a fun opportunity to make another card combining old and new with Nests of Winter, Elegant Pine Snowflakes, and Words of Beauty.
We start with a sheet of Pretty Peacock as our card base. A sheet of the Elegant Pine Snowflakes is the perfect backdrop for our tufted titmouse pair from the Nests of Winter paper pack. Circles of Regal Distressed Patterns and Earthen Tone Metallic help our feathered friends really shine. The circles are cut with the Spotlight on Nature dies and then the birds are adhered on top with dimensionals. The sentiment from Words of Beauty are heat embossed in copper on white paper and then cut with the banner die from the coordinating die set. The sentiment panel is adhered over Pretty Peacock and gold ribbon with dimensionals. And we finish things off with a touch of copper sparkle with the drusy embellishments across the front.
Next we’re going to be in thankful mode before turning our thoughts to the Christmas holidays. I hope you’ll drop by and see all the ways you can share thankfulness next week!
Howdy, friends, and welcome in! Today is an exciting day. It’s new product release day! Have you checked out all of the new Online Exclusive items in my store? So much good stuff there!
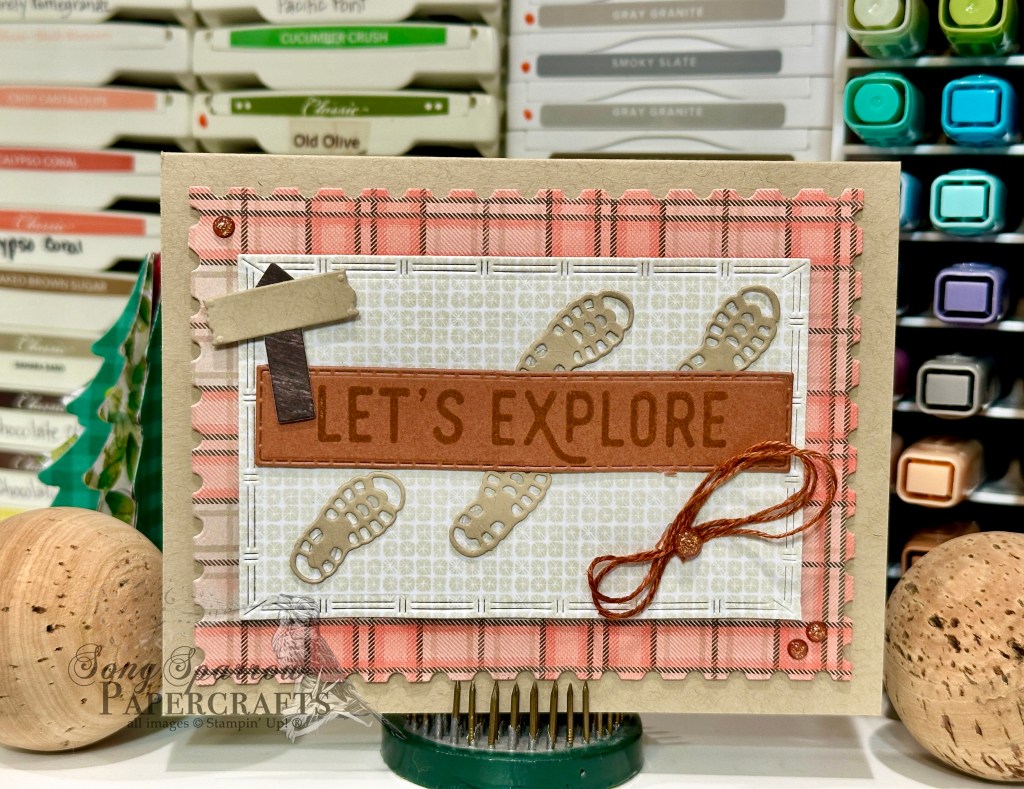
As we continue our trek through the woods this week, we’re getting another peek at a *new* bundle of products — the Outdoor Adventure stamps & dies. We’re pairing up this new set of products with the Timeless Plaid paper to create a fun masculine design.
We get started with a base of Crumb Cake cardstock. Our backdrop is a sheet of the Timeless Plaid paper cut with the largest Perennial Postage die. The focal panel is a sheet of the Gathering Together paper cut with the Textured Notes dies. The two panels are adhered to our card base with dimensionals. We create our trekking footprints with Crumb Cake cardstock and the Outdoor Adventure footprint dies. They’re adhered to our focal panel with glue dots. The sentiment panel is a sheet of Cajun Craze on which we stamp our sentiment from the Outdoor Adventure stamp set in Cajun Craze ink and then diecut with the Textured Notes dies before adhering over our footprints with dimensionals. I used a twist of Cajun Craze linen thread to create a bundle of climbing rope that is adhered in the bottom-right corner of our focal panel. The sign post is created with a combination of Crumb Cake and Country Woods papers using the Outdoor Adventure dies and then adhered to our focal panel with dimensionals. A few Cajun Craze & gold dots finish things off with a touch of sparkly interest.
I hope you’ll pop in tomorrow to see what else some of the new SU! Online Exclusives can lend to our trek through the woods!
Happy Monday, crafty friends! It was a busy weekend here in the studio as I worked furiously all weekend to make Christmas-themed product for an upcoming craft show. While I made a lot of progress, I still have quite a ways to go to be fully prepared for a Christmas market. Eeek!
But I digress. This week, we’re on to a new design theme, and I thought we would continue to hang out in the woods this week. The fun thing about a general theme is that we get a lot of freedom to pull all kinds of things from our crafty stash. *grin* And I’ll be sneaking in some of the new Online Exclusives that I snagged in my preorder.
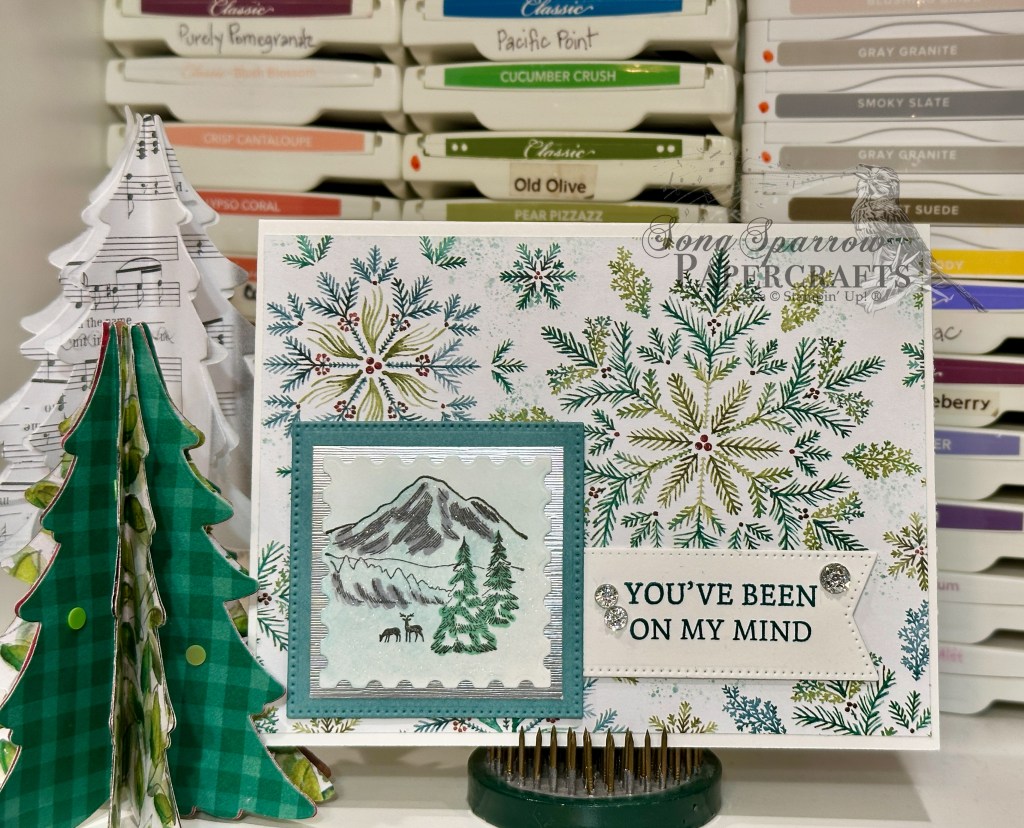
So today we’re getting started with a sketch. When I saw the Freshly Made Sketches #709, I knew exactly what I wanted to pair together — the new Winter Scenes stamp set, the Elegant Pine Snowflakes paper, and the brand new Words of Beauty stamp set (releasing tomorrow!).
I kept things super simple with today’s color palette. We get started with a base of Basic White cardstock. The sheet of white snowflakes from the Elegant Pine Snowflakes pack serves as our backdrop. Our focal panel starts with the mountain scene from the Winter Scenes stamp set on a postage stamp of white cardstock cut with the smaller square from the Perennial Postage die set. I did some light shading with Stampin’ Blends to add a touch of color to the scene and covered the scene with Wink of Stella for the perfect snowy twinkle. This scene is matted with some silver brushed silver and a square of Lost Lagoon cut with one of the smaller squares from the Stylish Shapes die set. The sentiment panel is a smaller banner cut from white cardstock using the Stylish Shapes dies. The sentiment from the *new* Words of Beauty stamp set is stamped in Pretty Peacock and then flanked with some silver drusy embellishments before being adhered on the back of the winter mountain scene panel. The full panel is adhered in the bottom-left corner with dimensionals.
Super simple but oh-so stunning, don’t you think? I hope you’ll tune in tomorrow to see where our trek in the woods takes us!
Happy rainy Saturday, crafty friends. Here in N. Texas, it’s the perfect day to spend in the craft room as we sit and enjoy a cup of tea while listening to the pitter-patter of the raindrops falling and soft (or not-so-soft) rumbles of thunder.
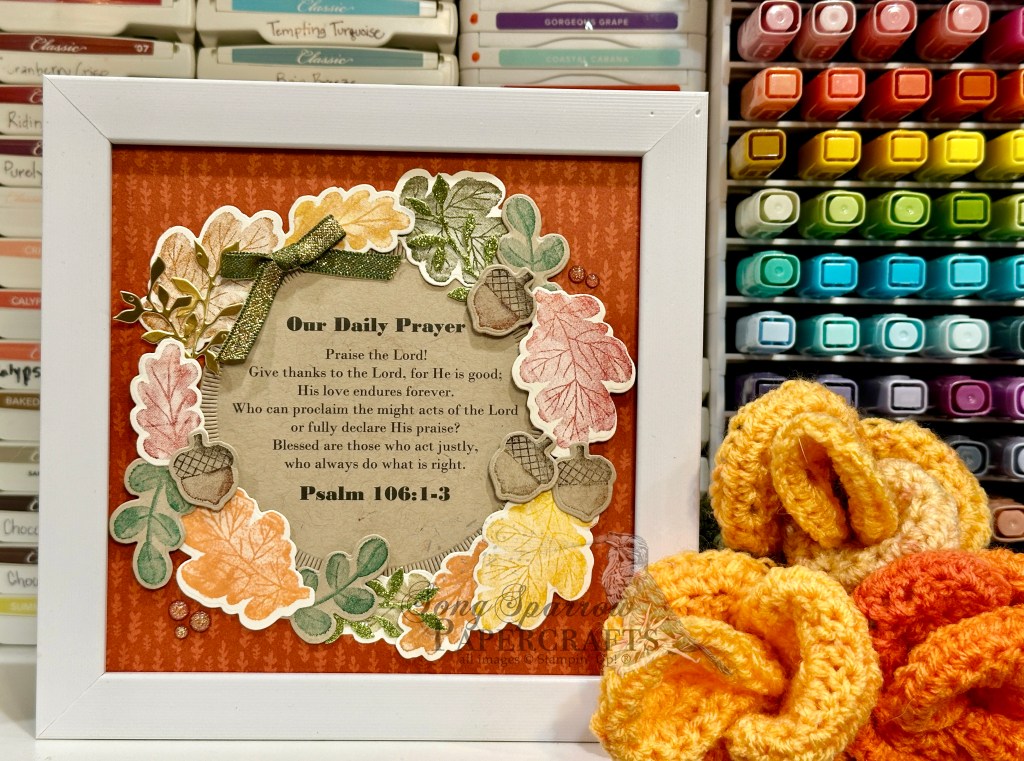
We’re rounding out our design series this week which has featured sneak peeks of upcoming Online Exclusive releases of Gathering Together and Beautiful Pumpkins that will be live in my shop on Tuesday! Today, we’re using the Gathering Together suite to create a lovely home decor project. If you’ve followed me for any length of time, you have maybe seen a post or two here and there about our family table prayers. And today’s featured project is a fall refresh for our framed prayer.
I’m continuing to use the 6×6 tabletop frame I bought off Amazon. I used a sheet of the Gathering Together patterned paper as the backdrop and cut it down to 6×6 to fit in the frame. Everything gets started with the selected scripture we’re using as the prayer. I used my computer to type it up and print it onto Crumb Cake cardstock and then cut it out using the Spotlight on Nature dies. It’s adhered in the center with dimensionals. Using the Gathering Moments stamps, I stamped both large and small leaves in a variety of colors onto Very Vanilla cardstock and then used the coordinating dies to cut them out. I also stamped some fronds of greenery and acorns onto Crumb Cake cardstock then diecut them with the coordinating dies from Gathering Moments set. I arranged these around the circular sentiment panel to create a wreath and adhered them all at varying heights with a combination of tear-n-tape and dimensionals. For some pops of sparkle, I cut some leafy fronds from gold foil paper and Old Olive glimmer paper using the Peace on Earth dies (another Tuesday release) and tucked them in and around the fall foliage wreath. I added a small bow of Mossy Meadow & Gold ribbon at the top and finished things off with a few Cajun Craze foil dots.
What do you think? All in all, this comes together really quickly. It’s really striking in person, and I’m super pleased with how this turned out. I think I’m going to make a few more to display in my booth at an upcoming craft show.
Next week, we’re going to jump ahead just a little and have a Christmas sneak peek as I show you some fabulous goodies that will be available to you in Tuesday’s release. I hope you’ll drop in and see what’s in store!
Products used in today’s project: 6×6 frame Very Vanilla, Crumb Cake cardstock Gathering Together (coming Tues), Old Olive glimmer (retired), gold foil DSP Gathering Moments stamps & dies (coming Tues) Peace on Earth (coming Tues), Spotlight on Nature dies Mossy Meadow & gold ribbon Cajun Craze foil dots (coming Tues) Dimensionals Adhesives
Happy Friday, everybody! I’m super excited to be (legitimately) wearing long sleeves & pants today as we’ve had our first major cool front of the season push through here in N. Texas. We’re not expected to get out of the 80s today. And if you’re at all familiar with Texas in August, well, this is quite a treat!
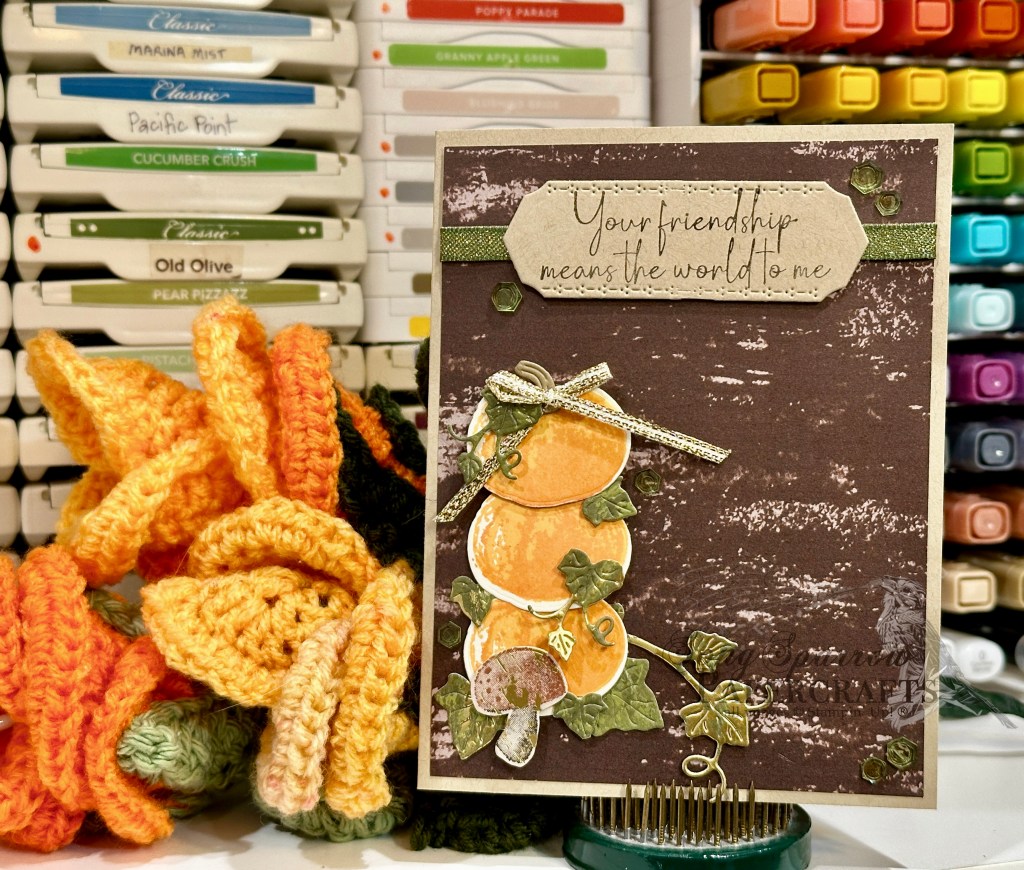
It’s definitely feeling like fall here which makes this week’s card theme all the more apropos. We’re working with the new Online Exclusive suite by Stampin’ Up! called Gathering Together. And once again, we’re pairing it up with the new Beautiful Pumpkins bundle to create a fun fall card design. All of the new products are set to drop on Tuesday, and everything is really and truly a must see!
Today’s card gets started with a base of Crumb Cake cardstock. I chose a sheet of the woodgrain pattern from the Gathering Together paper pack as the background for this design. The Beautiful Pumpkins stamps and dies create our focal image section. The pumpkins are stamped on Very Vanilla cardstock and cut with the coordinating dies. I decided to the use the Season of Elegance sheet for the vines and leaves because I loved the little touch of shimmery gold peeking out between the stacked pumpkins. The stem is cut from Crumb Cake and a lovely bow of gold trim sits atop the heap of gourds. Just for funsies, I added a mushroom from the Gathering Moments bundle that I had leftover from earlier this week to add a fun and whimsical detail at the bottom of the tower. The sentiment from Beautiful Pumpkins is stamped on Crumb Cake and diecut with the Mixed Labels die using the extension method. It sits atop some Mossy Meadow & Gold ribbon, which helps tie all of our focal elements together. We finish things off with some Shades of Green hexagons.
Tomorrow we’ll be finishing off this week’s series of sneak peeks at the upcoming fall products release. I hope you’ll drop in and see how we finish things off….it’s sure to be a showstopper!
Products used in today’s card: Crumb Cake, Very Vanilla cardstock Gathering Together (coming Tues), Season of Elegance DSP Beautiful Pumpkins bundle (coming Tues) Gathering Moments bundle (coming Tues) Mossy Meadow & Gold ribbon, gold trim Shades of Green hexagons Dimensionals Adhesives
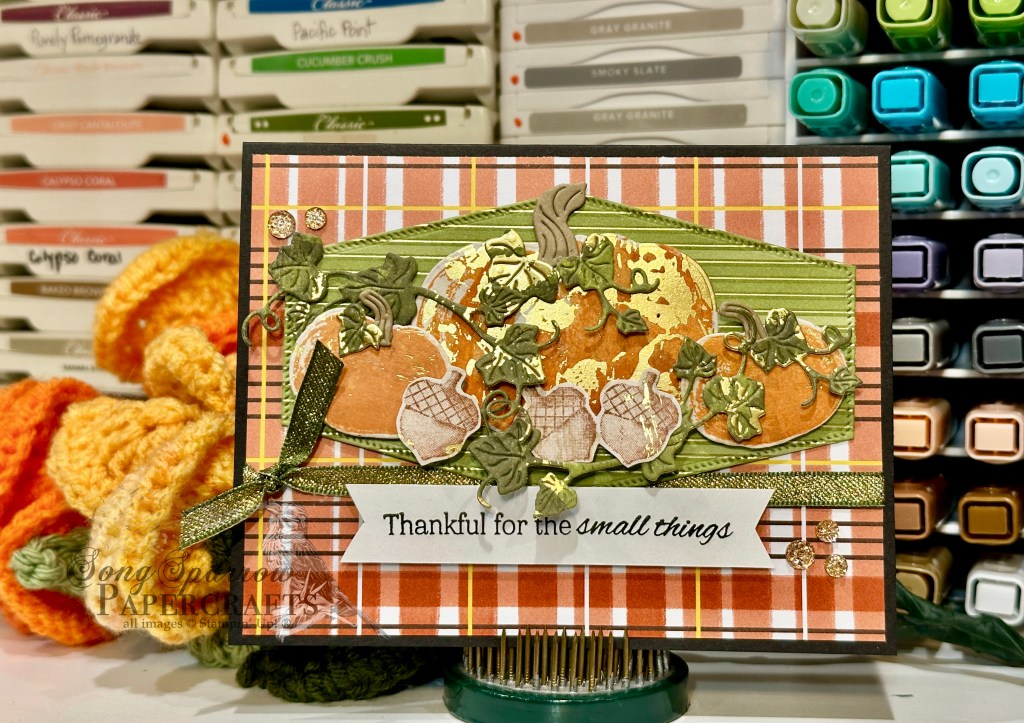
This week, we’re getting a closer look at the new Online Exclusive suite called Gathering Together that will release next week. Aside from being a combination of beautiful products that stand just fine all by themselves, they also pair up beautifully with other products in the SU! lineup. And today we’re getting a second sneak peek as we pair up Gathering Together with the new OE bundle called Beautiful Pumpkins.
I think I mentioned yesterday that I’m really in love with the foiled paper in the Gathering Together patterned paper pack. Today I’m showing you one of the non-foiled, reverse-side patterns which serves as the backdrop for this design. But I couldn’t just abandon the sheen of the foiled paper altogether. I used a sheet of the vanilla Season of Elegance foiled paper to stamp and diecut all of my focal panel images. I just love the look! One tip: let the ink dry before diecutting or you’ll end up with ink in interesting places! *wink and ugh* To speed things up, I used my heat gun.
We get started with a base of Basic Black cardstock. This pulls out the small black pinstriping in the background panel quite nicely. I tied some Mossy Meadow & Gold ribbon around the bottom of the panel before adhering to the card front. Our focal panel is a sheet of the foiled Gathering Together paper and is cut using the Nested Essentials dies. Using the Beautiful Pumpkins stamps, I stamped the pumpkins and acorns on the vanilla sheet of Season of Elegance paper, and I made sure to include some of the foiling in each of the stamped images. I used the coordinating dies to cut them out. I cut the pumpkin stems from Crumb Cake cardstock and the pumpkin leaves from a sheet of the Old Olive Season of Elegance paper. They’re all adhered to the pinstriped backdrop using different layers of dimensionals to create lots of depth in the scene. The sentiment from the Beautiful Pumpkins set is stamped on a strip of white cardstock, and I snipped the ends to create a banner. It’s adhered under the focal panel with dimensionals. I added some gold drusy embellishments in opposing corners to draw the eye across the panel.
Today’s card is a part of the Luv 2 Stamp Group Instagram Hop, which goes live at 9 AM Pacific Time (PST). Click here to head over to my Instagram feed at 9 AM Pacific/11 AM Central and check out what the other demos in our L2S Group have created for you today!
Products used in today’s card: Basic Black, Basic White, Crumb Cake cardstock Gathering Together (coming next week) , Season of Elegance DSP Beautiful Pumpkins stamps & dies (coming next week) Nested Essentials dies Mossy Meadow & gold ribbon Drusy embellishments Dimensionals Adhesives
We’re already halfway through this wonderful week and quickly headed for our long weekend. Do you have any special plans for the Labor Day holiday weekend? I’m hoping that the first significant cold front makes its way in as promised because I have some yardwork I’d really like to get done.
And speaking of yards, once fall arrives, they’ll be adorned with beautiful fall foliage. And this week is all about the foliage as we get an in-depth sneak peek at the upcoming Online Exclusive release called Gathering Together. Today we’re using more of the beautiful paper and the stamp set included in this suite to create a clean and simple Z-fold card. You guys, I’m just in love with this foiled patterned paper. Not into anything sparkly on your patterned paper? The back of each sheet is sans foiling so you get the best of both worlds in this pack of beautiful patterns!
Today’s fun fold gets started with a base of Cajun Craze cardstock, which creates our Z-shaped base. I chose a sheet of the Gathering Together patterned paper with a more subtle background to serve as the background on each of the panels. A sheet of the foiled fall foliage with berries and mushrooms is the backdrop of our focal panel which is cut using the Textured Notes dies. To pull out the lovely shades of yellow amongst the foliage, I chose Crushed Curry as the mat for this panel. The sentiment from Gathering Moments is stamped on Very Vanilla and I also stamped a few acorns in the background for some visual interest and to make the sentiment panel and background panel feel more cohesive. The sentiment is diecut using the Traditional Labels banner die and then adhered over some gold linen thread using dimensionals. I finished things off with a touch of extra sparkle with some Cajun Craze & gold dots in opposing corners.
Of all the fun folds, I really love Z-folds because they pack an amazing punch with very little extra work! And this particular layout with the larger overlapping front panel is a terrific way to show off beautiful patterned paper.
Tune in tomorrow for another fabulous fall-themed sneak peek. We’re going to be pairing up the Gathering Together suite with another new release product. You don’t want to miss this one!
Products used in today’s card: Cajun Craze, Crushed Curry, Very Vanilla cardstock Gathering Together DSP (coming next week) Gathering Moments stamps (coming next week) Traditional Labels (coming next week), Textured Notes dies Gold thread (retired) Cajun Craze & gold dots (coming next week) Dimensionals Adhesives
This week is all about fall. I heard on the radio yesterday that we’re just about 6 weeks from fall. And fall just happens to be my favorite season of the year. So naturally, I was pretty thrilled to hear that it’s just around the corner. Annnnnd we’re supposed to get a fall-like front moving through our area this weekend, so we’ll get a little preview of the wonderful fall weather we have to look forward to!
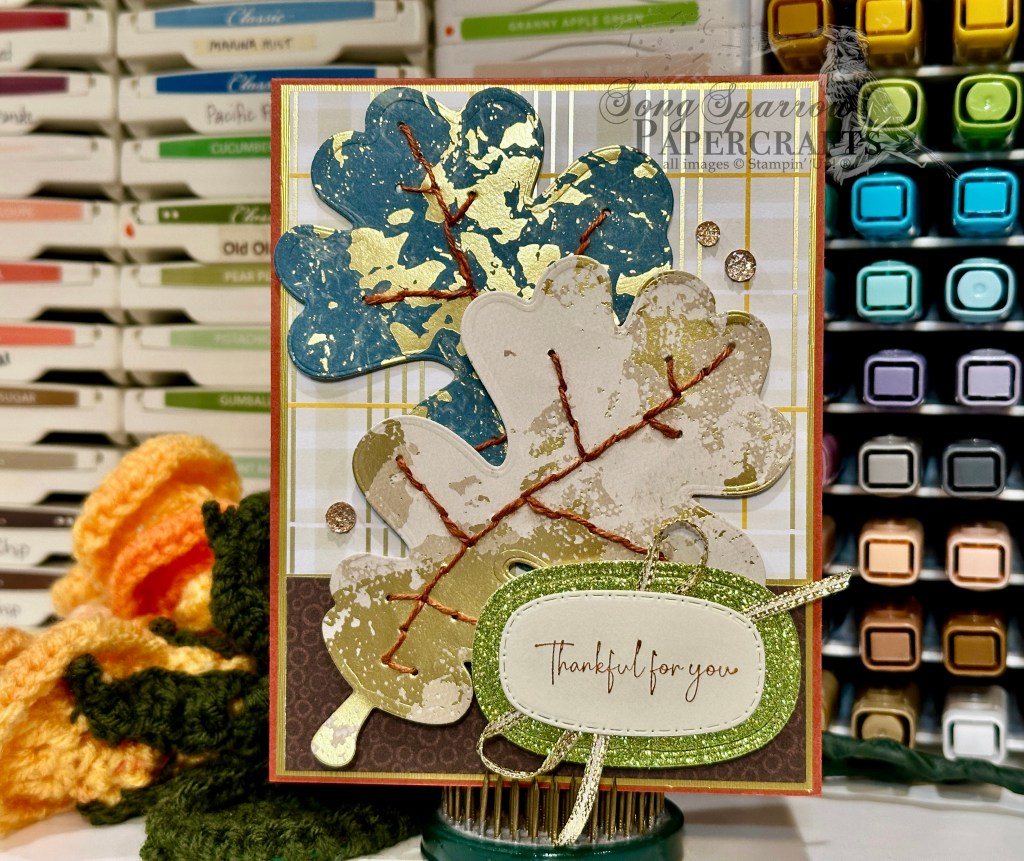
Our featured design product this week is the new Online Exclusive suite by Stampin’ Up! called Gathering Together. And today the diecuts are taking center stage. The fun thing about the large-scale dies in this bundle is the detail die that allows you to add the ribbing to the leaves. In this case, I chose to stitch the ribbing with linen thread, but you could just as easily use a marker to fill in the details or even use a fine-tip Versamark pen and heat emboss. The possibilities are endless!
Our card today gets started with a base of Cajun Craze cardstock. I used a sheet of the foiled plaid as the backdrop for the focal images. The reverse side of the foiled plaid made the perfect detailing at the bottom of the focal panel. And I used a sheet of brushed gold foil to mat the focal panel to add an extra bit of glimmering gold in the background. I used the oak leaf die from the Gathering Moments set to cut two leaves – one from Pretty Peacock and one from Very Vanilla Season of Elegance sheets. I love the look of the gold-foiled leaves. The detail die adds the stitch lines that are then filled in with Cajun Craze linen thread. You could use any color thicker thread you have on hand or simply fill in with a matching marker. The leaves are adhered to the card front with dimensionals. The sentiment from Gathering Moments is stamped on Very Vanilla and die cut using the smaller Traditional Labels die and then a sheet of Old Olive Festive glimmer paper serves as the mat. The sentiment is adhered over a bow of gold trim and then placed in the bottom right corner of the card front and adhered with several layers of dimensionals to ensure it sits proud above the leaves. For a little extra sparkled, I added a few drusy embellishments to draw the eye down and across the center of the panel and down to the sentiment.
Tune in tomorrow to see how we can use this suite to create a fun fold design.
Products used in today’s card: Cajun Craze, Very Vanilla cardstock Season of Elegance, Festive glimmer paper (retired), Brushed gold foil, Gathering Together (coming next week) DSP Gathering Moments stamps & dies (coming next week) Traditional Labels dies (coming next week) Cajun Craze linen thread (retired), gold trim Drusy embellishments Dimensionals Adhesives
It’s another bright & shiny week. Are you ready for it? We enjoyed a nice weekend of family time. It’s always a great start to the week coming off a solid family-togetherness weekend. And with a teenager in the house, I’ll take as many of those as I’m given! *wink*
We’re starting a new design series this week and another week of Stampin’ Up! Holiday Mini catalog sneak peeks. This week, we’ll be working with a new Online Exclusive suite called Gathering Together. The suite includes some beautiful foiled fall-inspired paper, coordinating stamps & dies, an embossing folder, linen twine, and embellishments. I personally chose products from this suite because they pair beautifully with other current products, like the Season of Elegance paper pack and Mossy Meadow & Gold ribbon.
I used a clean and simple card sketch to turn out this beauty. We get started with a base of Early Espresso cardstock. I cut a piece of the foiled leaf paper from the Gathering Together paper pack to serve as the backdrop for the focal panel in the center. The sentiment from the Gathering Moments stamp set serves as our focal point and is stamped in Cajun Craze on a piece of Very Vanilla cardstock that is diecut with the Traditional Labels dies. I cut a second panel from gold specialty paper, cut it in half, and mounted it behind the sentiment panel as a mat. The two leaves from Gathering Moments are stamped in Cajun Craze & Mossy Meadow on two different sheets of Season of Elegance paper and then cut with the coordinating Gathering Moments die and mounted on opposing corners of the sentiment panel using dimensionals. Cajun Craze & Gold dots on either side of sentiment bring the eye in to the center. The sentiment panel is mounted on dimensionals over a bow of Mossy Meadow & Gold ribbon in the center of the card. We finish things off with a few Drusy embellishments for a bit of extra sparkle.
I hope you’ll pop in tomorrow to see some cool features of the gorgeous dies in this set.
Products used in today’s card: Early Espresso, Very Vanilla cardstock Gathering Together (coming next week), Season of Elegance, gold foil DSP; Gathering Moments stamps & dies (coming next week) Cajun Craze & Gold dots (coming next week), drusy embellishments Mossy Meadow & Gold ribbon Dimensionals Adhesives
Happy Independence Day, everyone! We are certainly thankful to live here in the great U. S. of A. and are looking forward to reflecting on all that makes America great!
This week, we’re creating designs using some of the new Online Exclusives that launched this week. Today’s design uses the Label Me Grateful bundle to create a stunning thank-you card.
We get started with a base of Misty Moonlight cardstock. The tone-on-tone backdrop is created using the detail dies in the Label Me Grateful die set. The leaves and twigs are adhered directly to the card base, leaving space in the center for the focal panel. Our focal panel begins with a backdrop of Thoughtful Designs specialty paper cut with the label die from Label Me Grateful. The sentiment from the coordinating stamp set is stamped in a combination of Cloud Cover and Versamark and then heat embossed for a touch of glossy sparkle. And as an added bonus, I happened to have some glitter embossing powder! The sentiment is cut out using the Everyday Arches dies. I had some Country Flowers white glimmer paper flowers leftover from another project that I chose to use as an accent at the bottom of the sentiment panel. I cut a few leaves from Mossy Meadow with the Label Me Grateful die to make the flower look more finished. The sentiment panel is adhered over silver & white sheer ribbon with dimensionals onto the Thoughtful Designs backdrop panel. The focal panel is then adhered in the center of the card with dimensionals. Drusy embellishments finish things off with a nice amount of sparkle.
We’re going to be putting the focus on embellishments for our next project. Hope you pop in to check it out!

![Pretty Peacock 8-1/2" X 11" Cardstock [ 150880 ]](https://assets1.tamsnetwork.com/images/EC042017NF/150880s.jpg "Pretty Peacock 8-1/2\" X 11\" Cardstock [ 150880 ]")
![Basic White 8 1/2" X 11" Cardstock [ 166780 ]](https://assets1.tamsnetwork.com/images/EC042017NF/166780s.jpg "Basic White 8 1/2\" X 11\" Cardstock [ 166780 ]")
![Elegant Pine Snowflakes 12" X 12" (30.5 X 30.5 Cm) Designer Series Paper [ 166066 ]](https://assets1.tamsnetwork.com/images/EC042017NF/166066s.jpg "Elegant Pine Snowflakes 12\" X 12\" (30.5 X 30.5 Cm) Designer Series Paper [ 166066 ]")
![Earthen Toned Metallic 12" X 12" (30.5 X 30.5 Cm) Specialty Paper [ 165901 ]](https://assets1.tamsnetwork.com/images/EC042017NF/165901s.jpg "Earthen Toned Metallic 12\" X 12\" (30.5 X 30.5 Cm) Specialty Paper [ 165901 ]")
![Regal Distressed Patterns 12" X 12" (30.5 X 30.5 Cm) Specialty Designer Series Paper [ 164037 ]](https://assets1.tamsnetwork.com/images/EC042017NF/164037s.jpg "Regal Distressed Patterns 12\" X 12\" (30.5 X 30.5 Cm) Specialty Designer Series Paper [ 164037 ]")
![Nests Of Winter 12" X 12" (30.5 X 30.5 Cm) Designer Series Paper [ 164183 ]](https://assets1.tamsnetwork.com/images/EC042017NF/164183s.jpg "Nests Of Winter 12\" X 12\" (30.5 X 30.5 Cm) Designer Series Paper [ 164183 ]")
![Spotlight On Nature Dies [ 163580 ]](https://assets1.tamsnetwork.com/images/EC042017NF/163580s.jpg "Spotlight On Nature Dies [ 163580 ]")
![Words Of Beauty Bundle (English) [ 167090 ]](https://assets1.tamsnetwork.com/images/EC042017NF/167090s.jpg "Words Of Beauty Bundle (English) [ 167090 ]")
![Pretty Peacock & Gold 3/8" (1 Cm) Metallic Ribbon [ 162588 ]](https://assets1.tamsnetwork.com/images/EC042017NF/162588s.jpg "Pretty Peacock & Gold 3/8\" (1 Cm) Metallic Ribbon [ 162588 ]")
![Drusy Adhesive Backed Embellishments [ 164223 ]](https://assets1.tamsnetwork.com/images/EC042017NF/164223s.jpg "Drusy Adhesive Backed Embellishments [ 164223 ]")
![Stampin' Dimensionals [ 104430 ]](https://assets1.tamsnetwork.com/images/EC042017NF/104430s.jpg "Stampin' Dimensionals [ 104430 ]")
![Crumb Cake 8-1/2" X 11" Cardstock [ 120953 ]](https://assets1.tamsnetwork.com/images/EC042017NF/120953s.jpg "Crumb Cake 8-1/2\" X 11\" Cardstock [ 120953 ]")
![Cajun Craze 8-1/2" X 11" Cardstock [ 119684 ]](https://assets1.tamsnetwork.com/images/EC042017NF/119684s.jpg "Cajun Craze 8-1/2\" X 11\" Cardstock [ 119684 ]")
![Timeless Plaid 6" X 6" (15.2 X 15.2 Cm) Designer Series Paper [ 164678 ]](https://assets1.tamsnetwork.com/images/EC042017NF/164678s.jpg "Timeless Plaid 6\" X 6\" (15.2 X 15.2 Cm) Designer Series Paper [ 164678 ]")
![Gathering Together 12" X 12" (30.5 X 30.5 Cm) Specialty Designer Series Paper [ 165969 ]](https://assets1.tamsnetwork.com/images/EC042017NF/165969s.jpg "Gathering Together 12\" X 12\" (30.5 X 30.5 Cm) Specialty Designer Series Paper [ 165969 ]")
![Country Woods 12" X 12" (30.5 X 30.5 Cm) Designer Series Paper [ 163393 ]](https://assets1.tamsnetwork.com/images/EC042017NF/163393s.jpg "Country Woods 12\" X 12\" (30.5 X 30.5 Cm) Designer Series Paper [ 163393 ]")
![Perennial Postage Dies [ 162607 ]](https://assets1.tamsnetwork.com/images/EC042017NF/162607s.jpg "Perennial Postage Dies [ 162607 ]")
![Textured Notes Dies [ 165555 ]](https://assets1.tamsnetwork.com/images/EC042017NF/165555s.jpg "Textured Notes Dies [ 165555 ]")
![Cajun Craze Classic Stampin' Pad [ 147085 ]](https://assets1.tamsnetwork.com/images/EC042017NF/147085s.jpg "Cajun Craze Classic Stampin' Pad [ 147085 ]")
![Natural Tones Linen Thread [ 164071 ]](https://assets1.tamsnetwork.com/images/EC042017NF/164071s.jpg "Natural Tones Linen Thread [ 164071 ]")
![Cajun Craze & Gold Dots [ 165984 ]](https://assets1.tamsnetwork.com/images/EC042017NF/165984s.jpg "Cajun Craze & Gold Dots [ 165984 ]")
![Mini Glue Dots [ 103683 ]](https://assets1.tamsnetwork.com/images/EC042017NF/103683s.jpg "Mini Glue Dots [ 103683 ]")
![Lost Lagoon 8-1/2" X 11" Cardstock [ 133679 ]](https://assets1.tamsnetwork.com/images/EC042017NF/133679s.jpg "Lost Lagoon 8-1/2\" X 11\" Cardstock [ 133679 ]")
![Brushed Silver And Gold Foil 12" X 12" (30.5 X 30.5 Cm) Specialty Paper [ 164861 ]](https://assets1.tamsnetwork.com/images/EC042017NF/164861s.jpg "Brushed Silver And Gold Foil 12\" X 12\" (30.5 X 30.5 Cm) Specialty Paper [ 164861 ]")
![Winter Scenes Cling Stamp Set (English) [ 166088 ]](https://assets1.tamsnetwork.com/images/EC042017NF/166088s.jpg "Winter Scenes Cling Stamp Set (English) [ 166088 ]")
![Stylish Shapes Dies [ 159183 ]](https://assets1.tamsnetwork.com/images/EC042017NF/159183s.jpg "Stylish Shapes Dies [ 159183 ]")
![Shaded Spruce Stampin' Blends Combo Pack [ 154903 ]](https://assets1.tamsnetwork.com/images/EC042017NF/154903s.jpg "Shaded Spruce Stampin' Blends Combo Pack [ 154903 ]")
![Smoky Slate Stampin' Blends Combo Pack [ 154904 ]](https://assets1.tamsnetwork.com/images/EC042017NF/154904s.jpg "Smoky Slate Stampin' Blends Combo Pack [ 154904 ]")
![Clear Wink Of Stella Glitter Brush [ 141897 ]](https://assets1.tamsnetwork.com/images/EC042017NF/141897s.jpg "Clear Wink Of Stella Glitter Brush [ 141897 ]")


![Misty Moonlight 8-1/2" X 11" Cardstock [ 153081 ]](https://assets1.tamsnetwork.com/images/EC042017NF/153081s.jpg "Misty Moonlight 8-1/2\" X 11\" Cardstock [ 153081 ]")
![Cloud Cover 8 1/2" X 11" Cardstock [ 165621 ]](https://assets1.tamsnetwork.com/images/EC042017NF/165621s.jpg "Cloud Cover 8 1/2\" X 11\" Cardstock [ 165621 ]")
![Mossy Meadow 8-1/2" X 11" Cardstock [ 133676 ]](https://assets1.tamsnetwork.com/images/EC042017NF/133676s.jpg "Mossy Meadow 8-1/2\" X 11\" Cardstock [ 133676 ]")
![Berry Burst, Old Olive & White 12" X 12" (30.5 X 30.5 Cm) Glimmer Specialty Paper [ 163769 ]](https://assets1.tamsnetwork.com/images/EC042017NF/163769s.jpg "Berry Burst, Old Olive & White 12\" X 12\" (30.5 X 30.5 Cm) Glimmer Specialty Paper [ 163769 ]")
![Thoughtful Designs 12" X 12" (30.5 X 30.5 Cm) Specialty Designer Series Paper [ 163317 ]](https://assets1.tamsnetwork.com/images/EC042017NF/163317s.jpg "Thoughtful Designs 12\" X 12\" (30.5 X 30.5 Cm) Specialty Designer Series Paper [ 163317 ]")
![Versamark Pad [ 102283 ]](https://assets1.tamsnetwork.com/images/EC042017NF/102283s.jpg "Versamark Pad [ 102283 ]")
![Basics Wow! Embossing Powder [ 165679 ]](https://assets1.tamsnetwork.com/images/EC042017NF/165679s.jpg "Basics Wow! Embossing Powder [ 165679 ]")
![Label Me Grateful Bundle (English) [ 166112 ]](https://assets1.tamsnetwork.com/images/EC042017NF/166112s.jpg "Label Me Grateful Bundle (English) [ 166112 ]")
![Country Flowers Dies [ 163410 ]](https://assets1.tamsnetwork.com/images/EC042017NF/163410s.jpg "Country Flowers Dies [ 163410 ]")
![Everyday Arches Dies [ 164629 ]](https://assets1.tamsnetwork.com/images/EC042017NF/164629s.jpg "Everyday Arches Dies [ 164629 ]")
![Silver & White 1/2" (1.3 Cm) Sheer Ribbon [ 162149 ]](https://assets1.tamsnetwork.com/images/EC042017NF/162149s.jpg "Silver & White 1/2\" (1.3 Cm) Sheer Ribbon [ 162149 ]")
