January Mini Catalog

Fairy Hugs

When I was growing up in the country, I used to love to hunt for mushrooms and toadstools. I loved the *poof* of dust that would come from the toadstools. And I always found the different mushroom shapes fascinating and would think about what kind of Smurf might live in it based on the size and shape. I always loved a rainy spring because it meant that there would soon be oodles of fungi to find, and I was always excited when we had “fairy rings” — those are the mushrooms that grow in a circle. Anyone else call them that? My grandpa used to say that the circles of mushrooms were where the fairies played. To this day, I still smile every time I see a circle of mushrooms in a yard here in the ‘burbs.

And that’s the inspiration behind today’s card design using the Toadstool Gardens patterned paper. This week, we’re using the new Hugs for Love stamps & punch bundle to create our designs. And I thought the “you make me smile” sentiment was just perfect for today’s card with our cute mushrooms.

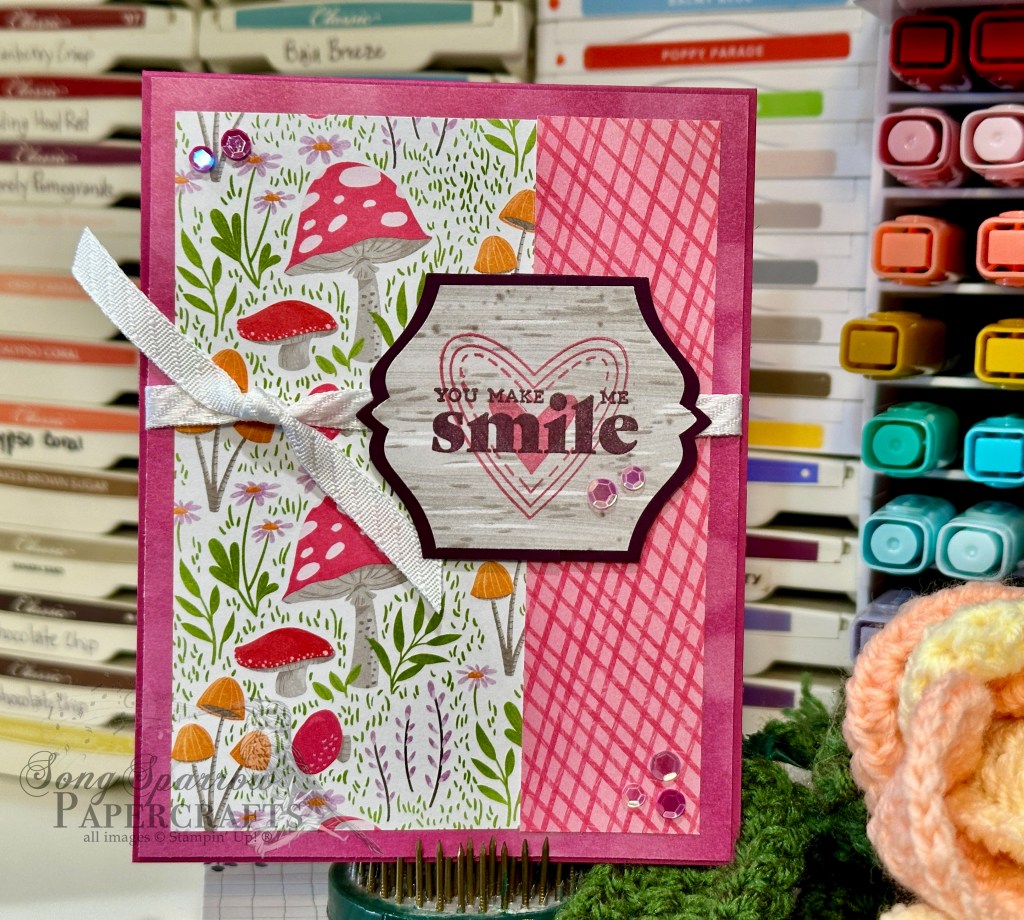
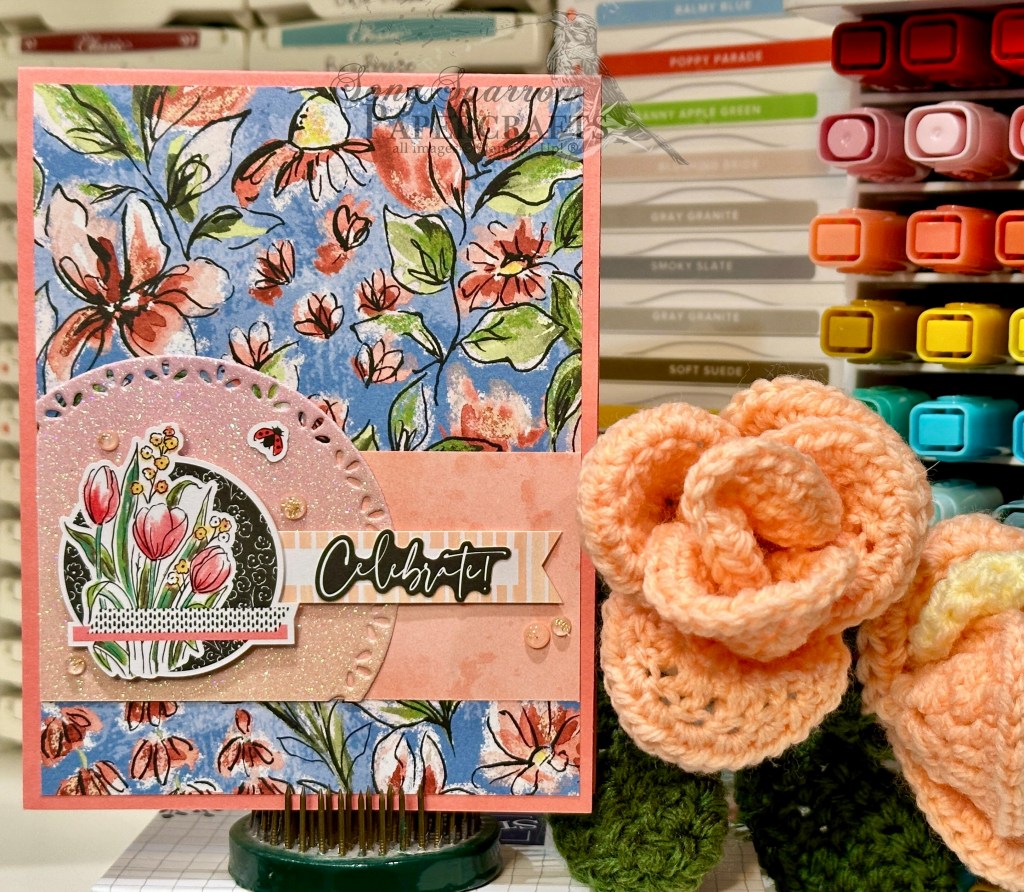
We get started on our card today with a base of Berry Burst cardstock. A sheet of the pink Beautiful Bokeh paper serves as the base for our focal panel with two patterns of the Toadstool Gardens designer paper. The sentiment from Hugs for Love is stamped in Blackberry Bliss on the woodgrain pattern from the Toadstool Gardens paper with a lovely heart from the same stamp set stamped in Flirty Flamingo. The sentiment panel is then punched with the coordinating Hugs for Love punch. I also punched two partial panels from Blackberry Bliss to create a full mat for the sentiment panel. The sentiment panel is adhered to the focal panel with dimensionals. The white diagonal trim breaks up the patterns and adds the perfect eye-catching backdrop for our sentiment panel. A scattering of purple sequins gives us the sparkle that makes this design feel magical.

Tomorrow we’re going to use our Hugs for Love bundle to play with patterns. I hope you’ll stop by.

Products used in today’s card:
Berry Burst, Blackberry Bliss cardstock
Toadstool Garden, Beautiful Bokeh DSP
Hugs for Love bundle
White diagonal trim
Purple sequins
Dimensionals
Adhesives

Product List
January Mini Catalog

Lots of Hugs

This week we’re having some fun with the new bundle by Stampin’ Up! called Hugs for Love. This bundle includes a stamp set and coordinating label punch. And while you can certainly get a great start on Valetines with this bundle, it’s versatile enough to create designs for all sorts of occasions.

Today, we’re taking a more traditional approach with the design elements and color palette by making a card that feels very Valentine-y. For this card, we’re pairing our featured bundle with the Marbled Elegance pattern paper.

We get started today with a card base of Cherry Cobbler cardstock. Our Marbled Elegance paper is matted with gold mercury vellum, which really accentuates the lovely gold foiling in our patterned paper. The sentiment from Hugs for Love is stamped in Real Red, while the heart accents are stamped in Pretty in Pink and the decorative border is stamped in Cherry Cobbler. The sentiment panel is then cut with the coordinating punch and adhered over a bow of gold trim using dimensionals. We finish things off by scattering varying sizes of gold foil hearts on and around the sentiment panel.

This is such a simple design that can be replicated quickly. And a simple swap of the sentiment makes this is a great layout for all occasions.

Tomorrow we’re smiling with the fairies. I hope you’ll drop in!

Products used in today’s card:
Cherry Cobbler, Basic White cardstock
Marbled Elegance, Mercury vellum DSP
Hugs for Love bundle
Gold trim
Gold hearts
Dimensionals
Adhesives

Product List
January Mini Catalog

Sending a Big Hug

Here we are at the start of a brand new week. After a very chilly weekend in North Texas and the remnants of snow and ice still lingering in places even now, it seemed appropriate to start our new weekly series with today’s icey color palette.

This week, we’re going to be using the new Hugs for Love bundle that just released in the Stampin’ Up! January Mini catalog. This bundle comes with a stamp set and coordinating punch. And while it’s certainly going to fit the bill for your Valentines, this bundle is designed with versatility in mind. And I think today’s card is a great start at showing you just that.

Our card today begins with a base of Pretty Peacock, which pairs beautifully with the Timeless Plaid patterned paper that serves as our focal section background. A piece of the In Color glimmer paper is the perfect compliment to our plaid and really brings out the subtleties of the plaid pattern. Our Timeless Plaid panel is diecut using the Nested Essentials dies. The sentiment from the Hugs for Love set is stamped in Lost Lagoon, while the decorative portion of the panel is stamped in Pretty Peacock. A line of riverside irregular pearls catch the eye and compliment the pattern of our panel outline. The panel is then cut out using the coordinating punch and adhered over the Lost Lagoon & gold ribbon using dimensionals. A few Sunny Day iridescent dots bring the eye in to our sentiment.

Tune in tomorrow as we take a more traditional look at this bundle.

Products used in today’s card:
Pretty Peacock, Basic White cardstock
Timeless Plaid, In Color glimmer DSP
Hugs for Love bundle
Pretty Peacock & Gold ribbon
Riverside irregular pearls, Sunny Day iridescent dots
Dimensionals
Adhesives

Product List
January Mini Catalog

Plaid Florals Birthday

We’ve made it to the weekend. What does everyone have in store? We were supposed to be at a school basketball tournament today, but due to the kiddos missing school at the end of the week due to winter weather, that’s been postponed. So we’re off to bowl the weekend league tournament instead, assuming we can get out of the icy driveway, that is.

This week, we’ve been working with the Mixed Media Florals bundle of products. And today, we’re closing things out by combining this fabulous bundle with the Timeless Plaid designer series paper and a loose take on Sketch #5 from the Stampin’ Up! Annual Catalog.

We get started with a base of Early Espresso cardstock, which brings out all of the subtle shades of brown in our Timeless Plaid background panel. A flowers-only patterned sheet from the Mixed Media Florals paper pack serves as our focal backdrop. I love how the slight turn askew adds a bit of whimsy and interest to this patterned paper and really draws the eye to our focal image. The focal image is a bundle of flowers that is cut from one of the smaller notecards in the Mixed Media Florals Memories & More kit. I cut around the florals to give it the look of a diecut piece and mounted it on dimensionals to ensure it really catches your eye. I cut a partial panel from the pastel ombre glimmer paper using the smaller decorative banner from the Mixed Labels die set. The sentiment is also from the Memories & More kit and is also mounted on dimensionals so that it overlaps all 3 of the panels that comprise our focal layer. I added a bit of gold thread behind the sentiment to ensure that the eye falls and rests on the sentiment. A few shiny sequins in various colors across the card front add some extra sparkle.

Next week, we’re going to be working with the Hugs for Love bundle to show how it can work for you for so much more than Valentine designs. I hope you’ll come along for the ride!

Products used in today’s design:
Early Espresso cardstock
Mixed Media Florals, Timeless Plaid, Pastel ombre glimmer DSP
Mixed Media Florals Memories & More kit
Shiny sequins
Gold thread
Dimensionals
Adhesives

Product List
January Mini Catalog

Sketchy Fridays: Celebrate

We’re having SNOW much fun here in North Texas, where we’ve woken up to a layer of fresh snow. After a full day of sleet and snow yesterday, things were already well covered before it got dark and we all turned in. Not sure that it will hang around long this time, but it sure is pretty!

But on to the business that is happening in the warmth of my craft room. This week, we’re getting a look at the new suite of products called Mixed Media Florals. And today’s design is pairing the gorgeous paper with the coordinating Memories & More kit.

And it just so happens to be time for a new installment of Sketchy Fridays, where we’re using a card sketch to design our featured card. Right now, we’re working through a full series of designs using the card sketches found in current Stampin’ Up! catalogs.

This week’s card is based on Sketch #2 from the Stampin’ Up! Holiday Mini Catalog because I just couldn’t resist how perfectly it tied all of the fun, and very different, elements from the Mixed Media Florals together. What’s fun about today’s use of the sketch is that it serves more as a jumping off spot for the design, and I really love how this design evolved as I began working with all of the elements.

We get started with a base of Flirty Flamingo cardstock. A gorgeous sheet of paper from the Mixed Media Florals paper pack serves as the backdrop for the focal section of our design. I used a strip of the Beautiful Bokeh paper to serve as the anchor for the focal section. A partial cut of the Spotlight on Nature circle from a sheet of the new pastel ombre glimmer paper serves as the oversized mat for the focal image and sentiment and definitely add some interest as a partial shape. The focal image is a sticker from the Mixed Media Florals Memories & More kit and is adhered over the mat using dimensionals. The banner and sentiment are also from the Memories & More kit and are placed to overlap both sections of our full focal panel to tie the elements together visually. I added a ladybug and some foiled gems to catch the eye and add some whimsy.

Tomorrow we’ll be closing out our Mixed Media Floral series with a super fun and simple design.

Products used in today’s card:
Calypso Coral cardstock
Mixed Media Florals, Pastel ombre glimmer, Beautiful Bokeh DSP
Mixed Media Florals Memories & More
Petal Pink foiled gems
Dimensionals
Adhesives

Product List
January Mini Catalog

Amazing Florals

We’re sailing into the end of the week in grand fashion here in North Texas as we all – kids & adults alike – anxiously sit at home, in our comfy clothes, awaiting the impending winter storm. For those of you who live in colder climates, you may wonder why on earth Texans are always so dramatic when it comes to winter weather. I will simply say…hurry on down here and drive on the roads during a winter storm and you will understand! For one, we typically receive a mix of icy precipitation during winter storms, and for another, we have a lot of elevated roadways. And our only fight against impassable roadways is a special brining mixture that is applied to roads ahead of forecasted weather. As you can imagine, this doesn’t yield the best results. So…here we sit! But I’ll never complain about being able to mix my comfy pants with my business jacket! *wink-wink*

This week, we’re having a closer look at the brand new suite called Mixed Media Florals. If you choose the entire suite of products, you’ll receive 2 stamp/die bundles, designer series paper, the Plaster Painting 3D embossing folder, and embellishments called low profile dots. There is also a coordinating Memories & More kit. And today, we’re pairing up the Memories & More with the gorgeous paper.

This clean and simple card comes together in a matter of minutes and would be perfect if you need a gorgeous card in a rush. We start with a base of Balmy Blue cardstock. Our background panel is a sheet of the Mixed Media Florals designer paper. The focal panel is a smaller card from the coordinating Mixed Media Florals Memories & More kit. I love how the ladybugs in this panel really pop against the floral backdrop. The sentiment is also from the Memories & More kit and is popped up on dimensionals to allow a little room for the leaves that are diecut from Festive glimmer paper using the Mixed Label dies. I added some regal foil dots and wrapped some gold thread behind the focal panel for just a touch of subtle sparkle and to draw the eye across the design.

I hope you’ll pop in tomorrow as we continue to explore all the ways that the Mixed Media Florals products can go to work for you!

Products used in today’s card:
Balmy Blue cardstock
Mixed Media Florals DSP
Mixed Media Florals Memories & More
Mixed Labels dies
Gold thread
Regal foil dots
Dimensionals
Adhesives

Product List
January Mini Catalog

Grateful Florals

Happy hump day, everyone! This is definitely one of those weeks when today feels like a big ol’ road hump! But we’re making it. Actually, here in North Texas, we’re bracing for our first winter storm of the season. And if you’re not familiar with what that looks like for Texans, well, it basically brings life to a standstill. But one of the best things to come from the COVID era is the ability to work from home. So we’re all scurrying around buying last-minute supplies and making preparations to be stuck at home for a few days.

Today, we’re continuing a closer look at the new Mixed Media Florals products. In particular, today’s design is all about the Memories & More pack of goodies that coordinate with the suite.

Our super simple card design begins with a base of Calypso Coral cardstock. Our focal panel is a beautiful 4×6 notecard from the Mixed Media Florals Memories & More pack. I cut the notecard down to fit the standard-sized card front and then added some Earth Tones shimmer gems. Voila! That is IT and what a stunning result, in my humble opinion anyway.

The beauty of the Memories & More products is how easily they simplify your paper crafting without sacrificing one bit of jaw-dropping designs. We’re going to finish out the week by using a variety of the Mixed Media Florals Memories & More elements to give you a whole host of ideas for using these lovelies to shortcut your design process.

Products used in today’s card:
Calypso Coral cardstock
Mixed Media Florals Memories & More
Earth Tones shimmer gems
Adhesives

Product List
January Mini Catalog

You’ve Got This

Guess what today is?! It’s new catalog launch day! That’s right, today the Stampin’ Up! January Mini and Sale-a-Bration catalogs are officially live. Have you checked out the new products yet and made your shopping list?

Speaking of the new goodies, this week we’re taking a closer look at the brand new Mixed Media Florals suite. And today, I’m pairing it up with the gorgeous new Everyday Skies paper. One of the many designs that popped to mind when I saw this paper was laying in the summer grass and flowers and staring up at the sky. And that’s what we’re recreating in today’s design.

We get started with a base of Pool Party cardstock. Our backdrop is the summer sky from the Everyday Skies paper pack. I used the Mixed Florals dies to cut the grass from Shaded Spruce cardstock. I stamped the daisy bunch from the Mixed Florals stamp set on white cardstock, colored with Stampin’ Blends, and then diecut with coordinating die. To help the flowers stand out against our grassy background, I mounted them with dimensionals over the grass in the center of the card. I tied some Fresh Freesia seam binding ribbon around the base of the greenery with a little assistance from the Night of Navy thread. I really love how the Fresh Freesia ribbon brings out the lovely pink and purple undertones in the sky. The sentiment from Mixed Labels is stamped on white cardstock and then diecut with the smaller banner die from the Peaceful Season die set. I used a few purple sequins to add a little touch of pinkish-purple sparkle to our scene.

I love how quickly this card design comes together and how it brought the picture in my mind’s eye to life! I hope you’ll pop in tomorrow when we add the new Memories & More pack to the mix.

Products used in this design:
Pool Party, Shaded Spruce, Basic White cardstock
Everyday Skies DSP
Mixed Media Florals stamps & dies
Peaceful Season dies
Stampin’ Blends
Fresh Freesia seam binding ribbon
Purple sequins
Dimensionals
Adhesives

Product List
Coming Soon · January Mini Catalog

Because I Care

Here we are — already beginning a fresh week of the new year. I was able to enjoy a little down time last week with a more relaxed work schedule, and I always find it funny how quickly that time passes by. I’m back in the office this week and the kiddo is back to school.

This week, the new Stampin’ Up! January Mini catalog will launch, and we’re continuing to get a closer look at some of the fabulous products that will be available. In particular, this week we are going to be focusing on the Mixed Media Florals suite of products. And today, we’re pairing up the stamps & dies with the lovely new Floral Delight designer series paper.

We get started today with a base of Lemon Lolly cardstock. I chose a smaller floral pattern from the Floral Delight paper pack as the backdrop for our focal panel. The focal panel base is a circle of blue gingham vellum from the coordinating Floral & Gingham vellum pack that I cut with the Spotlight on Nature dies. The floral bunch is stamped on white cardstock with the Mixed Florals stamp and then colored with Stampin’ Blends before being diecut with the coordinating die from the Mixed Florals dies. The sentiment mat is a lovely banner cut from Crushed Curry cardstock using the Mixed Labels die, which really helps our white sentiment panel pop. The sentiment from Mixed Labels is stamped in Lost Lagoon and then cut using the coordinating small banner die from Mixed Labels. Some Lost Lagoon soft cording and Daffodil Delight narrow satin ribbon tie our color palette together. A few riverside irregular pearls guide the eye across our card design.

I hope you’ll join me tomorrow where we’ll look at a few of the other stamps and dies in this terrific product suite!

Products used in today’s design:
Lemon Lolly, Crushed Curry, Basic White cardstock
Floral Delight DSP & vellum (coming soon)
Mixed Media Florals stamps & dies (coming soon)
Mixed Labels stamps & dies (coming soon)
Spotlight on Nature, Heart Shaped (coming soon) dies
Stampin’ Blends
Lost Lagoon soft cording, Daffodil Delight satin ribbon (coming soon)
Riverside irregular pearls
Dimensionals
Adhesives

Product List
Coming Soon · January Mini Catalog

Here for You

We’re rounding out our up-close look at the Beautiful Butterflies suite today. This gorgeous suite of products launches on Tuesday in the Stampin’ Up! January Mini catalog and includes stamps, dies, hybrid embossing folder, and designer paper. Today’s design keeps it simple by pairing the stamps and dies with the lovely Regal Winter paper.

We get started with a base of Pretty Peacock cardstock. I chose the coordinating plaid pattern from the Regal Winter designer series paper pack as the backdrop and matted with silver foil specialty paper. The plaid is embossed with the Beautiful Butterflies embossing folder, and I love how the folder gives a deep impression that scars the paper so the white center shows through for a distressed look. The two smaller butterflies are cut from silver foil specialty paper with the bodies cut basic black cardstock using the Beautiful Butterflies dies. The sentiment from the Beautiful Butterflies stamp set is stamped on white cardstock and then diecut with the smallest Mixed Labels die and matted with a portion of the largest banner die from the Beautiful Butterflies set. A few drusy embellishments scattered across the card front draw the eye across the full embossed panel. I finished the sentiment on the inside message pael and added a few butterflies to complete our theme.

Next week we’re going to be working with the Mixed Florals bundle. I hope you’ll stop by to see how this bundle can work for you!

Products used in today’s design:
Pretty Peacock, Basic White, Basic Black cardstock
Regal Winter, Silver foil DSP
Beautiful Butterflies bundle (coming soon)
Beautiful Butterflies embossing folder (coming soon)
Mixed Labels dies (coming soon)
Drusy embellishments
Dimensionals
Adhesives