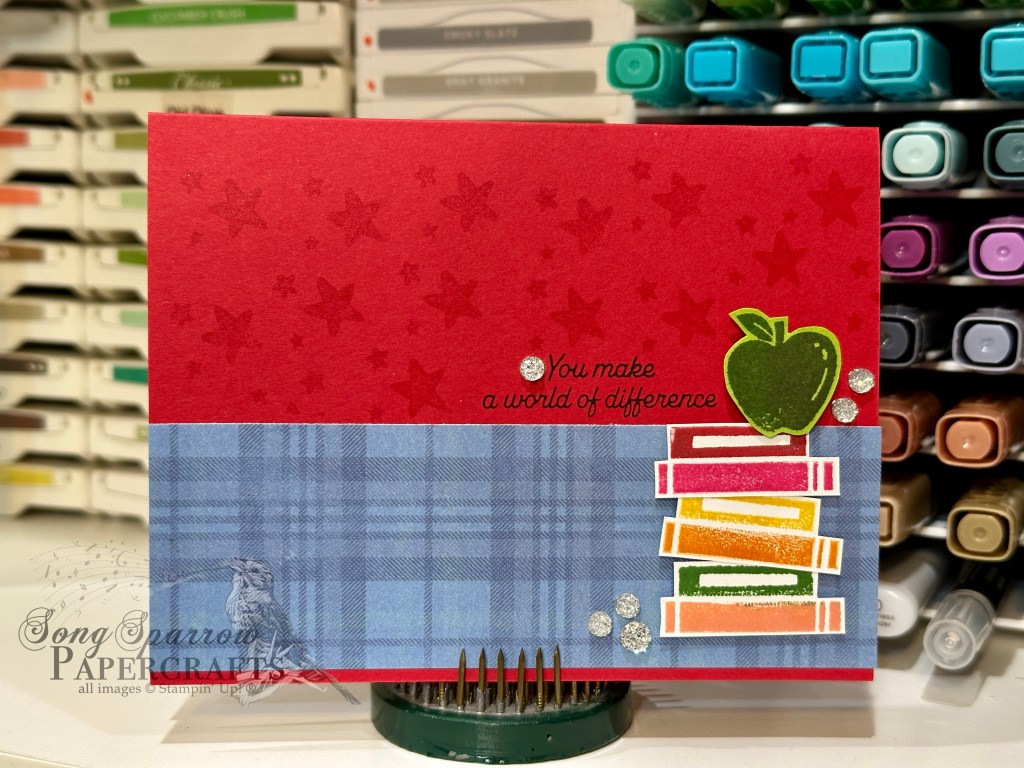
Welcome to another installment of teacher appreciation. As we wind down this last week of school, I know that students and teachers alike are counting down the days with gleeful excitement as their much-anticipated summer break is fast approaching.
We continue to use the new School Days stamp set to create our designs, and today we’re pairing it with the Timeless Plaid paper pack.
We get started with a sheet of Poppy Parade cardstock. I used a leftover strip of the blue plaid sheet from the Timeless Plaid pack to serve as the backdrop for our focal elements and then stamped the stars from School Days with Versamark on the card base on top. The book stamp was inked up in a variety of colors and then stamped onto white cardstock before being fussy cut in pairs. I stacked them up and adhered them to the backdrop with dimensionals. The apple is stamped in green onto Granny Apple Green cardstock and then fussy cut and set atop the tower of books. The sentiment from School Days is stamped in black and placed just next to the apple. A scattering of drusy embellishments adds a fun sparkly element.
I hope you’ll continue to follow along this week with all of the teacher appreciation designs.
Products used in this card: Poppy Parade, Granny Apple Green, Basic White cardstock Timeless Plaid DSP School Days stamps Dimensionals Drusy embellishments
Happy Monday, everyone! So glad to be back after an unexpected little hiatus. Between a crazy busy work schedule and prepping for and chaperoning my kiddo’s National Academic Pentathlon meet, I ended up having no time in the craft room last week. I’m pleased to report that the Texas teams represented the state well and my son’s school came home with 3rd place overall and a whole host of medalists in each of the 5 individual categories.
But never fear because all of the ideas for teacher appreciation gifts are still swirling around in the old noodle and need a place to go! So this week, the last week of school for us, we’re going to be exploring all of the ways we can use the Online Exclusive set called School Days to create some awesome designs to honor all of those teachers who have worked so hard all year. We’re starting our series with the old tried and true repeated pattern technique to create a sheet of patterned paper.
We start with a base of Mossy Meadow cardstock. To create our sheet of patterned paper, I used the apple image from School Days to create the quarter sheet of apple paper using Real Red, Old Olive, Poppy Parade, and Garden Green. After cutting the panel down, it’s mounted on Old Olive glimmer paper to leave a large shimmery border on the bottom. A strip of gold trim serves to divide the apple pattern from the green glimmer below. The sentiment from School Days is stamped in Real Red on white cardstock and then diecut with the smaller sentiment die from Beautiful Butterflies. The sentiment panel is adhered to the glimmer panel with dimensionals. A few iridescent discs finish things off with a little extra twinkle.
I hope you’ll continue to follow along this week as we honor our hard-working and dedicated teachers.
Products used in this card: Mossy Meadow, Basic White cardstock Old Olive glimmer DSP School Days stamps Beautiful Buuterflies dies Gold trim Dimensionals Iridescent discs
Howdy, crafty friends! I got a little side-tracked yesterday with a cookie project and ran out of time to play in my crafty stash. I was trying out a new cookie recipe to take to a cookie exchange. And once again, I forgot how much I hate messing with the candy coating. I can never get it to melt right and then end up making a big mess. I guess the good thing about this particular recipe is that the cookies are supposed to resemble snowballs, and snowballs are lumpy. Soooooo my lumpy candy coating is perfect! Hahaha!
I’m still furiously working away on gift tags and gift holders. And today, I’m bringing you a super easy gift card holder that I ran across on Pinterest that uses a standard card base. I decided to pull together some of my retired favorites for this one because the paper is perfect for my intended recipient!
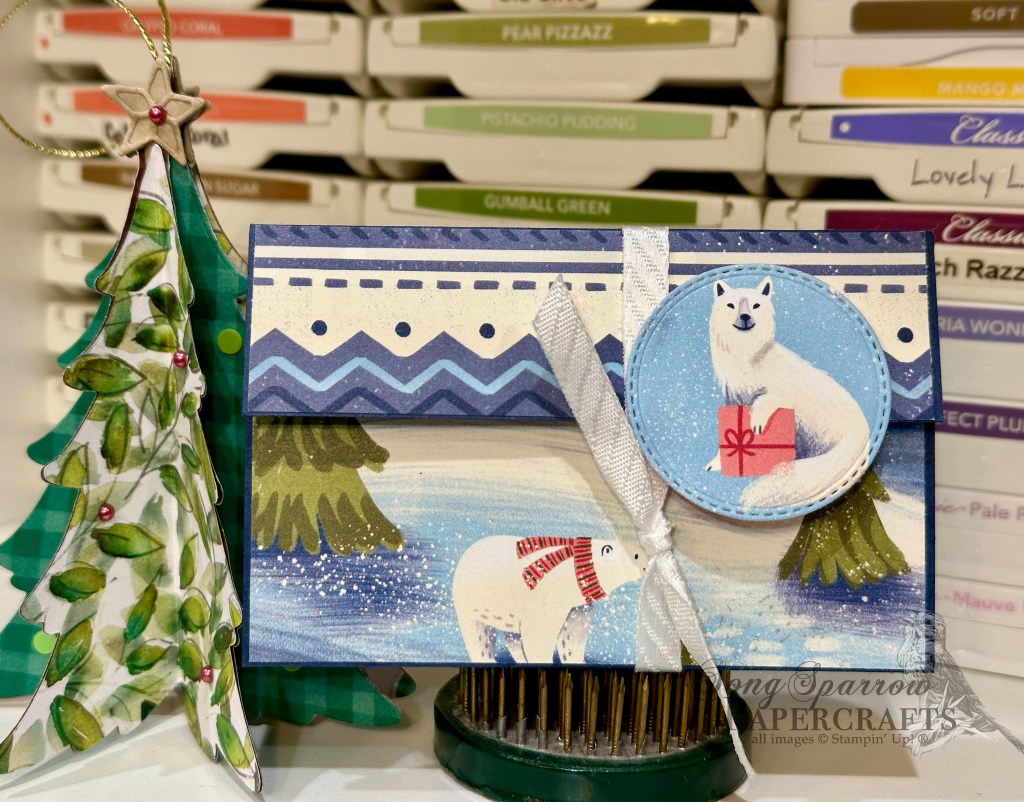
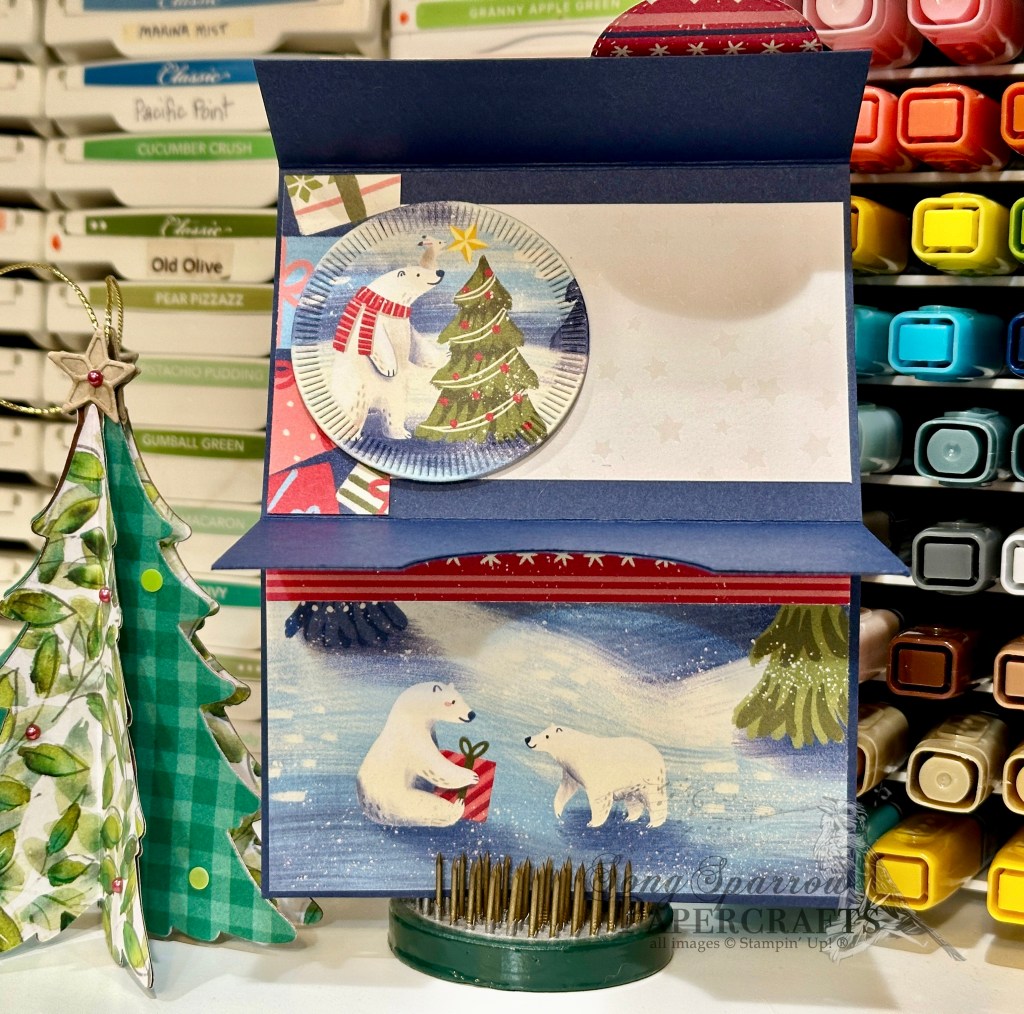
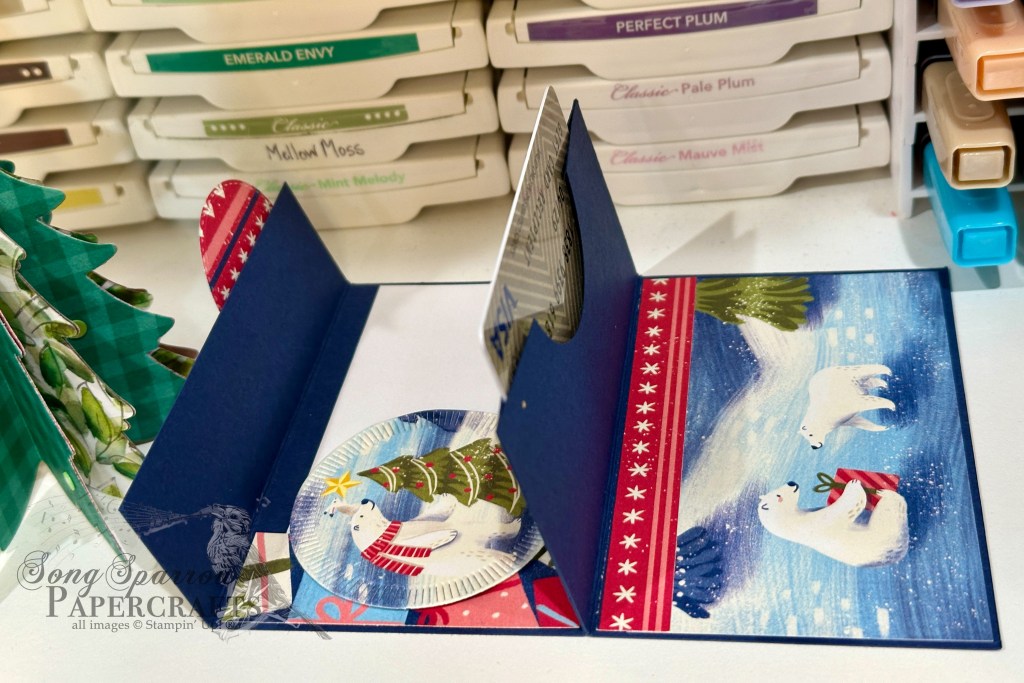
We get started with a base of Night of Navy cardstock. It’s scored at 1 1/4 inches, 4 inches, 6 inches, and 8 inches and then folded to create the center gift card pocket. I used a 2-inch circle punch to make the pull-out section in the center of the gift card pocket. The pocket itself is held together with tear-and-tape. The Beary Christmas patterned paper pack was a part of last year’s holiday catalog, and I just loved it so much that I stocked up when it went on sale. I was able to use a collection of scraps from another project to cover the panels on the outside and inside of the gift envelope. I thought the sweater-patterned strips were perfect accents for the flap and adjoining panels. I found a cute star-patterned cardstock from the Irresistibly Yours paper pack (long ago retired) in my scrap stash that is the perfect panel for the gift message. Our smaller circle focal elements on the outside and inside of our gift envelope are diecut to highlight cute little critters. I used the Changing Leaves and Spotlight on Nature dies for these circles. I thought the decorative edges were perfect designs elements that add a lot of interest to the pop-out panels. The fox panel on the front is adhered to the flap with dimensionals, which gives a nice gap under which I slid the knotted diagonal striped ribbon to keep the envelope closed.
I just love how this turned out, and it came together quickly. The hardest part was choosing what adorable critters from the Beary Christmas paper that I wanted to highlight on each portion of the gift envelope.
Products used in this design: Night of Navy Cardstock Beary Christmas (retired), Irresistibly Yours (retired) DSP 2″ circle punch Changing Leaves, Spotlight on Nature dies
We’re gearing up for Christmas here at Song Sparrow. Every day that Amazon shows up, my husband says something about the number of boxes that end up on the porch. *snicker* Hey, I can’t help it if the warehouses decide to box orders in a multitude of boxes.
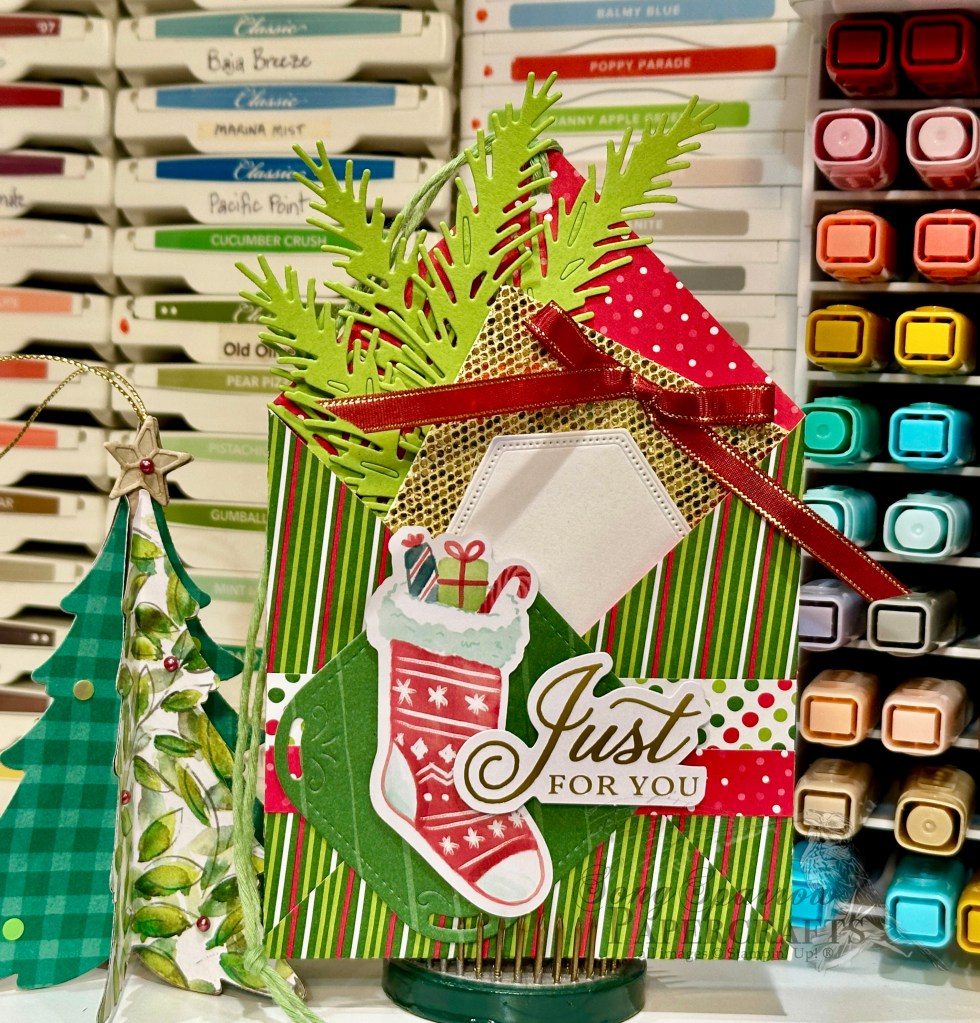
But speaking of getting ready for Christmas, I’m still working on gifts and gift tags. And today’s design is a super cute gift-giving envelope that I plan to hang on the Christmas tree for a little holiday hide-n-seek. I ran across this super cute envelope in one of my Pinterest searches, and it’s super easy to put together.
We get started with a 6×6 sheet of Take a Bow patterned paper and score from corner to corner on both sides. Then you fold to create the envelope. For this one, the flap on the envelope is supposed to stay open, which makes it a snap to put together. I used two smaller strips of the Take a Bow paper to cover my score line in the center and also to serve as a nice break in the pattern underneath the focal panel. Our focal panel starts with a base of the (retired) Garden Walk patterned paper that is cut using the Peaceful Season decorative square die. Then I just layered the stocking and sentiment from the Joyful ephemera packs right on top using the dimensionals. The gift panel is a sheet of the (retired) More Dazzle specialty paper with a to/from panel cut from white cardstock using the (retired) Stitched Nested Labels dies. I cut some greenery fronds from Granny Apple Green cardstock using the Golden Greenery dies and adhered them to the back of the gift panel with dimensionals. A cute red bow tied from Cherry Cobbler & Gold metallic ribbon finish off the gift panel nicely. The whole kit & caboodle will hang from the tree with some green thread.
The hardest part of this whole design was picking what ephemera I wanted to use! Otherwise, it comes together in a snap. And don’t you think it will just be the cutest way to give cash or a gift card?
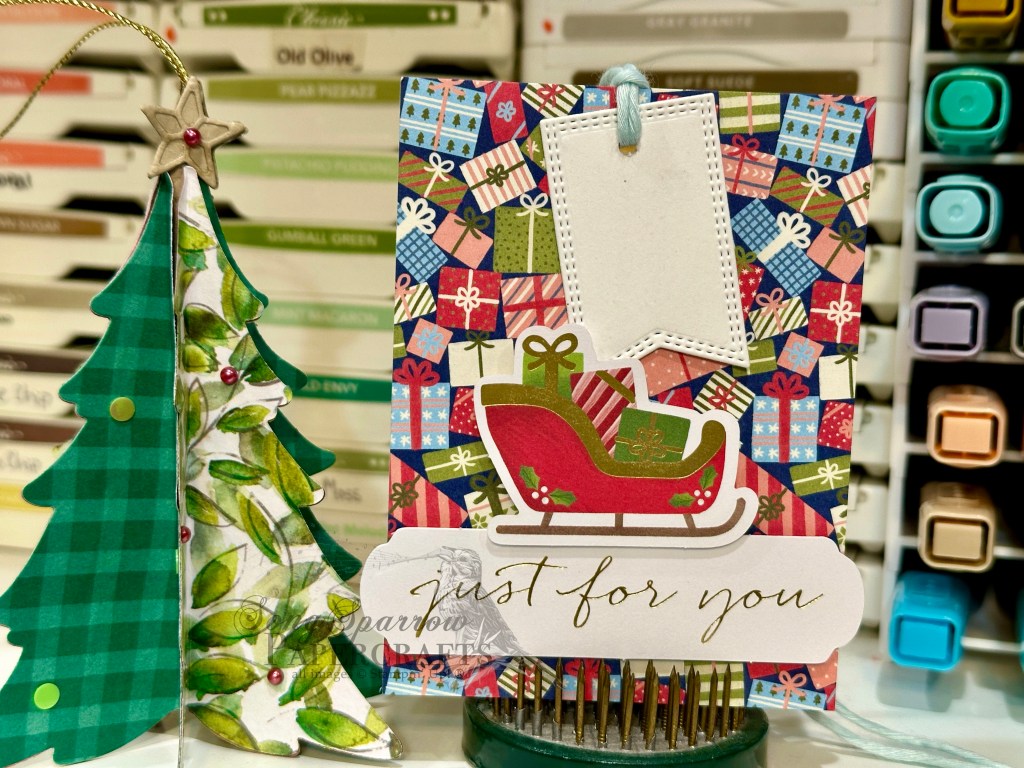
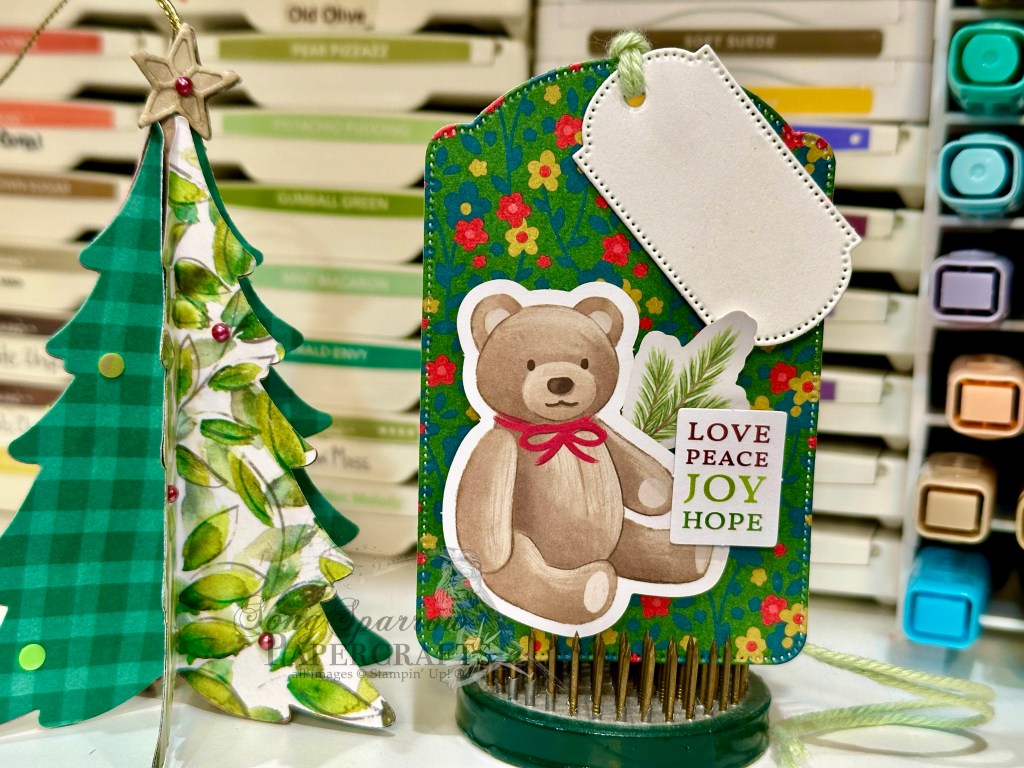
Welcome to a bright and shiny new week, crafty friends! We’re in full-on Christmas mode over here as we make our lists and check them twice. I pulled out all of the gifts we’ve purchased so far and started wrapping last night.
And that meant that I was also busy in the craft room making the gift tags. Did you know it’s super easy to make gift tags? Even with the smallest crafty stash, I have no doubt that you have the perfect combination of things to make cute gift tags. Today, I’m showing you a small sampling of what I whipped together last night using some patterned paper, several die sets, and the Joyful ephemera.
Are these not the cutest? And they are SO easy to put together. Let’s take a closer look at each one.
I got started on the first tag by diecutting the base from a sheet of Take a Bow paper using the largest Greetings of the Season die. I kept things simple with just a few elements from the Joyful ephemera packs — just a wreath and a sentiment. To help the wreath stand out against the polka dot background, I cut a sheet of red polka dot from the Take a Bow paper pack. I put this panel over a gold banner, which draws the eye nicely to the wreath panel. I mirrored on the reverse side with just the gold banner and then the Holly Jolly sentiment. For the to/from tag, I cut a smaller tag from white cardstock using the Greetings of the Season die and then finished off with some (retired) Cherry Cobbler twine to attach the tag to my package.
For this tag, I also used the largest Greetings of the Season die and cut a piece of the (now retired) Garden Walk patterned paper. I chose two larger images, some greenery, and two sentiments from the Joyful ephemera packs to decorate each side of the tag. I also cut some gold twigs using the Changing Leaves die sets. The bear, evergreen branch, and small sentiment are adhered on varying layers of dimensionals for a little depth. On the reverse side, I layered the drums, evergreen, gold sprigs, and sentiment. I also used varying layers of dimensionals on this side, as well. The small to/from tag is from Greetings of the Season and secured with some retired twine.
Our last tag uses a retired Memories & More set called Beary Christmas. I pulled the sleigh and sentiment from the Joyful ephemera packs and adhered on the package side of the Beary Christmas tag. I cut the to/from tag from white cardstock using the smallest banner from the Nested Essentials die set and secured with some retired twine. To cover the overhanging sentiment on the opposite side of the tag, I adhered two small stars from the ephemera packs to either side.
No matter the size of your crafting stash, you can dress up your packages with cute handmade gift tags! Tune in the rest of the week as we take a look at how we can quickly dress up our holiday gift-giving.
Products used in today’s featured designs: White cardstock Take a Bow, More Dazzle (retired), gold foil DSP Joyful ephemera Greetings of the Season, Nested Essentials, Changing Leaves dies Beary Christmas Memories & More (retired) Assorted twine (retired) Dimensionals Adhesives
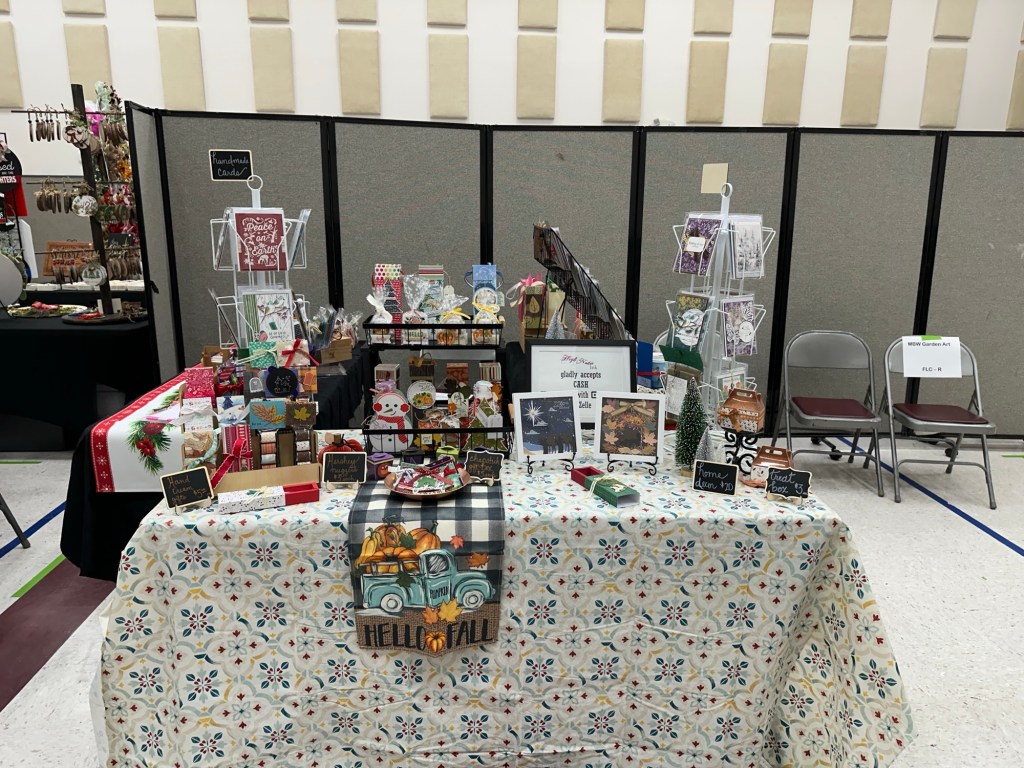
It’s been a tremendously busy week. I’ve been working away in the craft room as I’m down to the wire for my craft booth items. Today is setup day and tomorrow is booth day!
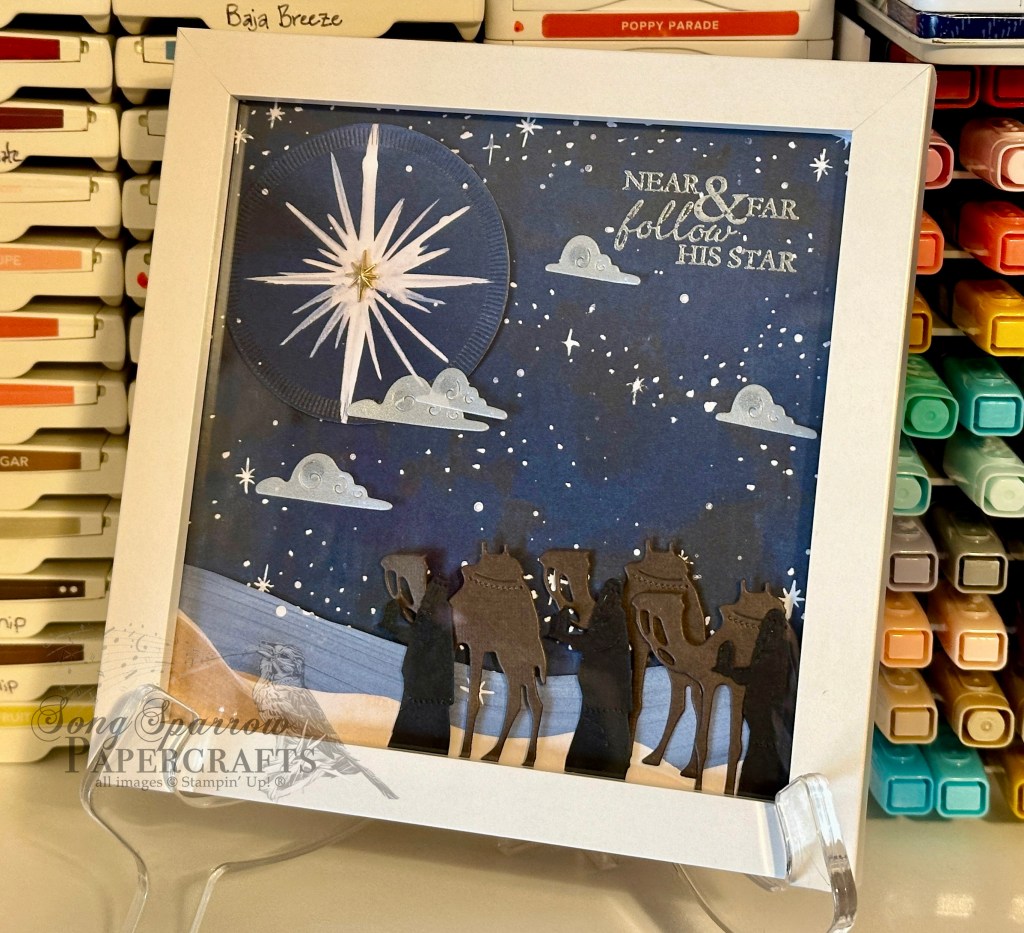
Today, I’m popping in to share another fun giftie that will be available in my shop — home decor items. On one of our recent virtual team events, we made a framed project and I just fell in love with the idea.
And as with most things I prefer to undertake in the craft room, projects don’t have to be overly complicated to have a WOW factor. Today’s sample is a Christmas project using the O Holy Night suite. This set of products retired last year and I’m still super sad about it! This particular project is a combination of patterned paper and diecut elements — most of them are repeated images. A simple bit of layering with dimensionals builds a gorgeous scene of the wisemen on their journey to find Jesus.
For those of you who have been following along over the last week and expressed some interest in the lip balm box, I was able to carve out a little time to make a video and PDF tutorial to walk you through putting a box together.
Next week, I’ll be popping in with a preview of my favorite soon-to-release Online Exclusive bundle. It’s otterly adorable! *wink wink*
It’s a bright and shiny new week, and I don’t know about you, but last week was a doozy. I felt like we were meeting ourselves coming and going! This week should be a little less frantic with the kiddos being out of school for fall break.
Last week, we got a special treat here in North Texas as the conditions were perfect (for those who live in areas without light pollution) to see the aurora. My parents had the absolute best view. Just look at that sky! What a terrific reminder of the majesty of God’s creation!
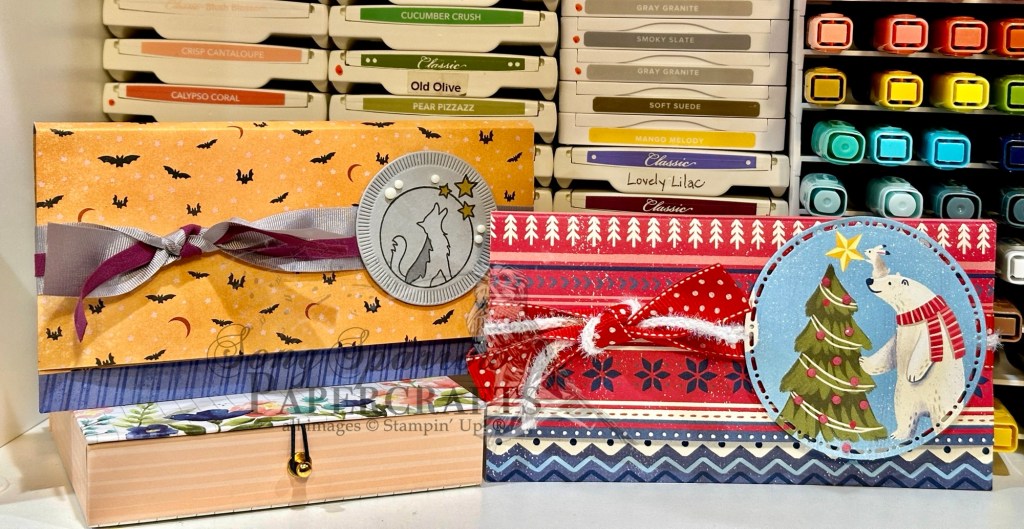
This week, I’m still frantically working to finish up items for my booth for this weekend’s craft fair. And since so many of these things are gift items and we’re heading into the gift-giving time of year, I thought it the perfect opportunity to continue sharing some of the things that go in my booth.
This year, I’m trying something new. I found a wonderful gift box by The Paper Pixie to hold small tubes of hand cream. Once I got the hang of making the box, which is a little tricky at first, these cute gifties come together pretty quickly. I try to have a good variety of seasons and occasions represented in the packaging. I found a really nice variety pack of hand creams that came in a whole assortment of fragrances on Amazon, but this box is also perfectly sized for the smaller L’Occitane hand creams if you happen upon a good deal for a variety pack.
If you’re a craft fair-goer, what types of things are you looking for? Tell me in the comments!
It’s craft fair season, and I’m hard at work preparing for an upcoming show. I like to offer a wide variety of products outside of just cards because, quite honestly, it always seems like the gift items sell best.
One surefire hit is always chocolate. And today’s cute giftie is a custom-wrapped chocolate bar. I’ve seen lots of clever ways to wrap a chocolate bar, but I really love this particular envelope design because it’s super quick and simple to make! super helpful when you want to turn out a bunch in a short amount of time.
Using double-sided patterned paper means that your treat envelope is decorative from start to finish. Several glue dots in the chocolate bar help it stay put inside the envelope. I like to hold the envelope closed with ribbon and then add a cute decorative element on top. Isn’t this an adorable way to give a sweet treat?!
We’ll be continuing our look into my craft booth next week. I have lots more cute stuff to show you and a video tutorial to share!
It has been a busy week this week, and I wish I could say that it involved more time in the Song Sparrow Papercrafts studio. But alas, the call of work and homelife have prevailed. We’ve all had our share of homework to do. And I don’t know about you, but we’ve been watching the trek of Hurricane Milton with bated breath.
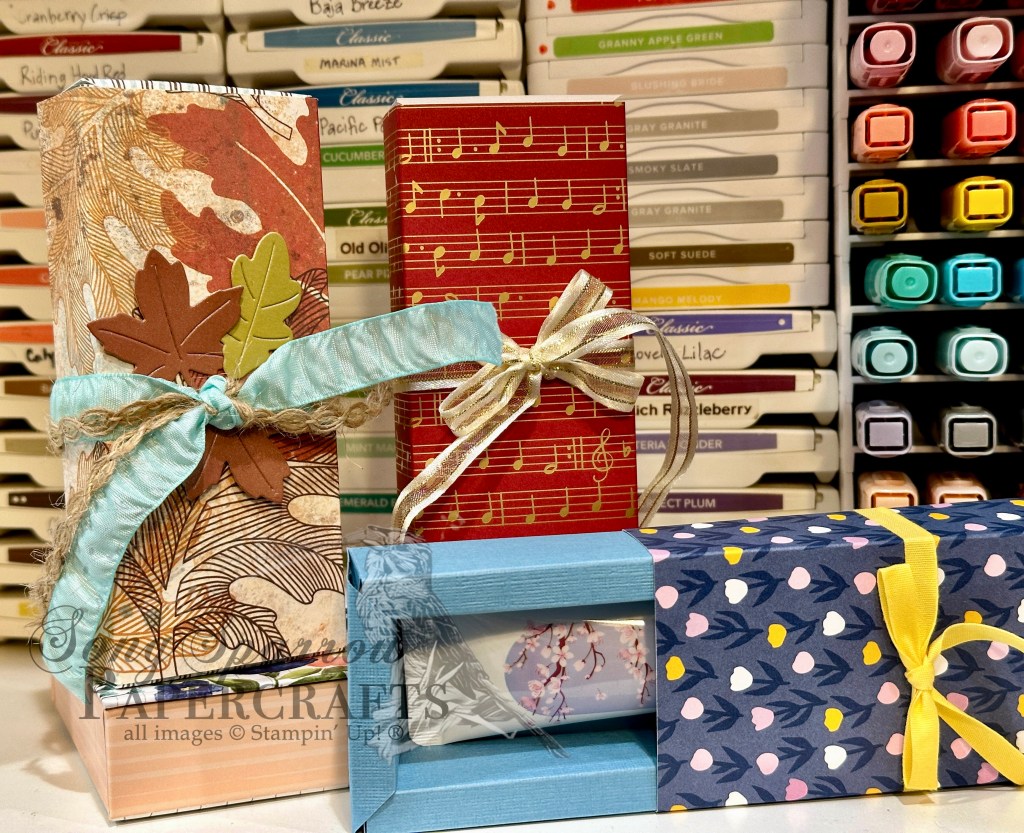
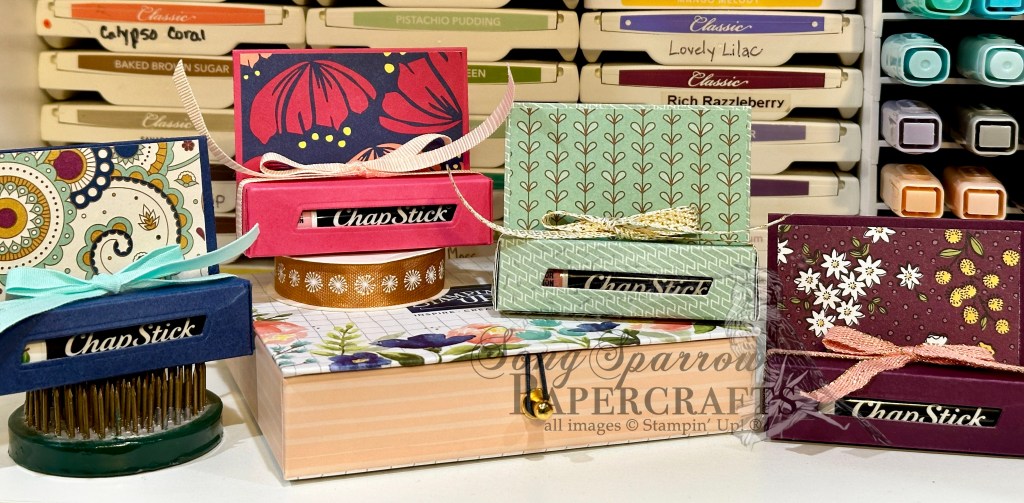
As I’m preparing for an upcoming craft show, we’re taking a look at some of the fun gifties that I’ll have in my booth. Aside from having the fun edible treats, I love to create little gift items that contain something useful. And who doesn’t love a good tube of lip balm? I have some in just about every room of the house, plus my car and my purse and at my office.
I found a super cute gift box tutorial over at The Paper Pixie that I have adapted/simplified a bit. Are these not the cutest little boxes? You can use solid or patterned cardstock for the box itself. I had some thicker patterned cardstock, and it worked super well. But as you can see, a plain box doesn’t have to look plain once you’re done dressing it up!
If you’re interested in a PDF tutorial for these cute boxes that includes my little shortcuts, simply drop me a comment with a link to your socials (or other means of sending it to you). I’ll be sending out all of the requested tutorials from this week’s projects over the weekend.
I’ll be popping in with a few more craft show goodies over the next few days. So I hope you’ll pop in and check out more cute gifties.

 Designer Series Paper")
 Designer Series Paper")
 Specialty Paper")


")

")

 Metallic Ribbon")