Coming Soon

Thinking of You

Howdy, everyone! Welcome to another sneak peek of some of the new products that are set to release next week. Like yesterday, today we’re combining a little bit of old and some new to create a super clean and simple design that you can put together in less than 5 minutes. If you’re like me, you need one of those designs every once in a while.

Today, we’re combining the beautiful Splendid Autumn designer series paper with the new foiled paper called Flower Garden foils and a new stamp set called Sentimental Framing. This stamp set is 100% sentiments perfect for all sorts of occasions.

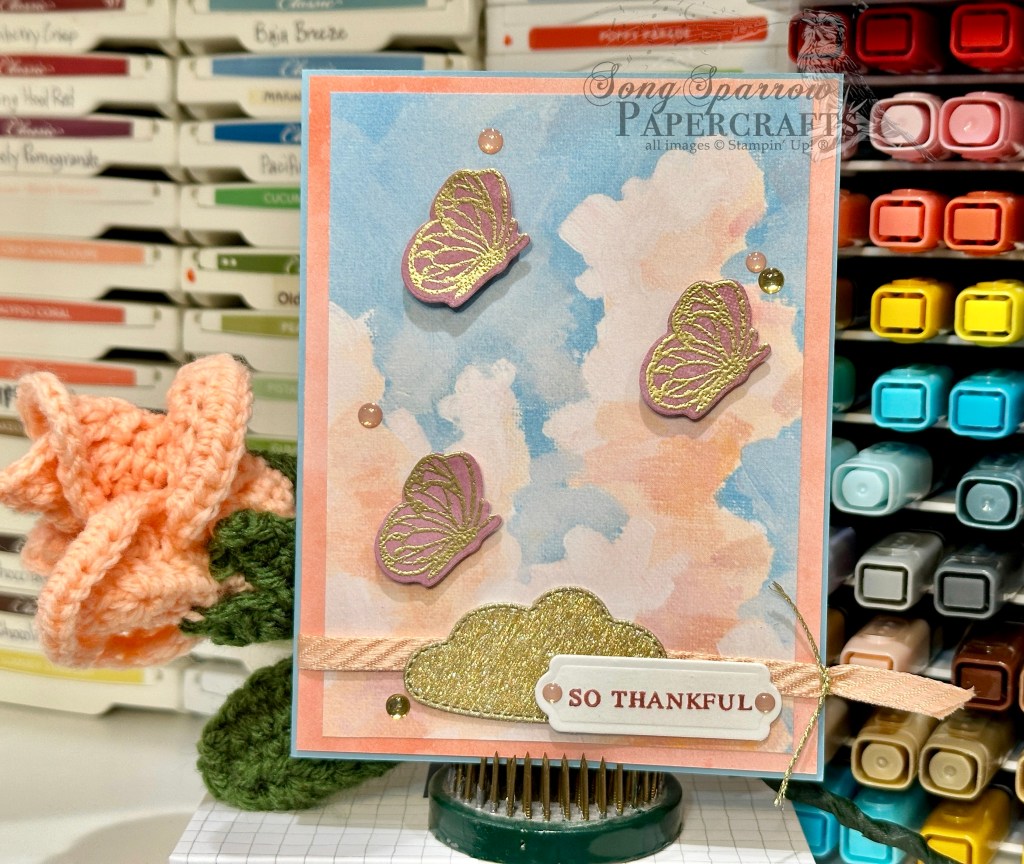
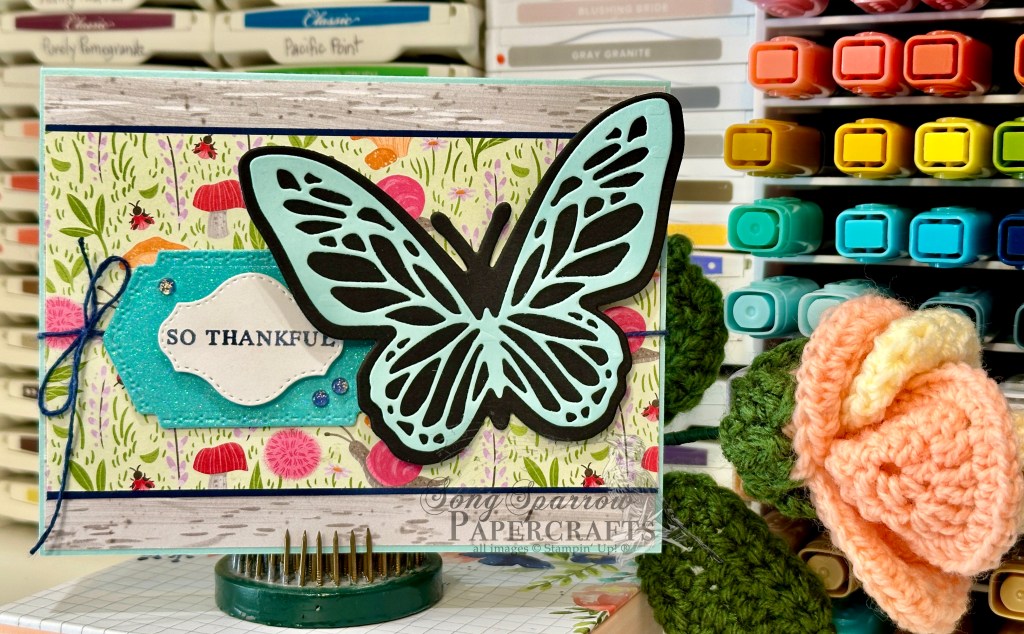
Let’s get started on our card. We’re going to begin with a base of Blackberry Bliss cardstock. Our focal panel is a sheet of the Splendid Autumn paper that is cut with the largest Textured Notes die and then matted with a sheet of the pink-hued Flower Garden foil specialty paper. I heat embossed the sentiment from the Sentimental Framing stamp set directly onto the patterned paper using some white embossing powder. I tied some iridescent trim just above the sentiment. I really love how the ribbon pulls in the more subtle colors of the sunset in our scene. I added a few purple shimmer gems for just a touch of sparkle and to help guide the eye down and across our card design.

Next up, we’re going to be taking a look at a new set that builds some beautiful scenes and is perfect for more masculine designs!

Products used in this card:
Blackberry Bliss cardstock
Splendid Autumn, Flower Garden foils (coming soon!) DSP
Sentimental Framing stamps (coming soon!)
Textured Notes dies
Iridescent striped trim
Purple shimmer gems

Coming Soon

Just Breathe

Happy Monday, everyone. It was a busy weekend around here with all sorts of different activities. I feel like I need a weekend from my weekend!

This week, we’re getting some little sneak peeks at some upcoming releases. Did you know that next week Stampin’ Up! will be releasing new Online Exclusives and a new annual catalog?! Today’s design is the perfect combination between old and new as we pair the Thoughtful Journey designer series paper with the new Sentimental Framing dies and Scenic Adventure stamps in this very clean and simple design.

We get started with a base of Petunia Pop cardstock. The sheet of flowering thistle paper from the Thoughtful Journey paper pack is cut using the new Sentimental Framing dies. The decorative frame is adhered to the card base with dimensionals while the center section is adhered directly to the card base to give a layered effect. The sentiment from the new Scenic Adventure stamp set is stamped in Pretty Peacock on white cardstock and diecut with the frame from the Enduring Beauty set. A twist of Fresh Freesia seam binding ribbon is adhered behind the sentiment panel at the base of the focal panel. The smaller flowers and leaves are cut from Mossy Meadow and Fresh Freesia cardstock using the Enduring Beauty dies and adhered behind the corner of the sentiment panel. Some starburst sequins finish things off with a pop of color and a patterned twinkle.

Tune in tomorrow for another sneak peek of products coming next week!

Products used in today’s card:
Petunia Pop, Basic White, Mossy Meadow cardstock
Thoughtful Journey DSP
Scenic Adventure stamps (coming soon!)
Sentimental Framing (coming soon!), Enduring Beauty dies
Starburst sequins
Fresh Freesia seam binding ribbon
Dimensionals

Coming Soon · January Mini Catalog

Because I Care

Here we are — already beginning a fresh week of the new year. I was able to enjoy a little down time last week with a more relaxed work schedule, and I always find it funny how quickly that time passes by. I’m back in the office this week and the kiddo is back to school.

This week, the new Stampin’ Up! January Mini catalog will launch, and we’re continuing to get a closer look at some of the fabulous products that will be available. In particular, this week we are going to be focusing on the Mixed Media Florals suite of products. And today, we’re pairing up the stamps & dies with the lovely new Floral Delight designer series paper.

We get started today with a base of Lemon Lolly cardstock. I chose a smaller floral pattern from the Floral Delight paper pack as the backdrop for our focal panel. The focal panel base is a circle of blue gingham vellum from the coordinating Floral & Gingham vellum pack that I cut with the Spotlight on Nature dies. The floral bunch is stamped on white cardstock with the Mixed Florals stamp and then colored with Stampin’ Blends before being diecut with the coordinating die from the Mixed Florals dies. The sentiment mat is a lovely banner cut from Crushed Curry cardstock using the Mixed Labels die, which really helps our white sentiment panel pop. The sentiment from Mixed Labels is stamped in Lost Lagoon and then cut using the coordinating small banner die from Mixed Labels. Some Lost Lagoon soft cording and Daffodil Delight narrow satin ribbon tie our color palette together. A few riverside irregular pearls guide the eye across our card design.

I hope you’ll join me tomorrow where we’ll look at a few of the other stamps and dies in this terrific product suite!

Products used in today’s design:
Lemon Lolly, Crushed Curry, Basic White cardstock
Floral Delight DSP & vellum (coming soon)
Mixed Media Florals stamps & dies (coming soon)
Mixed Labels stamps & dies (coming soon)
Spotlight on Nature, Heart Shaped (coming soon) dies
Stampin’ Blends
Lost Lagoon soft cording, Daffodil Delight satin ribbon (coming soon)
Riverside irregular pearls
Dimensionals
Adhesives

Product List
Coming Soon · January Mini Catalog

Here for You

We’re rounding out our up-close look at the Beautiful Butterflies suite today. This gorgeous suite of products launches on Tuesday in the Stampin’ Up! January Mini catalog and includes stamps, dies, hybrid embossing folder, and designer paper. Today’s design keeps it simple by pairing the stamps and dies with the lovely Regal Winter paper.

We get started with a base of Pretty Peacock cardstock. I chose the coordinating plaid pattern from the Regal Winter designer series paper pack as the backdrop and matted with silver foil specialty paper. The plaid is embossed with the Beautiful Butterflies embossing folder, and I love how the folder gives a deep impression that scars the paper so the white center shows through for a distressed look. The two smaller butterflies are cut from silver foil specialty paper with the bodies cut basic black cardstock using the Beautiful Butterflies dies. The sentiment from the Beautiful Butterflies stamp set is stamped on white cardstock and then diecut with the smallest Mixed Labels die and matted with a portion of the largest banner die from the Beautiful Butterflies set. A few drusy embellishments scattered across the card front draw the eye across the full embossed panel. I finished the sentiment on the inside message pael and added a few butterflies to complete our theme.

Next week we’re going to be working with the Mixed Florals bundle. I hope you’ll stop by to see how this bundle can work for you!

Products used in today’s design:
Pretty Peacock, Basic White, Basic Black cardstock
Regal Winter, Silver foil DSP
Beautiful Butterflies bundle (coming soon)
Beautiful Butterflies embossing folder (coming soon)
Mixed Labels dies (coming soon)
Drusy embellishments
Dimensionals
Adhesives

Coming Soon · January Mini Catalog

Thankful Trio

As it’s finally beginning to feel like winter here in North Texas, we’ve finally stopped seeing the last of the butterflies making their migration southward. But as we have warm days here and there, it does make me think of those last beauties who came flitting through just a few short weeks ago. And that’s the inspiration behind today’s card.

This week, we’re getting a closer look at the up-and-coming Stampin’ Up! mini catalog release that will go live on January 7th. In particular, this week, we’re focusing on the Beautiful Butterflies bundle. And today, we’re pairing up the butterflies with the gorgeous Everyday Skies patterned paper that will release at the same time.

For our design today, we get started with a base of Bashful Blue cardstock. I really love how that makes the blue sky pop here. Our background panel is a gorgeous sheet of the Everyday Skies paper pack, which is matted with a sheet of the Beautiful Bokeh paper. Together, these two papers really show off the setting sun reflecting off the clouds in our sky. Using a strip of another sheet of the Everyday Skies paper, I stamped the smaller half-butterfly and then heat embossed with gold before die cutting with the coordinating die from Beautiful Butterflies. The sentiment from Beautiful Butterflies is stamped in Flirty Flamingo on white cardstock and then cut with the smaller banner die from the Beautiful Butterflies die set. I cut a cloud from textured gold cardstock using the Bright Skies dies and used it as a backdrop for the sentiment panel. A strip of the Petal Pink diagonal striped trim really sets off the sentiment section nicely, and the gold thread (literally) ties everything together. A few low profile dots across the card front add a glimmer of sparkle that brings out the shimmery gold wings.

Tomorrow we’ll be finishing out our look at Beautiful Butterflies. I hope you’ll pop by and see how we finish things out this week.

Products used in today’s design:
Balmy Blue, Basic White cardstock
Everyday Skies (coming soon), Beautiful Bokeh (coming soon), Textured Metallic DSP
Beautiful Butterflies bundle (coming soon)
Bright Skies dies
Gold embossing powder
Low profile dots (coming soon)
Petal Pink diagonal trim, gold twisted thread
Dimensionals
Adhesives

Coming Soon · January Mini Catalog

Life is Better

This week, we’re exploring all of the wonderful ways that we can use the new Beautiful Butterflies suite that will release on January 7th in the Stampin’ Up! January Mini catalog. Today, we’re pairing it up with the lovely Mixed Media Florals designer series paper.

We get started with a base of Basic Black cardstock. I chose the one-sheet-wonder design in the Mixed Media Florals paper pack as the backdrop for this clean and simple design. The butterfly is stamped on a sheet of the blue Beautiful Bokeh paper using the Beautiful Butterflies stamps and then diecut with the coordinating die. I popped up the butterfly on dimensionals to give the illusion that its coming to light on the flowers in the foreground. The sentiment from Hugs for Love is stamped directly on the background paper in the top corner just above the butterfly. A twist of Night of Navy thread breaks up the white space and helps tie our blue elements together. A scattering of drusy embellishments add some sparkle.

I love how Stampin’ Up! provides so many ways to make gorgeous cards in a snap by making products that pair so beautifully together. Tune in tomorrow as we continue to flutter through design ideas with the new Beautiful Butterflies suite.

Products used in today’s card:
Basic Black cardstock
Mixed Media Florals (coming soon), Beautiful Bokeh (coming soon) DSP
Beautiful Butterflies stamps & dies (coming soon)
Hugs for Love stamps (coming soon)
Night of Navy thread
Drusy embellishments
Dimensionals
Adhesives

Coming Soon · January Mini Catalog

You Make Me Smile

Happy New Year, everyone! We had a delightful evening, enjoying a steak dinner, some s’mores around the firepit, a family movie in our pjs, and some celebratory poppers & bubbles to ring in the new year. What about you? Did you do something fun to ring in the new year?

Today, we’re working with the Beautiful Butterflies bundle that will release on January 7th with the new Stampin’ Up! January Mini Catalog. This bundle includes stamps, dies, and a hybrid embossing folder. And today, the hybrid embossing folder takes center stage in our design, along with the new patterned paper called Beautiful Bokeh.

We start our design today with a backdrop of Fresh Freesia cardstock. I chose a coordinating sheet of Beautiful Bokeh as the focal panel and embossed it using the Beautiful Butterflies embossing folder and, at the same time, I cut the large butterfly from the center of the embossed panel using the coordinating die. To bring out the detail in the embossed butterfly that has been cut from the center, I went over it with my finger and silver ink. I added some pastel ombre wing tips for extra sparkle and color. Both the focal panel and butterfly are adhered to the card base using dimensionals of varying heights. A strip of Fresh Freesia seam binding ribbon behind the butterfly really brings out the purple hues in our backdrop. The sentiment from Hugs for Love is stamped on white cardstock and punched with the coordinating Hugs for Love punch and then adhered in the bottom-right corner of our focal panel. A few purple sequins add that extra touch of sparkle that draws the eye across the card.

I hope you’ll tune in tomorrow as we continue to explore all of the lovely designs we can make using the Beautiful Butterflies bundle.

Products used in today’s design:
Fresh Freesia, Basic White cardstock
Beautiful Bokeh (coming soon), pastel ombre glimmer (coming soon) DSP
Beautiful Butterflies dies & embossing folder (coming soon)
Hugs for Love bundle (coming soon)
Fresh Freesia seam binding ribbon (coming soon)
Purple sequins (coming soon)
Dimensionals
Adhesives

Coming Soon · January Mini Catalog

Toadstool Butterfly

The upcoming Stampin’ Up! January Mini and Sale-a-Bration catalogs have so many adorable products. We’ve gotten a quick peek at some of my favorites, and this week we’re taking a closer look at the Beautiful Butterflies stamps & dies bundle.

Today, we’re pairing up Beautiful Butterflies with the adorable SAB paper called Toadstool Gardens. I’m circling back to a recent color combo that the Luv 2 Stamp Group is using for our December color challenge. I mean, you can’t go wrong with Melon Mambo, Night of Navy, and Pool Party. Today we’re keeping the Melon Mambo on the down low and bringing forward the more masculine colors. Let’s get started!

Our card begins with a base of Pool Party cardstock. The background panel is the woodgrain pattern from the Toadstool Gardens paper pack. The focal panel is a strip of Toadstool Gardens matted with Night of Navy. I cut the large butterfly using the Beautiful Butterfly dies and black and Pool Party cardstock. The sentiment from Beautiful Butterflies is stamped in Night of Navy on white cardstock and cut with the Mixed Labels die. The mat of pastel ombre glimmer paper is cut with the larger label from Mixed Labels. I tied some Night of Navy thread in the center to draw the eye to our focal point. A few navy foiled dots help the eye land squarely on our sentiment.

Tune in tomorrow as we get a look at the gorgeous embossing folder that’s part of the Beautiful Butterflies bundle!

Products used in today’s design:
Pool Party, Basic Black, Night of Navy, Basic White cardstock
Toadstool Gardens (coming soon), Pastel ombre glimmer (coming soon) DSP
Beautiful Butterflies bundle (coming soon)
Mixed Labels dies (coming soon)
Night of Navy thread
Night of Navy Regal foiled dots
Dimensionals
Adhesives

Coming Soon · January Mini Catalog

So Thankful

Welcome to the last bright & shiny new week of 2024! It’s hard to believe that this year is almost gone, but on a personal level, I can’t say that I’m disappointed to see the year go. It’s been a tough year for our family, and we’ll be glad to see a new year with new possibilities and fewer hardships!

In just a little over a week, the new Stampin’ Up! January Mini and Sale-a-Bration catalogs will officially launch. You’ve gotten smaller glimpses into some of my favorite products from the upcoming catalogs, and now we’re going to spend some time looking at all of these wonderful sets a little more closely. And I’m going to be pairing together products, as well, so you can see just how well they can work together.

This week, we’re getting started with the Beautiful Butterflies stamps & dies bundle. Stampin’ Up! has given even more versatility with this set of dies as we get to see a new half-panel cutting feature at work. And today’s design is my first foray into putting this new die feature into action.

We get started with a base of Blackberry Bliss cardstock. I scored the standard-sized base as usual and then used the half-panel die to cut just one panel of the card base. This gives a solid base panel and then the decorative flap on top. I chose a sheet of the purple Bloom Impressions Sale-a-Bration paper to serve as the backdrop for the decorative top panel and inside sentiment panel. The inside white sentiment panel is also cut using the half-panel die and then adhered over the Bloom Impressions paper to create a slight shadowing effect with the front decorative panel. The decorative butterfly panel is dressed up with the purple ombre glimmer paper and purple shimmer gems around the edges of the wings. The sentiment from the Beautiful Butterflies stamp set is stamped in Blackberry Bliss ink on white cardstock and then diecut with the smaller sentiment die included in the Beautiful Butterflies dies. A strip of Blackberry Bliss & Gold ribbon serve to ground the sentiment panel. A scattering of the Sale-a-Bration purple sequins give some additional sparkle and draw the eye across our card design and to the sentiment.

Drop by tomorrow to see more of the Beautiful Butterflies bundle!

Products used in today’s design:
Blackberry Bliss, Basic White cardstock
Bloom Impressions (coming soon), Pastel ombre (coming soon) DSP
Beautiful Butterflies stamps & dies (coming soon)
Purple sequins (coming soon), Purple shimmer gems
Blackberry Bliss & Gold ribbon
Dimensionals
Adhesives

Coming Soon · January Mini Catalog

Heartfelt Thanks

Today we’re rounding out our quick peeks at some of my favorite products from the upcoming Stampin’ Up! January Mini and Sale-a-Bration catalogs. This is a super easy design that uses the new Memories & More kit called Mixed Media Florals and the gorgeous new Plaster Painting embossing folder.

Our design begins today with a base of Petal Pink cardstock. The focal panel backdrop is a piece of Beautiful Bokeh patterned paper that is embossed with the new Plaster Painting embossing folder. I made sure to give the panel a deep impression, which allows the white center of the paper to show through. I really loved this distressed look ad how it brings out the white elements of our focal panel. Our focal panel is one of the smaller cards from the Mixed Media Florals Memories & More kit, along with one of the included sentiments from the same. The focal panel is adhered to the backdrop over the Petal Pink diagonal trim using dimensionals. I added Wink of Stella across the wings of the butterfly and adhered to the corner of the focal panel with dimensionals. A few shiny sequins and foiled gems help draw the eye across our design and settle on the sentiment.

Next week, we’ll be taking more in-depth looks at all of these new products and we’ll be getting started with the Beautiful Butterflies bundle. I hope you’ll come along as we combine a few products from the upcoming catalog to make gorgeous projects!

Products used in today’s design:
Petal Pink cardstock
Beautiful Bokeh DSP (coming soon)
Mixed Media Florals Memories & More (coming soon)
Plaster Painting embossing folder (coming soon)
Petal Pink diagonal ribbon
Petal Pink & Gold foiled gems, shiny sequins
Paper butterfly
Wink of Stella
Dimensionals
Adhesives