Coming Soon · Fun Folds · Holiday Mini Catalog · Peaceful Garden

Peaceful Thoughts

Welcome to the weekend! How is yours going so far? It’s been a busy one here just catching up on all of the things you don’t have time to deal with during the school week. But, of course, there’s always a little time for crafting too! *wink*

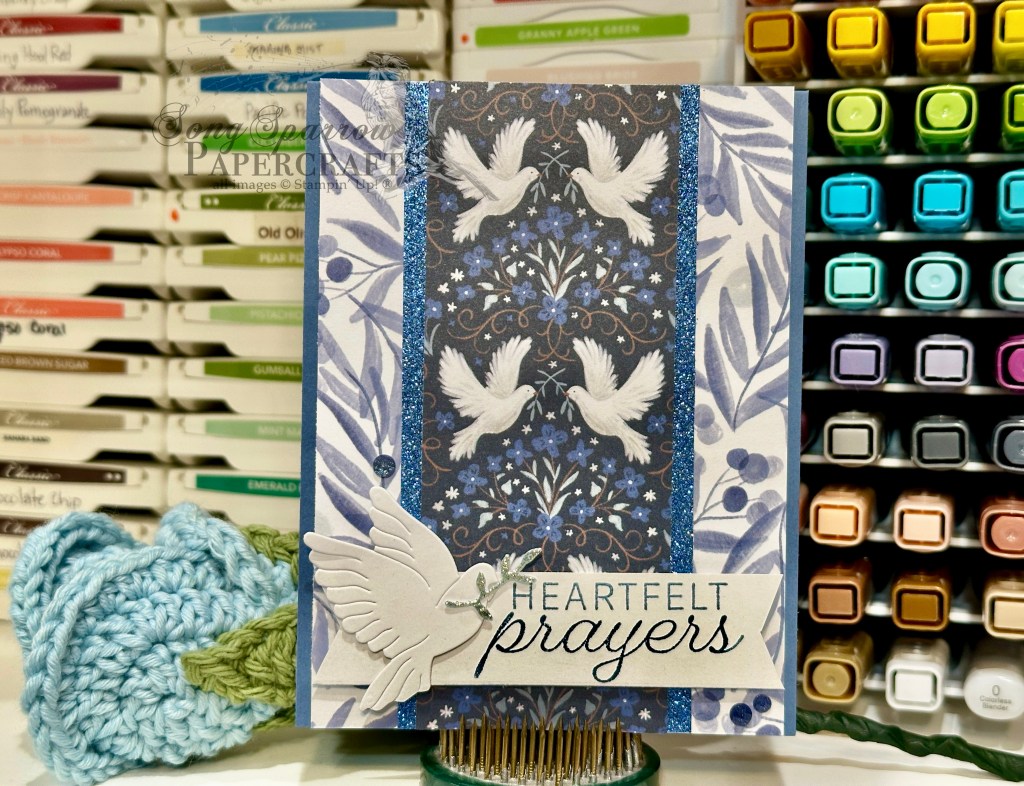
This week, we’ve been using the products in the SU! Peaceful Garden suite that will release in a few short weeks with all of the products in the new Holiday Mini catalog. Today we’re pairing up the paper with the With You in Mind stamp set and a cool fun fold I learned from fellow demo Patti Dolan called the Arrow Fun Fold.

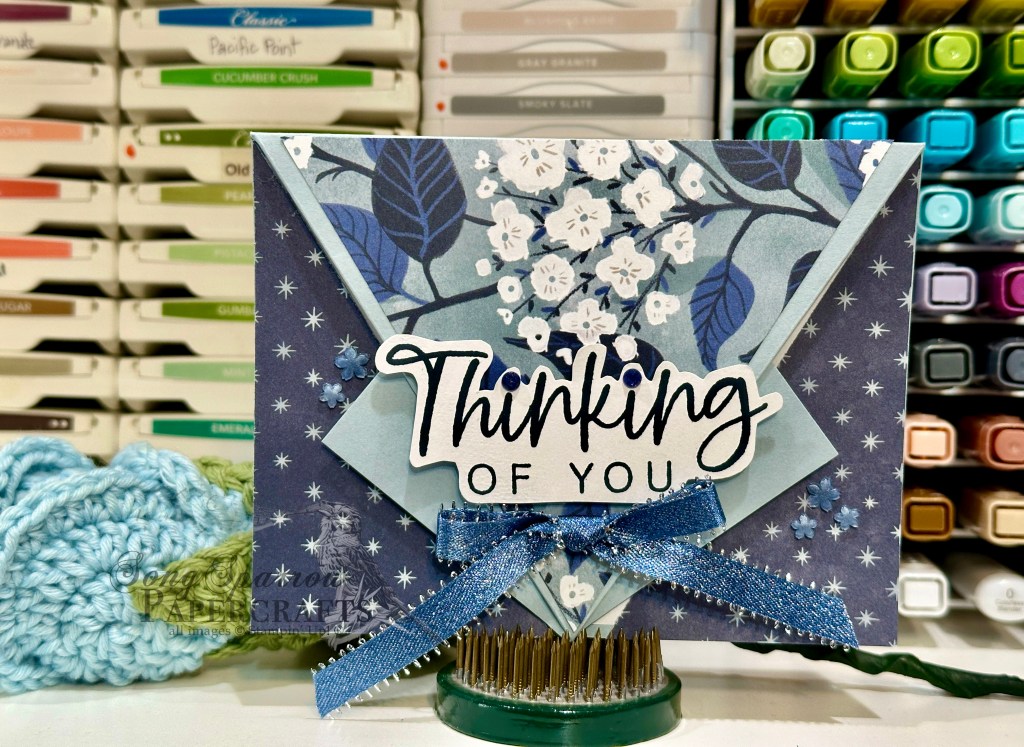
We get started with a base of Cloud Cover cardstock. One sheet of patterned paper from the Peaceful Garden pack serves as the show-stopping focal elements in this card. The sentiment from With You in Mind is stamped in Secret Sea on white cardstock. I used paper snips to cut around the sentiment. It’s adhered to the arrow portion using dimensionals. I finished things off with some Misty Moonlight silver edged ribbon, Hues of Blue flowers, and charming shimmer gems.

Would you like to give this fun fold a try? It’s really pretty simple, and you can download the PDF tutorial here.

Next week, we’re going to a stroll through another suite of products that will be releasing in September. And I can’t wait to show it to you!

Products used in today’s card:
Cloud Cover, Basic White cardstock
Peaceful Garden DSP (coming in Sept)
With You in Mind stamps
Misty Moonlight silver edged trim (coming in Sept)
Hues of Blue flowers (coming in Sept), charming shimmer faceted dots
Dimensionals
Adhesives

Coming Soon · Holiday Mini Catalog · Peaceful Garden · Sketchy Fridays

Sketchy Fridays: Peace, Love, & Joy!

Happy Sketchy Fridays, everyone, and welcome to the weekend! Around here, we’ve survived our first week of school and now we’re sailing into the weekend ready for the R&R for sure. I’m super stoked because I just got my box of pre-order goodies for the new Holiday Mini catalog. Anyone know what I plan to be doing this weekend? *grin*

We’ve taken a little break from Sketchy Fridays for the last little bit, but I thought it would be fun to get back to it. Because who doesn’t love being able to push the easy button on getting a card started?! *wink* For those of you who are new here, Sketchy Fridays is a weekly series where we use a card sketch to design our featured card.

This week’s card is based on our Luv 2 Stamp Group’s monthly sketch challenge using the Atlantic Hearts Sketch #640. Today’s design features the new Peaceful Garden suite that will release in Holiday Mini catalog in September.

We get started with a base of Cloud Cover cardstock. The background panel is a nice neutral pattern from the Peaceful Garden paper pack. The focal panel backdrop is a floral pattern and cross-hatch sheet from the pack. The sentiment from Peace on Earth is stamped in Misty Moonlight on white cardstock and then cut to a simple banner. The sentiment panel is adhered over a bow of Misty Moonlight & silver edged ribbon with dimensionals. I finished things off with some Hues of Blue flowers. Super simple and super elegant!

We’ll be wrapping up our Peaceful Garden card series tomorrow with a fun fold. I hope you’ll drop in!

Products used in today’s card:
Cloud Cover, Basic White cardstock
Peaceful Garden DSP (coming in Sept)
Peace on Earth stamps (coming in Sept)
Misty Moonlight & silver edged ribbon (coming in Sept)
Hues of Blue flowers (coming in Sept)
Dimensionals
Adhesives

Coming Soon · Holiday Mini Catalog · Peaceful Garden

Monochromatic Peace

We’re winding down this week, and I don’t know about you but I’m ready for the weekend ahead. The first week of school is always a rough transition as we work to find the school year rhythm again. Poor fella had a rough day yesterday after leaving some important papers and his school computer at home. Learning personal responsibility is tough!

This week, we’ve been working with a brand new suite of products that is due to release in September in the SU! Holiday Mini catalog. Peaceful Garden lends itself to a whole host of different styles and seasons. Today I thought it would be fun to work in a monochromatic color palette and with just a few simple elements from the suite. So our featured color is one of the new In Colors called Secret Sea and we’re letting the lovely Peaceful Greenery embossing folder do all of the heavy lifting for our design.

We start with a base of Secret Sea cardstock. Our Secret Sea focal panel is machine embossed with the Peaceful Greenery embossing folder and then matted with Secret Sea glimmer paper. One thing I love about the Peaceful Greenery embossing folder and Peace on Earth dies is that the decorative panels are made to inlay in the center of the debossed portion of the embossing folder. So I used the largest die to cut out the debossed section. And then I used the smaller die to cut down the cutout piece and create a smaller panel for the sentiment. The sentiment from Peace on Earth is stamped in Versamark and heat embossed with clear embossing powder. I cut some of the smaller greenery elements from a scrap of Secret Sea glimmer paper and adhered them on opposing corners of the sentiment panel before adhering the sentiment panel to the center of the card front with dimensionals. A few shimmer dots finish things off perfectly.

Tomorrow we’ll be using a sketch to create our card. I hope you’ll drop in and see what’s in store!

Products used in today’s card:
Secret Sea cardstock
Peaceful Garden glimmer SP (coming in Sept)
Peace on Earth stamp & die bundle (coming in Sept)
Peaceful Greenery embossing folder (coming in Sept)
Clear embossing powder
Charming shimmer faceted dots
Dimensionals
Adhesives

Coming Soon · Holiday Mini Catalog · Peaceful Garden

Peaceful Greenery

Welcome to the midway point of the week. The first week of school is always a whirlwind as we get back into the groove of the schoolyear schedule, and this year is no exception. Hopefully we’ll start finding our groove a little better next week, but for now we’re just flying by the seats of our pants! *grin*

This week, all of our designs feature the Stampin’ Up! Peaceful Garden suite which is due to release in September in the new Holiday Mini catalog. Today, I wanted to give a look at the Peaceful Greenery embossing folder.

We get started with a base of Night of Navy cardstock. The backdrop for our focal panel is a sheet of vine pattern from the Peaceful Garden paper pack. This panel is machine embossed with the Peaceful Greenery embossing folder. To ensure that the embossed pattern stood out against the complimentary patterned background, I used my finger to “shade” the embossing with platinum ink from my metallic ink stash. The embossed image has a perfect shaped portion in the center where the stacked dies from the Peace on Earth set fit. The sentiment from Peace on Earth is stamped in Misty Moonlight on white and then cut with the smallest die. The panel is then matted with Secret Sea glimmer paper from the Peaceful Garden pack that has been cut with the larger die. The full panel is adhered to the card front with dimensionals. I cut two of the larger twigs from the die set from silver glimmer paper and held them together with some of the Misty Moonlight silver edged ribbon. Drusy embellishments draw the eye down and across the design so that the eye takes in all the details.

I hope you’ll drop by tomorrow to see what else this lovely embossing folder can do!

Products used in today’s card:
Night of Navy, Basic White cardstock
Peaceful Garden DSP, Peaceful Garden glimmer (coming in September!)
Peace on Earth stamp & die bundle (coming in September!)
Peaceful Greenery embossing folder (coming in September!)
Misty Moonlight silver edged ribbon (coming in September!)
Drusy embellishments
Dimensionals
Adhesives

Coming Soon · Holiday Mini Catalog · Peaceful Garden

Wishing You Love

Welcome back, friends! I hope your week has gotten off to a good start. We have successfully navigated the first day of school. The kiddo was pretty stoked that he had friends in every class. And we’re just glad that he had a great day and seems to be at least moderately excited about this school year.

On to some crafting, shall we? This week, we’re working with a brand new suite from the upcoming Holiday Mini catalog – Peaceful Garden. And the beautiful paper takes center stage in today’s card.

We get started with a base of Secret Sea cardstock. (Does anyone else love the moodiness of this new shade of blue?) A sheet of the floral stems from the Peaceful Garden paper pack serves as the backdrop for our card. A strip of the coordinating Secret Sea glimmer paper serves as the focal panel on which we have two small squares of the vine patterned from the Peaceful Garden pack. The hovering dove is cut from a sheet of silver glimmer paper using the Peace on Earth dies and secured to the panel with dimensionals. Extra dimensionals under the wings give the realistic look of wing movement. The sentiment from Peace on Earth is stamped on white cardstock in Secret Sea ink. One end of the panel is snipped to create the sentiment banner that is adhered underneath the larger focal panel. A few drusy embellishments on either side help draw the eye across our design so that you take in each element.

Tomorrow we’ll be exploring a few of the other elements included in the suite. I hope you’ll drop in and see some of the other awesome goodies in this amazing suite.

Products used in this card:
Secret Sea, Basic White cardstock
Peaceful Garden DSP & glimmer paper (coming Sept 3!)
Peace on Earth stamp & die bundle (coming Sept 3!)
Drusy embellishments
Dimensionals
Adhesives

Coming Soon · Holiday Mini Catalog · Peaceful Garden

Peaceful Prayers

Happy Monday, crafty friends! It was a busy weekend that went by way too fast for us as we spent the last weekend soaking up summer and preparing for the new school year that begins today.

I am SO excited about this week’s featured design products. We’re going to be using the *new* Peaceful Garden suite of products, which releases in the new Holiday Mini catalog on September 3rd. This suite includes beautiful patterned paper, coordinating glimmer paper, stamps, dies, an embossing folder, gorgeous ribbon, and fun embellishments. I just love the beautiful blue color palette of this suite! And today’s super simple design features the gorgeous patterned papers.

We get started with a base of Misty Moonlight cardstock. I chose two coordinating patterns from the Peaceful Garden paper pack – the beautiful doves and greenery sheets. I loved the repeating pattern of the doves and chose to cut one of the vertical strips of repeating pattern to serve as the centerpiece of this design. To give a little eye relief and add a little punch, I separated the dove strip from the greenery with a strip of blue glimmer paper from the coordinating pack. The sentiment from the Peace on Earth stamp set is stamped in Misty Moonlight on a strip white cardstock and then notched on each end to create the banner. I offset the sentiment to allow for the diecut dove on the left. The dove is cut from white cardstock using the Peace on Earth dies and adhered to the sentiment panel with dimensionals. I also cut and added a branch of greenery cut from silver glimmer paper. The sentiment panel is adhered at the bottom of the front panel with dimensionals. A few charming shimmer faceted dots on either side of the sentiment panel add a little extra color-coordinated sparkle.

This suite really does make it easy to create beautiful cards in a snap. I can’t wait to show you more!

Products used in today’s card:
Misty Moonlight, Basic White cardstock
Peaceful Garden DSP & glimmer paper (coming Sept 3!)
Peace on Earth stamp & die bundle (coming Sept 3!)
Charming shimmer faceted dots
Dimensionals
Adhesives

Coming Soon · Online Exclusives

Appreciated

Welcome to a bright, shiny week all full of fun and possibilities! We had a nice lowkey weekend. With things really heating up here in North Texas, there wasn’t much fun to be had outside unless you were up for frying an egg on the sidewalk! *wink*

We’re starting a new design series this week. With a whole new set of Online Exclusives dropping tomorrow, we’re going to be taking a closer look at some of the things that I just couldn’t wait to get my hands on. And first up is the Label Me Grateful bundle, which is a set of lovely scripted sentiments and a set of dies that includes a large label and accent pieces. Today, I’m pairing it up with the Timeless Plaid paper to create a nice masculine card.

We get started with a base of neutral Crumb Cake cardstock. A sheet of the green plaid paper from the Timeless Plaid pack serves as our backdrop. I used the label die from the new Label Me Grateful set to cut a piece of Cloud Cover Flower Garden foil. The sentiment from the Label Me Grateful stamp set is stamped in Secret Sea on white cardstock and then cut with the middle label die from the Mixed Labels die set using the extension method. The sentiment is adhered over a twist of the new Mossy Meadow & Gold trim using dimensionals. I cut a few sprigs of greenery and a flower from pastel ombre glimmer paper and tucked them next to the sentiment. One of the new Secret Sea charming shimmer faceted dots serves as the floral center, while gold flecked gems flank the sentiment panel on either side.

Tune in tomorrow to see what’s cooking up next. *spooky*

Products releasing tomorrow!
Label Me Grateful stamps & dies
Mossy Meadow & gold trim
Charming shimmer faceted dots

Product List
Coming Soon · Treat Boxes

Boo Box

This week’s design theme is 3D projects, and today we’re whipping up a super simple (but simply adorable) treat box using some up-and-coming Online Exclusives. The new Spooky Sweet paper pack and coordinating precut shapes are just adorable. Add a few twinkly stars and some iridescent ribbon and you have the perfect treat box for your trick-or-treaters!

Our treat box is made from Basic Black cardstock. I used two different patterns from the Spooky Sweet paper pack on the box and added a little twinkle with the glimmer paper for an extra pop on the lid. I chose some precut shapes that complimented the patterned paper and helped tell the trick-or-treating story on the lid. A few sparkly stars scattered across the lid finish things off. I found that adding a few finger notches on the sides of the lid, as well as the little tab on the front of the box really helped make the box much easier to open.

Isn’t this box the cutest?! A simple swap of paper and embellishments and you can have a cute little gift box for any occasion! Wanna try making one yourself? You can download the instructions here.

Products used in today’s project:
Basic Black cardstock
Spooky Sweet DSP & cutouts (coming July 1st)
Three color glimmer paper (retired)
Petunia Pop iridescent ribbon (coming July 1st)
Shimmer stars foam pieces (coming July 1st)
Small circle punch
Dimensionals
Adhesives

Coming Soon · Sentiments

Make a Difference

We’re finishing out our sentiments design series with a super clean and simple design. This card combines the lovely Florals in Bloom Online Exclusive paper with the up-and-coming Label Me Grateful stamp and die bundle that will release on July 1st.

This card starts with a base of Summer Splash cardstock. A sheet of the Florals in Bloom paper serves as the backdrop for our focal panel. The sentiment from the new Label Me Grateful stamp set is stamped in Pretty Peacock on white cardstock and then diecut using the Something Fancy dies. To help the sentiment really pop against the floral background, we mat it with a panel of Summer Splash glimmer paper that’s cut with the next size die up in the Something Fancy set. We mount the sentiment panel with dimensionals over Lost Lagoon soft cording and some greenery cut from the pastel ombre glimmer paper using the Label Me Grateful detail dies. I added a diecut flower and Petunia Pop iridescent ribbon for some pops of color around the sentiment panel. We finish off with a few charming shimmer faceted dots on either side of the focal section.

I hope this week’s designs have given you a fresh look at your sentiments and how they can stand front and center as easily as they can support a focal image. Tune in next week as we work through a whole week of 3D projects and gift-giving projects.

Product List

Products that will release on July 1:
Label Me Grateful bundle
Charming shimmer faceted dots
Petunia Pop iridescent ribbon

Coming Soon · Sketchy Fridays

Sketchy Fridays: Smile!

This week, we’re getting some sneaky peeks at some of the brand new product that will be launching next week. And today we’re making another trip to the garden as we combine some new products with a sketch for Sketchy Fridays.

For those of you who are new here, Sketchy Fridays is a weekly series where we’re using a card sketch to design our featured card. Right now, we’re working through a full series of designs using the card sketches found in current Stampin’ Up! catalogs.

This week’s card is based on Sketch #3 from the Stampin’ Up! Annual Catalog. Today’s design features the Florals in Bloom suite that will release next week. This week, I’m staying pretty true to the sketch. I simply flipped the side where the focal panel is affixed.

We get started with a base of Blackberry Bliss cardstock. I used the Pattern of Friendship die on the front panel to add a little texture in the background. Our background panels are a combination of Florals in Bloom and Petunia Pop glimmer paper, and these are all adhered directly to the card front. I tied a piece of Fresh Freesia velvet ribbon around the card front before placing the focal panel. The focal panel base is a white circle cut using the Spotlight on Nature dies. Using the Pretty Florals dies, I cut some flowers from the Florals in Bloom paper and then affixed them to the circle using a combination of dimensionals and glue dots. The sentiment panel is cut from vellum using the Something Fancy dies. The sentiment from Sweet Blooms is stamped in Blackberry Bliss ink and then heat embossed with clear embossing powder before being adhered to the focal panel with glue dots. We finish things off with two tone sparkle gems across the card front.

Tomorrow we’re going to have our sentiments take center stage. I hope you’ll drop by and check it out.

Products used in today’s card:
Blackberry Bliss, Basic White cardstock
Florals in Bloom (coming soon), In Color glimmer, vellum DSP
Sweet Blooms stamps (coming soon)
Pretty Florals (coming soon), Spotlight on Nature, Something Fancy, Pattern of Friendship dies
Clear embossing powder
Fresh Freesia velvet ribbon
Two tone sparkle gems
Dimensionals