Happy Tuesday, everybody. I still find it hard to figure out what day of the week it is after being home sick and just the holidays generally. Anybody else? Slowly but surely we’ll get back in the groove. But not before another holiday interrupts our week!
This week we’re playing with some of my new crafty goodies that arrived. And we’re keeping it simple again today with the new On Display stamp & die bundle. All of the little images in this set make it easy to make quick, clean & simple cards, which is super helpful when you’re short on time but don’t want your card to show short on thoughtfulness. Today we’re pairing up On Display with the current Product of the Month True Blue Florals paper to create this cutie.

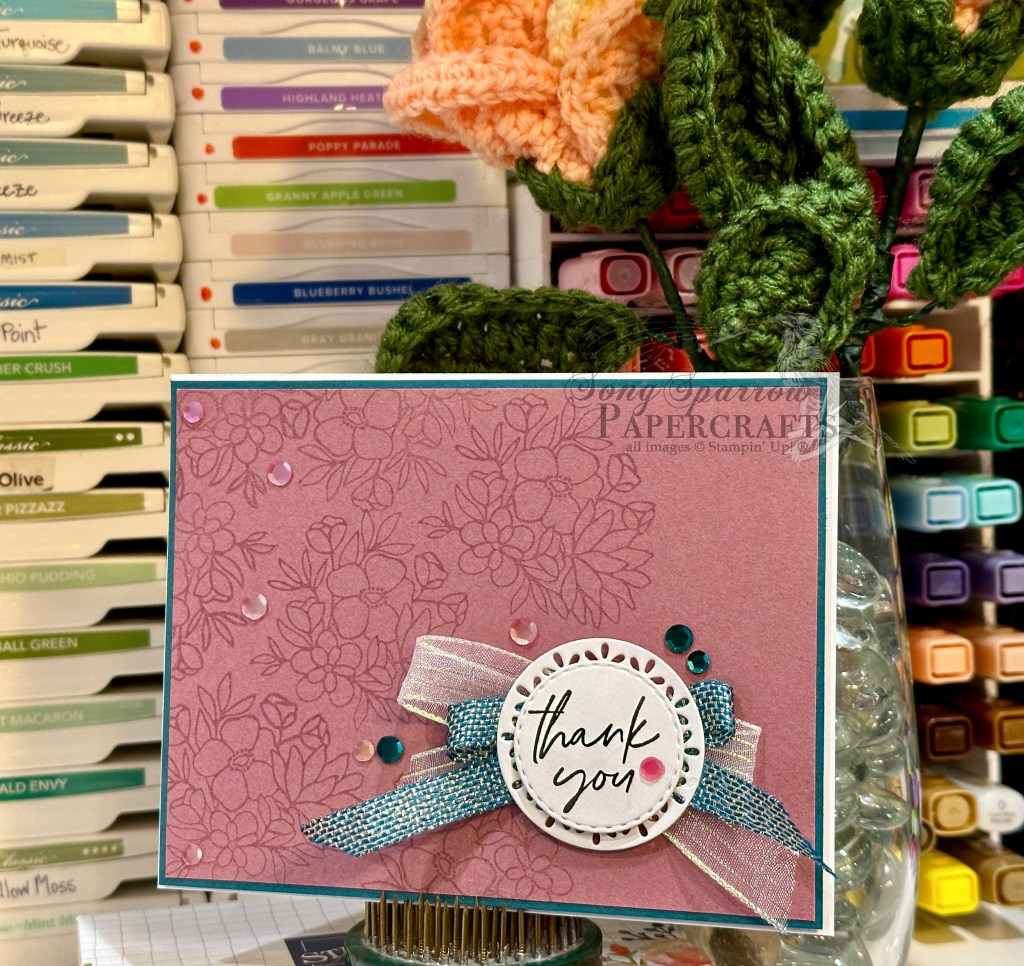
We get started with a base of Balmy Blue cardstock and we’re using the floral pattern (that reminds me of my grandmother’s wallpaper) from the True Blue Florals paper pack as our backdrop. I wrapped this panel with some Misty Moonlight linen thread to tie all of our hues of blue together. The focal panel is cut from white cardstock with the smallest die in the Branching Out set and then matted with Misty Moonlight glimmer paper from the Peaceful Garden glimmer pack that’s diecut with the next size up. I stamped the sentiment from the On Display set directly onto the focal panel in the top-right corner. Our potted plants are cut with the On Display dies with a combination of Cajun Craze, Mossy Meadow, Oxidized Copper, and Shaded Spruce. They’re adhered onto our focal panel with dimensionals and then the full panel is adhered to our card front with dimensionals, as well. We finish things off with some Misty Moonlight flowers from the Hues of Blue flower set, along with some Secret Sea charming shimmer dots.
Doesn’t this feel like a picture in a picture? I just love that effect. And I love how the backdrop feels calm and familiar, just like my Granny’s house. This card would be perfect to welcome someone into a new home or simply to just say hello.
Tune in tomorrow as we take a peek in Granny’s curio cabinet. It will be fun to see what we find!
Product List![Balmy Blue 8-1/2" X 11" Cardstock [ 146982 ]](https://assets1.tamsnetwork.com/images/EC042017NF/146982s.jpg "Balmy Blue 8-1/2\" X 11\" Cardstock [ 146982 ]")
![Basic White 8 1/2" X 11" Cardstock [ 166780 ]](https://assets1.tamsnetwork.com/images/EC042017NF/166780s.jpg "Basic White 8 1/2\" X 11\" Cardstock [ 166780 ]")
![Cajun Craze 8-1/2" X 11" Cardstock [ 119684 ]](https://assets1.tamsnetwork.com/images/EC042017NF/119684s.jpg "Cajun Craze 8-1/2\" X 11\" Cardstock [ 119684 ]")
![Mossy Meadow 8-1/2" X 11" Cardstock [ 133676 ]](https://assets1.tamsnetwork.com/images/EC042017NF/133676s.jpg "Mossy Meadow 8-1/2\" X 11\" Cardstock [ 133676 ]")
![Shaded Spruce 8-1/2" X 11" Cardstock [ 146981 ]](https://assets1.tamsnetwork.com/images/EC042017NF/146981s.jpg "Shaded Spruce 8-1/2\" X 11\" Cardstock [ 146981 ]")
![Oxidized Copper 12" X 12" (30.5 X 30.5 Cm) Specialty Designer Series Paper [ 162190 ]](https://assets1.tamsnetwork.com/images/EC042017NF/162190s.jpg "Oxidized Copper 12\" X 12\" (30.5 X 30.5 Cm) Specialty Designer Series Paper [ 162190 ]")
![Peaceful Garden 12" X 12" (30.5 X 30.5 Cm) Glimmer Paper [ 165929 ]](https://assets1.tamsnetwork.com/images/EC042017NF/165929s.jpg "Peaceful Garden 12\" X 12\" (30.5 X 30.5 Cm) Glimmer Paper [ 165929 ]")
![True Blue Florals 12" X 12" (30.5 X 30.5 Cm) Designer Series Paper [ 167970 ]](https://assets1.tamsnetwork.com/images/EC042017NF/167970s.jpg "True Blue Florals 12\" X 12\" (30.5 X 30.5 Cm) Designer Series Paper [ 167970 ]")
![Branching Out Dies [ 165775 ]](https://assets1.tamsnetwork.com/images/EC042017NF/165775s.jpg "Branching Out Dies [ 165775 ]")
![On Display Bundle (English) [ 167306 ]](https://assets1.tamsnetwork.com/images/EC042017NF/167306s.jpg "On Display Bundle (English) [ 167306 ]")
![Misty Moonlight Classic Stampin' Pad [ 153118 ]](https://assets1.tamsnetwork.com/images/EC042017NF/153118s.jpg "Misty Moonlight Classic Stampin' Pad [ 153118 ]")
![Hues Of Blue Flowers [ 165930 ]](https://assets1.tamsnetwork.com/images/EC042017NF/165930s.jpg "Hues Of Blue Flowers [ 165930 ]")
![Charming Shimmer Faceted Dots [ 166139 ]](https://assets1.tamsnetwork.com/images/EC042017NF/166139s.jpg "Charming Shimmer Faceted Dots [ 166139 ]")
![Natural Tones Linen Thread [ 164071 ]](https://assets1.tamsnetwork.com/images/EC042017NF/164071s.jpg "Natural Tones Linen Thread [ 164071 ]")
![Stampin' Dimensionals [ 104430 ]](https://assets1.tamsnetwork.com/images/EC042017NF/104430s.jpg "Stampin' Dimensionals [ 104430 ]")
![Tear & Tape Adhesive [ 154031 ]](https://assets1.tamsnetwork.com/images/EC042017NF/154031s.jpg "Tear & Tape Adhesive [ 154031 ]")


 Specialty Paper")
 Glimmer Specialty Paper")


")


 Designer Series Paper")
")


 Designer Series Paper")
")


 Striped Trim")


 Specialty Paper")
")
")


")
")


 Metallic Ribbon")
 Striped Trim")


