Coming Soon · Father's Day

Always There

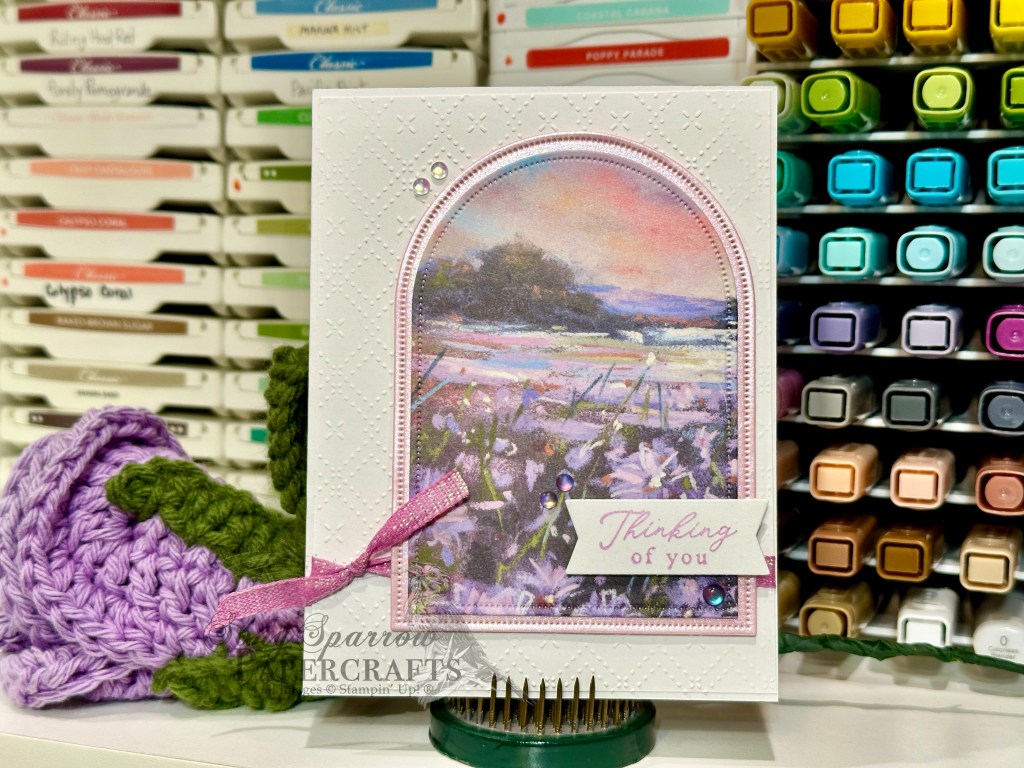
Welcome back, everyone! So glad you chose to stop by today. This week, were taking a random tour of the myriad of projects on my desk as I’m in the throes of creating product for an upcoming craft show and am also thinking ahead to both Mother’s Day and Father’s Day.

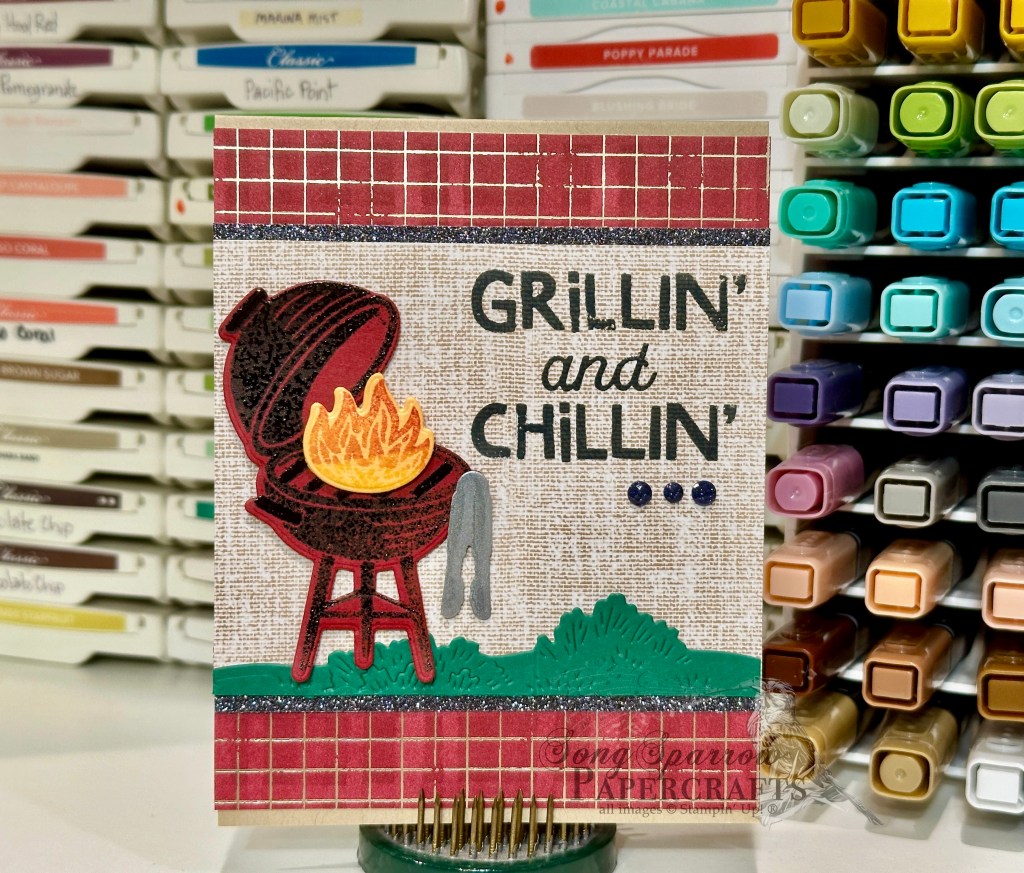
Today we’re using the brand new Silly Old Bear patterned paper (that will release next week) to create this Father’s Day card. I love the ready-made panels that are included in this paper pack. There are two separate sheets that give you instant card panels when cut apart.

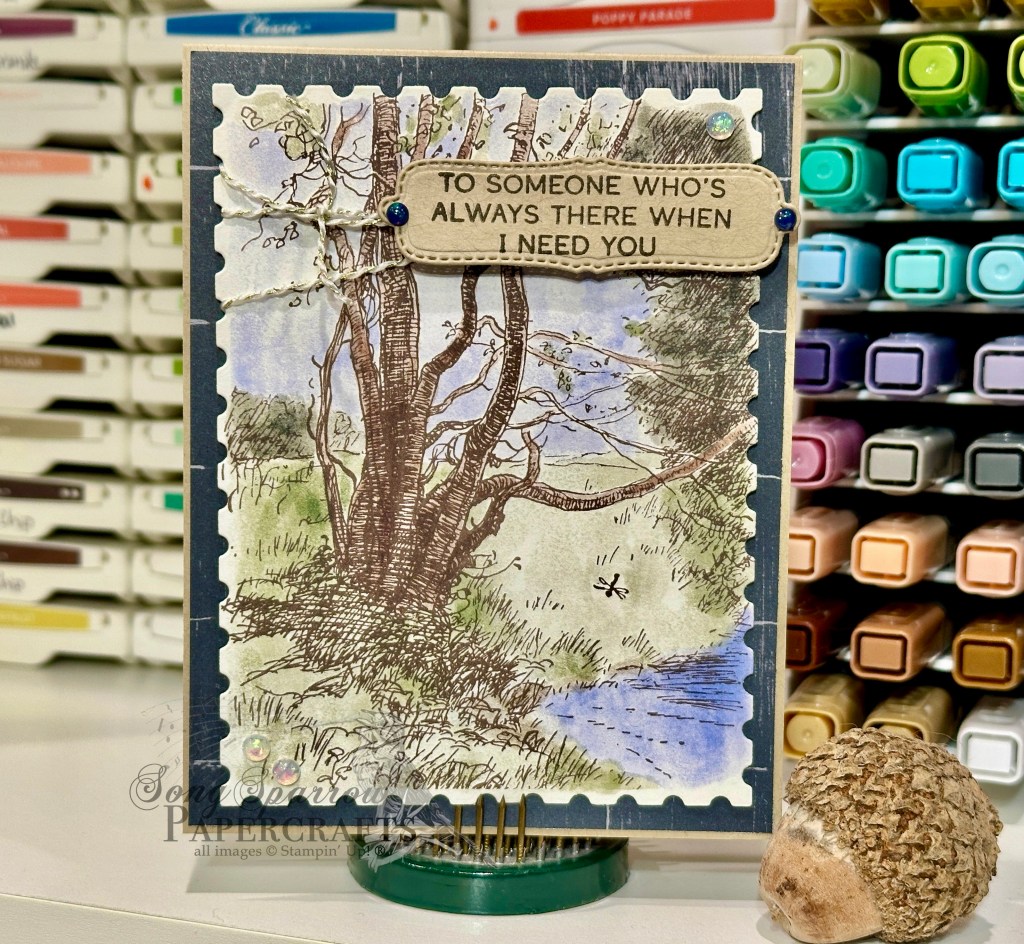
We get started with a base of Crumb Cake cardstock for this one. The background panel is a sheet of the Nature Walk paper. I love the subtle grid pattern that this sheet provides. The Silly Old Bear paper gives us our focal panel, which is cut out with the largest Perennial Postage die. The focal panel is wrapped in gold and white baker’s twine before it’s mounted on our background sheet with dimensionals. The sentiment is from the Sweet Words & Labels set is stamped on Crumb Cake in Early Espresso and then diecut with one of the coordinating dies. We finish things off with some iridescent opal rounds for a hint of twinkle.

I hope you’ll hop back by tomorrow to check out a very special fun fold design!

Products used in this card:
Crumb Cake cardstock
Nature Walk, Silly Old Bear (coming soon!) DSP
Perennial Postage dies
Sweet Words & Labels (coming soon!) stamp & die bundle
Early Espresso ink
Opal rounds
Gold & white baker’s twine
Dimensionals
Adhesives

Coming Soon

Relax & Enjoy Today

Welcome to a brand new week! The weekend went by in a flash here. We had lots of stuff going on between all of the kiddo’s activities and the usual weekend around-the-house chores. What about you? What did your weekend look like?

This week, we’re off to a new design series — a NO theme week. As I’m prepping for a late spring craft show and looking ahead to both Mother’s Day and Father’s Day, we’re going to take a look at a very random assortment of projects. First up is some fun tabletop home decor using the new Rolling Waves stamps & dies.

This scene is built on a sheet of Pecan Pie 6×6 cardstock. I still have a stash of the Oh So Ombré 6×6 retired paper pack that had the perfect sheet of turquoise-colored paper fading to white that fit the bill perfectly for the ocean water in this scene. I used the Rolling Waves dies to cut the edge of the paper toward the light end and then cut the detailed portion of the wave from white cardstock and another die from the set. Once I knew where the water’s edge was going to be, I stamped the sand detailing in Crumb Cake and Gray Granite with the stamps from the Rolling Waves set. The water dies don’t quite reach across a 6×6 sheet, so I used the palm leaves to cover the exposed portion. The leaves are cut from Granny Apple Green cardstock and then layered with dimensionals. The umbrella is a combination of white and Cloud Cover with an opal dot as the knob on top. Some shells are scattered along the beach and are cut from Flirty Flamingo and white. The sentiment combines the Notes & Totes relax & enjoy stamp heat embossed in white with the today from the Time for Celebration ephemera pack that is covered with Wink of Stella. I added some yellow opal rounds on either side of the sentiment for a little hint of sunshine.

This turned out even cuter than I had hoped. I’m thinking it will be the perfect summertime gift that just might catch someone’s eye when they stroll through my booth. What do you think?

Coming Soon

Keep Looking Up

Welcome to the weekend! We made it. This is one of those weeks where I’m glad to see the weekend but already wishing I had more time to do all the home-things I put off to the weekend AND still get a chance to rest & recharge. But sometimes it doesn’t really seem to be in the cards to do both.

We’re still working our way through the patterns & textures design series. And as soon as I saw the patterns included in the new pack of Silly Old Bear paper, I knew I had to use it to make a card for this design series! Two patterns in the pack include a sheet of small scenes, like the one I used in today’s card, which make quick & easy work of a card. We’re pairing up Silly Old Bear with the Branching Out dies, which are on the last chance list, and some of the Woodgrain Wonders paper for this super simple encouragement card.

We get started with a neutral base of Crumb Cake cardstock. A sheet of the darker woodgrain from the Woodgrain Wonders paper pack serves as the backdrop for our focal scene. The focal panel is cut from a sheet of the Silly Old Bear paper using the largest die in the Branching Out die set. The panel is adhered with dimensionals over a strip of green patterned paper from the Nature Walk paper pack. The sentiment from Sweet Words & Labels is stamped in Early Espresso on white cardstock and then cut with the small banner die from the coordinating die set. The leaf and acorns are also cut with dies from that set. The sentiment is adhered with dimensionals. A few metallic gems in opposing corners finish things off.

I love how all of the subtle patterns in the papers work together to create a feeling of walking through the woods. Sometimes patterns are bold and loud, while other times they’re backup players in the overall design. Either way, patterns are a great way to convey a message in your designs.

Products used in this card:
Crumb Cake, Cajun Craze, Early Espresso, Basic White cardstock
Nature Walk, Woodgrain Wonders, Silly Old Bear (coming soon!) DSP
Branching Out dies
Sweet Words & Labels (coming soon!) stamp & die bundle
Early Espresso ink
Metallic gems
Dimensionals
Adhesives

Coming Soon

The Right Words

Welcome back, friends! I’m glad you decided to stop by. Do you ever have days that just get off on the wrong foot — with one snafu after another? It started out as one of those days for me, but thankfully, everything was a bit more uphill after lunch. I’ll definitely be glad to see this week in the rearview!

We’re slowly but surely going to work our way through a patterns & textures design series. And today I’m sharing a sneak peek of some new paper that literally has texture — velvet, to be precise. The new Velvet Meadow patterned (and textured) paper is taking center stage in this fun fold sympathy card, along with a few other new products.

We get started with a base of Berry Burst cardstock. It’s scored to give a standard size panel inside but with offset folding panels for the card front. I really love to use this fun fold with busy patterned papers. It allows the sheet to sit front and center while also breaking up the pattern for some eye relief. The sheet of new Velvet Meadow patterned paper is matted with Pretty in Pink soft shimmer paper, which really helps the softer details in the paper pop. The sentiment from The Right Words stamp set is stamped in Secret Sea on a panel of white cut with the More Messages die. (Hint: I usually cut a quarter sheet of cardstock with the More Messages die to create a stash of sentiment panels for easy grab-and-go sentiments.) its mounted with dimensionals on a sheet of new pink Sunset Shimmer vellum and Berry Burst Garden Textures paper that are both cut with the new Sweet Words & Labels dies. I made a big twist of Berry Burst shiny ribbon and adhered it to the back of the sentiment panels for before adhering it to the left panel of the card front with dimensionals. Pearlized faceted circles and frosted iridescent dots finish things off with pops of color.

Although not pictured (because I completely forgot to photograph it), the inside is decorated with leftover strips of the Velvet Meadow paper. And the message panel includes a coordinating sentiment from The Right Words stamp set.

Sympathy cards are always hard, but combining products in a way that feels like a paper hug is always worth the extra effort!

Products used:

Berry Burst, Basic White cardstock

Garden textures, pastel shimmer DSP

Velvet Meadow DSP, Sunset Shimmer vellum, Sweet Words & Labels dies (May releases)

The Right Words stamps

More Messages dies

Secret Sea ink

Pearlized faceted dots, frosted iridescent dots

Berry Burst shiny ribbon

Dimensionals

Coming Soon

On My Desk

Howdy, friends! Did you miss me? I’ve sure missed being in my studio! It’s been a crazy week around here with a super busy work schedule. So every free minute I’ve had has been spent with the family or catching much-needed Zzzzzz. But I wanted to drop in to let you know that I haven’t forgotten about our patterns & textures design series. And I’m planning to hop right back into it once the ol’ work schedule allows.

In the meantime, I wanted to share with you a little sneak peek at the brand new goodies that arrived — all from the new release that drops in just a little under 2 weeks.

I’ve broken my shopping list into a couple of orders and this is part one. And I can’t WAIT to have some time to start playing with all this good stuff. So hopefully you can hang with me as I craft in fits and spurts for the next couple of weeks! We’ll be exploring all this new loot and picking out part two!

Patterns

Splendid Texture

Welcome back! It’s hard to believe but we’re already halfway through this week. Where does the time go? And speaking of stealing some time, today’s card uses a sheet of the Splendid Autumn paper pack that just makes you want to kick back in an easy chair on the breezy porch with a glass of tea and watch the wildflowers dance on the pasture, doesn’t it? Or maybe that’s just me showing my country upbringing.

This week, we’re using pattern and texture to create our card designs. And today is all about adding texture to give that extra pizzazz to a card. We’re combining the Beautiful Pattern embossing folder with the Splendid Autumn paper to create a little side glance out the window.

We get started with a simple base of white cardstock. The background panel is a quarter sheet of white cardstock that’s embossed with the Beautiful Pattern embossing folder. The focal panel is cut from a sheet of the Splendid Autumn paper pack using the Everyday Arches dies and then matted with some pastel pink shimmer paper cut into an arch just a tick bigger. The embossed backdrop is wrapped with some Petunia Pop iridescent ribbon and then adhered to the card base. And then the focal panel is adhered just slightly off-set on top with dimensionals. The sentiment from the stamp set included in the 2025 Advent Calendar is stamped in Fresh Freesia on one of the smaller banner dies from the More Messages set and then adhered with dimensionals onto to the bottom-right corner of the focal panel. A few frosted iridescent dots finish things off with a hint of twinkle.

While this card would be just fine without an embossed background, isn’t it fun to see how much more interesting and eye-catching this card is with that little extra textured detail. I hope you’ll continue to hop along on the patterns & textures design series this week!

Product List
Patterns

Perennial Patterns

Howdy, friends! I hope your week is off to a great start. Our weekend was super busy. So I’m off to a bit of a slow start this week. But here we are — breaking out with a new design theme.

This week is all about patterns & textures. Sometimes we forget the easiest things in our creative arsenal. So let’s shine a little light on our best crafty friends! We’re getting started with some patterns today with a combination of patterned paper and a geometric pattern on our card front. The Perennial Lavender paper and Heartfelt Hexagon punch do all the heavy lifting in today’s design.

We get started with a base of Blackberry Bliss cardstock. A quarter panel of white cardstock serves as the base for our focal panel. Using the Heartfelt Hexagon punch, I cut a hexagon of each of the patterns from the Perennial Lavender paper pack from all of the scraps I had from previous cards. I laid them out on the white cardstock to get the right orientation and adjoining patterns before adhering each hexagon in place and then trimming the overlapping portions on the edges. The focal panel is matted in Fresh Freesia to bring out some of the more subtle purple hues in the patterned pieces. A piece of the Berry Burst shiny ribbon is wrapped around the focal panel toward the bottom and tied in a bow in the center. Using a previously-cut sentiment panel from the More Messages die, I stamped the sentiment from the Cutest Crew set in Blackberry Bliss ink, leaving just enough space on the side to add a few butterflies in Fresh Freesia using another stamp from Cutest Crew. The sentiment is adhered with dimensionals offset above the ribbon. The whole panel is adhered to the card base with dimensionals, and then we add some frosted iridescent dots across the card front in a diagonal to draw the eye over the whole design.

Hot tip: if you cover an entire sheet of cardstock with the hexagons, you can create 4 cards at once with each of the decorated quarter panels. Super way to build a stash of cute cards for those last-minute occasions!

Hope you’ll continue to hop along as we find fun ways to use patterns and textures this week!

Product List
Adventures

Hello, Birdie

We’re rounding out our outdoorsy series of card designs this week with a look through the window at some cute little birdies — just the perfect way to say hello. We’re pairing up the Cutest Crew stamps with Everyday Arches for this one.

We get started with a base of Pretty Peacock cardstock. The background is a sheet of the white and gold foil plaid from the Distressed Patterns paper pack. Our focal panel is a panel of Pool Party cut with the Everyday Arches die. The sentiment and bird image from Cutest Crew are stamped in Secret Sea ink. I added a touch of sky with Cloud Cover and a blending brush. The remainder of the scene is colored with Stampin Blends. The focal panel is adhered over some Gray Granite ribbon with dimensionals. The green hexagons give us a pop of extra color and draw the eye across the full card front.

Hope to see you next week when we delve into a new design theme!

Product List
Adventures

Time for Grillin’

TGIF, everyone! We’re jumping into the springtime spirit as the weather gets more & more perfect for time on the patio. Today we tip our hat to those great backyard BBQs with the new BBQ Master bundle.

We get started with a base of Crumb Cake cardstock. A sheet of the red plaid Regal Distressed Patterned paper gives us that picnic feel. A combination of the thatch pattern from the Delicate Dreams pack and some Secret Sea glimmer paper give us the base for our focal panel. We add some grass to start our scene with the help of the Scenic Adventure dies. The grill is stamped on Cherry Cobbler cardstock and then heat embossed with black. We add some grass fire with a combination of Peach Pie cardstock and an assortment of red, yellow, and orange ink to stamp the image and then cut out with the coordinating die from the BBQ Master bundle. The tongs image is stamped on lunar luster paper and then diecut with the coordinating die before hanging them on the side to be ready for use flipping the food. The sentiment from the BBQ Master set is stamped in Secret Sea ink and then we add a few coordinating moody palette dots to finish things off.

Isn’t this card super fun? This stamp and die bundle has tons of potential, for sure! I hope you’ll drop in tomorrow to see where we wind up on this week’s adventures.

Products used:

Crumb Cake, Cherry Cobbler, Peach Pie, Garden Green cardstock

Delicate Dreams, Silver Luster, Peaceful Garden Glimmer, Regal Distressed Patterns DSP

BBQ Master stamps & dies, Scenic Adventure dies

Moody palette dots, Wink of Stella, WOW embossing powder, dimensionals

Adventures

Sunshine & Soft Seas

Welcome back, crafty friends! We’re headed to the ocean today as we explore the great outdoors this week. And we’re pairing up the Beautiful Bokeh paper with the new Rolling Waves bundle to create this card full of sunshine.

We get started with a neutral base of white cardstock, which provides a nice contrast to our soft, beachy color palette. A panel of Pool Party shimmer paper serves as our mat for the focal panel. We’re building our focal panel on Crymb Cake cardstock and we’ve stamped some larger sand piles with the Rolling Waves stamp set. To create the ocean, we’re using a sheet of the blue Beautiful Bokeh and a scrap of white paper and the Rolling Waves waters edge dies to create the foaming effect in the foreground. I’ve cut a palm frond from Soft Sea Foam and sea shells from Flirty Flamingo and layered them up front. The sentiment is stamped ina combination of Flirty Flamingo and Daffodil Delight to create a sunset effect. We finish things off with a combination of opal rounds — a few to create pebbles and a few to create bubbles in the water.

I hope you’ll drop by tomorrow to see where our next adventure takes us!

Product List