How is it Friday already?! Anyone else feel this way? Our last week of summer has just flown by. We’ve shopped for school clothes and last-minute supplies, cleaned out the backpack and started fresh for the year, set next week’s lunch box menu, and squeezed in some random fun. What do you typically do with your kiddos for their last week of summer break?


For this week’s Sketchy Fridays, we’re taking a little detour from the Annual Catalog and, instead, are taking a page from my personal sketch book. Our sketch is a little unconventional, but then again, so is today’s card!
Today, we’re continuing our back-to-school theme, and I just love how this card design came out! I knew that I wanted to make a design that included a backpack, but I definitely didn’t have a backpack image in my current product stash. So I started looking at everything a little differently as I sorted through sets again. And that’s when I realized that I could use the sled die from Sophisticated Sled die set to make it happen. Let’s take a closer look!
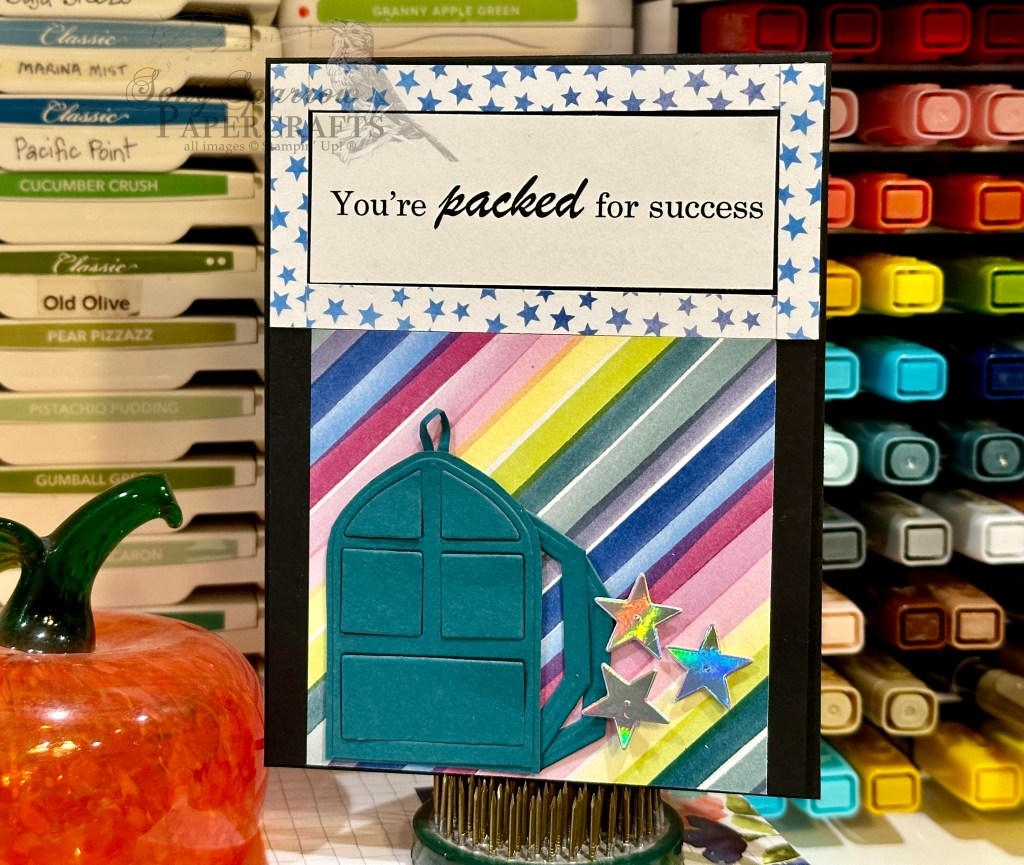
Our card gets started with a base of Basic Black cardstock. I wanted the focal panel to look like a wall in a classroom. Although difficult to see here, the focal panel is a quarter sheet of black cardstock that has been trimmed slightly on each side and then raised with dimensionals. I used the Bright & Beautiful patterned papers to help me create this look with the bottom of the wall being the striped pattern. And then I wanted the top portion to look like a bulletin board, so the star pattern is serving as the decorative border around the bulletin board and our printed sentiment is the inspirational message from the teacher.
To create our backpack, we’ll start with a quarter sheet of Pretty Peacock cardstock and use the top portion of the sled die to cut our backpack. Be sure to save all of the negative space pieces to serve as backpack pockets, and we’ll trim any portion of the bottom of the sled off to keep the look of a backpack. Using the die itself, I traced around the outside of the portion I used to cut the backpack and then fussy cut on my trace marks to create a base to which I adhered all of my pieces. This also creates a more realistic look of a stuffed backpack. I used my glue pen to adhere the outline portion and then I used several layers of glue dots on each of the “pockets” to adhere them and give them the look of having items inside. Using the letter “i” from the Alphabet a La Mode die set, I cut the handle for the backpack and adhere it using tear & tape. I used the handle for the toolbox from the Trusty Toolbox die set to create the backpack straps. The backpack is adhered to the background with dimensionals. I added a few stars cut from silver foil with the Merriest Trees dies to finish off the design.
Isn’t this the most fun? Our inside sentiment says “reach for the stars” so everything ties together nicely. I just love how it turned out!
I hope you’ll tune in tomorrow where we’ll be making some Lunchbox Lovin’. You won’t want to miss it!
Products used in today’s card:
Basic Black, Basic White, Pretty Peacock, Crushed Curry cardstock
Bright & Beautiful, Silver foil DSP
Sophisticated Sled, Trusty Tools, Merriest Trees dies
Dimensionals
Adhesives


 Designer Series Paper")
 Foil Sheets")


