This week, we’re working with the new Online Exclusive bundle from Stampin’ Up! called Frosted Forest. This bundle includes a photopolymer stamp set, coordinating dies, and coordinating decorative masks. Up until I added this bundle to my stash, I had staunchly avoided decorative masks. Decorative masks allow you to quickly color and add detail to your stamped images with sponges or blending brushes. I thought they were going to be too fussy, but Stampin’ Up! has made it super easy to line them up perfectly every time with the corner notches.
Wanna know something else I really love about the Frosted Forest set? It pairs beautifully with SO many other SU! products. And today’s card shows you exactly that, so let’s talk about how this one comes together.
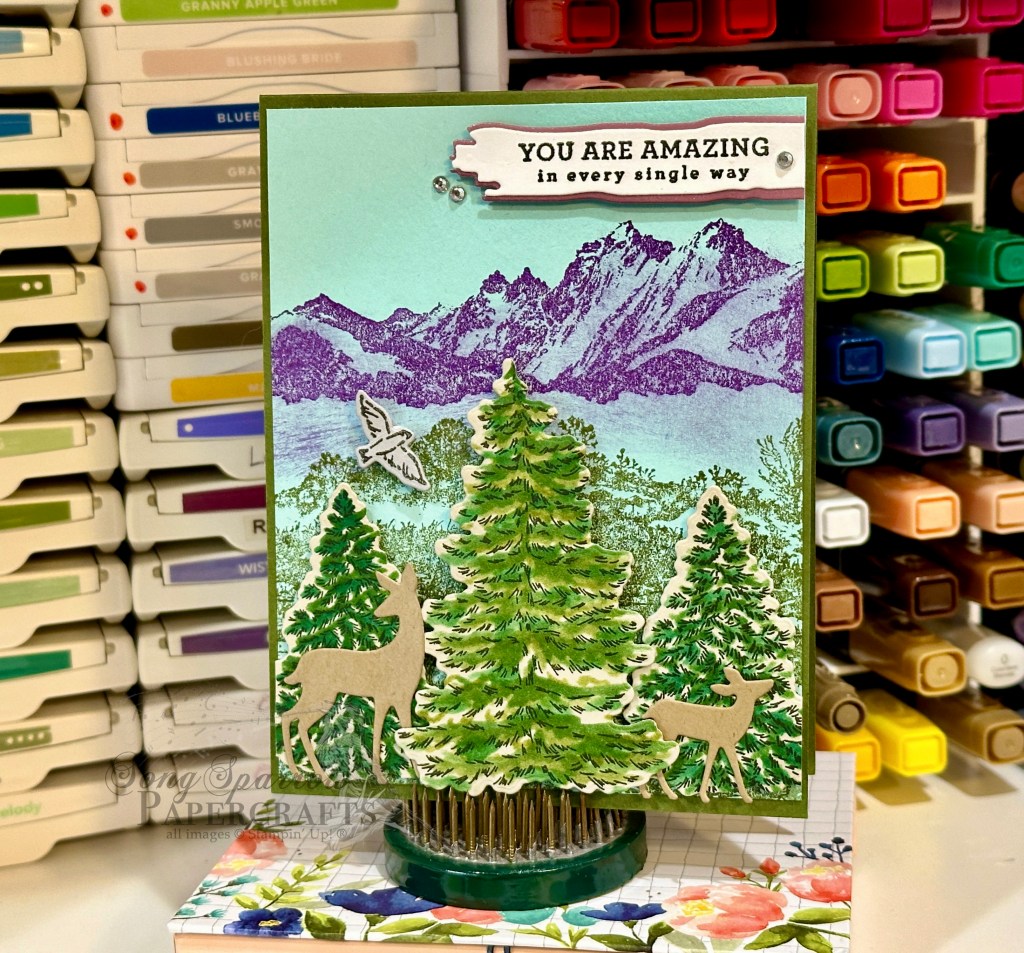
We get started with a base of Mossy Meadow cardstock. I chose a quarter panel of Pool Party as the backdrop for the focal panel so that I wouldn’t have to add the sky myself, and it allowed for a soft backdrop for all of the stamped images that follow.
So next we start building our background scene with a combination of the In the Grove and Grassy Grove stamp sets. The mountain range from In the Grove is stamped in Gorgeous Grape and then I lightly sponged over it with Highland Heather and pulled that color down to create a valley. With the grass stamp from Grassy Grove, we add a layer of grass slightly over the purple of the mountain valley using Mossy Meadow ink and continue down the panel with the grass stamp from In the Grove, also using Mossy Meadow, until the panel is complete. A few gaps here and there give a sense of changes in terrain and elevation.
Next up, we start building our forefront scene by stamping both the large and small tree from Frosted Forest in black in on Gray Granite cardstock. Each is shaded using the coordinating decorative masks with a combination of Shaded Spruce, Old Olive, and Garden Green and then each tree is diecut using the coordinating Frosted Forest die. The smaller trees are adhered on either side of the panel with dimensionals. The larger tree is adhered in the center with dimensionals so that it stands taller. The larger and smaller deer silhouettes are diecut from Crumb Cake cardstock using the Grove dies and then tucked into the trees and adhered with glue dots. The bird from the Frosted Forest set is stamped in black on Smoky Slate cardstock and then diecut with the coordinating die. It’s adhered with a dimensional over the grass so that it appears to be soaring through the valley.
Our sentiment from the Changing Leaves set is stamped in black on white cardstock and then diecut using the Friends for Life smudge banner. A piece of the Moody Mauve shimmer paper is also cut with the Friends for Life smudge banner and is cut in half to allow it to serve as a mat for the sentiment. The full panel is adhered with dimensionals and a few rhinestone jewels are added to draw the eye to the sentiment.
While this card may look a little complicated, it comes together quickly and easily. I love thinking about how I can use various sets together to create beautiful scenes, and the Frosted Forest set lends itself so easily to doing so.
I hope you’ll tune in tomorrow to see how we can create a snowy scene. You won’t want to miss it!
Products used in today’s card:
Mossy Meadow, Pool Party, Basic White, Crumb Cake, Smoky Slate, Gray Granite cardstock
Moody Mauve In Color cardstock
Frosted Forest stamps, masks, and dies
In the Grove, Grassy Grove, Changing Leaves stamps
Grove, Friends for Life dies
Rhinestone basic jewels
Dimensionals
Adhesives


 Cardstock")


")


")
")

")


