Christmas · Holidays · Winter

Sketchy Fridays: Snowy Wonder and Happiness

I really, really love this week’s theme, which is one of the reasons that I wanted to spend today showing you the designs I had planned for you throughout the last week. One of the most valuable things I have learned over the last several years is that flexibility is key when things don’t work out exactly as you planned.

So this post is the ode to Sketchy Fridays. Each week we’re using a card sketch to design our featured card. Right now, we’re working through a full series of designs using the card sketches found in current Stampin’ Up! catalogs.

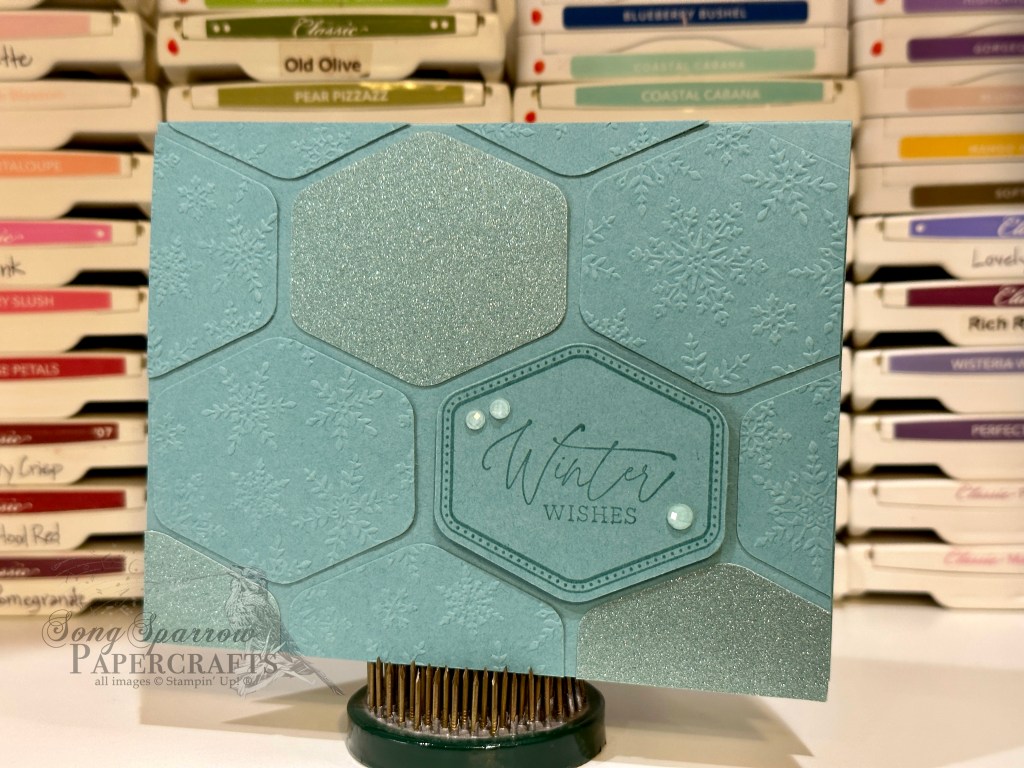
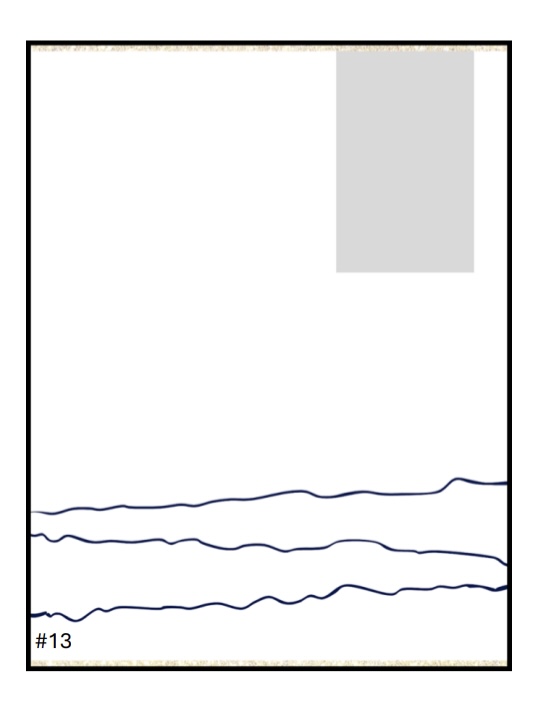
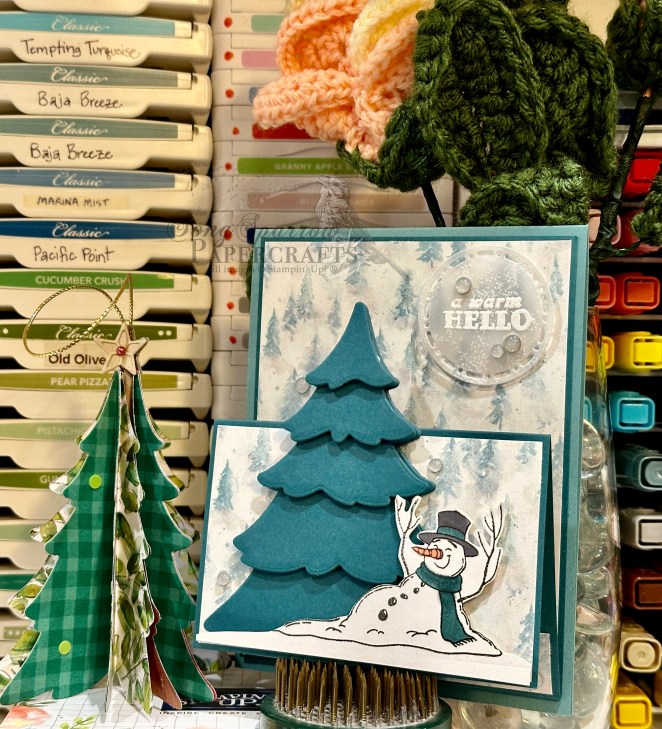
This week’s card is based on Sketch #13 from the Stampin’ Up! Annual Catalog and features the Peaceful Evergreens and In the Grove Dies, along with the ever-lovely Snowflake Sky embossing folder. Today’s card design is inspired by the very talented demo known on Instagram as Craftsomnia.

This week’s design theme is stopping by the woods on a snowy evening. This Robert Frost poem is all about taking the time to bask in the wonder of falling snow, and I can’t help but think how well the idea of stopping to take in the wonder and joy everyday moments of life has to be one of the best life lessons. And outside of this wonderful life lesson, the theme lends itself so well to a variety of lovely winter cards, don’t you think?

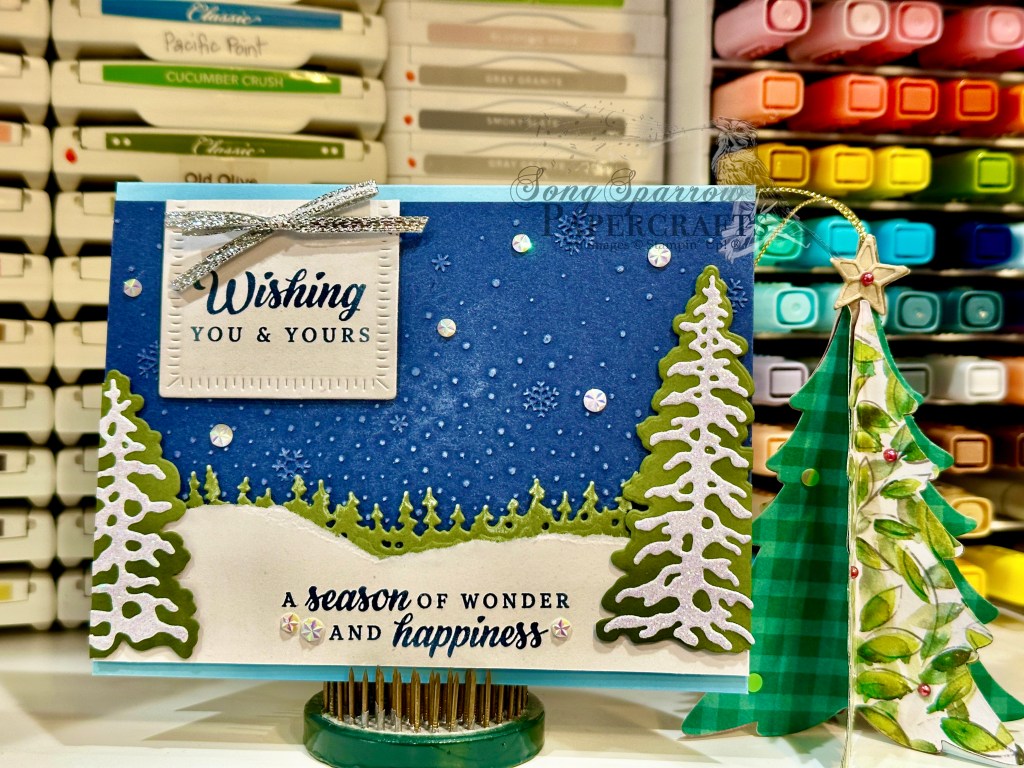
We get started with a base of Balmy Blue cardstock. Our backdrop is a panel of Night of Navy that is machine embossed with the Snowflake Sky embossing folder and then lightly brushed with white craft ink to really bring out the beautiful soft snowflakes. Our snowbank is a simple piece of white cardstock that is torn to create the soft edges of a snowy hill. The Mossy Meadow trees are diecut with a combination of the In the Grove and Peaceful Evergreen dies. A touch of craft ink to the edges of the treeline and a bit of white glimmer paper on the larger evergreens in the foreground make for the perfect dusted evergreen grove. The sentiment from the Peaceful Season stamp set is stamped in Night of Navy in the center of a white banner cut with the Radiating Stitches die and then finished in the snowbank. Dimensionals help give lots of depth to our scene, and the silver trim and iridescent faceted gems lend the sparkle.

This design is even more stunning in person as the lighting in my craft room just wasn’t quite right today to capture the true colors and details. I hope you’ll drop in a little later as I bring you one final clean & simple design in this series.

Product List
Winter

Loads of Holiday Cheer

Well, to say that my week didn’t exactly go as planned is likely obvious to you all by now. I had everything planned out, but when all was said and done, I simply didn’t have the time to execute. I had to travel out of town for work and then had some other obligations that simply overran the time I allotted for them. Such is life sometimes, eh? So today, I’m going to play a little catchup and bring you all the content I had planned for Thursday, Friday, and Saturday of this week.

If you’re new here, for the last month or so, I’ve been working with themes to inspire designs. This week, we’re stopping by the woods on a snowy evening. And today’s card was inspired by a design that was recently posted by Stampin’ Up! Artisan crafter the Crafty O’ Ink Pen. When I saw her design, I knew it would be perfect for this week’s theme, and I wanted to do my own take on it. That’s the wonderful thing about design inspiration — you get to make it your own!

So we get started with a base of Night of Navy cardstock. The background panel is a sheet of Pool Party that is machine embossed with the Snowflake Sky embossing folder, which is then lightly inked with a sponge dauber and Pool Party ink to give the look of a cloudy sky. To create the snowdrifts, I tore a quarter panel of white cardstock in half and then very lightly inked the torn edges with the Pool Party ink to give some definition and detail and layered them to the snowdrifts. They’re ultimately adhered to the background panel with dimensionals. Using the Merriest Trees dies, I cut two of the smaller sized trees from Shaded Spruce cardstock and lightly rubbed some craft ink over the tops to give them the look of having a dusting of snow. They’re tucked in and behind the snowdrifts to give depth and dimension to the scene. The sled is diecut with the Sophisticated Sled and Filled With Fun die sets from gold foil and Early Espresso cardstocks and then cut in half to create the side view of our sled. Isn’t this brilliant?! Such a great idea, Crafty O’ Ink Pen! The sled is filled with holiday goodness which has been stamped on white cardstock using the Filled With Cheer stamp set and then colored with Stampin’ Blends. Our sentiment from Filled With Cheer is stamped in Night of Navy on white cardstock and then diecut using the Peaceful Season small banner die and adhered with dimensionals over some gold trim. Adhesives snowflakes finish our snowy scene with a little sparkle.

Check back in a little later in the afternoon for our Sketchy Fridays snowy evening design.

Product List
Winter

Snowy Thoughts

It’s a super busy week around the Song Sparrow household. Yesterday, the kiddo’s basketball team had their first game of the season. It was a fairly solid loss, but I think the kids learned a lot and could see areas that still need some work and improvement. Everyone seemed to have fun, and that’s all that really matters in sports, as far as I’m concerned. I’m over here prepping for some out-of-town training and a big meeting for work, so I’m burning the candle pretty low.

This week, we’re working around the theme of stopping in the woods on a snowy evening. I kept it pretty simple with this first design. We’re using a layout by the lovely Did You Stamp Today demo as our inspiration.

We get started with a base of Shaded Spruce cardstock. Our focal panel is a strip of the snowy evergreen forest pattern from the Winter Meadow designer series paper pack that is matted with Pool Party to really bring out the more subtle blues. Our sentiment panel is cut from the blue woodgrain from the Country Woods patterned paper using the Spotlight on Nature dies. He sentiment from Friends for Life is stamped in Pretty Peacock. Our focal trees are from the Frosted Forest die set and are diecut from Shaded Spruce and adhered over a strip of layered Shaded Spruce satin ribbon and white diagonal trim. A few carefully placed regal foiled dots finish things off with a little pop of color and sparkle.

I’ve really enjoyed working with design themes the last several weeks. I find it especially useful if I want to highlight a bunch of different products rather than focusing on just one. What about you? Which format do you like best? Let me know in the comments!

Thursday we’ll continue our stop in the woods with the Sophisticated Sled set. I hope you’ll pop in!

Product List
Holidays · Winter

Bright & Beautiful Season

We’re taking a trek in the woods this week, and as much as I love all things autumn, I thought it would be nice to show how a few simple tweaks can yield beautiful winter designs. Today’s card is another clean and simple design, and we’re highlighting the Stampin’ Up! In the Grove dies and the Snowflake Sky embossing folder.

We get started with a card base of Smoky Slate cardstock. A piece of Graceful Greenery vellum serves as a soft base for our focal panel and is diecut using the Deckled Rectangles dies. Our focal panel combines a white background embossed with the Snowflake Sky embossing folder and the trees diecut from the grey woodgrain in the Country Woods patterned paper pack using the In the Grove die. The sentiment from the Peaceful Season stamp set is stamped in Smoky Slate on white cardstock and then diecut using the Radiating Stitches circle die and then matted with a silver foil circle diecut with the Everyday Details dies. A scattering of snowflakes and iridescent faceted gems give the snowy background the perfect amount of twinkle.

Tomorrow we’re going to be pairing our woodsy theme with a sketch from a SU! catalog. I hope you’ll pop in and check it out.

Product List
Holidays · Winter

Wish You Were Here

Thanks for joining me today as we continue our new design series — using holiday products to create everyday designs. I don’t know about you, but I tend to look at products in a holiday release from a single lens. But very often, these products are intended for designs far outside specific holidays.

Today, we’re using the new Take a Bow paper and Joyful ephemera packs to create a missing-you card. For me, there’s no question that the winter holidays make me think of friends and loved ones far away. So why not send them a card to let them know?!

We get started with a base of Pool Party cardstock. All of the patterned papers come from the Take a Bow paper pack, which will release on September 6th. I used the Nested Essentials dies to cut the two image background panels that hold our focal images from the Joyful Images ephemera packs. The sentiment comes from the Joyful Sayings ephemera pack. Varying layers of dimensionals behind elements gives depth and interest to our design. We finish things off and tie things together with a few gold snowflakes to bring out the gold striping in the sentiment banner backing.

Tomorrow we’re making an elegant sympathy card that is definitely a must-see! I hope you’ll pop in and check it out.

Products used in today’s card:
Pool Party cardstock
Take a Bow (coming soon!) DSP
Joyful Sayings & Images ephemera (coming soon!)
Nested Essentials dies
Snowflakes
Dimensionals
Adhesives

Winter

Warm Hello

I hope you’re having as much fun with the wintery designs as I am this week! Ordinarily, I would be escaping the Texas heat by dreaming of winter, but we continue to enjoy unseasonably cool, spring-like weather here in North Texas and I’m not complaining a bit!

Today, we’re learning a new fun fold to build this super cute snowy scene using Merriest Trees and the new Online Exclusive stamp set called Filled With Cheer. The double easel fold is a cute way to showcase sets that create scenes or just to draw attention to beautiful patterned paper and a sentiment.

We get started on today’s snowy scene with a standard card base of Lost Lagoon cardstock. In this case, we’re cutting the base so that our center fold is oriented at the top of the portrait-oriented design. Our double easel is created with a sheet of Pretty Peacock, which also serves as the mat for our patterned paper on each front-facing panel. The small tree patterned sheet from the Winter Meadow designer series paper pack is our backdrop for this snowy scene. Our tree is diecut from Pretty Peacock cardstock using the Merriest Trees dies, which are designed to layer on top of one another to create the look of a fluffy evergreen tree. Layers of dimensionals help provide our fluffy look even after our card has made its trek through the mail. A dab of Wink of Stella across the bottom of each layer of branches adds some twinkle. The snowman from Filled With Cheer is stamped on white cardstock and is then separated from the remaining portion of the stamped scene with paper snips. A touch of color is added to the hat, scarf, and nose of the snowman using Stampin’ Blends. The snowman is adhered on top with layers of dimensionals to ensure he stands out against the background elements. I chose the “warm hello” sentiment from Filled With Cheer and stamped in Versamark on the snowy vellum sheet from the Graceful Greenery vellum pack. It’s then covered with white embossing powder and heat embossed. I just loved the play on words with the melting snowman. *grin* The transparent dots serve as cover for the dimensionals under the sentiment but also serve as subtle snowflakes across the card front.

Isn’t this just the cutest scene?! Today’s card is a part of the Luv 2 Stamp Group Instagram Hop, which goes live at 9 AM Pacific Time (PST)Click here to head over to my Instagram feed and check out what the other demos in our L2S Group have created for you today!

Want to see this card come together from start to finish? You can watch the full Terrific Tuesdays video tutorial. I’ve also added a FREE printable tutorial. Click here to download the PDF.

Products used in this card:
Lost Lagoon, Pretty Peacock, Basic White cardstock
Winter Meadow, Graceful Greenery vellum DSP
Filled With Cheer stamps
Merriest Trees, Spotlight on Nature dies
Embossing powder
Stampin’ Blends
Wink of Stella
Transparent dots
Dimensionals
Adhesives

Product List
Winter

Fun & Laughter

Our unseasonably cool weather continues here in North Texas, and I’m looking forward to taking a longer walk today. What do you do when you’re having nicer weather in your area? I like to take advantage of cooler weather in the summer, for sure, and aside from taking a longer walk, I hope to knock out some gardening-related things outside this afternoon.

This week, we’re focusing on winter-themed products in the current Stampin’ Up! lineup in anticipation of the new winter mini catalog that will be launching in September. Today’s card is actually a nod to an older SU! wood-mounted set called Home for Christmas. The main image in that stamp set included a sled leaning against a door with a snow-filled threshold. Anyone remember that one?

So we get started on this card with a base of Shaded Spruce cardstock. Our background panel is the Mossy Meadow polka dot pattern sheet from the Season of Green & Gold designer paper pack. The door is “built” using a sheet of lighter woodgrain from the Country Woods designer paper pack. The door is adorned with an evergreen wreath which uses Shaded Spruce, Old Olive, and Garden Green cardstock and the greenery sprig from the Sophisticated Sled die set. The greenery is layered in a circle to create a wreath and then affixed to the door with dimensionals. Our sled is diecut from Pecan Pie and gold foil using the sled dies in the Sophisticated Sled die set and then leaned against the door and affixed with dimensionals. I added a few rhinestone jewels to serve as the sled rivets. To give the look of a snowy landscape, I diecut the white snowy vellum sheet from the Graceful Greenery vellum pack using the cloud dies from the Bright Skies die set. The sentiment from Sophisticated sled is stamped in Versamark on Very Vanilla cardstock and heat embossed with gold embossing powder. It’s then diecut using the Autumn Leaves dies and then affixed in the center of the wreath with dimensionals. To help draw the eye to the sentiment, I added a few Blooming Pearls on either side.

Tomorrow we’re going to fill our hearts with cheer. I hope you’ll drop in and find out how!

Did you know that TODAY and today only, you can stack two specials on your order? With a $75 order, you qualify for both free shipping AND a $5 Bonus Days coupon. So if you’ve got items on your shopping list, now is the perfect time to order! Click here to head over to my online store and take advantage of these great specials.

Products used in today’s card:
Shaded Spruce, Pecan Pie, Old Olive, Garden Green, Very Vanilla cardstock
Country Woods, Season of Green & Gold, Graceful Greenery vellum, Gold Foil DSP
Sophisticated Sled stamps & dies
Bright Skies, Autumn Leaves dies
Blooming Pearls, Rhinestone basic jewels
Dimensionals
Adhesives

Product List
Winter

Let It Snow

Welcome to a brand new week! I can’t even believe that we’re quickly approaching the end of July already. Ironically, here in North Texas, we’re experiencing some unseasonably cool weather. It’s been so nice to not melt into a puddle as I drink my coffee on the back porch!

And speaking of cooler weather, this week we’re beginning a new series of card designs centered on the cool winter season. Stampin’ Up! has just launched a few new holiday-themed products and will be launching the full line of holiday products in August. So this week, we’ll be gearing up as I show you the early release products. And today’s card combines the Season of Green & Gold specialty papers with the new Sophisticated Sled bundle.

We get started on today’s card design with a base of Basic White cardstock. The background panel is a sheet of seasonal greenery patterned paper from the Season of Green & Gold designer series paper pack with a twist of iridescent striped trip and gold trim wrapped around the center. Our focal panel is a piece of snowy patterned vellum from the Graceful Greenery vellum pack. Our focal image is a series of diecut elements using the Sophisticated Sled dies to create the sled, skates, and greenery. The sentiment from Sophisticated Sled is stamped in black on white cardstock that has been diecut using a circle from the Unbounded Love die set. Things are finished off with some rhinestones across the card front to draw the eye across our design.

Tomorrow we’ll be decking the halls. I hope you’ll stop by and check it out!

Products used in this card:
Basic White, Pecan Pie, Old Olive, Shaded Spruce cardstock
Season of Green & Gold, Gold Foil, Graceful Greenery vellum, In Color Luster DSP
Sophisticated Sled stamps & dies
Deckled Rectangles, Unbounded Love dies
Gold, Iridescent Striped trim
Blooming Pearls, Rhinestone basic jewels
Dimensionals
Adhesives

Product List
Terrific Tuesdays

Tiled Winter Wishes

This week, we’re looking at all of the wonderful projects that we can make when we combine the Heartfelt Hexagon bundle and more masculine color palettes. Today’s card is a monochromatic design and I’m in love with how it turned out!

I’ve recently seen quite a few card designs that use this tiled layout with the Heartfelt Hexagon bundle, and I just knew I had to give it a try. I’ve seen it with designer paper, embossed cardstock, and all sorts of variations in between. I have a new pack of shimmer paper that I wanted to break open, and that’s where this design got started.

The base of this card is a sheet of Lost Lagoon cardstock. After cutting the card base, I halved the remaining portion to use in creating the hexagon pattern on the card front. I stamped the more decorative hexagon frame from the Heartfelt Hexagon set and the sentiment from the Magical Meadow set using Pretty Peacock ink to give a bit more contrast. The remainder of the panel was embossed with the Winter Snow embossing folder and then punched with the hexagon punch. I cut a strip of the Lost Lagoon shimmer paper and punched a few hexagons from that, as well. Because they’re just adding a little sparkle to the design, only a few will be needed.

To build the tiled background, I began by placing the sentiment panel first. To give it more prominence, I added dimensionals and then adhered into place on the card front. I filled in the sentiment row with embossed hexagons and then worked my way down and then up the card design from there. I laid out everything before adhering to get the placement just right. When cutting the portions that hang over the edges, be sure to retain those scraps as they’re used to fill in smaller gaps along the edges across the design.

While I’m not a huge fan of fussy cutting, this card came together quickly and easily with the scraps which meant no scraps leftover!

Would you like to see the projects featured in this week’s Terrific Tuesdays episode? Hop on over to my YouTube channel and check it out by clicking on the link below:

Products used in today’s design:
Lost Lagoon, soft shimmer cardstock
Heartfelt Hexagon stamps and punch
Winter Snow embossing folder (retired)
Magical Meadow stamps
Fine sparkle gems
Dimensionals
Adhesives

All ads on this site are posted by WordPress.  Song Sparrow Papercrafts is not responsible for ad content.

Terrific Tuesdays

Thankful Curtain Fold

Stampin’ Up! has so many wonderful holiday designer series paper packs to choose from, and each one offers a whole world of possibility for card designs. On this week’s episode of Terrific Tuesdays, we’ve walked through several ways to make beautiful holiday thank you cards. And today, I want to show you another fun way to show off your stunning DSPs.

Today’s card features a new-to-me fun fold called a curtain fold. At first glance, it looks a little complicated, but it’s a very straight forward set of folds that make a beautiful pleated paper pattern as the focal point. I chose a sheet of Mossy Meadow as the base for this card and a sheet of Joyful designer series paper is the mat for the focal point. I used a sheet of A Walk in the Forest for the pleated fold portion. The sentiment is diecut from white cardstock using the Nested Essentials dies. The sentiment from the So Sincere stamp set is stamped in Pretty Peacock. A banner diecut from Distressed Gold cardstock is diecut using the banner die from the Nested Essentials die set. This card is finished off with a gold & very vanilla ribbon bow and a few sequins.

I love how the look of the card changes as you switch up the designer papers that you pair together. There are just so many possibilities. The first thing that pops to mind for me are wedding cards, but really this fold will be great for so many different occasions! Check out these two variations:

You can see all of the other fun fold designs that we made together in this week’s Terrific Tuesdays video by clicking below for the full video.

Tune in tomorrow for another fun fold you can create using Stampin’ Up! holiday designer series papers.

Products used in today’s featured design:
Mossy Meadow, Basic White, Distressed Gold cardstock
Joyful, A Walk in the Forest DSP
Very Vanilla & Gold satin-edged ribbon
Neutrals sequins
Dimensionals
Adhesives

All ads on this site are posted by WordPress.  Song Sparrow Papercrafts is not responsible for ad content.