Snowy Delights · Winter

Merry & Bright Flakes

Happy Friday, everybody! It’s been a week, let me tell you. Between a busy work schedule, an unexpected interruption in my SSP Pinterest account, and a failed attempt at today’s card, I’m ready for a refresh! And it’s going to be the perfect weekend for it as we enjoy the first real feel of fall weather here in N. Texas. It’s due to be a glorious weekend to be outside.

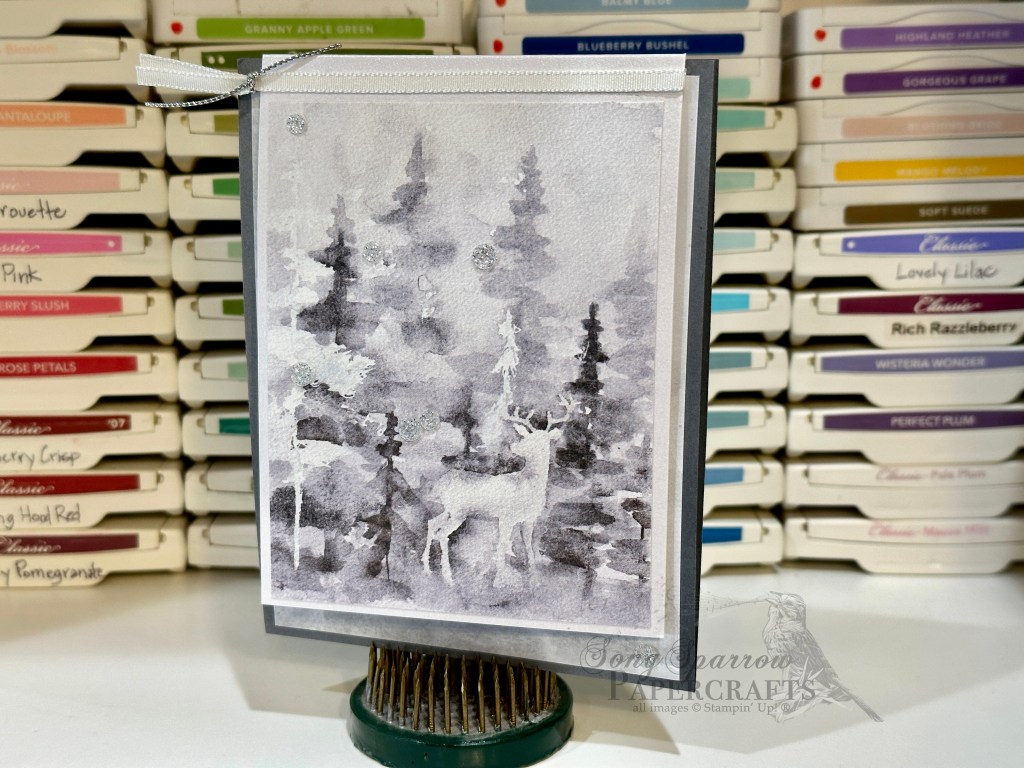
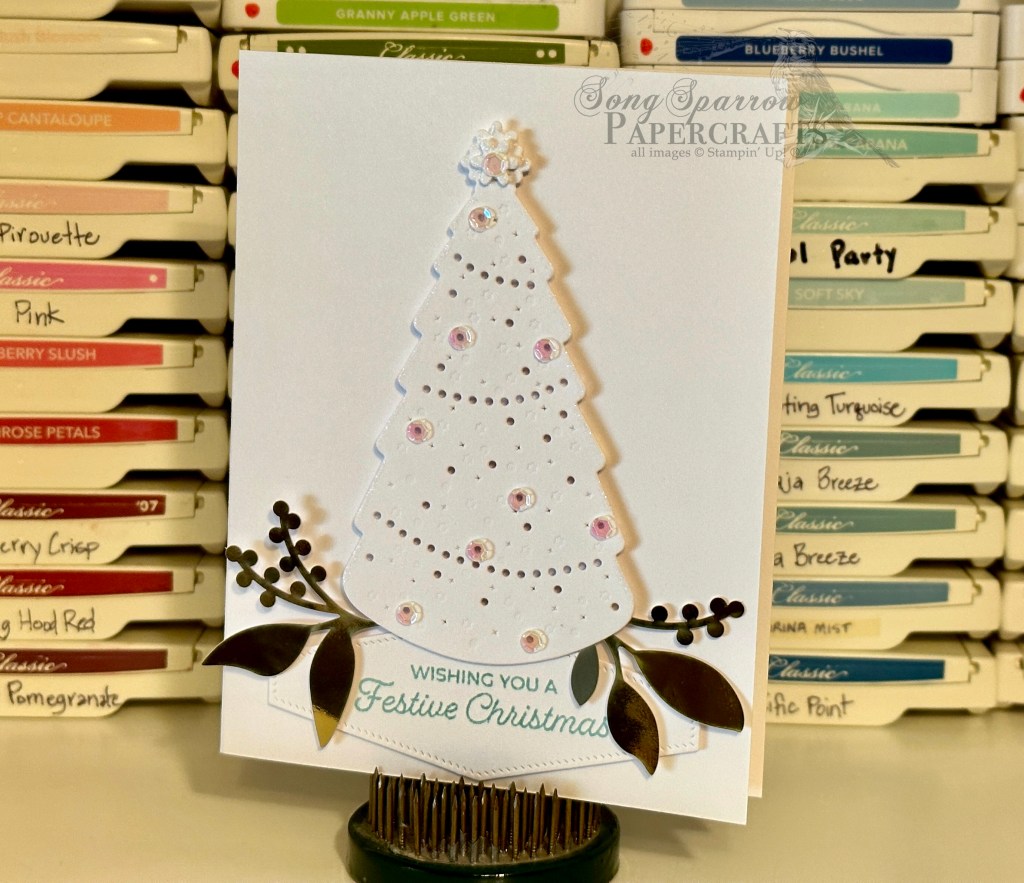
But on to crafting. This week, we’re pulled our snowflakes from the crafty stash to create our projects. Today’s card combines the Snowy Delights dies with the Greetings for You ephemera to create our lovely white wonderland.

But I just have to share a little about today’s card idea and failure to launch first. Because guess what? Every crafter has good ideas that don’t execute.

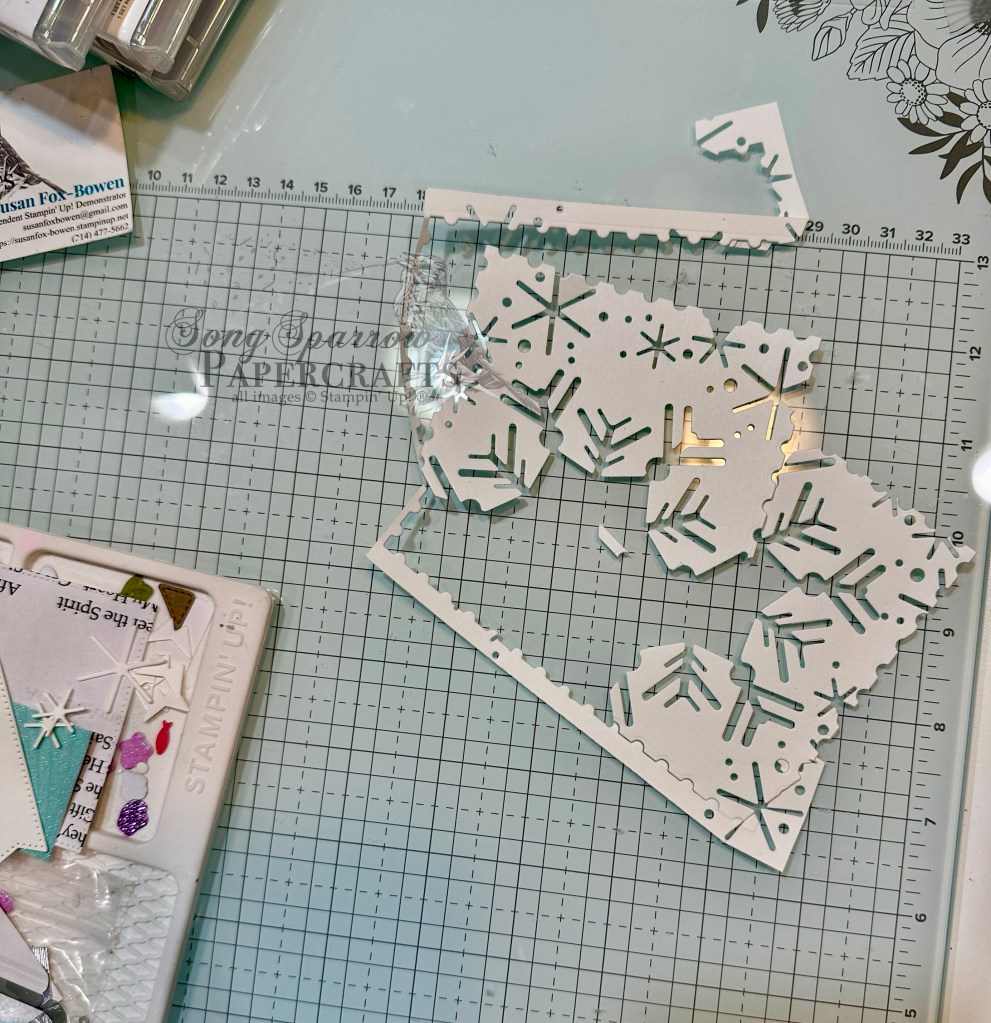
I gave you a little tease that today’s project was going to be a snowflake childhood throwback. And in my mind’s eye, I was going to use some current dies in the stash to create the look of the paper snowflakes we used to make as kids. You know the ones where we would fold the paper and cut shapes out of the edges to create unique snowflake designs? Well, I was hoping to do that with a quarter panel and my dies. And I really wanted it to look like a postage stamp to boot. And no matter how many placements and combinations of the dies I tried, I kept ending up with big sections coming apart – like the photo above. I decided to table the idea for now – I won’t be deterred from getting this one eventually *grin* – and move on with creating with the actual diecut shapes I had instead of using the sheet of negatives. And that’s how we arrive at today’s card design.

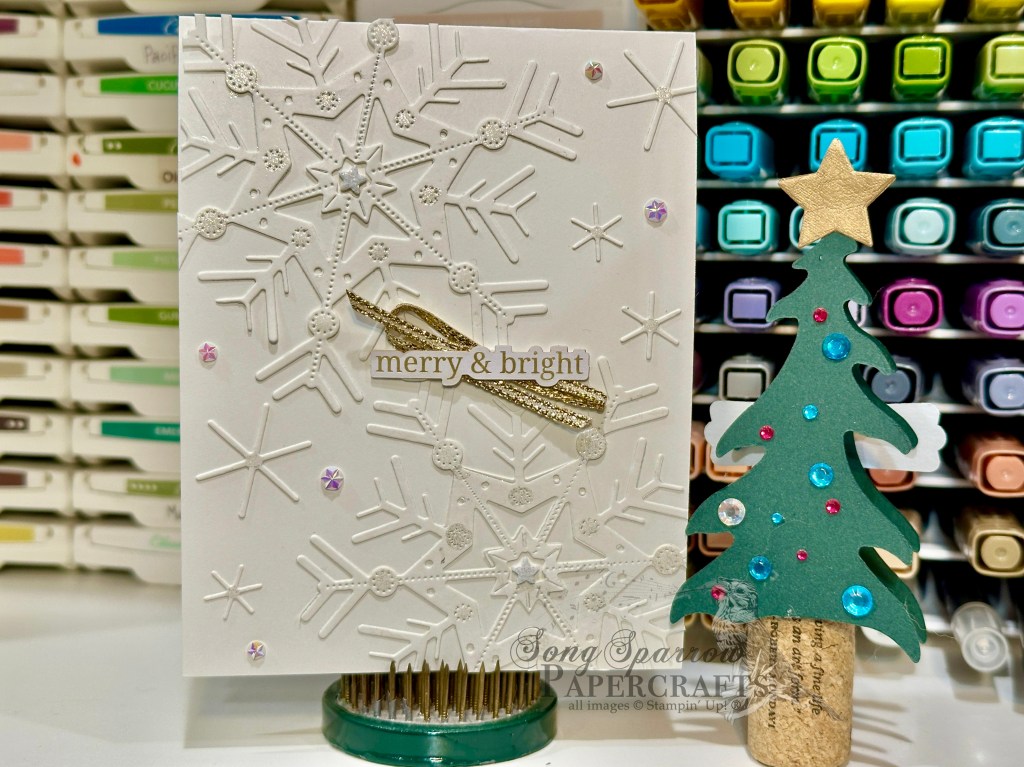
This is a super simple color palette – white as snow. So we get started with a sheet of white cardstock. All of the snowflakes are cut from a quarter sheet of white using the Snowy Delights dies. I used the larger detail die as the star of the show and used 2 of them in opposing corners of the card front, allowing them to overlap the edges of the card. After adhering the larger flakes to the card front, I snipped off the overhanging edges with my paper snips. I filled in the gaps of white space in the other corners with the smaller, less detailed flakes. I chose a small sentiment – merry & bright – from the Greetings for You ephemera pack and adhered it over some gold trim. To finish things off with the perfect amount of twinkle, I added Wink of Stella to the round elements of each of the snowflakes and then also added a few iridescent faceted gems in the white space between the smaller flakes.

Don’t you just love this tone-on-tone look? It is super sparkly in person (I’ll have to remember to add a little video to the Instagram post later so you can see it for yourself) and it just makes me smile.

I saw the coolest idea in my inspiration searching recently that I can’t wait to try out for you tomorrow. I hope you’ll drop in and see what that’s all about!

Product List
Christmas · Fun Folds

Magic of the Season

If you have followed me for the last month or so, you probably will recall that I have mentioned how much I love the Winter Meadow designer series paper that Stampin’ Up! just launched in its Holiday Mini catalog. And you may have heard me talk about how much I love this particular sheet of paper from that paper pack. I come from a family of avid hunters, so I’m always drawn to well-designed craft products that lend themselves well to documenting a hunt or simply the majesty of wildlife.

What I love, in particular, about this sheet of paper is the repeating pattern of the deer in the forest. It feels like you’re seeing the deer through the fog of fall morning. Pairing this design with different background colors allows for many different moods and lends itself well to different occasions. A while back, I used this paper to make a birthday card. Today, I’m focusing on the muted colors of a snowy winter to make this holiday card. And I tried my hand at a variation on the two-flip fun fold.

I used Basic Gray as the base for the card design as a whole. I also pulled a sheet of shimmer white cardstock to serve as the base for the front flip and inside panels. The gorgeous scene of the deer standing in the grove of evergreens serve as the focal image on the front of the card. Although it’s difficult to capture in photographs, the shimmer of the white cardstock and the touch of Wink of Stella on the deer really give the feel of a cold winter morning.

When you flip up the front panel, a new scene is revealed. This view of the forest from the open prairie is created atop another sheet of paper from the Winter Meadow paper pack. On its own, this design looks like a gray wash, but to me, it still spoke to the feeling of a snowy morning. I simply stamped the forest scene and sentiment in Basic Gray using the Magical Meadow stamp set. The Basic Gray card base serves as the base for this panel and gives some depth to the snowy grays. The sentiment stamp itself is one long strip, but I wanted two lines for better symmetry so I masked portions of the sentiment stamp to create it across two stacked lines. I added a little sparkle with the glitter sequin.

When you flip down the center panel, you reveal the inside of the card. Since this section is intended for a message to your card recipient, it’s very simple with just a sentiment panel over the shimmer white cardstock. I added a few stars diecut from a sheet of the Snowflake Magic designer paper for a little visual interest and to carry the snow theme through to the inside message panel.

Overall, everything about this design is simple and muted because I wanted the beauty of winter and the pizzazz of the fun fold to be the stars of the show. How do you think it turned out? Would you like to see a video on how this card is made?

Products used:
Basic Gray, shimmer white (retired) cardstock
Winter Meadow, Snowflake Magic DSP
Magical Meadow stamps
Stars at Night dies
Whisper White, silver ribbon
Glitter sequins
Wink of Stella
Adhesives

All ads on this site are posted by WordPress and are based on your personal browsing history. I do not control ad content.

Christmas

Happy Holidays to You

Do you attend parties during the holidays? When I do, I really enjoy admiring the holiday decor. When I was looking for inspiration for this design, I wanted to recreate a festive hall all dressed for a holiday party.

I selected a pattern of the Ever Eden designer paper that most resembled wall paper, and I felt this stripe fit the bill perfectly. I used a small strip of a more ornamental pattern of Ever Eden designer paper to serve as the tree skirt. I decided to keep the tree relatively simple and used white vellum to serve as the backing to show through as ornaments and lights and allowed the lights to twinkle with some Wink of Stella. The holiday banner serves as the perfect backdrop with its sparkling holly and berries.

Hop on over to the Etsy shoppe to check out the complete Twinkling Lights collection!

Products used:
Basic White, Handsome Hunter (retired)
White vellum
Ever Eden DSP (retired)
Twinkling Lights dies
Deckled Rectangles dies
Gold holly leaves (retired)
Expressions in Ink Ephemera
Adhesive-backed sequins
Dimensionals
Adhesives

All ads on this site are posted by WordPress and are based on your personal browsing history. I do not control ad content.

Christmas

White Christmas

I can’t help but hum “I’m dreaming of a white Christmas . . . .” when I start thinking about Christmas. What about you? I wanted to create a very clean and simple card and the song White Christmas actually inspired this design.

Never underestimate the power of monochromatic designs. 100% of this card uses Basic White cardstock. I added twinkle to the Christmas tree with sequin ornaments and Wink of Stella all along the edges of the tree diecut. The pop of gold from the Ephemera elements add festive style and interest, as well as drawing the eye down the card to the sentiment.

Hop on over to the Etsy shoppe to check out the complete Twinkling Lights collection!

Products used:
Basic White
Expressions in Ink Ephemera
Trucking Along stamps
Twinkling Lights dies
Nested Essentials dies
Adhesive-backed sequins
Wink of Stella
Dimensionals
Adhesives

All ads on this site are posted by WordPress and are based on your personal browsing history. I do not control ad content.

Card Sets · Fun Folds

Zany, Bright, and Beautiful Birthday

I’m working more with combinations of patterns with the latest designs. It’s still quite a challenge for me, but I do feel like designs came much more easily with this set. And what could be more fun than bright designs and fun folds?! This newest card pack called Bright and Beautiful Birthday will be available in the shoppe later this week.

I focused on the SU! Bright and Beautiful and Zoo Crew designer series paper packs in designing this set. As I was sketching out design ideas, it seemed natural to focus on a birthday theme. The bright colors and fun patterns just lent themselves easily to it. And to me, birthday designs call for fun folds! Let’s take a closer look at each card.

Something to Celebrate flap fold:
Blueberry Bushel, Shimmer White, Basic White cardstock
Bright & Beautiful DSP
Zany Zoo stamps
All That dies
Circle punch
Lemon Lime, Smoky Slate ribbon
Adhesive-backed sequins
Dimensionals
Adhesives

Birthday Confetti angled gate fold:
Night of Navy, Basic White cardstock
Bright & Beautiful, Zoo Crew DSP
Shimmer vellum (retired)
Special Moments stamps (retired)
Scallop punch
Adhesive-backed sequins
Wink of Stella
Dimensionals
Adhesives

Birthday Balloons angle fold:
Lemon Lime Twist, Shimmer White, Granny Apple Green cardstock
Bright & Beautiful, Zoo Crew DSP
Shimmer vellum (retired)
Zany Zoo stamps
All That, Nested Essentials dies
Adhesive-backed sequins
Wink of Stella
Dimensionals
Adhesives

Koala Cupcakes angle fold:
Lemon Lime Twist cardstock
Bright & Beautiful, Zoo Crew DSP
Shimmer vellum (retired)
Stitched Stars dies (retired)
Wink of Stella
Adhesive-backed sequins
Dimensionals
Adhesives

Birthday Fox angled trifold:
Night of Navy, Basic White cardstock
Bright & Beautiful, Zoo Crew DSP
Shimmer vellum (retired)
Wink of Stella
Pansy Patch stamps
All That, Nested Essentials dies
Adhesive-backed sequins
Dimensionals
Adhesives

All ads on this site are posted by WordPress and are based on your personal browsing history. I do not control ad content.

Bold Bouquet · Dies · Wink of Stella

Birthday Bouquet

I have lots of new things to share in the days ahead after getting a few new goodies delivered yesterday. Today’s design features the SU! Bold Bouquet stamps and dies.

This sunny design would be perfect for any recipient, even the guys in your life. The plaid design in the Inked Botanicals designer paper bundle provides the perfect neutral backdrop for this gorgeous bouquet, which sits atop glimmer vellum diecut using the Deckled Rectangle set. The sentiment is nestled in the bouquet. For a little extra sparkle, the larger roses have centers accentuated with the Wink of Stella glitter brush. This design has the perfect amount of sparkle in person and is sure to bring a smile to its recipient!

Products used:
Daffodil Delight, Basic White cardstock
Inked Botanicals DSP
Glimmer vellum (retired)
Lost Lagoon, Pretty Peacock, Shaded Spruce, Crushed Curry, Basic Black ink
Bold Bouquet stamps & dies
Pansy Patch stamps (sentiment)
Deckled Rectangles dies
Stitched Nested Labels dies (retired)
Pastel adhesive-backed sequins
Wink of Stella
Dimensionals
Adhesives

All ads on this site are posted by WordPress and are based on your personal browsing history. I do not control ad content.