Father's Day

Simply Incredible

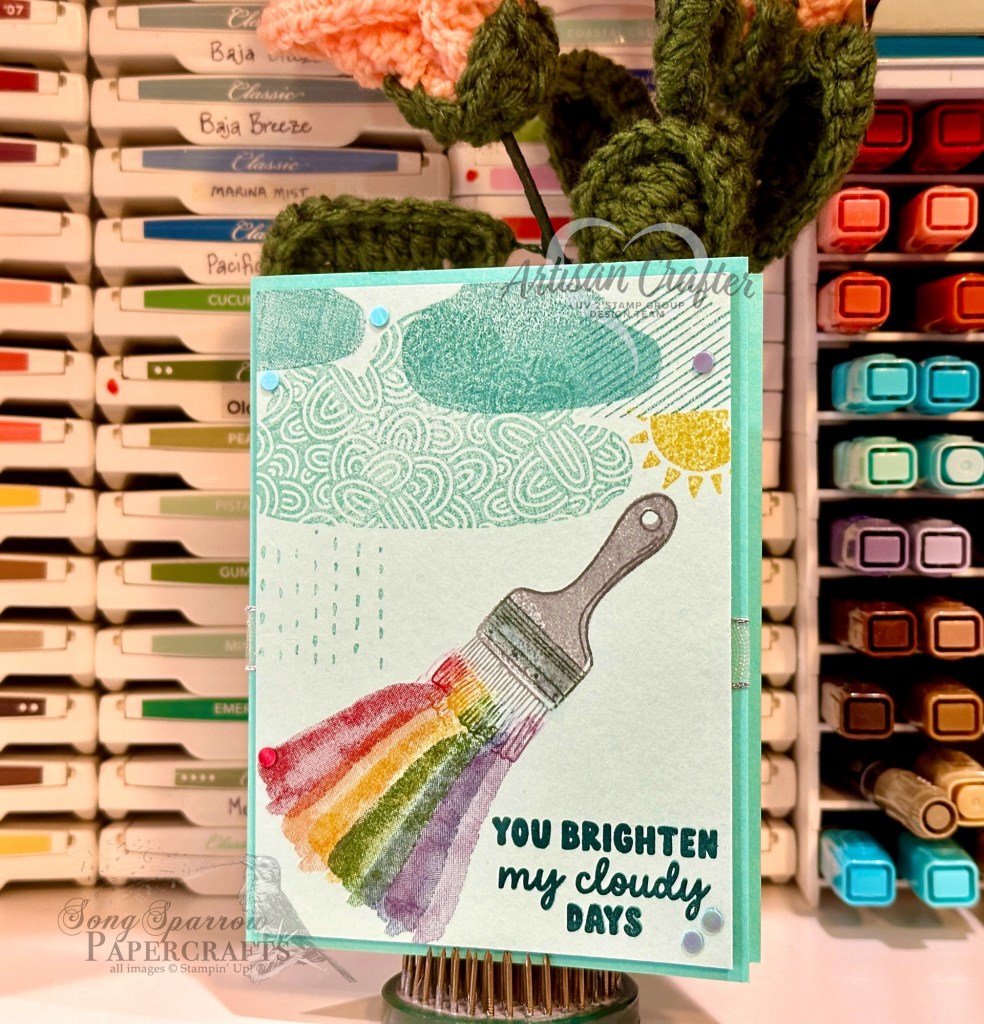
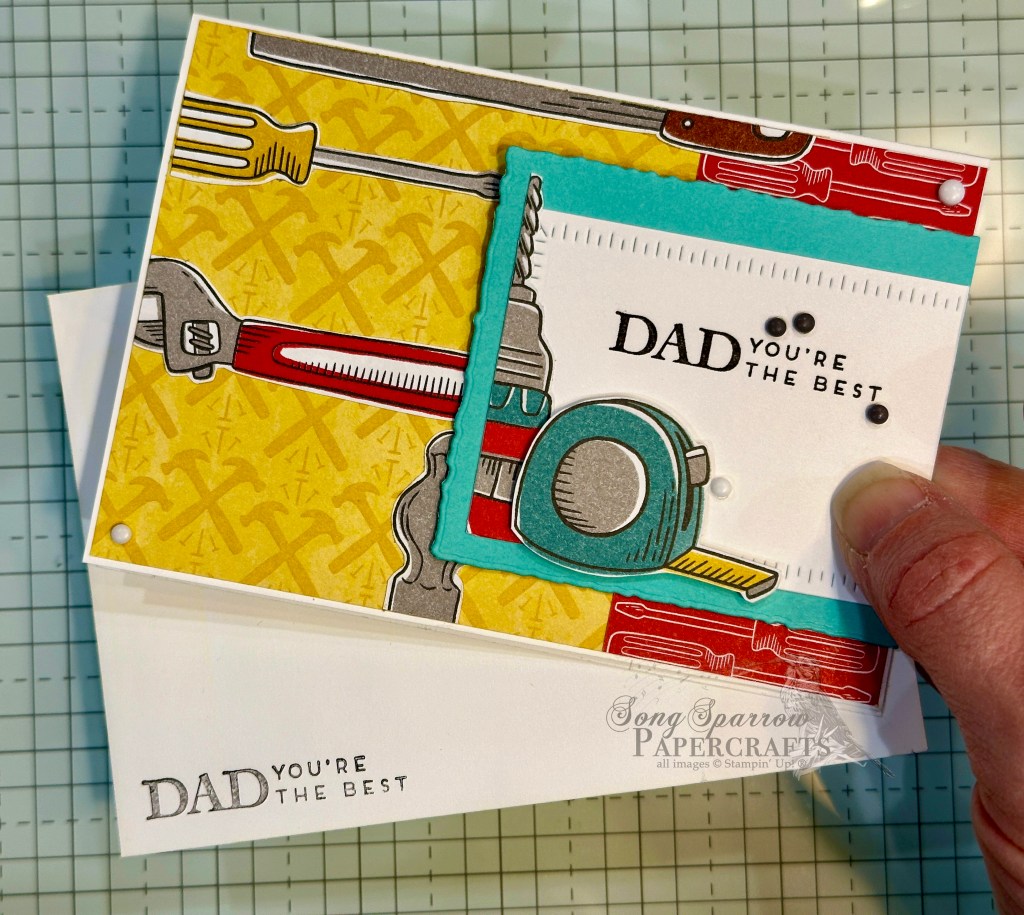
I hope you’re enjoying our design theme this week as we pull out our crafty stash to create some lovely cards to honor the special fellas in our lives. Today’s card is a combination of several products, including Trusty Tools and More Messages, to create this tribute to an incredible dad. This card uses a super fun color palette of Coastal Cabana, Peach Pie, and Strawberry Slush. Can you spot all of the colors?

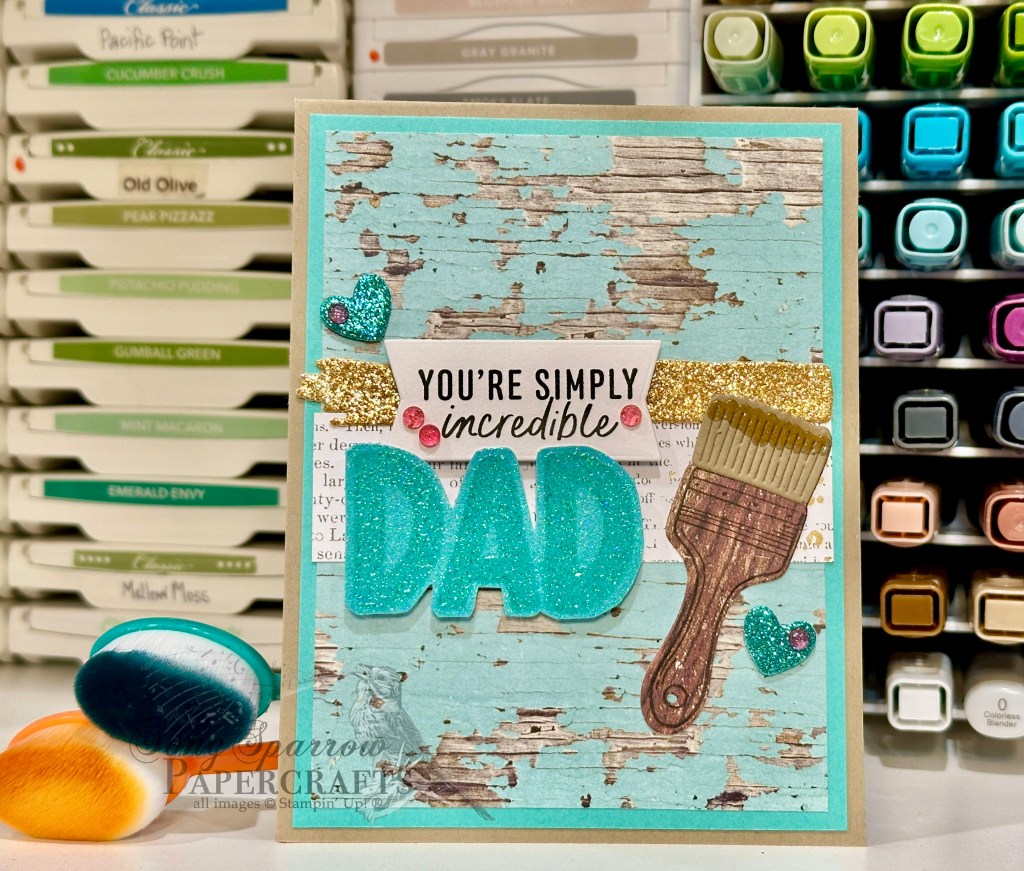
We get started with a base of Crumb Cake cardstock. Our focal panel begins with a sheet of Country Woods woodgrain paper and is matted in Coastal Cabana. A strip of the newsprint from Nature’s Sweetness adds a nice eye relief in the center of the panel to add our focal elements. The paintbrush is created using the Trusty Tools stamps and dies. I stamped the brush handle on Country Woods woodgrain. The bristles are cut from Crumb Cake. The dripping paint on the end is stamped in Peach Pie and then heat embossed with clear embossing powder to give the look of being wet. To give the look of a freshly painted stripe of paint, I cut Peach Pie glimmer paper with the Friends for Life smudge strip. It’s adhered just above the newsprint to create a nice border in the center of the card. The paintbrush is adhered directly to the focal panel.

The sentiment is a combination of the new More Messages you’re simply incredible sentiment, cut out with the coordinating die, and the DAD sentiment from Trusty Tools stamped in Coastal Cabana on pastel ombre glimmer paper, heat embossed with clear embossing powder, and then cut out with paper snips. The sentiment is layered and adhered with dimensionals to the left of the paintbrush. I used a few leftover hearts diecut from Summer Splash glimmer paper with the Sending Love dies to add some nice sparkly accents on either side of our focal section. The Strawberry Slush gems add a nice pop of color that stands out against the rest of the color palette and draws the eye across the focal section perfectly.

Product List
Father's Day

Best Tool in the Chest

Happy Monday, everyone. I hope you enjoyed your weekend. It was a busy one for us with the start of the kiddo’s summer bowling league and then some other family obligations. But we enjoyed the time together and are now ready to hit the ground running for this brand new week.

This week, we’re going to be digging in our stash of crafty goodness to create Father’s Day cards. It’s hard to believe that we’re already on the doorstep of Father’s Day, but I’m here to help you be prepared to knock his socks off with a personalized tribute. When the new Stampin’ Up! catalog released in May, I was thrilled to see that the Trusty Tools bundle carried over. It’s especially perfect for the dads in our family as all of them excel at working with their hands!

We get started on today’s card design with a base of Poppy Parade cardstock. The front panel of the card is machine embossed using the Timber embossing folder. The focal panel is a quarter panel of Misty Moonlight cardstock that is diecut with the Textured Notes dies. I stamped the nuts and bolts from the Trusty Tools stamp set in Misty Moonlight on opposite corners before diecutting the panel. The sentiment panel is cut from white cardstock using the Trusty Tools dies and then the sentiment from the coordinating stamp set is stamped in the center in a combination of Misty Moonlight and black inks. I stamped the pencil, tape measure, and hammer images on white cardstock using black ink and then used a combination of the filler stamps and Stampin’ Blends to color each of the images before cutting them out with the coordinating dies. They’re all affixed to the focal panel with tear-n-tape. The focal panel is adhered to the front panel with dimensionals. A few industrial trinkets in opposing corners of the focal panel finish things off perfectly.

Tomorrow we’re headed to the pond. I hope you’ll pop in and see what we catch!

Product List
Back to School

Color With Greatness

This week, we’re putting on our creative hats to make back-to-school designs. Why do I need my creative hat? Well, for me personally, my current stash of products (as in, not retired products) doesn’t make it easy to stick to this week’s theme without a little ingenuity. And today, we’re combining the Trusty Tools set with Filled With Fun to create our desktop of color. Let’s see how we can make this one happen.

We get started with a card base of Crumb Cake cardstock. Our focal panel background consists of two layers of patterned paper — the bottom from Take to the Sky and the top from Nature’s Sweetness — and is cut to leave a very small border of the card base peeking around on each side. We cut a focal point out of the top layer of our background panel with the Spotlight on Nature dies and then adhere our two focal panels together with dimensionals. To create the storage box for our paint brushes, we use the wagon fencing from the Filled With Fun die set to cut Crumb Cake cardstock and then tuck the box in the center of the circle. Our paintbrushes are diecut using the Trusty Tools dies. The handles are cut from textured metallic gold while the bristles are cut from Smoky Slate. A dab of paint is stamped in primary colors on the end of each set of bristles. We tuck our paintbrushes into the storage box and adhere with several layers of dimensionals to give the look of multiple planes of view. Once again, I turned to my trusty printer to provide my custom sentiment and diecut it with the Everyday Essentials die using the extension method. The sentiment is adhered with dimensionals, as well. I added a few splatters of paint that were diecut from Real Red and Daffodil Delight cardstock using the Bright Skies dies. A few dollops of rhinestone jewels add just the right amount of sparkle across the card front to help the eye glide easily across the design.

Tomorrow we’ll be packing up some tools for success. I hope you’ll tag along and check it out!

Products used in today’s card:
Crumb Cake, Smoky Slate, Real Red, Daffodil Delight, Basic White cardstock
Take to the Sky, Nature’s Sweetness, Gold textured metallic DSP
Trusty Tools, Filled with Fun, Bright Skies, Everyday Details, Spotlight on Nature dies
Trusty Tools stamps
Rhinestone jewels
Dimensionals
Adhesives

Product List
Back to School

To a Sharp Year

Welcome in to this wonderful Wednesday! We’re halfway through this week and about halfway through our back-to-school design series. I hope you’ve been enjoying things thus far. Today, we’re keeping things on the simple side with a design using the Trusty Tools stamps and dies. Let’s dive in and learn more about how this card comes together.

We get started with a card base of Cajun Craze cardstock. Our focal panel is a piece of white cardstock that has been cut down on either side to allow a border of our card base to shine through. Using the Trusty Tools stamps, I stamped a pencil on Crushed Curry cardstock and then diecut with the coordinating die. I colored the erasers with Stampin’ Blends to give a realistic look. Using the smaller heart die from the Friends for Life die set, I drew a heart in the center of the focal panel to serve as a guide while adhering the pencils to the focal panel. Once again, I’ve used my printer to print a sentiment that I created to fit the card theme. The sentiment, and its mat of Peach Pie glimmer paper, is diecut using the Friends for Life die set. A layer of dimensionals behind the sentiment gives it a nice rise above the busy focal panel. And we finish things off with a few shiny sequins.

Of the back-to-school designs thus far, this one is by far the one that has come together the quickest. This would be a super cute card to accompany a small gift to teachers on the first day, don’t you think?

I hope you’ll tune in tomorrow when we paint the halls with greatness!

Products used in today’s card:
Cajun Craze, Crushed Curry, Basic White cardstock
Peach Pie glimmer paper
Trusty Tools stamps & dies
Friends for Life dies
Stampin’ Blends
Shiny sequins
Dimensionals
Adhesives

Product List
Masculine Designs

Dad’s Trusty Tools

We continue our look at a good sampling of the Stampin’ Up! products that stand to make great Father’s Day cards. Today we’re revisiting a terrific set called Trusty Tools, which includes a photopolymer stamp set and a set of coordinating dies (sold separately). When I first bought this set, I only bought the stamps, but then I found myself fussy cutting way more than I really like to do when making projects. And I also realized that the set of dies includes things like a peg board and a tool box that really help give my stamps even greater value. And this set can go well beyond just Father’s Day designs.

This super fun design begins with a base of Daffodil Delight cardstock. The background panel mat is Basic Black. The background panel is a strip of Daffodil Delight stamped tone-on-tone with the nuts and bolts from the Trusty Tools stamp set and then a panel of white cardstock that has been diecut using the peg board die from the Trusty Tools die set. Each of these smaller panels is adhered directly to the black mat. The tools are diecut from a combination of black cardstock and silver foil specialty paper. I felt like this really gave the tools a more realistic look. The tools are adhered over the peg board using varying heights of dimensionals so that you really feel like you’re sitting at the tool chest. The sentiment panel is the bottom portion of the toolbox die and cut from Daffodil Delight. The word DAD is stamped in black in the center. The Happy Father’s Day sentiment is stamped on a banner diecut using the Happy Little Things dies. The design is finished off with some industrial trinkets to keep with the tool-look.

Tune in tomorrow to check out a brand new fun fold and fun outdoorsy theme!

Products used in today’s card:
Daffodil Delight, Basic Black, Basic White cardstock
Silver foil specialty paper
Trusty Tools stamps & dies
Happy Little Things dies
Industrial trinkets
Dimensionals
Adhesives

Terrific Tuesdays

Thank a Teacher

This week we’re looking at two stamp sets, and today’s card shows you how the Trusty Tools stamp set goes beyond the obvious masculine designs to allow you to create a whole host of cute cards that can meet so many different occasions. One of the things that caught my eye in this stamp set is the pencil stamps. My mind immediately turned to design ideas for the teachers we all know and love.

I wanted to recreate the look of an art teacher’s table with colored pencils scattered about. The pencil outline and filler stamps in the Trusty Tools stamp set are the easy ticket here to do just that.

We start with a card base of Pecan Pie. The mat for the focal panel is a cool polka-dotted sheet of Trusty Toolbox designer paper. I really like the effect of a border of dots around the focal panel. It reminds me on the Broadway marquis signs. And don’t you think teachers deserve to have their names in lights?! The focal panel is white cardstock, and I used the pencil stamps to create the look of scattered art pencils on a desk. The sentiment from the stamp set sits atop a strip of grid paper from the Trusty Toolbox paper pack. I used rainbow colored dots and a strip of Lighter than Air designer paper behind the sentiment to help it stand out and to repeat the rainbow of colors from the focal panel. The twist of ribbon and foiled dots add some pizzazz and help draw the eye to the greeting.

Check back tomorrow as we start exploring the Jungle Pals bundle!

Products used in today’s design:
Pecan Pie, Basic White cardstock
Trusty Toolbox, Lighter Than Air DSP
Trusty Tools stamps
Ribbon duo
Rainbow dots
Adhesives

All ads on this site are posted by WordPress.  Song Sparrow Papercrafts is not responsible for ad content.

Luv 2 Stamp Artisan Design Team · Terrific Tuesdays

Paint Brighter Skies

Do you ever sit down with your stamps and try to look at each one a little differently? Think to yourself, now how can I use this stamp in a new or unexpected way.

Such is this case when I began designing this card. I wanted to use the paintbrush from the Trusty Tools stamp set to paint a rainbow across the sky. I remembered that the Hills of Tuscany stamp set has a watercolor look and included some scene building stamps that might help me with the rainbow shape. And voila, the design idea became a reality!

This card is made with a combination of cardstock and stamps. We start with a base of Coastal Cabana cardstock and the focal section is stamped on Pool Party. The Bright Skies stamp set helps build our scene with the rainy clouds and bit of sunshine. I used the small hillside builder stamp from the Hills of Tuscany stamp set to “paint the rainbow” by stamping the beams of color. The paintbrush is from Trusty Tools.

I just love how this idea came to life on paper. It always feels good when a plan comes together.

Check back tomorrow to see another fun Trusty Tools card design!

Products used in today’s design:
Pretty Peacock, Basic White cardstock
Softly Stippled, Soft Shimmer DSP
So Sincere stamps
Pretty Peacock & Gold metallic ribbon
Foiled gems
Dimensionals
Adhesives

All ads on this site are posted by WordPress.  Song Sparrow Papercrafts is not responsible for ad content.

Terrific Tuesdays

No Terrific Tuesdays This Week

I have had to travel out of town unexpectedly, so I will not have a Terrific Tuesdays video for you this week. I will, however, still be bringing you some fun card designs with this week’s selected products.

This week, I’ll be featuring the Trusty Tools stamp set and the Jungle Pals bundle. The Jungle Pals stamps and dies are Sale-a-Bration items. The stamp set is available with 1 SAB credit, while the dies are available to you when you redeem 2 SAB credits. So while not quite a bundle in the traditional sense, they are a perfectly coordinated pair.

First up is this cute card using the Trusty Tools stamps and coordinating designer series paper. The Trusty Toolbox paper is another Sale-a-Bration item. This fun fold card begins with a base of standard sized Pebbled Path cardstock. We score in half and then another inch over to create this Book Binding Fold. The strip (or spine) created is adhered to the card base to finish the look.

I used the graph paper from the Trusty Tools paper pack to decorate the spine portion. I cut a sheet of the tool chest design to create the rolling tool chest. I opted to make it have four drawers and have cut an individual drawer and adhered with dimensionals in order to make it look as though the second drawer of the chest is open. The tools peeking out of the drawer were stamped with the Trusty Tools stamps, colored with Stampin’ Blends, and then cut out by hand. The tools are also adhered with dimensionals to give a more realistic look to the drawer. The sentiment is stamped centered above the tool chest with brushed metallic dots placed on either side.

This card speaks to a number of occasions and could easily be customized based on the sentiment placed on the inside message panel. Cute, right? And it really doesn’t take all that long to put together, which makes it easy to turn out a whole set in no time flat!

Products used in today’s design:
Pebbled Path, Basic White cardstock
Trusty Toolbox DSP
Trusty Tools stamps
Brushed metallic dots
Stampin’ Blends
Dimensionals
Adhesives

All ads on this site are posted by WordPress.  Song Sparrow Papercrafts is not responsible for ad content.

Sale-a-Bration · Terrific Tuesdays

Dad’s the Best

This week we’re taking a closer look at several of the FREE designer series paper packs available with a qualifying order between now and the end of February during Sale-a-Bration. Today’s designs are all about the dudes as we make some cool cards using the Trusty Tools designer paper.

Today’s post includes not one but TWO cards because these are designs I made for my dad’s birthday. As soon as I saw the Trusty Tools paper in the Sale-a-Bration catalog, I knew exactly who I would be designing cards for! My dad is a handyman and I grew up doing all sorts of projects with him using his favorite tools. Needless to say, I know my way around a toolbox and my husband is thankful for that everytime we take on a DIY project at home. *grin*

This adorable notecard accompanied my dad’s gift. A Basic White notecard serves as the base for this design. To get the most out of a quarter-sheet of Trusty Tools designer paper, I decided to make this a fun fold. That’s right, even smaller cards can be fun fold cards! I fussy cut a bunch of tools from the sheet of paper, including several of the ones on the edges because they’re perfect for the edges of the notecard. I combined the hammer and screwdriver patterns on the front of the notecard and covered them with some of the tools. 

I diecut a piece of Coastal Cabana cardstock with a Deckled Rectangles die to make the fold-over panel. The front-facing portion holds the sentiment from the coordinating Trusty Tool stamp set which is stamped on white cardstock diecut with the Radiating Stitches dies. A few additional tools are added to this panel and finished with classic matte dots. The fold-out portion is covered with Trusty Tools paper and a hand-cut screwdriver.

This fun card went by snail mail to arrive ON my dad’s birthday because who doesn’t love to get mail on their birthday?! We start with a base of Crushed Curry cardstock. I used the remaining portion of the quarter-sheet of the screwdriver print to serve as the decorative base for the card front. The argyle pieces are diecut from the Coastal Cabana cardstock (so that the two card designs coordinate). I chose to use the Happy Birthday abbreviation (HBD) as the center of the ribbon, which has been diecut from white cardstock and Pretty Peacock soft shimmer paper using Nested Essentials and All That dies. I tucked the remaining hand-cut tools behind. The classic matte dots give a more realistic look to the pliers and channel locks. 

If you missed this week’s Terrific Tuesdays episode, we made 4 cards together using 4 different Sale-a-Bration papers. And there’s still time to check it out here!

Products used in today’s notecard:
Basic White, Coastal Cabana cardstock
Trusty Tools DSP
Trusty Tools stamps
Deckled Rectangles, Radiating Stitches dies
Classic matte dots
Dimensionals
Adhesives

Products used in today’s card:
Crushed Curry, Coastal Cabana, Basic White cardstock
Trusty Tools, Soft shimmer, Gold foil DSP
All That, Nested Essentials, Alphabet a la Mode dies
Classic matte dots
Brushed metallic dots
Dimensionals
Adhesives

All ads on this site are posted by WordPress.  Song Sparrow Papercrafts is not responsible for ad content.