Fall

Hello, Pumpkin

It’s really beginning to feel like fall here in Texas. And fall is my favorite season! I love everything about fall — cooler temperatures, beautiful colors as the leaves change, pumpkins, hot apple cider, toasty fires, going to sleep when it’s dark! There’s so much to love about fall.

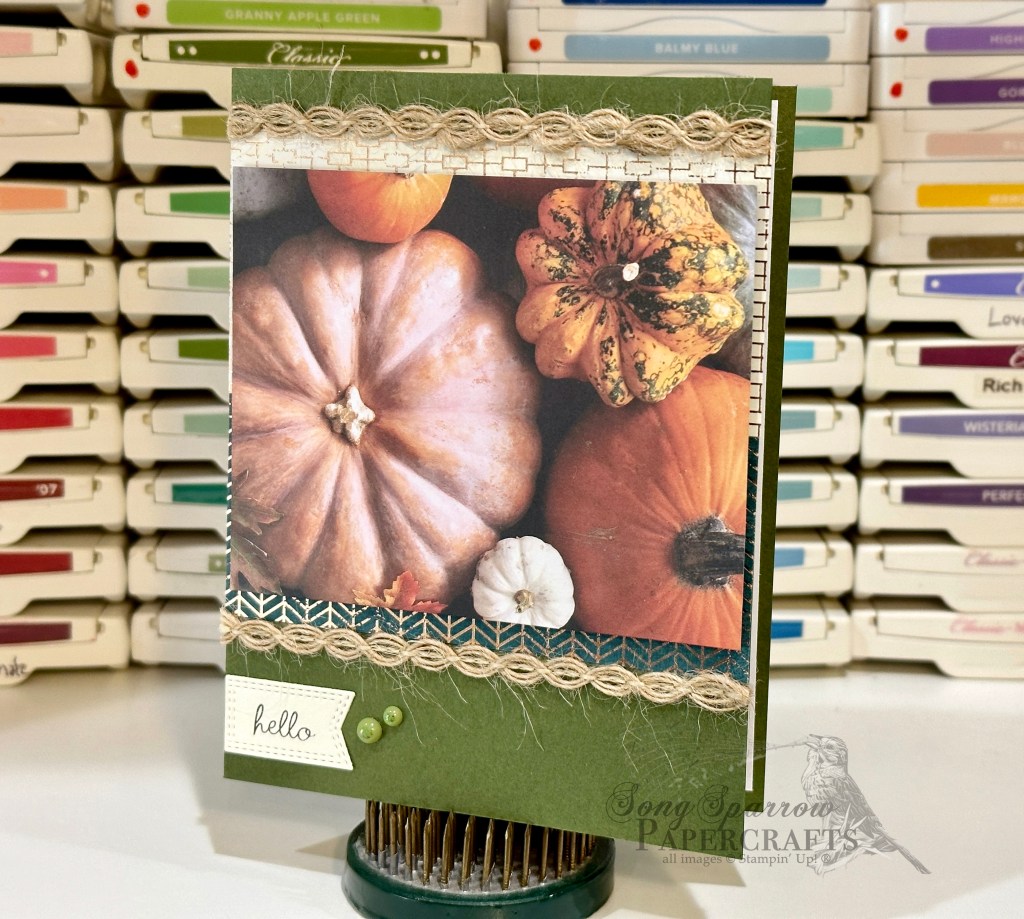
The All About Autumn designer paper in the current Stampin’ Up! Holiday Mini Catalog has been popular, and it’s no wonder because it’s absolutely stunning in person! There are beautiful photos on one side and gorgeous foiled designs on the other. Honestly, it’s hard to choose, but the great thing about the 6×6 pack of papers it that you have 4 of each design so you don’t have to!

For this card design, I began with a base of Mossy Meadow. I wanted to bring out all of the detail in the various pumpkins and so I chose to use two different foiled sheets, one in vanilla and one in peacock. I love how it brings out both the lighter details of the pumpkins and the greens in the heirloom pumpkin. To carry on with the natural theme, the natural wavy trim pays tribute to the pumpkin stems. The little sentiment panel is diecut from white using the Nested Essentials dies. A few speckled dots add visual interest and draw the eye to the sentiment panel and help carry the green elements through the entire design.

Products used:
Mossy Meadow, white cardstock
All About Autumn DSP
Pansy Patch stamps
Nested Essential dies
Adhesive-backed speckled dots
Natural wavy trim
Dimensionals
Adhesives

All ads on this site are posted by WordPress and are based on your personal browsing history. I do not control ad content.

birthday

Who Wants Cake

Growing up, one of my favorite things about my birthday was the family party with the homemade birthday cake. My grandmother was an excellent baker and made the most beautiful and delicious cakes. The floral pattern in this paper reminds me of the one of the cakes she made for my birthday one year. And I chose the pink accents for this design because strawberry cake is my absolute favorite!

I chose Crumb Cake as the card base since it provides the perfect neutral background for the beautiful floral patterned paper. The decorative nesting dies provide the perfect feminine touch for the sentiment panel and my favorite pink — Flirty Flamingo — provides the perfect pop of bright pink. When you want the look of a large bow in the background but an actual bow doesn’t really work, you can layer the ribbon and affix it underneath the sentiment panel to give the look and feel of a tied bow. The pink sequins provide some much-needed sparkle and pizzazz that just says, “Happy Birthday!” What do you think?

Products used:
Blushing Bride (retired), Flirty Flamingo, Crumb Cake
Regency Park DSP (retired)
Heartfelt Hexagon stamps
Papertrey Ink dies
Adhesive-backed sequins
Ribbon duo
Dimensionals
Adhesives

All ads on this site are posted by WordPress and are based on your personal browsing history. I do not control ad content.

Christmas

In the Trees

I ran across a super cute layout by Stamp It Up With Jaimie on one of my recent strolls through my Instagram feed. I loved the funky layout and how she brought out the Old Olive in the tree pattern from A Walk in the Forest designer paper. And isn’t there something about imitation is the best form of flattery?

I changed up a few of the elements from the inspiration design to fit with the supplies in my stash. I started with a card base of basic white cardstock. The Old Olive is cut to cover the entirety of the card front and is embossed using a retired snowflake embossing folder. The tree pattern is matted by Pretty Peacock while the evergreen pattern is mounted on white. The sentiment is embossed in gold on a white panel diecut using the All That dies and the panel sits atop a folded bunch of natural finish ribbon. A few faceted gems scattered about give a pop of sparkle and complete the visual triangle around the focal point of the card design.

This particular layout is out of my wheelhouse, but I really love it and hope to incorporate it in some future designs to mix up my usual style. What do you think — is this layout a winner?

Products used:
Old Olive, Pretty Peacock, white cardstock
A Walk in the Forest DSP
All That dies
Gold embossing powder
Faceted gems
Magical Meadow stamps
Winter Snow embossing folder (retired)
Natural finish ribbon
Adhesives

All ads on this site are posted by WordPress and are based on your personal browsing history. I do not control ad content.

Christmas

We Wish You a Merry Christmas

During a recent stroll through the Instagram feed, I saw a lovely card design by LoritaMarie Crafts and immediately added it to the inspiration folder. It was the perfect combination of patterns and colors. I made a few modifications to paper selections and this design is the end result.

The card base is Mossy Meadow, which helps draw out the shades of green in the evergreen branches in the greenery panel. The evergreen panel is matted by Cherry Cobbler cardstock and mounted on dimensionals. The tree is diecut using the Merriest Trees dies and the sentiment is heat embossed in gold in the center of the tree. To keep the tree topper more delicate, I placed a star trinket at the top. The gold trim is tucked behind the elevated focal panel and gold pearls are scattered on the focal panel for visual interest. My favorite part of this design is the Christmas tree. What is yours?

My son helped me place a few of the elements, including the tree topper. We both decided that the end result is a really nice design that will be included in those that we personally send out to our holiday mailing list.

Products used:
Mossy Meadow, Cherry Cobbler, vellum cardstock
A Walk in the Forest DSP
Merriest Trees stamps & dies
Gold trim
Star trinkets
Gold pearls
Gold embossing powder
Dimensionals
Adhesives

All ads on this site are posted by WordPress and are based on your personal browsing history. I do not control ad content.

Custom Orders

Beyond Grateful

In the U.S., workers will celebrate Boss’s Day on October 16th. I love having the opportunity to help customers celebrate special days, so when a dear friend reached out about a design for Boss’s Day, I was all over it.

Much like the birthday designs you’ve seen over the last couple of days, I knew the intended recipient and could really tailor the end product to fit her style and personality. And I knew I wanted something classy, elegant, AND fun with elements of pink incorporated. The Simple Elegance designer paper is perfect with its rose gold, silver, and gold foiling of the delicate floral elements. Talk about classy! To help the rose gold really shine, the patterned paper is mounted on a sheet of Blushing Bride. The sentiment is heat embossed in copper atop a vellum backdrop, which allows the beautiful patterned paper below to peek through. The copper sequins add sparkle to the design.

I love the end result of this design so much that I’m considering a new line of cards. What do you think?

Products used:
Blushing Bride (retired), vellum cardstock
Simple Elegance DSP (retired)
Heartfelt Hexagon stamps & punch
Copper embossing powder
Adhesive-backed sequins
Dimensionals
Adhesives

All ads on this site are posted by WordPress and are based on your personal browsing history. I do not control ad content.

birthday · Custom Orders

Celebrate

Celebrate is today’s blog post today, and it’s definitely a day to celebrate as it’s my birthday! I’m not exactly sure what the family has on the agenda today, but it will definitely involved a homecooked dinner by the hubby.

Today’s design is another card from a recent custom order. Knowing the intended recipient of this birthday card really helped shape the design. I just love this foiled polka-dot cardstock. It’s one of the last sheets from a custom order I completed about a year or so ago. I’ve been hoarding it. LOL! The polka cardstock pairs beautifully with the sheet of Sweet Sorbet designer paper by adding a soft and playful feel. The lighter background of the patterned paper also provides the perfect relief for the sentiment to really take the floor. To add another layer of sparkle and pizzazz, I added a strip of sequin trim between the two paper panels. I’m thrilled with how this came out and think it spells FUN — just like its recipient!

Products used:
Bazzill Foil Candy Necklace cardstock (retired)
Sweet Sorbet DSP (retired)
Kaiserkraft glitter cardstock
Papertrey Ink dies
Sequin trim
Dimensionals
Adhesives

All ads on this site are posted by WordPress and are based on your personal browsing history. I do not control ad content.

birthday · Custom Orders

Eat Cake

I recently had the opportunity to complete a custom order with the recipients being friends of mine. It’s always fun when you get to design cards for friends because you have the opportunity to tailor to the recipient.

I had just gotten a delivery of clearance product, and I knew the Regency Park paper was going to be perfect. The base of this card is Blushing Bride with the sheet of Regency Park taking center stage. The sentiment panel is punched from white cardstock using the Heartfelt Hexagon punch. I used two different shades of pink to give visual interest to the sentiment and help it to stand out against the busy floral background. The ribbon helps break up the background, as well. The sparkle from the sequins gives a festive look and helps draw the eye across the design to the sentiment. I love this bright and happy design, don’t you?

Products used:
Blushing Bride (retired), white cardstock
Regency Park DSP (retired)
Heartfelt Hexagon stamps & punch
Adhesive-backed sequins
Ribbon duo
Dimensionals
Adhesives

All ads on this site are posted by WordPress and are based on your personal browsing history. I do not control ad content.

Christmas

Christmas Holly

I always find it funny when I can take an inspiration design and then have the end product look nothing like it! That’s definitely the case for today’s card. And all I did was tweak the look of the sentiment panel to achieve a completely different look.

A base of Cherry Cobbler provides the festive backdrop for the holly designer paper. The inspiration design had a solid sentiment panel with a diecut holly wreath. Because I wanted to see more of the beautiful foiled designer paper, I used a sheet of vellum for the sentiment panel and chose to stamp the holly wreath and nestle the sentiment in the center. Rather than placing the bow atop the wreath, I chose to use it as a design element along the side of the wreath instead.

As I was looking at the completed design, it seemed to be missing a little something. And if I had it to do over, the sentiment needs to be heat embossed in red rather than stamped. That would help it to have the *pop* it deserves. What do you think? Embossed sentiment or no?

Products used:
Cherry Cobbler, vellum cardstock
Shining Christmas DSP
Come to Bethlehem stamps (retired)
Bells & Boughs stamps (retired)
Adhesive-backed sequins
Faux linen ribbon (retired)
Dimensionals
Adhesives

All ads on this site are posted by WordPress and are based on your personal browsing history. I do not control ad content.

Christmas

Beary Happy Christmas

Did you know that even seasoned stampers look for inspiration? Sometimes designs just come to you and other times you have to look high and low for them! I actually stumbled across this design by Susan Campfield in my daily stroll through my Facebook feed and knew it needed to go in the Inspiration file. It can easily be adapted to so many different occasions, which makes it a design you can turn to again and again.

I love how the buffalo plaid is reminiscent of a warm winter flannel, making it a perfect design element for this holiday card. The base of the card is black cardstock and the plaid paper is matted by a sheet of Cherry Cobbler and black cardstock. The bear is punched from black cardstock using the Beary Cute punch. The red and white gingham ribbon allows the sentiment panel to function visually as a banner across the focal panel. If you’re making a set of cards, you can alternate the direction of the bear for some added interest. The sentiment panel is diecut from white cardstock using the Nested Essentials die and then the sentiment is stamped in Real Red using the Merriest Trees stamps. The adhesive hexagons help draw the eye across this playful design.

I just love the rustic feel of this card. It reminds me of a homey cabin in the snowy woods. Don’t you think?

Products used:
Cherry Cobbler, Basic Black and White cardstock
A Walk in the Forest DSP
Merriest Trees stamps
Beary Cute punch
Real Red and White gingham ribbon (retired)
Adhesive hexagons (retired)
Adhesives

All ads on this site are posted by WordPress and are based on your personal browsing history. I do not control ad content.

Card Sets · Christmas · Packaging

It’s All in the Packaging

Whether I’m preparing one card or a pack of cards for sale, I believe that the packaging is as important as the product itself. There are many iconic brands that are known as much for their packaging as what they’re selling — think Tiffany’s or Louis Vuitton.

Here are examples of a few card packs that I packaged for upcoming craft fairs. It’s important to me that the card design is clearly visible through the packaging and an insert is included on the back to show the inside sentiment, which can be especially important to customers when they’re selecting cards. Because larger sets of cards result in thicker packaging, a top closure is necessary and a nice coordinating paper and ribbon really dress things up!

Have you seen cards packaged list this before? What other methods have you seen?

All ads on this site are posted by WordPress and are based on your personal browsing history. I do not control ad content.