Did you catch this week’s Terrific Tuesdays video? This week’s episode we looked at all the ways we can use the Merriest Trees bundle to create beautiful holiday cards, including pairing it with some of Stampin’ Up!’s popular designer series paper packs.
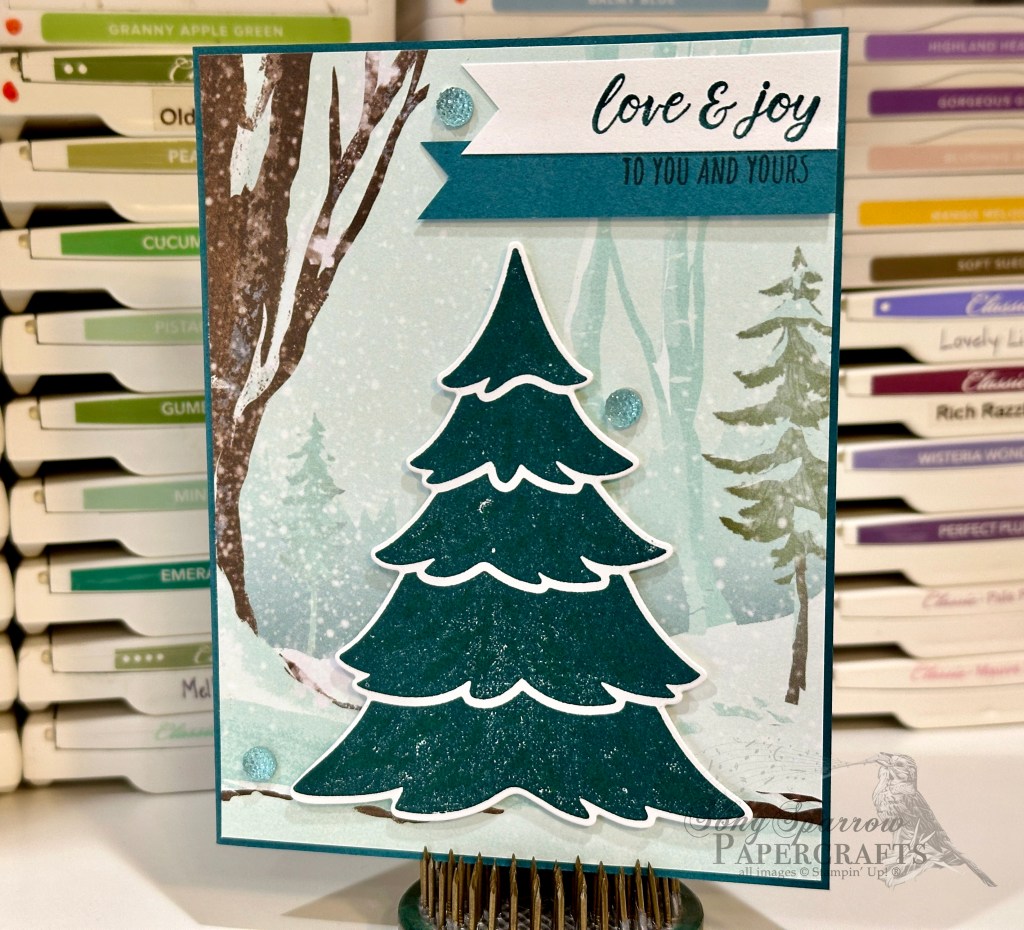
Today’s card is one of the designs we made during the Terrific Tuesdays video. I really love how the One Horse Open Sleigh paper provides the perfect backdrop for a single stamped image of the largest evergreen tree from the Merriest Trees stamp set. The coordinating set of dies makes it super easy to cut out the tree image. Pretty Peacock is currently one of my favorite shades of blue-green in the Stampin’ Up! color palette, and it takes center stage in this design.
Wanna know more about how this card came together? Do you want to see what other designs we made using the Merriest Trees bundle? Check out this week’s Terrific Tuesdays video to learn more!
Products used for today’s card design: Pretty Peacock, Basic White cardstock One Horse Open Sleigh DSP Merriest trees bundle Faceted gems trio Dimensionals Adhesives
All ads on this site are posted by WordPress and are based on your personal browsing history. I do not control ad content.
Happy Thursday, crafty friends! I hope your week has been going well. For me, things are really gearing up in the singing department, so I’ve been busy rehearsing while working in the craft room. Do you ever multi-task during your crafting time?
Today, we’re taking a look at more of the detailed elements of the Merriest Trees bundle. The combination of stamps and dies allows you so much versatility and variety in your designs. This card design highlights yet another way you can build a beautiful scene with this bundle of products.
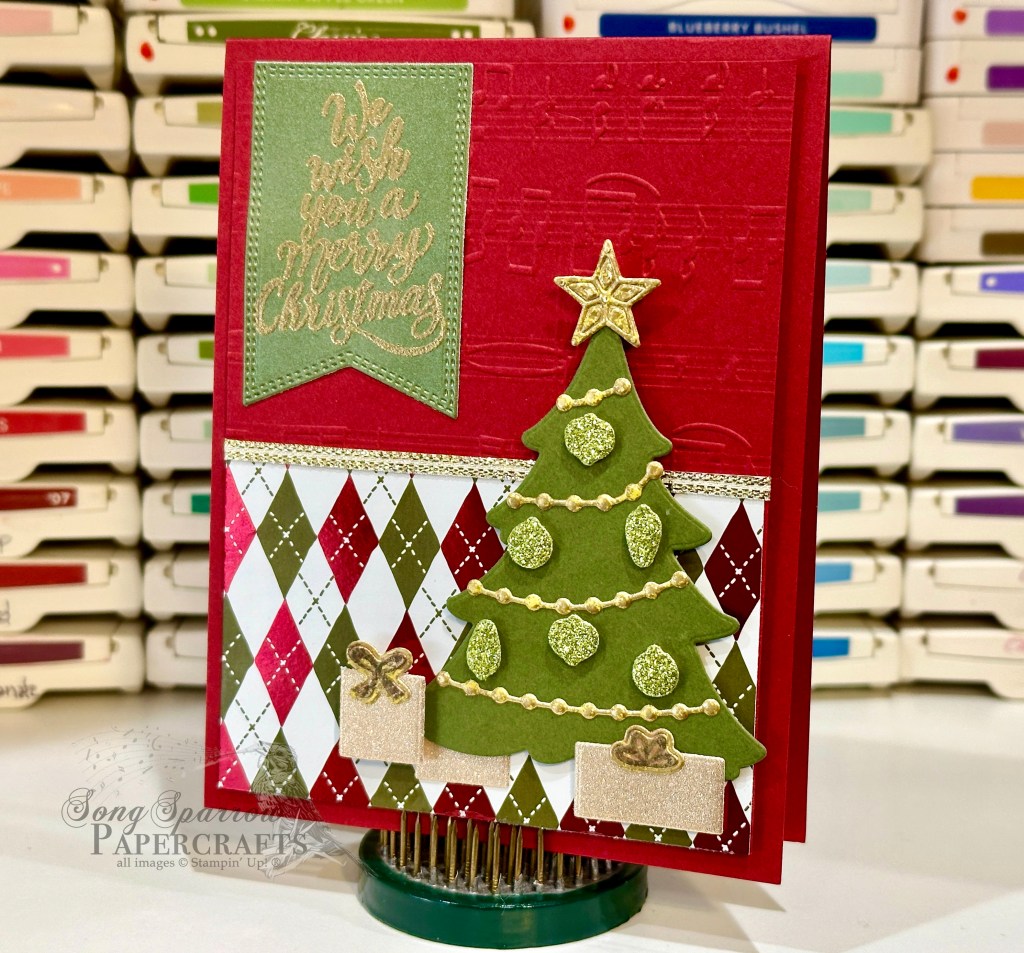
The base of today’s card is Cherry Cobbler cardstock. And in the spirit of this musical week, I also incorporated some Merry Melody in today’s card design by using the embossing folder for the top portion of the focal panel. I finished the focal panel with the fun argyle print from the Shining Christmas designer series paper pack, which is very sadly sold out. The four-panel tree is diecut from Mossy Meadow and adorned with gold trim and a star cut from Distressed Gold and sparkly ornaments cut from glitter paper. The packages under the tree are diecut from gold shimmer paper with the bows diecut from Distressed Gold and then the bow stamped in Early Espresso to give the details. The sentiment from Merriest Trees is stamped in gold and then heat embossed in gold on top of a Nested Essentials banner. The silver and gold trim in the center helps merry the two sections with a cohesive sparkle. I just love how Merriest Trees allows you to incorporate so much detail into a design without much effort.
A few tips from today’s card design:
Using an adhesive sheet on the back of your paper when cutting the finer elements, like the tree trim and star, allow for very easy application of your diecut element onto your tree.
Mini dimensionals are perfect for popping up the ornaments. Half of a mini dimensional is just right for the long, narrow ornament.
For a richer color when embossing metallics, try stamping tone-on-tone metallic ink instead of Versamark. For example, here I used Tsukineko Galaxy Gold ink under the layer of SU! gold embossing powder.
Wanna know the other ways we learned to use the Merriest Trees bundle? Check out this week’s episode of Terrific Tuesdays!
Products used for today’s card design: Cherry Cobbler, Mossy Meadow cardstock Shining Christmas, Distressed Gold DSP Glitter and shimmer paper Merriest Trees stamps and dies Nested Essentials dies Merry Melody embossing folder Gold embossing powder Gold & silver trim Dimensionals Adhesives
All ads on this site are posted by WordPress and are based on your personal browsing history. I do not control ad content.
Wonderful Wednesday, everyone! We’re beginning to have the chill of winter weather in the air here in North Texas and many mornings of heavy frost. Is it beginning to feel more like winter in your area?
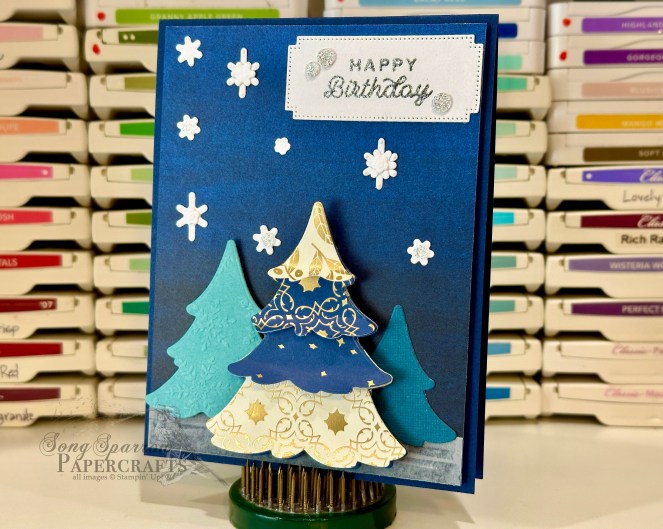
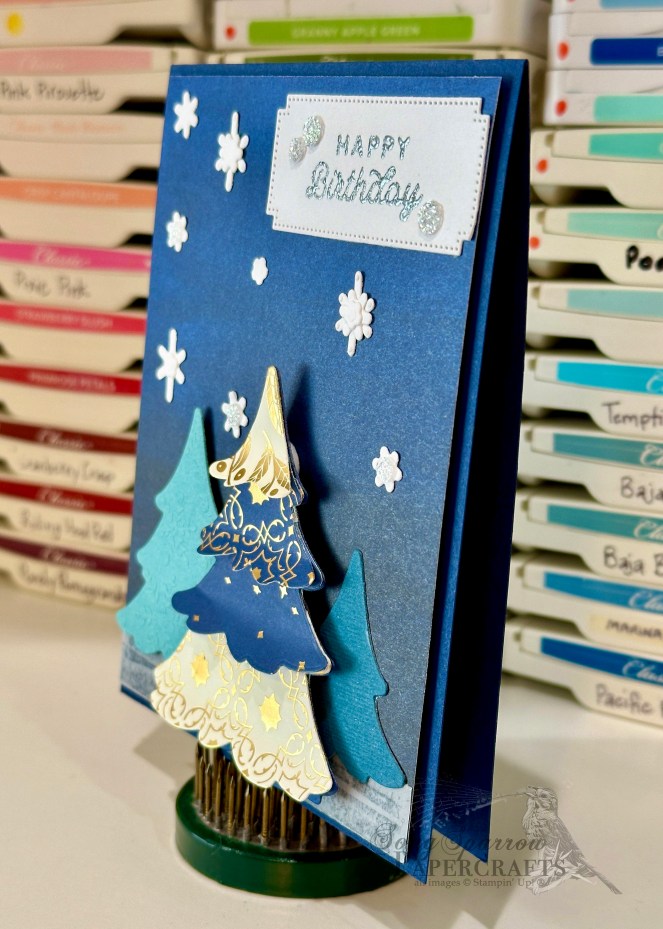
And speaking of winter, today’s card tips the hat to winter birthdays AND shows yet another way that you can use the Merriest Trees bundle to create beautiful projects. Today, I wanted to share how you can layer the tree dies to give realistic depth and dimension to the trees on your projects.
In this week’s Terrific Tuesdays video, we spoke briefly about the various sizes of trees in the suite of dies. Not only does this make it quick and easy to cut trees of all sizes, but it also allows you to create beautiful layers on single tree for a more realistic look. This card design shows you both.
The base of this card is a sheet of Night of Navy cardstock. The background panel is the ombre night sky patterned sheet from the O Holy Night designer series paper pack. I decided on a trio of trees as the focal scene with the center tree as the focal image. I stuck with shades of blue and blue-green for a more visually unified scene. I used vellum as the backdrop for the trees. The smallest tree in the background is diecut from Pretty Peacock using the two-panel tree die. The medium-sized tree closer to the foreground is embossed with an older snowflake embossing folder (you could easily substitute the Snowflake Sky EF) and then diecut from Lost Lagoon using the three-panel tree. The base of the focal tree in the foreground is Night of Navy and is diecut using the four-panel tree die. I used several different sheets of the Shining Brightly designer series paper as the layers for the focal image, which are adhered to the tree base. Each tree layer is cut using a different sized tree die from the suite, which makes for very quick and easy layering without any fussy cutting. The edges of each of the layers is curled up for a realistic look of fluffy layers in the tree. Isn’t this a stunning effect? I finished off the scene with some snowflakes diecut from white cardstock and a sentiment. While the snowflake dies I used are from a retired set, there are beautiful snowflakes in a number of sets in the Holiday Mini Catalog, including Merriest Trees, Stars at Night (on sale), and Wishes All Around (on sale).
Wanna know the other ways we learned to use the Merriest Trees bundle? Check out this week’s episode of Terrific Tuesdays!
Products used for today’s card design: Night of Navy, Basic White cardstock Vellum O Holy Night (sold out), Shining Brightly (sold out) DSP Merriest Trees, Autumn Leaves, Twinkling Lights (retired) dies Winter Snow (retired) embossing folder Circle Sayings stamps Silver embossing powder Glitter sequins Dimensionals Adhesives
All ads on this site are posted by WordPress and are based on your personal browsing history. I do not control ad content.
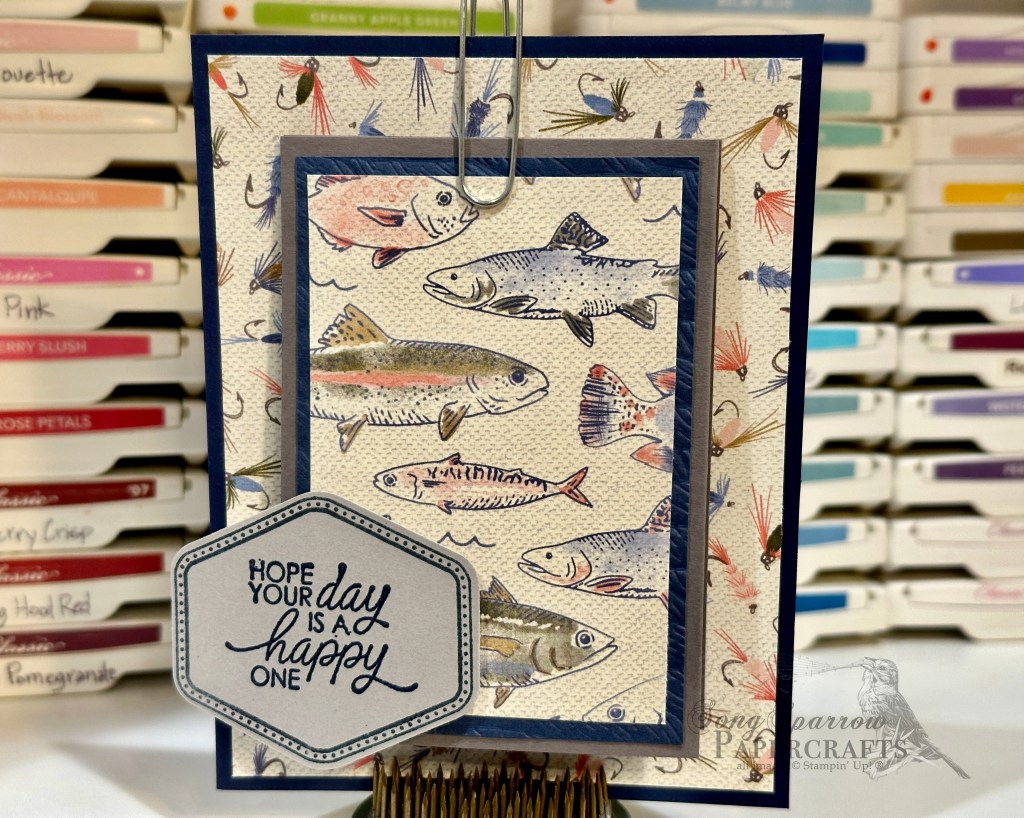
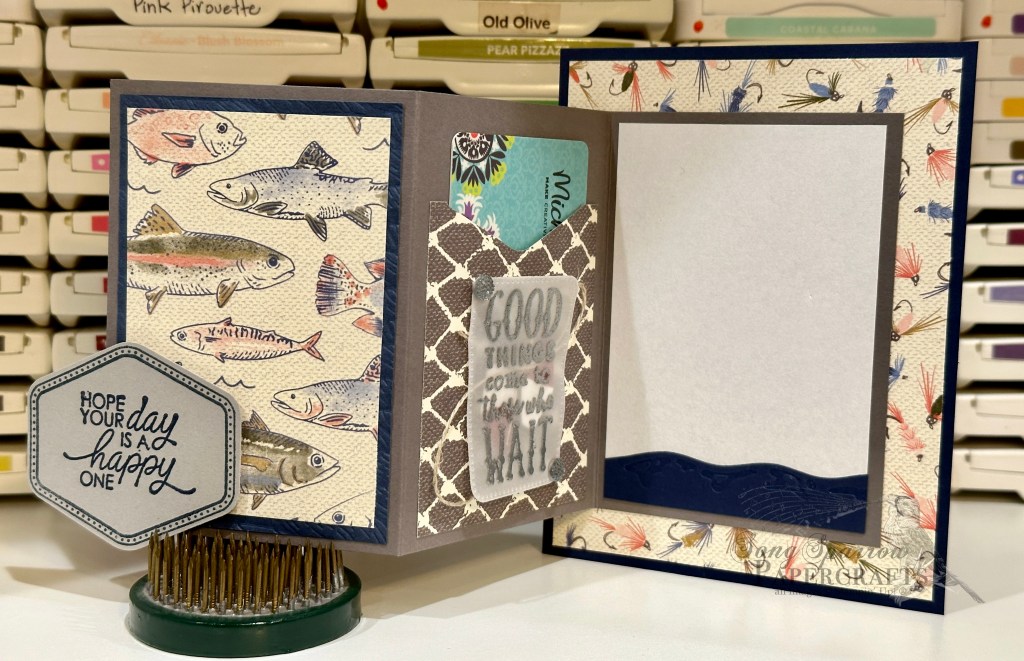
Did you catch yesterday’s Terrific Tuesdays video? This week’s episode is all about gift card holders and was inspired by today’s card design! I love finding fun ways to give gift cards. I recently ran across this super fun gift card holder shared by fellow demonstrator Heidi Collins. I knew this would be the perfect design for an upcoming family member’s birthday as this young man is all things outdoors.
The gift card holder is built on a standard single-panel base of Night of Navy cardstock. The patterned papers are all from the Let’s Go Fishing designer series paper pack. The fold-out gift card holder portion in the center is built on a piece of Basic Gray cardstock, which is scored into thirds. For the front-facing panel, I decided to add a little interest to the navy mat by embossing it using the 3D Rope embossing folder. The sentiment panel is stamped on Smoky Slate cardstock with a border stamp from the Heartfelt Hexagon set and a sentiment from the So Sincere stamp set and then punched with the coordinating hexagon punch. The gift card pocket is made with a piece of Let’s Go Fishing DSP with the notch created by the hexagon punch. The cute vellum sentiment panel on the gift card pocket has a heat embossed sentiment from the Gone Fishing stamp set and is diecut using the Nested Essentials dies. There are a few bobbers and some line underneath the vellum panel to carry the theme through and for a bit of visual interest. The message panel is a simple piece of white paper with a strip of Night of Navy diecut and embossed using the Gone Fishing dies.
This gift card holder was super easy to put together! And with several more upcoming birthdays and the Christmas holidays just around the corner, as well, I love having a cute way to give gift cards that can easily be tailored to each individual recipient and occasion.
Wanna know more? Check out this week’s Terrific Tuesdays video to learn how this design was adapted for holiday gift-giving!
Products used for today’s design: Night of Navy, Basic Gray, Smoky Slate, Cherry Cobbler, Basic White, vellum cardstock Let’s Go Fishing DSP Gone Fishing stamps & dies Heartfelt Hexagon stamps & punch Faceted gems trio Linen thread Silver embossing powder Dimensionals Adhesives
All ads on this site are posted by WordPress and are based on your personal browsing history. I do not control ad content.
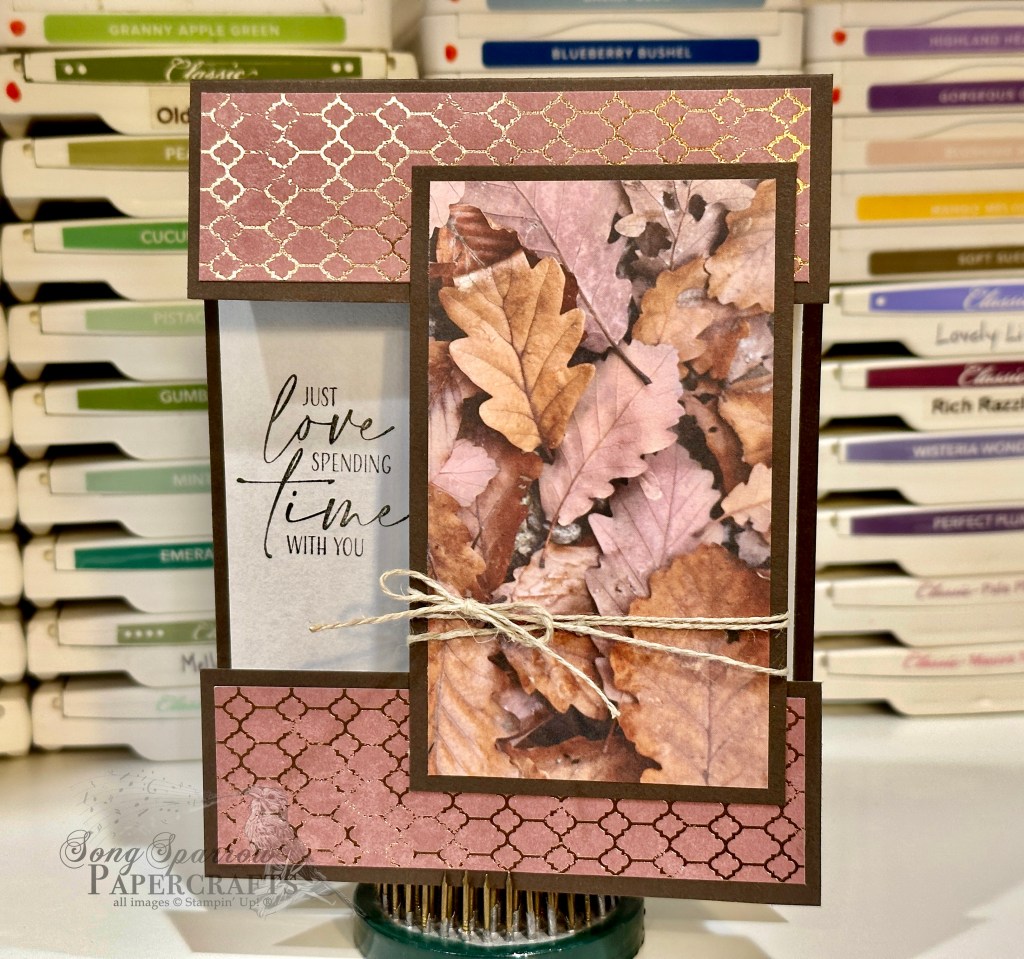
Do you love learning new things? I’m learning new fun folds to add interest to my card designs, and I really love this one that I learned from fellow demonstrator Jacki Bolhuis with Klompen Stampers. She calls it the Split Front Fold, but I like to think of it as the Cut and Twist because you cut out the center of the front panel and twist it up to make it a focal panel. What I really love about this fun fold is that you can get stellar results whether you dress up the front focal panel or leave it as a stand-alone, like I did here. So many possibilities!
For this card, we begin with a base of Early Espresso and a single sheet of the leaf pattern from the All About Autumn designer paper pack. The base is is a standard size but scored at the top rather than on the side. To achieve the cut and flip, with the long edge up, you cut 1 1/2-inches from one side and then make a second cut of 2 1/2-inches. This leaves a 1 1/2-inch strip just beyond the center fold, along with the two pieces that were cut. The larger piece gets twisted up vertically to serve as the focal panel on the card front and also holds the smaller pieces of the card front together. I chose the leaf pattern of All About Autumn to serve as the star of the vertical focal panel. The foiled pattern on the back side of the leaf sheet serves as the two decorative strips at the top and bottom. A little twist of linen thread gives a little punch to the focal panel. To allow the beautiful patterned paper to really shine, the sentiment is stamped on the card base so that it shows through the peek-through window in the card front.
What do you think of this new Cut and Twist method? I’m excited to try some other designer papers with this unique fun fold!
Products used: Early Espresso cardstock All About Autumn DSP Linen thread Adhesives
All ads on this site are posted by WordPress and are based on your personal browsing history. I do not control ad content.
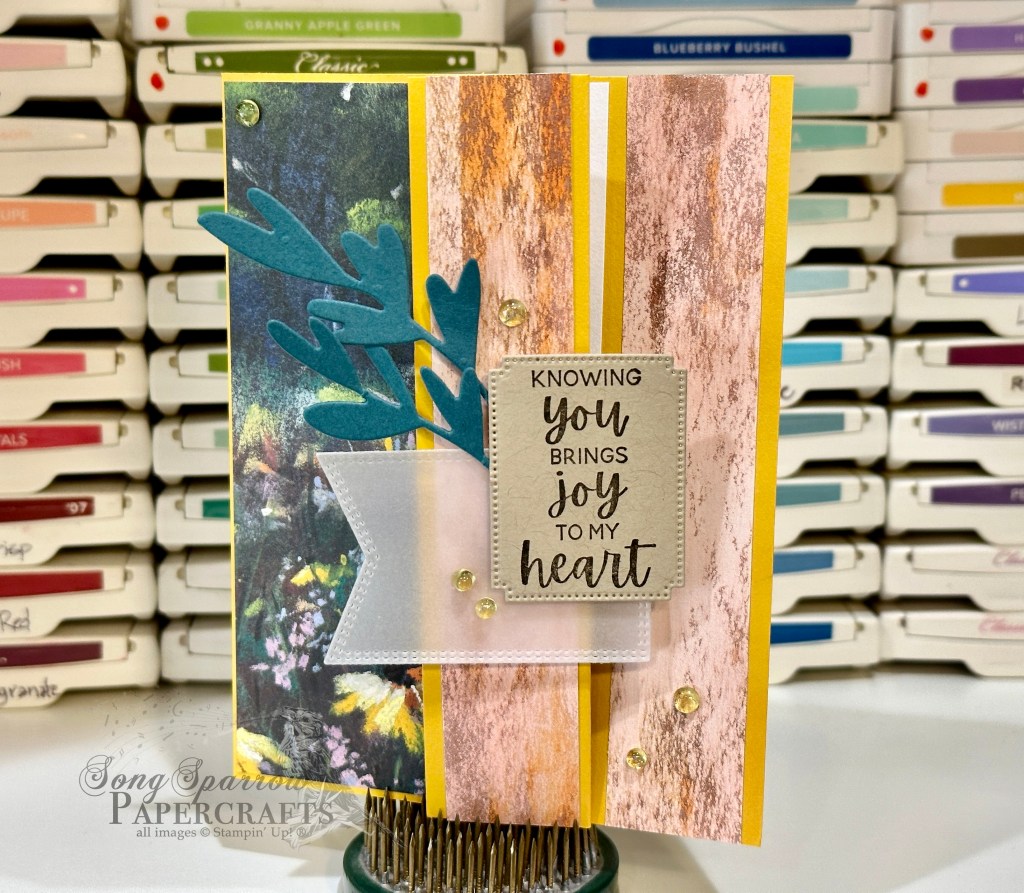
Sometimes I find myself a little stumped with design ideas for beautiful designer papers because the thought of cutting them up gives me pause. But I’ve learned that there are a whole host of fun folds that afford an inspired design while sparing gorgeous designer papers.
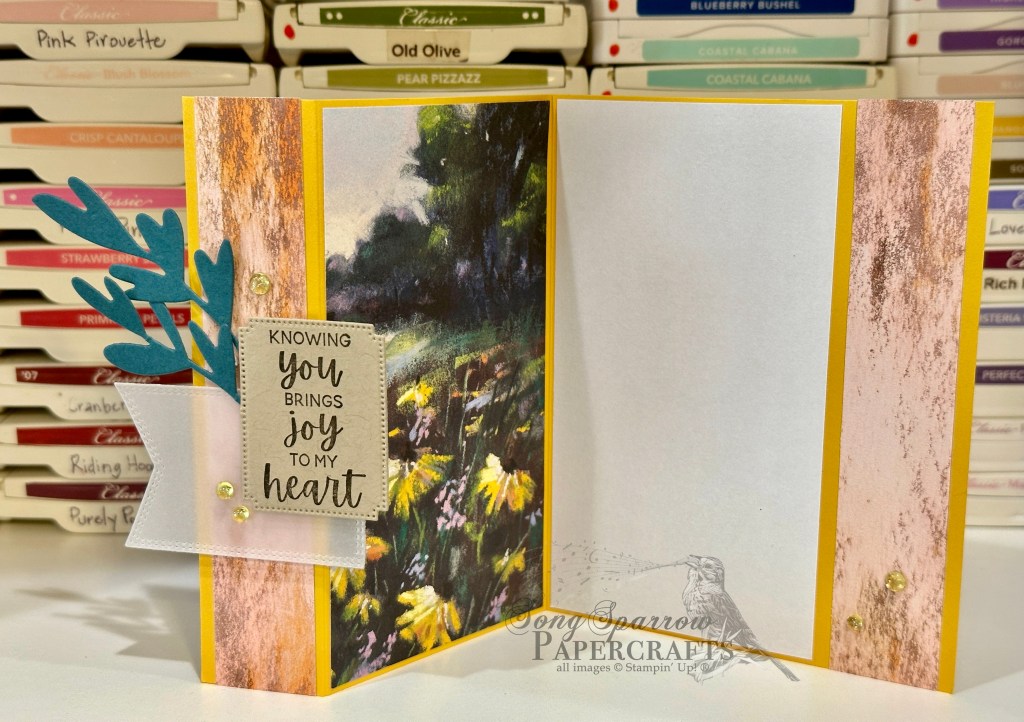
I recently ran across a small modification to the Z-fold that gives even more space for designer paper. As you look at the closed card, you may be thinking that the design looks oddly familiar. That’s because this fun fold is a combination of both a Z-fold and peek-through, but rather than cutting the one-inch strip from the card front, the card front is scored at the one-inch mark. Then this small flap is folded back toward the card front.
This card design begins with a base of Crushed Curry card stock. It is cut to a standard size of 4 1/4 x 5 1/2-inches with the 1-inch panel scored and folded back on the front panel. Two sheets of a single pattern of Meandering Meadow designer paper are needed for this design — one for the card front and flap and the other for the inside panel and inside base. I chose the beautiful fields of yellow daisies for this card because it perfectly represents the cheerful sentiment. The smaller strips of patterned paper are the reverse side of the sunny daisy paper. The focal sentiment panel is comprised of a vellum banner diecut using the Nested Essentials dies and a smaller sentiment panel diecut from Crumb Cake cardstock using the Autumn Leaves dies. The sentiment is from the So Sincere stamp set. To add a pop of additional color to the sentiment, a few sprigs of greenery cut from Pretty Peacock using the Bold Bouquet dies is tucked in the center. A scattering of sparkle gems add visual interest and move the eye across the design.
I really love this new fun fold variation and am looking forward to putting it to use with a few of my other favorite designer papers. What do you think of this fun fold variation? Interested in giving it a try? Check out the PDF tutorial here.
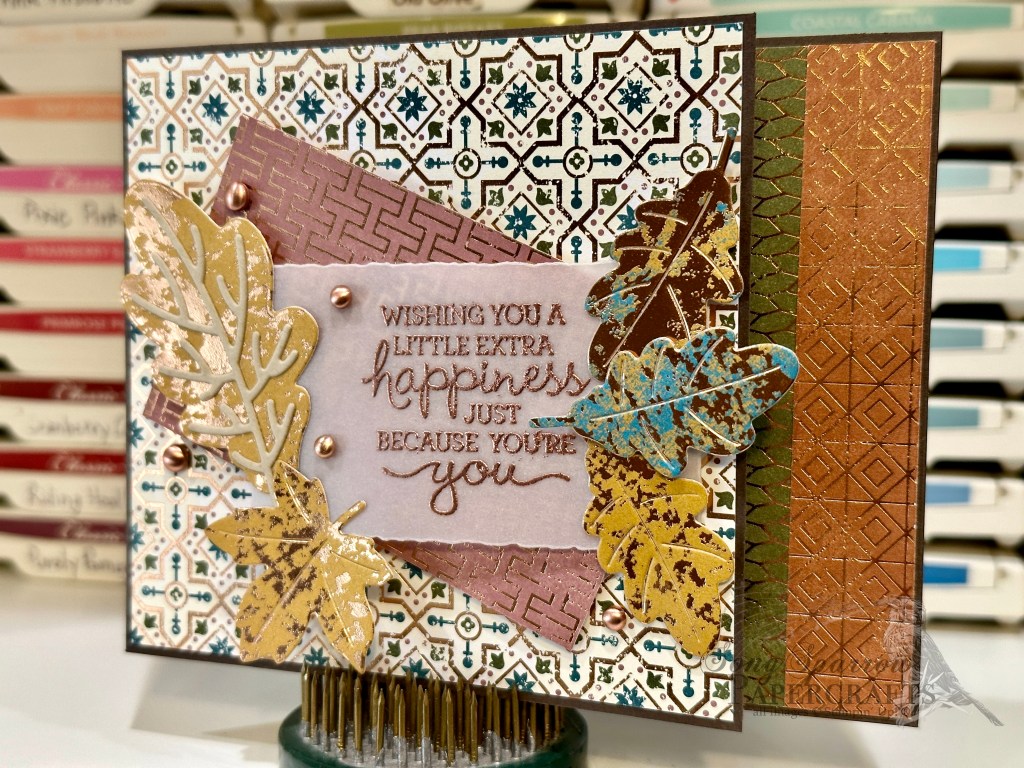
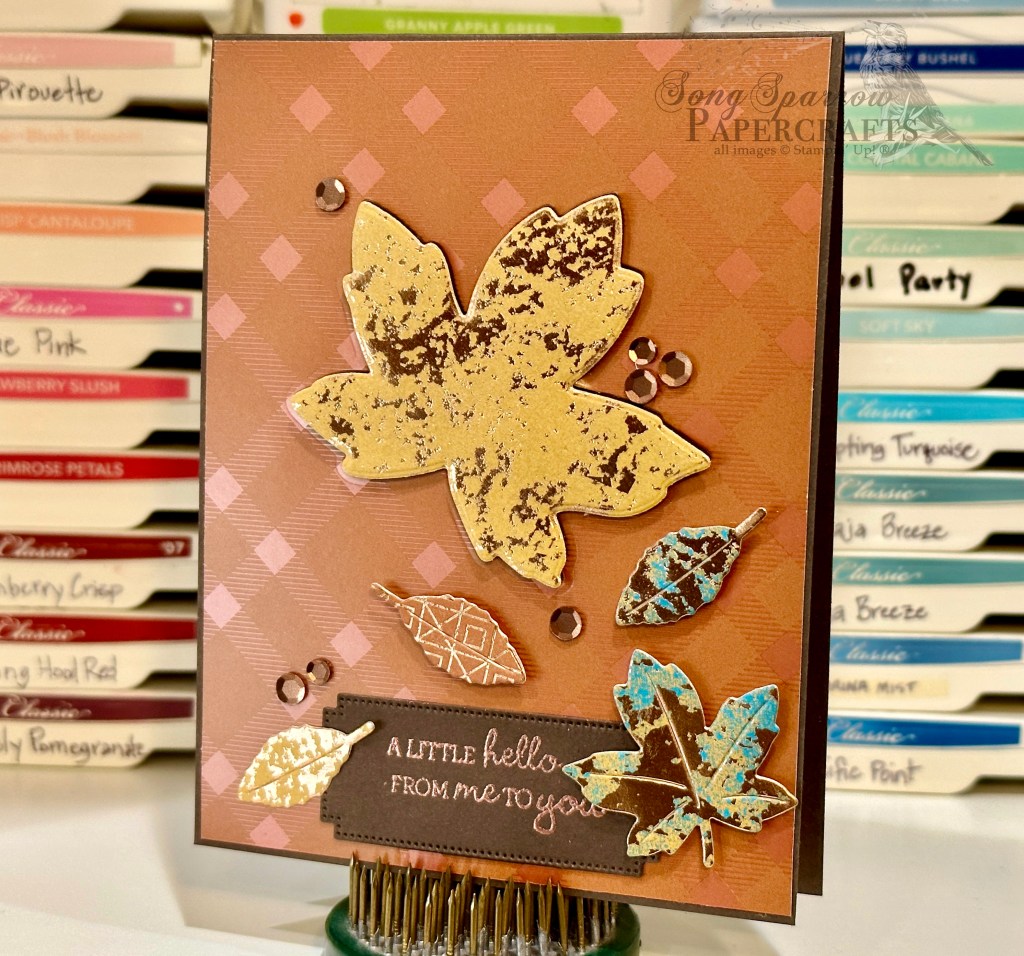
For today’s card design, I challenged myself to use paper scraps for as many elements as I could. I had accumulated a number of scraps of All About Autumn after completing projects for a team event. So those scraps set the color palette for this card design.
We begin with a base of Early Espresso cardstock. A 1-inch peek-through panel is cut in the card front. The predominantly vanilla mosaic foil from All About Autumn serves as the decorative base for the card front. Scraps of Mossy Meadow and copper foil serve as the peek-through elements on the base panel. A scrap of Moody Mauve foil is mounted askew on the mosaic foil to add visual interest and a color base for the vellum sentiment panel. The mauve also helps to bring out the copper metallic of the leaves and sentiment. The leaves are diecut from Oxidized Copper designer paper using the Autumn Leaves dies. The veining of the larger leaf is diecut from Crumb Cake cardstock to add a little definition without detracting from the overall design. The sentiment is stamped using the Pansy Patch set and heat embossed in copper atop a vellum panel that is diecut using a Deckled Rectangle die. The vellum sentiment panel and leaves are layered using dimensionals. The brushed metallic dots draw the eye to the sentiment panel in the center.
Do you save your paper scraps? If so, do you have success in using up your accumulated scraps? I’m a scrap saver and pretty efficient at being able to use them. I do periodically purge my scraps since the smaller pieces can sometimes take over. I love how these scraps worked together for this design!
Products used: Early Espresso, Crumb Cake, vellum cardstock All About Autumn (retired), Oxidized Copper DSP Pansy Patch stamps Autumn Leaves, Deckled Rectangles dies Copper embossing powder Brushed metallic dots Dimensionals Adhesives
All ads on this site are posted by WordPress and are based on your personal browsing history. I do not control ad content.
I’m feeling all the fall vibes these days. What about you? In usual fashion, however, the weather here in North Texas can’t decide if it’s summer, fall, or winter. But I shall press on with my fuzzy socks and long sleeves anyway!
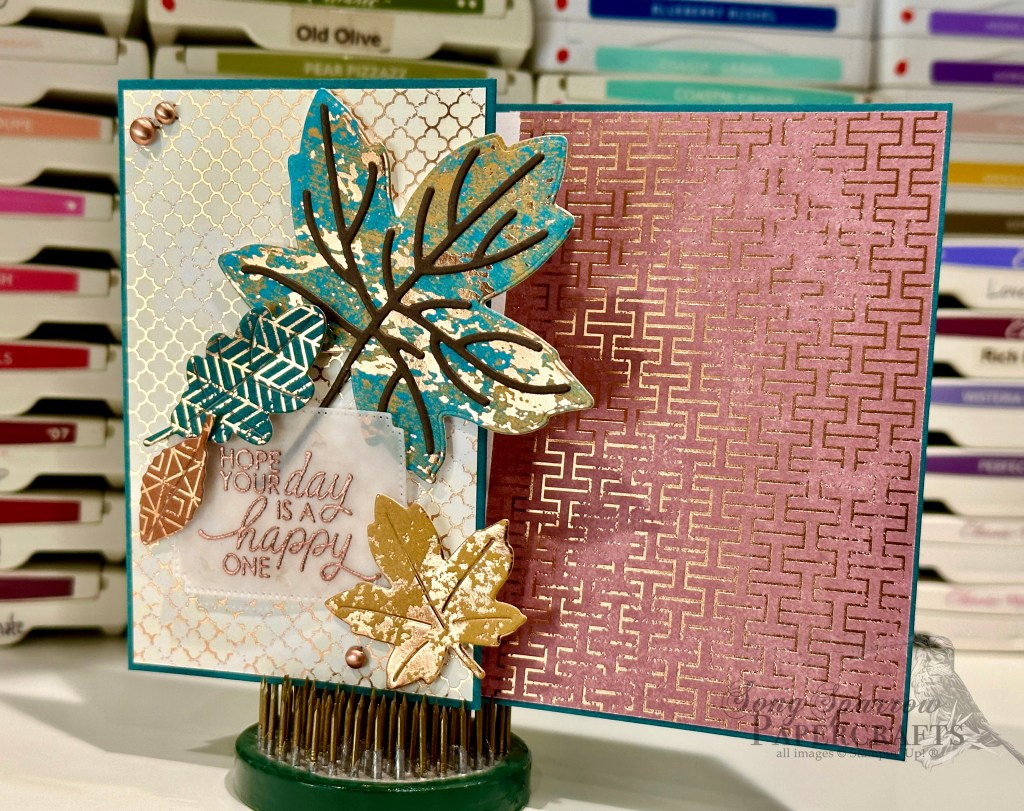
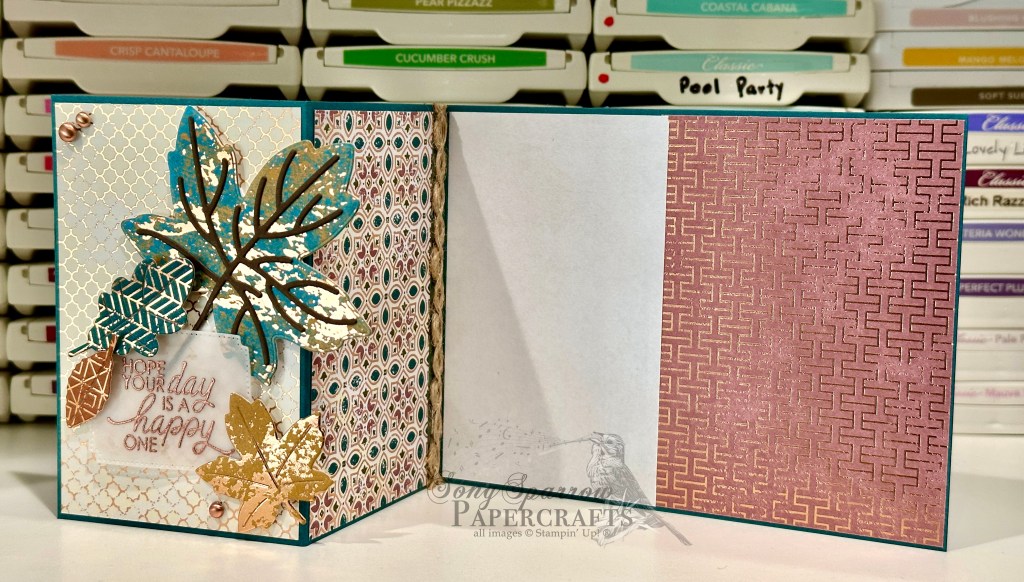
Today, we’re revisiting the Z-fold. Did you recognize it when you glanced at the photos of today’s card? It looks a little different when the orientation is changed from portrait to landscape, and I just love how this orientation adds some extra drama!
For this card, we begin with a base of Pretty Peacock. You’ll want to cut your card base 4 1/4-inches by 11-inches and then score at 2 3/4-inches and 5 1/2-inches to achieve the landscape-oriented Z-fold. The foiled papers are from two different designer series paper packs — All About Autumn and Oxidized Copper. For the card panels, I selected 3 different foiled patterns from the All About Autumn paper pack. These 3 patterns work in tandem to introduce the color palette of vanilla, peacock, and mauve. The leaves on the front panel are diecut from our selected designer papers using the Autumn Leaves dies. The veining for the largest leaf is cut from Early Espresso, which helps the eye pick up on the foiling in our other card elements. The sentiment is stamped using the So Sincere stamp set and then heat embossed in copper atop a panel of vellum, which is diecut using the Autumn Leaves die set. The sentiment panel and leaves are layered on the card front using dimensionals. The brushed metallic dots help the eye move across the front panel of the card and also draw out the foiling in the papers.
TIP: if you use a paper scrap that isn’t quite wide enough, like I did here with the mosaic pattern in the center, select a complementary ribbon to fill in the gap and add interest. I loved the texture and pattern that the natural wavy trim adds to the mosaic panel.
Products used: Pretty Peacock, Early Espresso, vellum cardstock All About Autumn (retired), Oxidized Copper DSP So Sincere stamps Autumn Leaves dies Natural wavy trim Copper embossing powder Brushed metallic dots Dimensionals Adhesives
All ads on this site are posted by WordPress and are based on your personal browsing history. I do not control ad content.
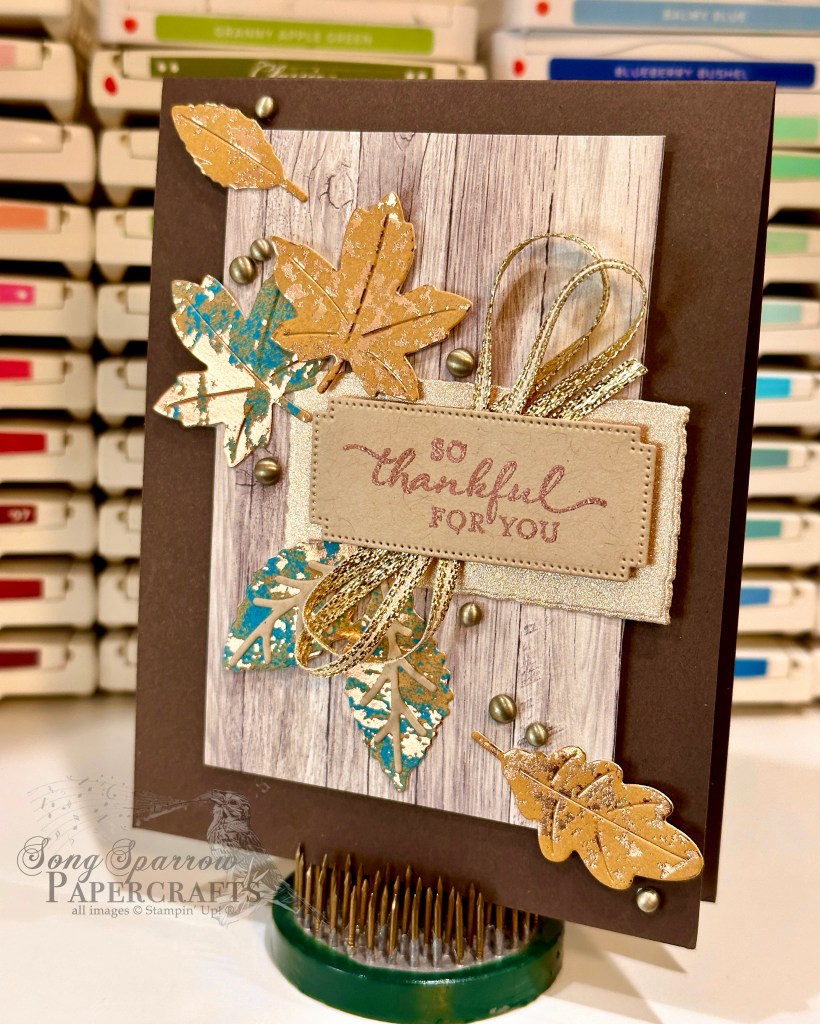
Today, we continue to explore all of the ways we can use the current autumn products to make beautiful cards. Believe it or not, this card is a variation of yesterday’s design. Hang around and I’ll show you how we got from A to Z.
The base of this card is Early Espresso. The dark background helps make the copper elements in this design stand out. Because I wanted copper to be more prominent, the center panel of copper Tartan Foil went from a smaller accent-sized panel to encompassing most of the card front. The large sweetgum leaf is diecut from the copper and gold sheet of Oxidized Copper designer paper and stands prominently in the center of the design to give the eye a starting point when viewing the design. The smaller elm and sweetgum leaves were leftover from other projects and are scattered under the larger leaf to mimic the feeling of falling leaves. The sentiment panel is centered at the bottom of the card rather than offset in the center of the card. Rather than drawing the eye with a much lighter element, cutting the sentiment panel from the darker Early Espresso helps draw out all of the copper elements and draws the eye to the heat embossed sentiment. The scattered sequins help the eye move down and across the card to reinforce the feeling of the leaves falling.
I’m having lots of fun playing with all of the autumn-themed products. Hopefully you’ve been enjoying them. I’m planning to practice a little gratitude over the course of the month and will be mailing a lot of these designs out. Do you do anything to actively practice gratitude?
Products used: Early Espresso cardstock Tartan Foil, Oxidized Copper, All About Autumn DSP Pansy Patch stamps Tsukineko Cosmic Copper Copper embossing powder Neutrals sequins Dimensionals Adhesives
All ads on this site are posted by WordPress and are based on your personal browsing history. I do not control ad content.
Have the leaves begun to change in your area? Fall is my favorite time of year. And I absolutely love it when the leaves begin to change colors. The main thoroughfare through our neighborhood is lined with a wide variety of trees that put on quite a show during the fall. The street looks like it’s lined with fire. I love to watch the process and am always awed by it. I find reasons to run errands every day as the leaves are changing.
I was super excited to receive a box of goodies last week, which included the beautiful Oxidized Copper designer paper, the Autumn Leaves die collection, and brushed metallic dots. When the Holiday Mini Catalog first released, I completely talked myself out of any of the fall products. But after participating in a team building event where we used them, I realized that I would find myself reaching for them more than I thought!
I was inspired by a card posted by i.heart.stamps over on Instagram and wanted to try my hand at recreating it with a few twists here and there. This card design begins with a base of Early Espresso cardstock. The beautiful woodgrain panel is from the All About Autumn designer series paper pack. The gorgeous leaves are diecut from Oxidized Copper designer paper using the Autumn Leaves dies. The sentiment panel consists of two layers. The base layer is gold glimmer paper diecut with the Deckled Rectangles set. The sentiment is heat embossed in copper atop Crumb Cake cardstock, which has been diecut using the Autumn Leaves dies. TIP: for richer color when heat embossing, whenever possible stamp in the same color ink that you will be embossing with. A twist of gold trim behind the smaller sentiment panel really helps unify the metallic elements and draw the eye to the sentiment. The brushed metallic dots allow the eye to pass across the card, following the path of the falling leaves.
I just love the details in the Autumn Leaves dies. The veining you see here is a part of those dies. There are also leaves without the vein detail embedded within the die but that include a separate die for the veins. The leaf duo under the bottom, left corner of the sentiment panel is an example of that combination of dies.
Products used: Early Espresso, Crumb Cake, gold shimmer (retired) cardstock All About Autumn DSP (sold out) Oxidized Copper specialty paper Tsukineko Cosmic Copper ink Copper embossing powder So Sincere stamps Autumn Leaves, Deckled Rectangles dies Gold trim Brushed metallic dots Dimensionals Adhesives
All ads on this site are posted by WordPress and are based on your personal browsing history. I do not control ad content.