Retiring

Brighter Skies on the Way

Happy Saturday, crafty friends! It’s a rainy (and cold) day here in North Texas, and I’m playing catchup after a very busy end to the week. And with the weather as dreary as it is, I have my head in the clouds — the rain clouds, that is — and that works perfectly into this week’s design theme of all about nature.

This design is a combination of some of my favorite patterned paper — Everyday Skies — with two of my favorite pick-me-up stamp bundles — Playing in the Rain and Bright Skies. Both of these stamp bundles are on the current Last Chance list, so if you love them as much as I do, now is the time to swipe them for your stash! For today’s design, we’re keeping it pretty simple because these three products work super well together.

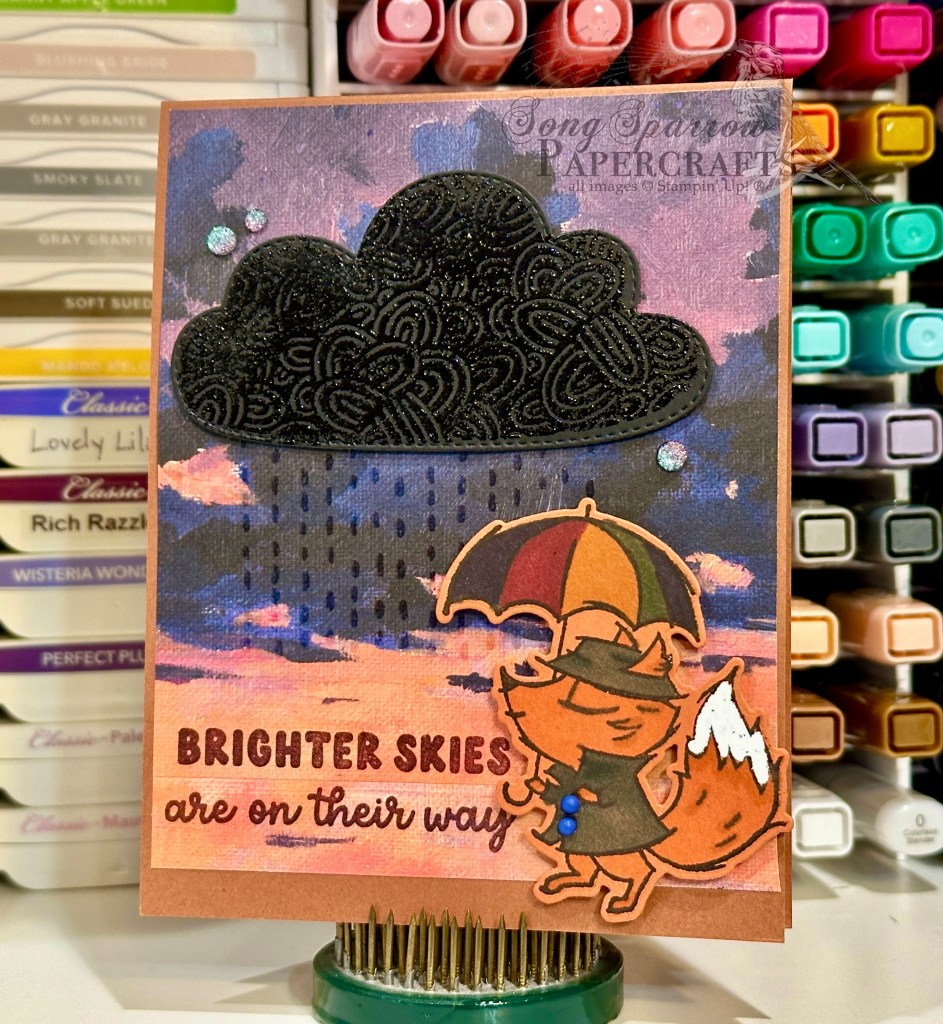
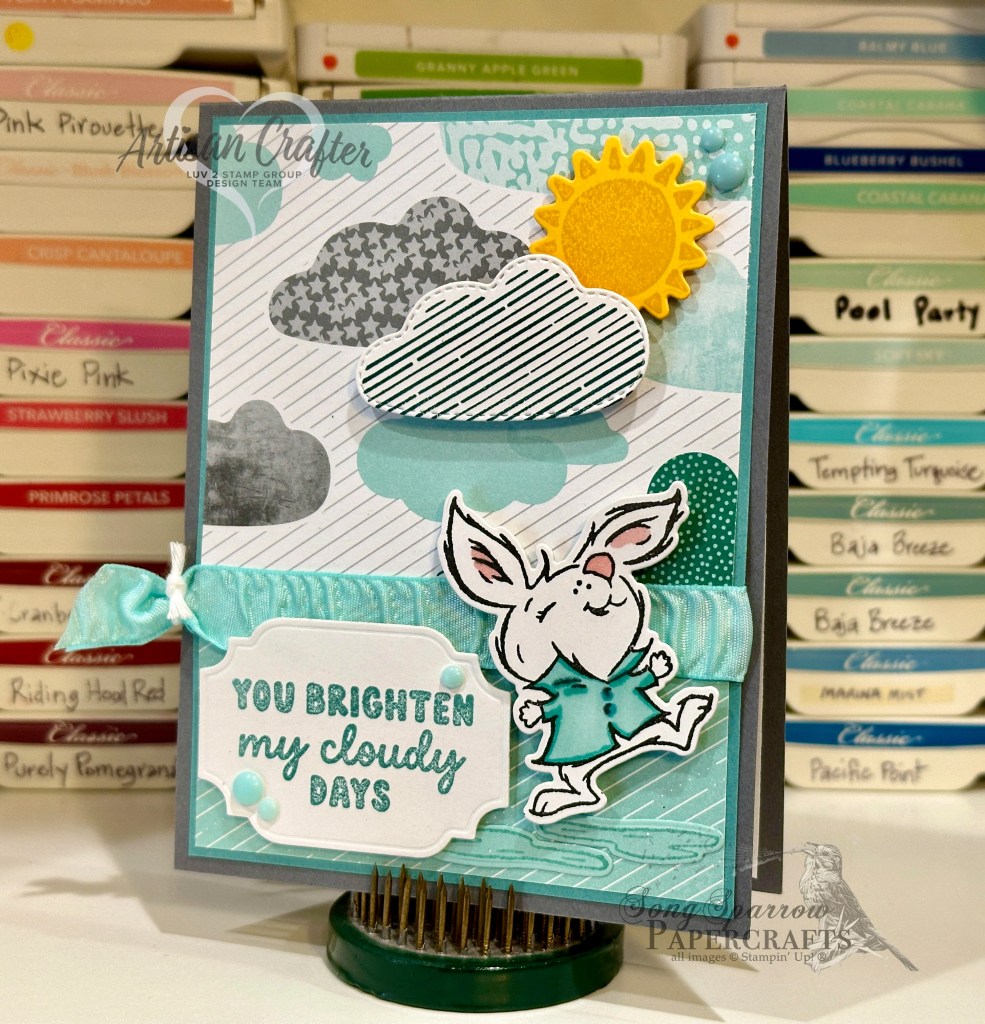
We get started with a base of Copper Clay cardstock. I really love how this pulled out the darker elements in the Everyday Skies paper but in a way that lends itself to our encouraging message. To add a touch of whimsy to the card to pair with our cute fox from the Playing in the Rain set, I chose to stamp the larger cloud from the Bright Skies stamp set onto black cardstock and then heat emboss in black before diecutting with the coordinating die. I add some rain in the area underneath where I intended to affix my cloud by heat embossing the stamped raindrops in clear powder and then affixed my cloud with dimensionals.

Next up, I worked on my focal character — the cute fox from the Playing in the Rain set. I stamped him in black onto Calypso Coral so that the space around the image would blend into the backdrop. I colored the fox with Stampin’ Blends before diecutting with the coordinating die. To ensure that the end of his tail had nice contrast, I used my Versamark pen to heat emboss the tip of the tail with white embossing powder. I used a couple of the ombre matte dots for buttons. I stamped the sentiment from Bright Skies in Blackberry Bliss ink and then affixed the fox to the right of the sentiment and used two layers of dimensionals so our character really stood front and center in the scene. I added a few two tone sparkle gems in the clouds for just a little added sparkly drama.

I really love the challenge of pairing products in my stash and I think this one turned out smashingly well. We’re going to continue our nature tour by using a sketch. I hope you’ll drop back by later to check it out.

Product List
Fun Folds · Holidays

Sending a Little Love

This week is all about honoring the Valentines in our life – be they friends, family, or significant others. Anyone whose special to you deserves a little handmade love from time to time. And today we’re pairing up some older Stampin’ Up! bundles with some of the newer papers to create this super cute spanner fun fold card design. We’re also going to be using the reverse stamp technique to flip an image. So let’s get to it.

We get started with a base of Fresh Freesia cardstock, which is cut to standard A2 size. We’re creating a fun fold today that is inspired by the Spanner Panel fold by fellow demo Jackie Bolhuis. To create the front spanner panel, the front panel of the card is cut from the bottom edge to the center score line on each side at the 1 1/4-inch mark, giving you a front panel that has 3 flaps – 1 1/4-inch, 3-inch, and 1 1/4-inch. The two smaller front flaps are covered with strips of the striped pattern from the Toadstool Gardens paper pack. The center flap is covered with a piece of the Everyday Skies paper, which is going to serve as the backdrop for our focal scene. We’ll cut a 3/4-inch strip of Fresh Freesia to span the front card panel and connect only the two smaller side panels, which are going to lift up separately from the center panel. This strip is going to serve as the structural base for our focal scene, so we’ll begin by covering it with grass. Our grass is cut from Old Olive and a piece of the Floral Delight paper using the Bright Skies long cloud edge die. This provides some nice rolling tufts of grass that don’t distract from our scene. These strips of grass are adhered to the strip of Fresh Freesia with dimensionals, layering one on top of the other to give depth. Using the Playing in the Rain dies, we’ll cut some tufts of grass from Shaded Spruce and Granny Apple Green cardstock and tuck them in, adhering with glue dots. The mailbox is diecut using the Sending Love dies. The post is cut from Blackberry Bliss, while the box is cut from Fresh Freesia glimmer paper and Fresh Freesia cardstock. The flag is Petal Pink for a pop of contrast. An industrial trinket serves as the screw that affixes the flag to our mailbox. A larger envelope is diecut from Beautiful Bokeh paper and closed with a heart sequin. Once assembled, we’ll tuck the mailbox into the grass and adhere to the far left panel with dimensionals, ensuring that we don’t have any overlap onto our center panel of clouds. Tuck the envelope inside the box an adhere with a dimensional or two inside the box.

Now for our main character. Turtle is from the Playing in the Rain stamp set, but when stamped as-is, he will be facing the wrong direction. To get our turtle facing toward the left, you’ll want to stamp the image onto your silicone mat and then carefully press your white cardstock on top to transfer the image onto the paper. Be sure that you’ve inked the stamp heavily to ensure that the image is dark enough once you’ve transferred from the silicone mat to paper. Next, I colored the turtle with a combination of Old Olive and Shaded Spruce Stampin’ Blends. I used a color lifter on the shell to lighten things up a bit and provide good contrast with the skin of turtle’s body. I cut him out with paper snips and then adhered to the grass with several layers of dimensionals for plenty of height. I stamped a smaller envelope from Sending Love on Beautiful Bokeh and cut out with the coordinating die.

The front sentiment is stamped in Blackberry Bliss using the Sending Love sentiment and then diecut with the Friends for Life banner using the extension method so that each end has matching shape. I adhered over the grass with dimensionals. We finish off the front with a selection of purple sequins. On the center panel, tucked discretely behind the mailbox, I stamped the small “sent with love” sentiment and added a few heart sequins around it. The inside panel of the card is left blank for a personalized message. The message panel is flanked with two strips of Beautiful Bokeh paper.

Isn’t this such a fun card?! I love creating scenes, and while we have some terrific products in the current mini catalog, Stampin’ Up! has some great go-tos in the main catalog that should get a little love, as well! Tune in tomorrow for Sketchy Fridays…with a twist!

Products used in today’s card:
Fresh Freesia, Old Olive, Granny Apple Green, Shaded Spruce, Blackberry Bliss, Petal Pink, Basic White cardstock
Everyday Skies, Floral Delight, Three Color glimmer, Toadstool Gardens, Beautiful Bokeh DSP
Playing in the Rain bundle
Sending Love bundle
Stampin’ Blends
Bright Skies, Friends for Life dies
Industrial Trinkets, purple sequins, heart sequins
Dimensionals
Adhesives

Product List
Luv 2 Stamp Artisan Design Team · sketches

Heart Blooms

Today, we’re taking another look at the Filled With Fun bundle, which includes an adorable photopolymer stamp set and coordinating dies. This Online Exclusive from Stampin’ Up! can be used in so many different ways and will pair with any number of other super cute sets. One of the many things I love about SU! is that they design products to mix and match, which means your stamps and dies can serve you in a LOT of ways. I’m not always the best at thinking of creative or different ways to use my stamp sets, but someone in my great, big world of crafty friends has!

I’ve been coloring a lot outside of my usual design lines lately. And today’s stretch uses patterns. There are some patterned papers that really just stump me. Outside of having them stand alone and take center stage, I’m not sure what to do with them. But one of the things you can learn by following stampers who have completely different styles from your own is how to do things differently and IT WORKS! For today’s card, we’re using two very busy patterns from the Delightfully Eclectic designer series paper pack and they work together beautifully! Sometimes it’s all about figuring out how your patterns can compliment one another and remembering that a pattern doesn’t have to take center stage in a design.

Today, we’re using a sketch from Stampin’ Pretty as the inspiration for our card layout. We start with a base of Fresh Freesia cardstock. I really like how this color brought out the deeper pink tones in both patterns of the Delightfully Eclectic DSP. Rather than using the full wagon image from Filled With Fun, I chose to use a portion of it as a planter for the lovely flowers from the stamp set. Our Stampin’ Blends provide the beautiful flowers with their coordinating color. I love how perfectly the sweet turtle from Playing in the Rain pairs with this scene and sentiment. The sparkle for this design comes compliments of the white and Bubble Bath shimmer papers, along with the Blooming Pearls, adhesive hearts & flowers, and Bubble Bath sequins from Sequins Trio.

Today’s card doesn’t follow the sketch to the letter, but that’s the beauty of inspiration – it’s not your ruler, it’s just your guide!

In honor of my son’s birthday, I will be giving away 3 mystery packets of 6×6 designer series paper – both current and retired designs. To be entered to win, simply comment on any of my social media posts (WordPress, Facebook, Instagram) and tell me your favorite Stampin’ Up! color(s). I’ll have my son draw a winner at 3 PM CST tomorrow (March 29).

Products used in today’s design:
Fresh Freesia, Basic White cardstock
Delightfully Eclectic, Bubble Bath soft shimmer, white shimmer DSP
Filled With Fun, Playing in the Rain stamps & dies
Hearts & flowers, Blooming pearls, Sequins trio
Dimensionals
Adhesives


All ads on this site are posted by WordPress.  Song Sparrow Papercrafts is not responsible for ad content.

Luv 2 Stamp Artisan Design Team · Terrific Tuesdays

Brighten My Days

The Bright Skies stamps and dies pair beautifully with so many of the current Stampin’ Up! lineup. Today, we’re pairing the bundle with Playing in the Rain. And I love how SU! has the coordinating Sunny Days designer series paper in the Sale-a-Bration catalog. Some paper, a stamp or two, and some dies and *VOILA* a cheery card!

Today’s card is built on a base of Basic Grey cardstock. The focal panel is comprised of two patterns of the Sunny Days designer paper matted with Lost Lagoon cardstock. I stamped the cloud and sun using the Bright Skies stamps and diecut them with the coordinating dies. The sentiment is stamped on white cardstock and diecut using the All That die. The adorable rabbit and rainy puddles are from the Playing in the Rain set, which also has the coordinating set of dies. I colored the rabbit’s raincoat with Stampin’ Blends to coordinate with the color palette of the card. The focal elements are all on dimensionals and the decorative dots and ribbon further help draw the eye diagonally across the design.

Missed this week’s episode of Terrific Tuesdays where we made 3 fun designs with the Bright Skies bundle? No problem, you can catch it here!

Products used in today’s design:
Basic Grey, Basic White, Crushed Curry cardstock
Sunny Days DSP
Bright Skies, Playing in the Rain stamps
Bright Skies, Playing in the Rain, All That dies
Pool Party crinkle ribbon
White baker’s twine
Decorative dots
Wink of Stella
Stampin’ Blends
Dimensionals
Adhesives

All ads on this site are posted by WordPress.  Song Sparrow Papercrafts is not responsible for ad content.

Terrific Tuesdays

Cloudy Days Are Better With Friends

One of the many things I love about Stampin’ Up! products is that they’re made to go together. This week, we’ve been using the Bright Skies stamps and dies to create super cute cards. We’ve seen how well this set pairs with other sets. And today’s design is keeping it simple but with plenty of pizzazz.

Everyone needs a friend who makes a dreary day better. Someone who makes you want to throw down the umbrella and just jump in the puddles. And that’s the inspiration behind today’s design.

This super cute card sits on a base of Pool Party cardstock. The focal panel is also a sheet of Pool Party that has been diecut with the largest Deckled Rectangles die and then embossed using the Raindrops embossing folder. To give just a little definition to the panel without adding dimensionals, I chose to ink the three exposed edges with Pool Party ink. I fussy cut the three clouds from a sheet of the Sunny Days designer paper, taking advantage of the clouds that were on the corners of the sheet of paper. The bunny and fox are stamped on white cardstock and colored with Stampin’ Blends. After diecutting each of them, I did a little fussy cutting around each to narrow the white outlines. The puddles are stamped on Pool Party and diecut using the Playing in the Rain dies. I colored in the centers with Wink of Stella to mimic reflections. A few adhesive hearts finish everything off nicely.

Looking for more inspiration using the Bright Skies stamps and dies? Check out this week’s Terrific Tuesdays episode for some design inspiration.

Products used in today’s featured design:
Pool Party, Basic White cardstock
Sunny Days DSP
Bright Skies, Playing in the Rain stamps
Bright Skies, Playing in the Rain dies
Raindrops embossing folder
Wink of Stella
Adhesive hearts
Stampin’ Blends
Dimensionals
Adhesives

All ads on this site are posted by WordPress.  Song Sparrow Papercrafts is not responsible for ad content.

Terrific Tuesdays

Enjoy Your Day

Today’s card features the designer series paper that coordinates with the Bright Skies stamps and dies. The Sunny Days paper pack allows you to create so many different styles of cards. This pack could be yours for FREE with a qualifying order between now and the end of February during Sale-a-Bration.

I really love this DSP Gate Fold fun fold by Jackie Bolhuis over at Klompen Stampers. It’s such a great way to showcase both sides of a lovely sheet of designer series paper. I felt like so many of the designs I’ve made with Bright Skies have been more doom and gloom than bright and cheery, and this is the most perfect card to send a cheerful vibe!

This card is built on a quarter-sheet of Real Red cardstock. The third-sheet of designer series paper is scored and folded to create an overlapping barn or gate fold. To punch up the hints of red, the sentiment panel is matted on Real Red cardstock. The sentiment panel is white cardstock diecut using the Everyday Essentials dies. Our cute little rabbit is from the Playing in the Rain bundle and is colored using Stampin’ Blends. Bunny is jumping for joy over some festive grass that is diecut from a sheet of Sunny Days DSP using the Sending Love dies. I added a few adhesive flowers to the grass for a punch of joyful color. A twist of red ribbon from the ribbon combo pack helps draw the eye to the sentiment panel. I let the cheerful Sunny Days paper stand on its own on the inside of the card and simply added white cardstock for the message panel.

Did you miss this week’s Terrific Tuesdays where we made some cute cards with the Bright Skies bundle? You can still check it out.

Products used in today’s featured design:
Real Red, Basic White cardstock
Sunny Days DSP
Playing in the Rain, Heartfelt Hellos stamps
Playing in the Rain, Everyday Essentials, Sending Love, Deckled Rectangles dies
Real Red ribbon combo
Adhesive hearts & flowers
Stampin’ Blends
Dimensionals
Adhesives

All ads on this site are posted by WordPress.  Song Sparrow Papercrafts is not responsible for ad content.

Terrific Tuesdays

Better With You

What do you like to do on rainy days? For me, it depends, but there’s nothing better than being able to spend them with my loved ones! And that’s the inspiration behind today’s card.

A quick peek through the window tells this duo that their fun has to be indoors today. So mama llama and the turtle set about their favorite rainy day activities — knitting and singing.

This card is built on a base of Lost Lagoon cardstock. The focal panel background is also Lost Lagoon. Using two nesting Deckled Rectangles dies, I fashioned the window and window frame. I used the smaller die to cut the interior of the window frame and the window panel to the card front where the raindrops are stamped and embossed with clear embossing powder for a more realistic watery shimmer. The clouds are fussy cut from the Sale-a-Bration Sunny Days designer series paper, and the lightning bolts are diecut from holographic specialty paper using the Bright Skies dies.

To make a more realistic-looking room in the foreground of our focal panel, I diecut the rug from the rainbow sheet of Sunny Days paper using the middle-sized cloud in the Bright Skies die set. Our two adorable characters are diecut directly from the Zoo Crew designer paper using the coordinating Zany Zoo dies. The table and lamp are made with a combination of the Zany Zoo and Bright Skies die sets. The lamp base is the vase from Zany Zoo, while the lampshade is the tulip from Bright Skies. And to give the lamp the look of being on, I diecut a second tulip from a sheet of vellum that I colored yellow using my Stampin’ Blends. To keep the sentiment from distracting from this adorable scene, I stamped on vellum.

Check out this week’s Terrific Tuesdays video for even more inspiration using the Bright Skies stamps and dies.

Products used in today’s featured design:
Lost Lagoon, Crumb Cake, Basic White cardstock
Sunny Days, Holographic, Zoo Crew DSP
Vellum
Bright Skies, Zany Zoo, Autumn Leaves dies
Playing in the Rain, Zany Zoo stamps
Stampin’ Blends
Clear embossing powder
Dimensionals
Adhesives

All ads on this site are posted by WordPress.  Song Sparrow Papercrafts is not responsible for ad content.

Luv 2 Stamp Artisan Design Team · Terrific Tuesdays

Sunshine on a Cloudy Day

When you’re browsing a new Stampin’ Up! catalog, do you ever think to yourself, “I know exactly what I’m going to pair with that!” As soon as I saw the Bright Skies stamps and dies, I just knew that I had to try it out with the Playing in the Rain bundle. To quote one of my favorite movies, “they’re M-F-E-O!” (MFEO = Made For Each Other … And bonus points if you can name that movie! *wink-wink*)

For today’s card, I built this adorable scene using the Bright Skies and Playing in the Rain bundles. The overall theme is “You brighten my cloudy days” and I decided to place the sentiment on the inside message panel rather than cluttering the scene on the front.

I began building the front panel scene with a base of Pool Party cardstock. Using the Playing in the Rain set, I stamped raindrops on most of the base in Versamark and then heat embossed with clear embossing powder. I fussy cut a variety of clouds from the Sunny Days designer paper and also stamped and diecut one cloud using the Bright Skies set. I wanted the clouds to look “rainy” but cheery too, so I balanced the grey clouds with the two Lost Lagoon. I gave them a more realistic layered feel by varying the heights of the clouds with dimensionals, which easily allowed the sun to pop out and shine in between.

I knew I wanted the cute fox to be strolling across a bridge over water, so I set about bringing that portion of this design to life. The grass and hills are cut from Old Olive cardstock. I freehanded the banks and diecut the grass strips using the Sending Love die. All of the grass elements are adhered to a strip of Lost Lagoon cardstock which is popped up on a layer of dimensionals. I added a few adhesive flowers on the grass banks for a bit of whimsy and fun. To give a more realistic shimmer to the water, I added Wink of Stella to the Lost Lagoon cardstock, and I also added water rings for the raindrops using the Pool Party Stampin’ Blends. The cute fox is stamped on white cardstock and colored with Stampin’ Blends. I diecut the fox with the coordinating Playing in the Rain die and then trimmed down the diecut image to further reduce the white edging all around. The bridge is diecut from Crumb Cake cardstock using the Playing in the Rain dies. I very lightly sponged the bridge with Crumb Cake ink to bring out the details in the bridge railing. The fox is adhered to the card base with dimensionals and the bridge is then layered on top in the same manner.

Don’t you just love it when an idea comes together even better than you imagined? I love, love, LOVE this card! It just makes me smile!

Want to see other design ideas using the Bright Skies bundle? Check out this week’s Terrific Tuesdays episode for more inspiration!

Products used in this design:
Pool Party, Crushed Curry, Lost Lagoon, Old Olive, Crumb Cake, Basic White cardstock
Sunny Days DSP
Bright Skies, Playing in the Rain stamps
Bright Skies, Playing in the Rain, Sending Love dies
Clear embossing powder
Adhesive flowers
Stampin’ Blends
Wink of Stella
Dimensionals
Adhesives

All ads on this site are posted by WordPress.  Song Sparrow Papercrafts is not responsible for ad content.

Terrific Tuesdays

Brighter Days

This week, we’re going to explore all of the ways that we can use the Bright Skies bundle to make some wonderful cards. A lot like Sending Love, the Bright Skies bundle pairs beautifully with so many of the current Stampin’ Up!

Today’s card uses a fun mix of products. The Sunny Days designer series paper that is currently available as a Sale-a-Bration item (FREE with qualifying purchase of $50) is designed to pair perfectly with the Bright Skies stamps and dies, not to mention it’s awesome on its own!

So let’s talk more about how this card came together. I was inspired by the sheet of rainbow patterned paper in the Sunny Days paper pack, and that one sheet drove the bus on most of the design elements. Knowing that I was going to be mixing busy patterns, I decided to keep the base clean and simple with Basic White cardstock. With a rainbow theme, all of the paper selections reflect ingredients in a rainbow — clouds, rain, and sunshine.

To construct the rainbow, I diecut each color using the full set of the Everyday Essentials circle dies, along with the small circle from the Bright Skies set. After halving each circle, each layer was adhered together to complete the rainbow. The sun and clouds were diecut using dies from the Bright Skies die set. And the polka-dotted cloud is actually diecut from a sheet of the Sunny Days patterned paper. 

To add some eye relief and a visual transition between the rainbow scene up top and the bright and sunny scene down below, I used a strip of the Sunny Days paper that resembles falling rain. The adorable turtle is from the Playing in the Rain stamp and die set. He’s on his way to pick more flowers to bring sunshine to this cloudy day. The field of flowers were made using the Bright Skies dies. The little butterfly is from the Painted Lavender set and just adds the perfect touch of sunshine to “brighten” things up here.

This design is way outside my wheelhouse, but I liked the challenge of combining so many different patterns into one fun design. How do you think it turned out?

Looking for some simpler ways to use the Bright Skies bundle? Check out yesterday’s episode of Terrific Tuesdays for some great inspiration!

Products used in today’s featured design:
Basic White, Smoky Slate, Real Red, Pumpkin Pie, Crushed Curry, Old Olive, Blueberry Bushel, Gorgeous Grape cardstock
Sunny Days DSP
Bright Skies, Playing in the Rain, Painted Lavender stamps
Bright Skies, Everyday Essentials, Playing in the Rain, Painted Lavender dies
Opaque faceted gems
Dimensionals
Adhesives

All ads on this site are posted by WordPress.  Song Sparrow Papercrafts is not responsible for ad content.