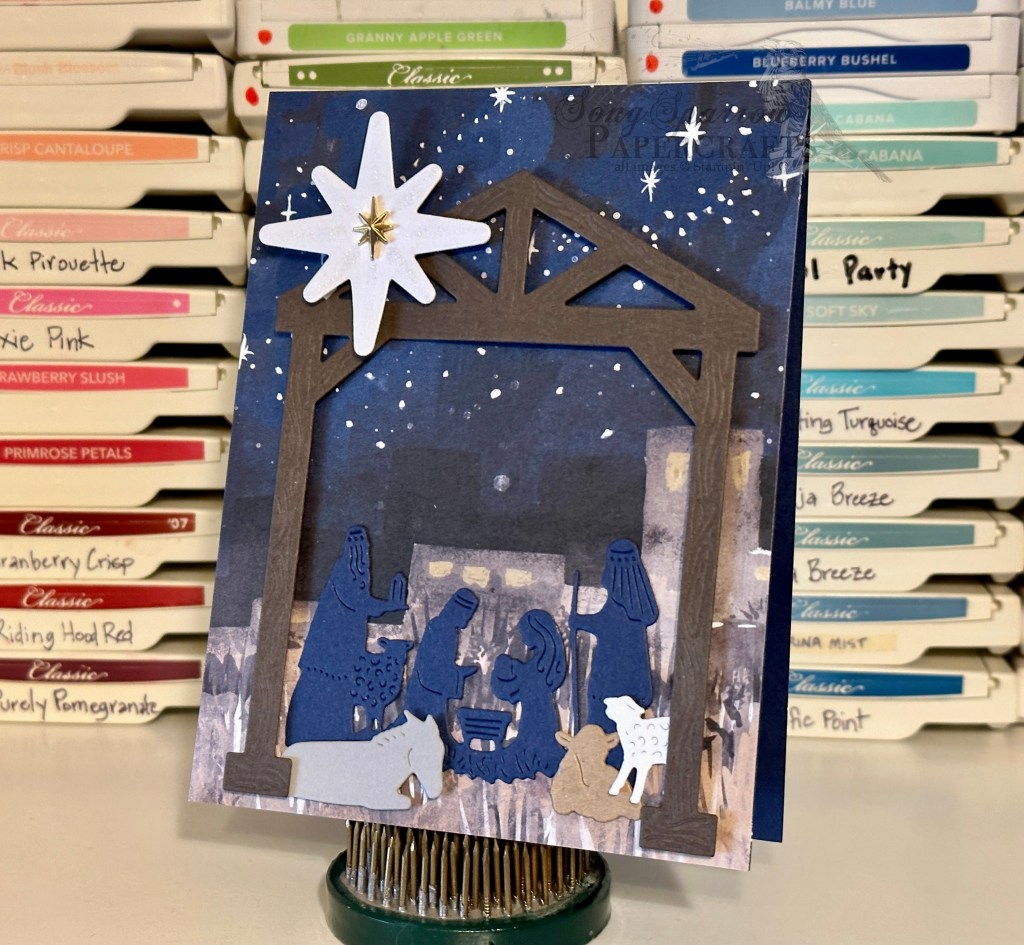
The O Holy Night designer series paper lends itself to so many beautiful designs. Today, our journey to Bethlehem culminates at the manger, where the wise men and shepherds have gathered to pay homage to the newborn King with the city of Nazareth in the background and the Star of Bethlehem shining brightly overhead.
The designer series paper serves as the backdrop for this beautiful scene. The Night Divine dies provide every element needed to create the manger scene, and each one has stunning detail. The Stars at Night hybrid embossing folder cuts and embosses gorgeous stars, although the details of the star are difficult to capture on camera. Just look at all of the detail in each of the elements of this card! Stampin’ Up! gave careful thought to designing this suite of products, and it really shows!
Products used: Night of Navy, Early Espresso, Smoky Slate, Basic White, kraft cardstock O Holy Night DSP Night Divine stamps Night Divine, Stars at Night dies Stars at Night hybrid embossing folder Star trinkets Wink of Stella Dimensionals Adhesives
All ads on this site are posted by WordPress and are based on your personal browsing history. I do not control ad content.
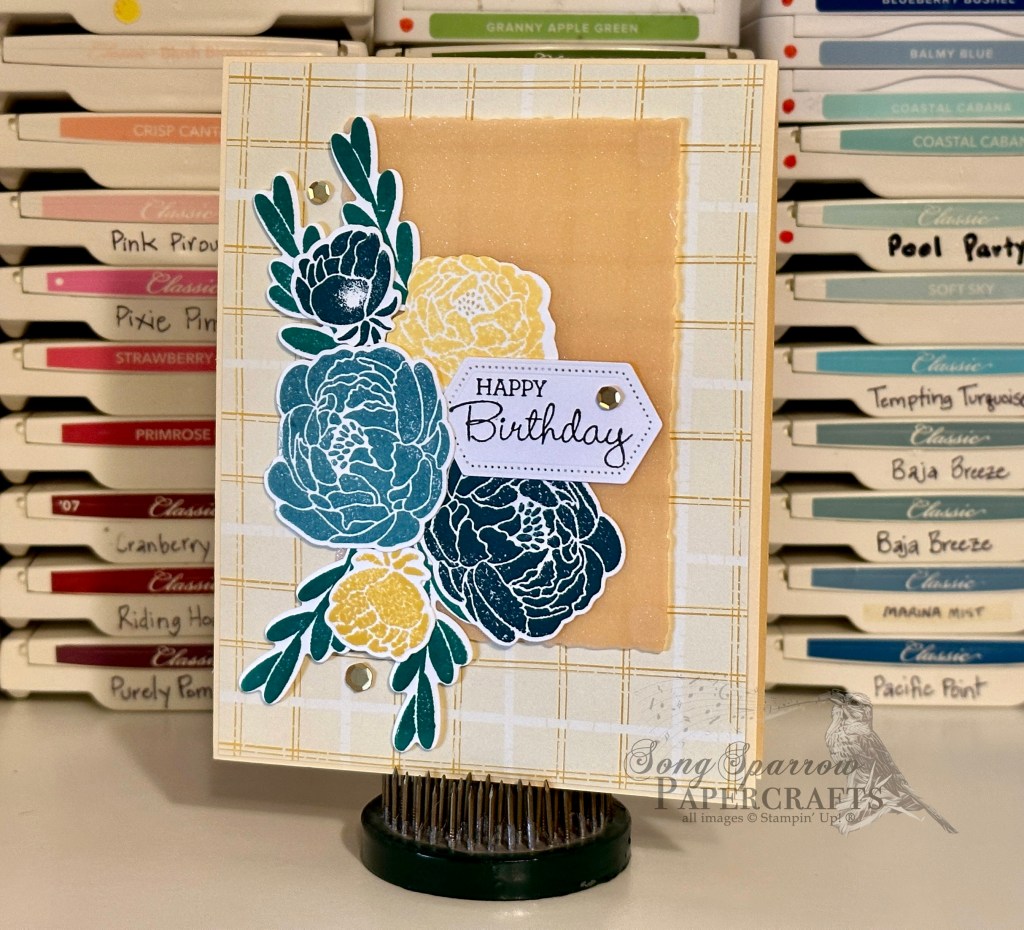
I have lots of new things to share in the days ahead after getting a few new goodies delivered yesterday. Today’s design features the SU! Bold Bouquet stamps and dies.
This sunny design would be perfect for any recipient, even the guys in your life. The plaid design in the Inked Botanicals designer paper bundle provides the perfect neutral backdrop for this gorgeous bouquet, which sits atop glimmer vellum diecut using the Deckled Rectangle set. The sentiment is nestled in the bouquet. For a little extra sparkle, the larger roses have centers accentuated with the Wink of Stella glitter brush. This design has the perfect amount of sparkle in person and is sure to bring a smile to its recipient!
Products used: Daffodil Delight, Basic White cardstock Inked Botanicals DSP Glimmer vellum (retired) Lost Lagoon, Pretty Peacock, Shaded Spruce, Crushed Curry, Basic Black ink Bold Bouquet stamps & dies Pansy Patch stamps (sentiment) Deckled Rectangles dies Stitched Nested Labels dies (retired) Pastel adhesive-backed sequins Wink of Stella Dimensionals Adhesives
All ads on this site are posted by WordPress and are based on your personal browsing history. I do not control ad content.
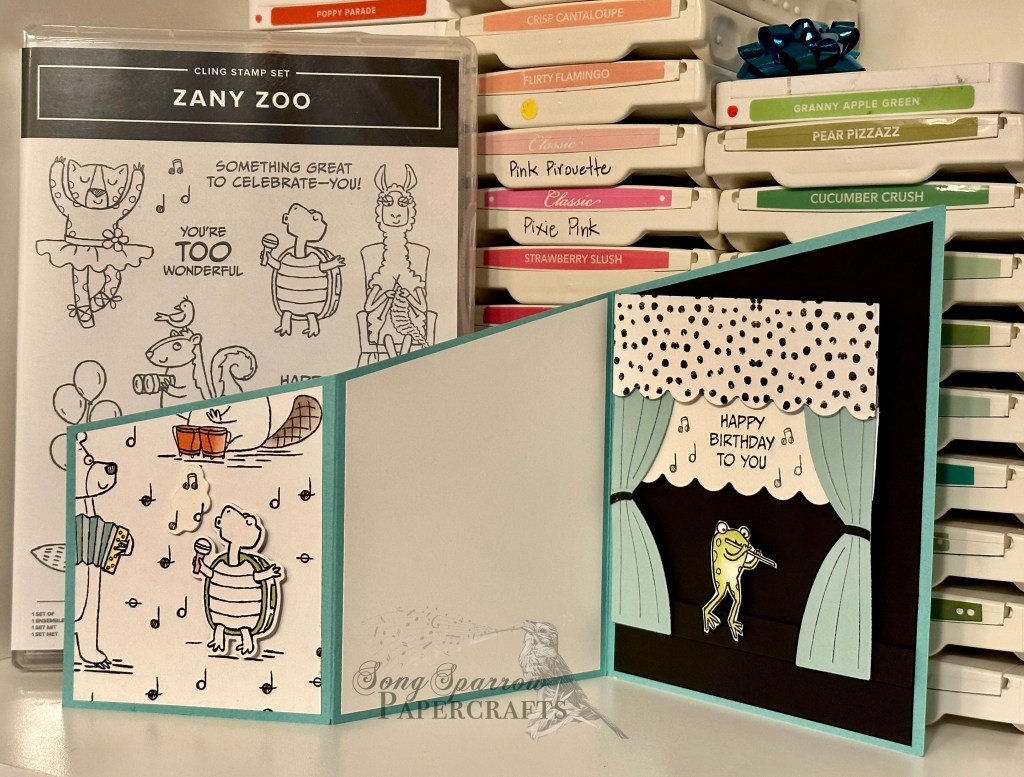
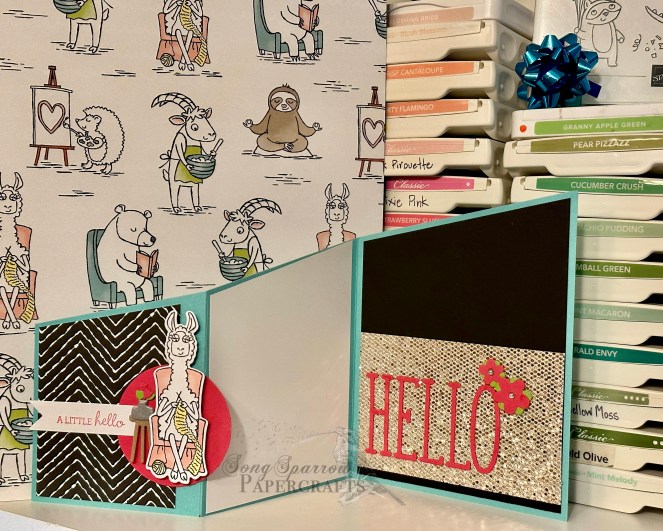
Howdy and happy Monday everyone! I hope you enjoyed the weekend and maybe a festivity or two for Father’s Day. Today, I’m bringing you another fun card design using the Zany Zoo Suite and a diagonal fun fold shared over at Klompen Stampers.
What I love about this particular fun fold design is that it is so easy and it makes TWO cards at one time. How about that for efficiency?! For this first design, I used the sing-along sheet of designer paper from the Zoo Crew pack to create a cute birthday card.
The base is Pool Party and the diagonal design is cut by marking the cardstock at 3” down/up on the short edge of both sides of the paper and then cutting a straight line between the two marks. Score one half at 3” and 6.75” and then fold to create the panels. The outward-facing panels are 2.75” wide, 3.25” wide, and 4” wide.
For this first design, I chose DSP for the front panel and diecut and popped up the singing turtle for effect. I chose a complimentary DSP from the Zoo Crew pack for the outward-facing center panel. I prefer to have the center inside panel be blank for a personal message and selected white for the message panel. I built a concert scene for the inside back panel using Pool Party, DSP, and black cardstock. I fussy cut the frog from the sing-along sheet and used lots of dimensionals for a more realistic look.
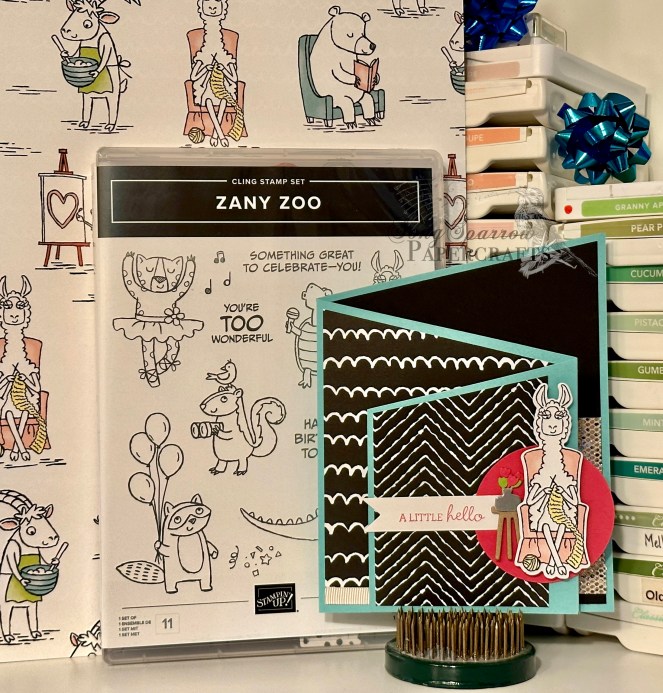
Using the second card base, I created this fun little Hello notecard. I used the dies to cut the crocheting llama from the arts & crafts sheet from the Zoo Crew paper pack. I punched a circle from Melon Mambo cardstock to use as the base under the llama. To complete the scene, I diecut the table, vase, and flowers using the Zany Zoo dies. I used a portion of a sentiment from the Pansy Patch stamp set and cut a banner strip from white paper. This entire scene is popped up on dimensionals for added drama and realism. The outward-facing center panel is a scrap of sing along sheet and finished with Petal Pink duo ribbon. I kept the very back panel very simple with black cardstock, a strip of champagne dazzle specialty paper, and a simple HELLO diecut using the Alphabet a la Mode set and cut from Melon Mambo cardstock. The flowers are diecut from Melon Mambo and Granny Apple Green and the centers are finished with festive pearls and sit atop dimensionals.
Products used: Design 1 Zany Zoo stamps & dies Zoo Crew DSP Coastal Cabana, Pool Party, Basic Black & White cardstock Dimensionals Adhesives Design 2 Zany Zoo dies Alphabet a la Mode dies Pansy Patch stamps (sentiment) Circle punch Zoo Crew DSP Champagne dazzle designer paper Melon Mambo, Granny Apple Green, Basic Black & White cardstock Festive pearls Dimensionals Adhesives
All ads on this site are posted by WordPress and are based on your personal browsing history. I do not control ad content.
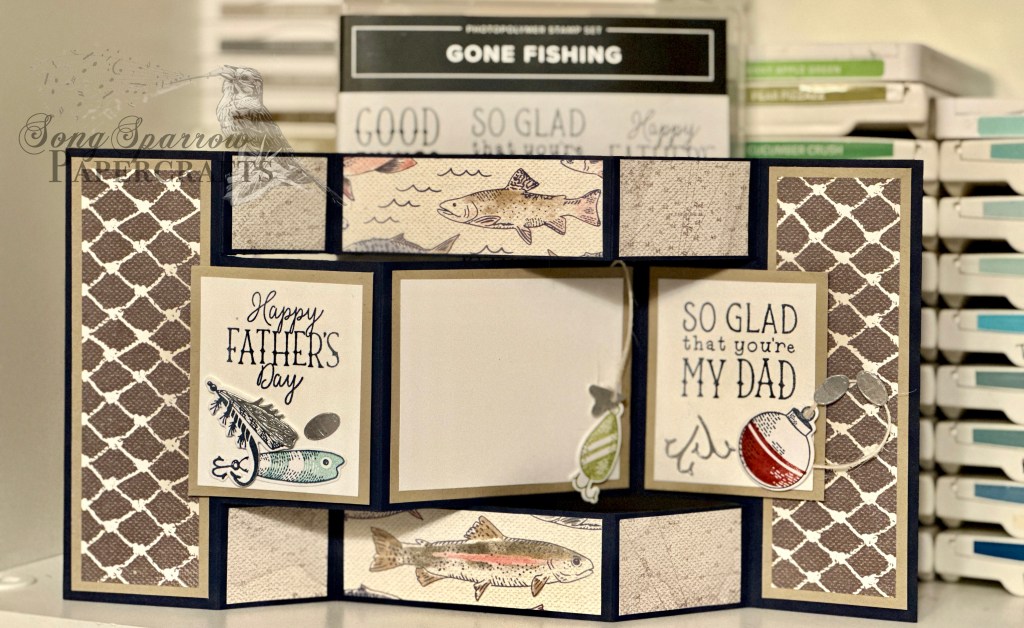
I’m excited to bring you another design using the Gone Fishing Suite. I also decided to tackle a new folding technique that Stampin’ with Kim shared this week, and I would highly recommend that you give it a try.
Today, we’re using the stamps, dies, and designer paper for this suite to create this stunning design. This design uses three sheets of the DSP—the swimming fish, the netting, and the map. The base of this design is made from Night of Navy cardstock. The matting is Crumb Cake cardstock, and the center panels are white. The tackle elements are stamped on white cardstock and cut out using the coordinating dies. The base of the card is cut and scored to create the folding portions of the design.
TIP: I wanted the sinkers, hooks, and spinner elements to be shiny but don’t have any silver paper right now. So I embossed a section of white cardstock with silver embossing powder and diecut these elements from the silver embossed section.
Here is a view of the card stretched out to see each of the panels and then a view of the collapsed card design.
Products used: Let’s Go Fishing DSP Night of Navy, Crumb Cake, Basic White cardstock Gone Fishing stamps Gone Fishing dies Silver embossing powder Linen thread Dimensionals Adhesives
All ads on this site are posted by WordPress and are based on your personal browsing history. I do not control ad content.
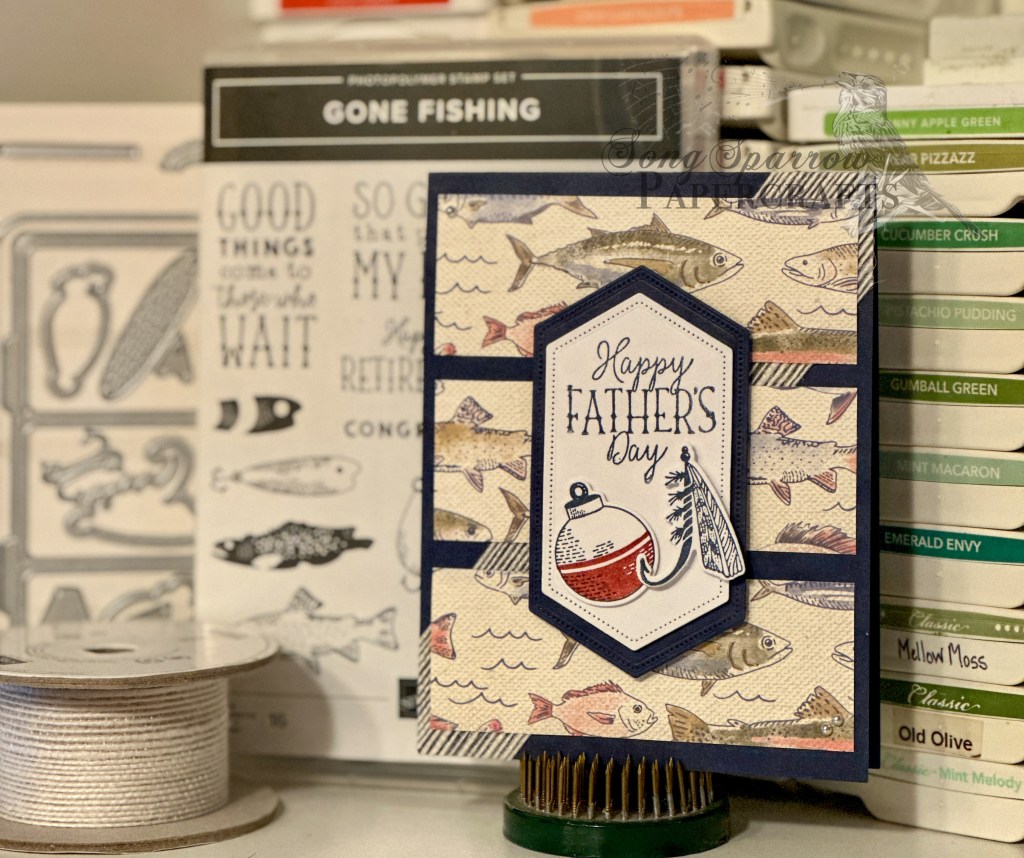
Thus far, I’ve showcased the Pansy Patch set from the new catalog. This week we’ll be taking a look at the Gone Fishing Suite. June is a busy month in our family between Father’s Day and birthdays, and this set will be perfect!
The Gone Fishing Suite includes the stamps, dies, designer paper, and the Twisted Rope 3D embossing folder. (Buy the suite here) For this design, I used the stamps, dies, and paper. I included jute ribbon in the background to give the look of netting and add a little visual interest. The center panel is popped up on dimensionals to ensure it stood out against the patterned paper, and the fishing tackle elements are also layered on dimensionals for visual interest.
I’m really loving this set so far and can’t wait to show you more designs with this suite all this week!
Products used: Let’s Go Fishing DSP Night of Navy cardstock Gone Fishing stamp set Gone Fishing dies Adhesive-backed pearls Dimensionals Adhesives Stitched Nested Labels dies (retired) Jute ribbon (retired)
All ads on this site are posted by WordPress and are based on your personal browsing history. I do not control ad content.
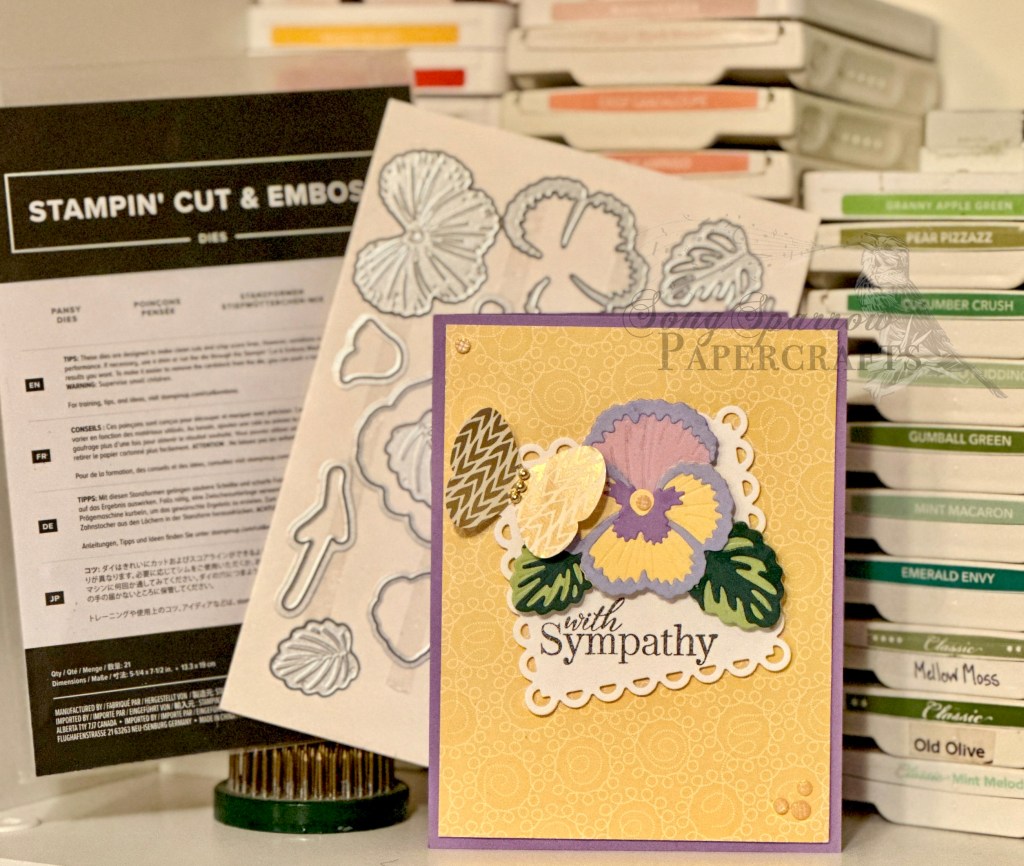
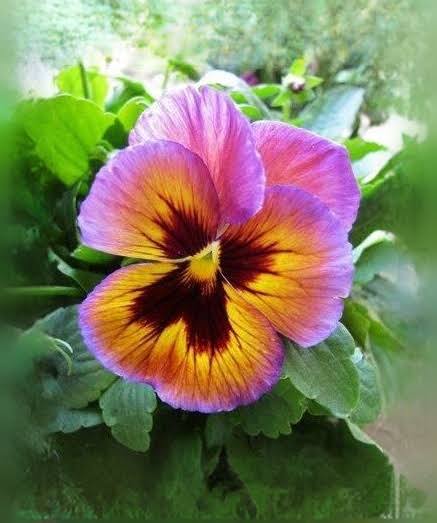
As promised, today’s design features the Pansy Patch dies. The focal image of this card is 100% diecut from cardstock. I wanted to create a realistic focal image and selected a pansy variety that had pink, purple, and yellow hues and used the inspiration photo to guide my color cardstock selections.
Although the paper pieces are on the larger side, the width of the detailed pieces is narrow enough to make traditional adhesive runners a less than ideal choice for adhering the layers together. In cases such as these, I turn to one of two adhesives—the fine-tip glue pen or adhesive sheets. In this case, I elected to use the glue pen and it worked beautifully!
Products Used (current): Pansy Dies Cardstock—Daffodil Delight Adhesive-backed gems Adhesive-backed pearls Dimensionals Adhesives
Products Used (retired): Cardstock—Almost Amethyst, Pale Plum, Lavender Lace, Handsome Hunter, Certainly Celery Delicate Dots DSP Butterfly Punch Love & Sympathy sentiment
All ads on this site are posted by WordPress and are based on your personal browsing history. I do not control ad content.