Christmas

We Wish You a Merry Christmas

During a recent stroll through the Instagram feed, I saw a lovely card design by LoritaMarie Crafts and immediately added it to the inspiration folder. It was the perfect combination of patterns and colors. I made a few modifications to paper selections and this design is the end result.

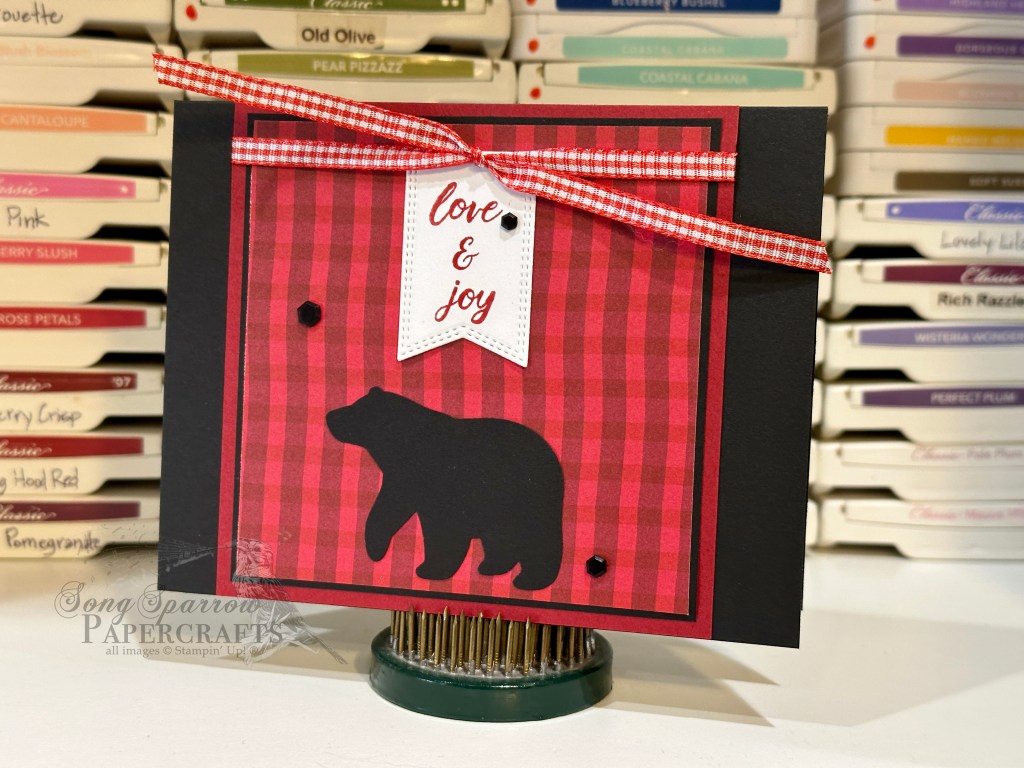
The card base is Mossy Meadow, which helps draw out the shades of green in the evergreen branches in the greenery panel. The evergreen panel is matted by Cherry Cobbler cardstock and mounted on dimensionals. The tree is diecut using the Merriest Trees dies and the sentiment is heat embossed in gold in the center of the tree. To keep the tree topper more delicate, I placed a star trinket at the top. The gold trim is tucked behind the elevated focal panel and gold pearls are scattered on the focal panel for visual interest. My favorite part of this design is the Christmas tree. What is yours?

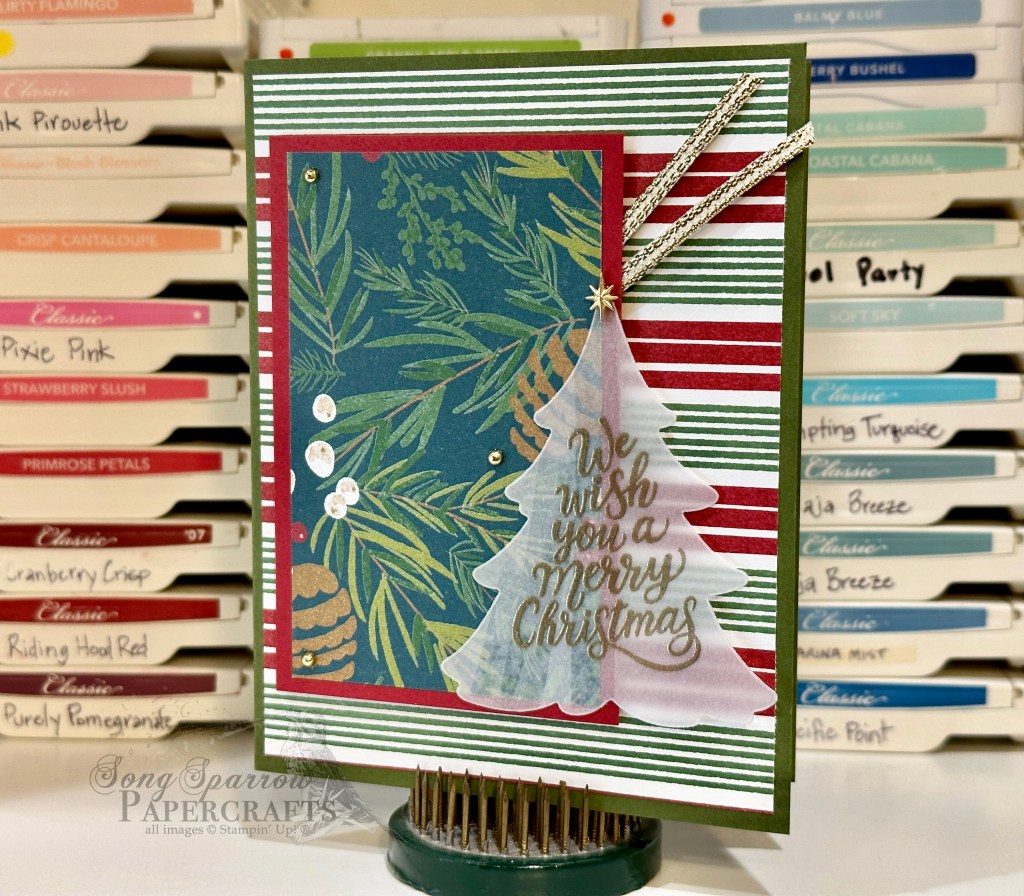
My son helped me place a few of the elements, including the tree topper. We both decided that the end result is a really nice design that will be included in those that we personally send out to our holiday mailing list.

Products used:
Mossy Meadow, Cherry Cobbler, vellum cardstock
A Walk in the Forest DSP
Merriest Trees stamps & dies
Gold trim
Star trinkets
Gold pearls
Gold embossing powder
Dimensionals
Adhesives

All ads on this site are posted by WordPress and are based on your personal browsing history. I do not control ad content.

Custom Orders

Beyond Grateful

In the U.S., workers will celebrate Boss’s Day on October 16th. I love having the opportunity to help customers celebrate special days, so when a dear friend reached out about a design for Boss’s Day, I was all over it.

Much like the birthday designs you’ve seen over the last couple of days, I knew the intended recipient and could really tailor the end product to fit her style and personality. And I knew I wanted something classy, elegant, AND fun with elements of pink incorporated. The Simple Elegance designer paper is perfect with its rose gold, silver, and gold foiling of the delicate floral elements. Talk about classy! To help the rose gold really shine, the patterned paper is mounted on a sheet of Blushing Bride. The sentiment is heat embossed in copper atop a vellum backdrop, which allows the beautiful patterned paper below to peek through. The copper sequins add sparkle to the design.

I love the end result of this design so much that I’m considering a new line of cards. What do you think?

Products used:
Blushing Bride (retired), vellum cardstock
Simple Elegance DSP (retired)
Heartfelt Hexagon stamps & punch
Copper embossing powder
Adhesive-backed sequins
Dimensionals
Adhesives

All ads on this site are posted by WordPress and are based on your personal browsing history. I do not control ad content.

birthday · Custom Orders

Celebrate

Celebrate is today’s blog post today, and it’s definitely a day to celebrate as it’s my birthday! I’m not exactly sure what the family has on the agenda today, but it will definitely involved a homecooked dinner by the hubby.

Today’s design is another card from a recent custom order. Knowing the intended recipient of this birthday card really helped shape the design. I just love this foiled polka-dot cardstock. It’s one of the last sheets from a custom order I completed about a year or so ago. I’ve been hoarding it. LOL! The polka cardstock pairs beautifully with the sheet of Sweet Sorbet designer paper by adding a soft and playful feel. The lighter background of the patterned paper also provides the perfect relief for the sentiment to really take the floor. To add another layer of sparkle and pizzazz, I added a strip of sequin trim between the two paper panels. I’m thrilled with how this came out and think it spells FUN — just like its recipient!

Products used:
Bazzill Foil Candy Necklace cardstock (retired)
Sweet Sorbet DSP (retired)
Kaiserkraft glitter cardstock
Papertrey Ink dies
Sequin trim
Dimensionals
Adhesives

All ads on this site are posted by WordPress and are based on your personal browsing history. I do not control ad content.

birthday · Custom Orders

Eat Cake

I recently had the opportunity to complete a custom order with the recipients being friends of mine. It’s always fun when you get to design cards for friends because you have the opportunity to tailor to the recipient.

I had just gotten a delivery of clearance product, and I knew the Regency Park paper was going to be perfect. The base of this card is Blushing Bride with the sheet of Regency Park taking center stage. The sentiment panel is punched from white cardstock using the Heartfelt Hexagon punch. I used two different shades of pink to give visual interest to the sentiment and help it to stand out against the busy floral background. The ribbon helps break up the background, as well. The sparkle from the sequins gives a festive look and helps draw the eye across the design to the sentiment. I love this bright and happy design, don’t you?

Products used:
Blushing Bride (retired), white cardstock
Regency Park DSP (retired)
Heartfelt Hexagon stamps & punch
Adhesive-backed sequins
Ribbon duo
Dimensionals
Adhesives

All ads on this site are posted by WordPress and are based on your personal browsing history. I do not control ad content.

Christmas

Christmas Holly

I always find it funny when I can take an inspiration design and then have the end product look nothing like it! That’s definitely the case for today’s card. And all I did was tweak the look of the sentiment panel to achieve a completely different look.

A base of Cherry Cobbler provides the festive backdrop for the holly designer paper. The inspiration design had a solid sentiment panel with a diecut holly wreath. Because I wanted to see more of the beautiful foiled designer paper, I used a sheet of vellum for the sentiment panel and chose to stamp the holly wreath and nestle the sentiment in the center. Rather than placing the bow atop the wreath, I chose to use it as a design element along the side of the wreath instead.

As I was looking at the completed design, it seemed to be missing a little something. And if I had it to do over, the sentiment needs to be heat embossed in red rather than stamped. That would help it to have the *pop* it deserves. What do you think? Embossed sentiment or no?

Products used:
Cherry Cobbler, vellum cardstock
Shining Christmas DSP
Come to Bethlehem stamps (retired)
Bells & Boughs stamps (retired)
Adhesive-backed sequins
Faux linen ribbon (retired)
Dimensionals
Adhesives

All ads on this site are posted by WordPress and are based on your personal browsing history. I do not control ad content.

Christmas

Beary Happy Christmas

Did you know that even seasoned stampers look for inspiration? Sometimes designs just come to you and other times you have to look high and low for them! I actually stumbled across this design by Susan Campfield in my daily stroll through my Facebook feed and knew it needed to go in the Inspiration file. It can easily be adapted to so many different occasions, which makes it a design you can turn to again and again.

I love how the buffalo plaid is reminiscent of a warm winter flannel, making it a perfect design element for this holiday card. The base of the card is black cardstock and the plaid paper is matted by a sheet of Cherry Cobbler and black cardstock. The bear is punched from black cardstock using the Beary Cute punch. The red and white gingham ribbon allows the sentiment panel to function visually as a banner across the focal panel. If you’re making a set of cards, you can alternate the direction of the bear for some added interest. The sentiment panel is diecut from white cardstock using the Nested Essentials die and then the sentiment is stamped in Real Red using the Merriest Trees stamps. The adhesive hexagons help draw the eye across this playful design.

I just love the rustic feel of this card. It reminds me of a homey cabin in the snowy woods. Don’t you think?

Products used:
Cherry Cobbler, Basic Black and White cardstock
A Walk in the Forest DSP
Merriest Trees stamps
Beary Cute punch
Real Red and White gingham ribbon (retired)
Adhesive hexagons (retired)
Adhesives

All ads on this site are posted by WordPress and are based on your personal browsing history. I do not control ad content.

Card Sets · Christmas · Packaging

It’s All in the Packaging

Whether I’m preparing one card or a pack of cards for sale, I believe that the packaging is as important as the product itself. There are many iconic brands that are known as much for their packaging as what they’re selling — think Tiffany’s or Louis Vuitton.

Here are examples of a few card packs that I packaged for upcoming craft fairs. It’s important to me that the card design is clearly visible through the packaging and an insert is included on the back to show the inside sentiment, which can be especially important to customers when they’re selecting cards. Because larger sets of cards result in thicker packaging, a top closure is necessary and a nice coordinating paper and ribbon really dress things up!

Have you seen cards packaged list this before? What other methods have you seen?

All ads on this site are posted by WordPress and are based on your personal browsing history. I do not control ad content.

Christmas

Festive Tannenbaum

I have a thing for foiled papers. Nothing says festive quite like the sparkle of foiled paper! When Stampin’ Up! recently released some new foiled holiday designs in the Online Exclusives, I just had to have them.

I’ve been playing one of my favorite Christmas albums in the craft room this week because it seems to keep my newest office assistant (aka Nolan the 6-week-old kitten) from going full tilt all the time. There’s a particularly lovely arrangement of O Tannenbaum on the album which inspired this card design.

The beauty of the Shining Christmas specialty paper pack is how beautifully each of the patterns stands on its own. The lovely sheet of trees just called for a prominent spot, and so it comprises most of the front of the card with a sheet of Cherry Cobbler serving as the base. And all of the remaining design elements are simple to allow the trees to shine (literally). The velvet ribbon adds a little texture, while the gold holly leaves carry the sparkle across the design. With just the right group of elements, a simple design can still have eye-catching appeal!

Products used:
Cherry Cobbler, white cardstock
Shining Christmas DSP
All That dies
Gold holly leaves (retired)
Glitter sequins
Adhesive-backed sequins
Papertrey Ink Think Big Favorites #8 (sentiment)(retired)
Velvet ribbon (retired)
Dimensionals
Adhesives

All ads on this site are posted by WordPress and are based on your personal browsing history. I do not control ad content.

Christmas

Behold the Star

I’ve been busy in craft fair mode for many weeks now. I’m teaming up with my mom, who also happens to be my upline, and sponsoring a booth in a local fair at the end of the month. And to boot, the church where I work is having a craft fair this weekend, and last week I offered to contribute some items for the church’s booth. So I have been working on new designs for that.

I wanted to use the beautiful O Holy Night suite of products for at least one card. The paper is so thoughtfully designed, which makes it easy to put together beautiful cards with very few elements.

Here, I started with a base of Night of Navy cardstock. I selected the Bethlehem scene from the O Holy Night designer paper pack. I wanted the Star of Bethlehem to be shining brightly over the city and I wanted to capture the ethereal look of that bright and magical heavenly star. Using the Stars at Night stamp set, the largest star is heat embossed in gold atop vellum and then diecut using the accompanying dies. The sentiment is heat embossed directly atop the designer paper as if the words of the angels’ song is hanging over the blessed city. Just a few simple elements with such a stunning impact, don’t you think?

Products used:
Night of Navy, vellum cardstock
O Holy Night DSP
Stars at Night stamps & dies
Adhesive-backed sequins
Dimensionals
Adhesives

All ads on this site are posted by WordPress and are based on your personal browsing history. I do not control ad content.

birthday

Birthday Bouquet

Welcome to this shiny new week! It’s going to be a busy one for me with appointments, rehearsals, and professional meetings, but I’m ready for it.

Did you see the SU! Clearance Rack refresh last week? I love swiping things on sale. My hubby thinks I’m just about the most frugal person who ever lived. I mean, I save my paper scraps. Lol! But when there’s so much pretty paper, who wants to throw even the tiniest bit away?!

Speaking of swiping sale items, I nabbed the lovely Regency Park designer paper last week and was excited when it arrived on Friday, along with all of the other goodies I got on clearance. The whole paper pack is full of bright and cheery patterns, and I couldn’t wait to get started making some things.

A sheet of Blushing Bride cardstock serves as the base for this birthday card. The sheet of Regency Park is front and center here. To allow relief for the sentiment, I added ribbon under the patterned paper. To really draw the eye to the sentiment, I added the trio of sparkly sequins. This birthday bouquet just makes me happy. What about you?

Products used:
Blushing Bride cardstock (retired)
Regency Park DSP (retired)
Ribbon duo
Adhesive-backed sequins
Dimensionals
Adhesives

All ads on this site are posted by WordPress and are based on your personal browsing history. I do not control ad content.