Online Exclusives · Pattern of Friendship

Joy & Laughter

TGIF, everybody! We’ve made it to the end of the week. And it’s certainly been a busy one. Finishing up the work week and packing for a trip is no small task, and that completely put me off schedule yesterday. But in between packing and cleaning today in preparation for our family spring break trip, I squeezed in a little time to make this cutie.

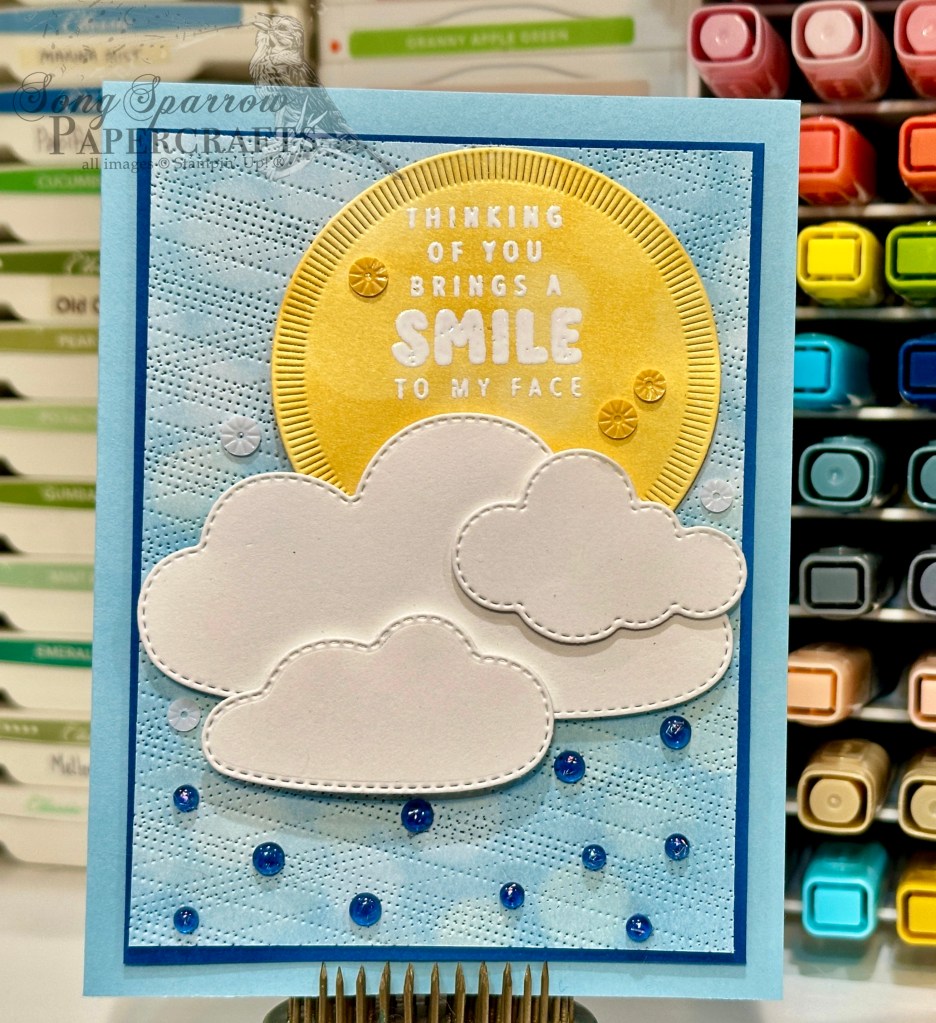
This week, we’ve been exploring all of the cute ways that we can use the new Pattern of Friendship bundle from Stampin’ Up! And today, we’re pairing it up with the Bright Skies and Playing in the Rain dies to make this chipper scene. I also tried a new stamp technique to create an ombré effect with the sentiment and I’m pretty pleased with how it turned out!

This design starts with a base of white cardstock. I love how it makes the scene really pop. The scene is built on a base of Balmy Blue cardstock. I wanted the grassy hills to look like they were freshly mowed and so I began by using the Pattern of Friendship die to make the mower lines in the Lemon Lime Twist panel before cutting the hills using the Bright Skies long cloud die. I already had the flowers cut from a previous project — they’re a combination of Mossy Meadow and Pretty in Pink. I adhered the grass and flowers with dimensionals and create depth with different heights. I added a few clouds to the sky that are cut from Graceful Greenery vellum with the Bright Skies dies. The sentiment is stamped in between in Misty Moonlight that is stamped off using different pressure across the stamp to create an ombré look to the stamped sentiment. I finished things off by cutting a butterfly from the pastel ombré glimmer paper using the Playing in the Rain dies and added two tone sparkle gems to the wings to give some definition to the butterfly. A few starburst sequins finish things off with a little detailed sparkle.

I’ll be taking tomorrow off to enjoy some time with the family. I hope you all have a fantastic weekend! I’ll be popping in on Monday to bring you a perfectly festive design. ☘️ I hope you’ll check it out!

Products used in today’s card:
Basic White, Balmy Blue, Lemon Lime Twist, Mossy Meadow, Pretty in Pink cardstock
Graceful Greenery vellum, pastel ombré glimmer paper
Pattern of Friendship bundle
Bright Skies, Playing in the Rain dies
Two tone sparkle gems, starburst sequins
Dimensionals

Online Exclusives · Pattern of Friendship

Let’s Keep in Touch

We’re already halfway through this week, folks! My fellow demos are off to North Carolina for the annual Stampin’ Up! convention. And I’m here at home prepping for a little spring break adventure with the fam in just a few days. Needless to say, I’m actually a little sad that this week is halfway gone!

This week, our designs feature the new Online Exclusive bundle called Pattern of Friendship. I’ve had a lot of fun coming up with different ways to use this fun set. Today we’re pairing it up with the Hot Air Balloon dies and Everyday Skies paper. See if you can spot where the fun texture die comes into play.

We get started with a base of white cardstock. I chose white to provide contrast with the focal panel. Our focal panel starts with a piece of Petal Pink glimmer paper that is diecut with the Textured Notes dies. This serves as the eye-catching mat for our focal sheet of Everyday Skies patterned paper that is diecut with the Perennial Postage dies. I cut two hot air balloons with the Hot Air Balloon dies. And for a fun little twist, I add texture to both balloons with the Pattern of Friendship die and the Painted Texture embossing folder. To give some dimension to the scene, I adhered the balloons on dimensionals of different heights. I added a few clouds that I cut from Graceful Greenery vellum using the Hot Air Balloon dies. The sentiment from Pattern of Friendship is stamped in Cajun Craze on white cardstock and then cut with the small banner die from the Countryside Corners dies. I scattered some shiny sequins across the panel for some eye-catching sparkle.

We’ll look for more fun ways to make patterns as we continue our design series through the week. I hope you’ll stop in and check it out.

Product List
Online Exclusives · Pattern of Friendship

A Smile to My Face

This week, our featured design product is the Pattern of Friendship bundle by Stampin’ Up! This stamp and die bundle just released with the new Online Exclusive products. It’s not your typical stamp and die bundle though. The accompanying die is a full-size background die that leaves delicate lines of dots in your paper. What I love about this die is being able to create so many different looks with this one very simple die. Let’s check out today’s card to see what I mean.

This design was inspired by a card I saw made by fellow demo Mikaela Titheridge over at the Crafty O’ Ink Pen. We get started with a base of Balmy Blue cardstock. The focal panel has a mat of Misty Moonlight cardstock which serves to give some structure and stability to our focal panel and some depth to our color palette. The focal panel is a sheet of the blue Beautiful Bokeh that has been cut with the Pattern of Friendship die on the diagonal to create an argyle pattern. I love how this pattern gives the illusion of blowing rain. Using the Bright Skies dies, I cut several different sized clouds from white cardstock and adhered them in several different layers onto our focal panel. I stamped the sentiment from Pattern of Friendship in Versamark and then heat embossed with white embossing powder onto a sheet of the yellow Beautiful Bokeh paper and then cut a circle using the Spotlight on Nature dies to create the sun for the scene. I tucked the sun behind the clouds. I added some raindrops under the clouds using the blue tinsel gems and then added some bits of sparkly interest with the white and yellow starburst sequins.

Reimagining how to pair products in our crafty stash is what making a papercrafter so much fun. When I’m looking for a unique spin on an otherwise very traditional idea, I try to think of how I can use something from my stash differently. Like using the Pattern of Friendship background die to create the look of rain. How can you reimagine some of your favorites?

I hope you’ll pop in tomorrow to see what else we can get up to with this week’s featured bundle!

Product List
Online Exclusives · Thankful Garden

You’re On My Mind

Happy Saturday….uh, I mean Monday? As I’m sure you could tell, Saturday came and went and all was quiet here. Saturday turned out to be a much busier day than we had originally anticipated. The kiddo had an Academic Pentathlon tournament and then we had dinner with friends. I expected to have enough time in between to make charcuterie boards AND a card. But those best laid plans didn’t quite pan out. But I had this idea in my head and wanted to share one final card to wrap up our week with the Lovely Garden suite. So today, you’ll be getting TWO posts!

Our final card in the Lovely Garden design series pairs this lovely paper with the new Pattern of Friendship die, Mixed Labels stamps, and paper butterflies (one of my favorite accessories). I wanted to try something a little different with the Pattern of Friendship die and double cut to create a pattern, and I really love how it turned out and am looking forward to trying out some other pattern ideas.

Our card gets started with a base of Fresh Freesia cardstock. I used the small floral pattern sheet from the Lovely Garden paper pack as the backdrop for our focal panel. The focal panel is also a sheet of the Lovely Garden pack and is matted with a sheet of the tungsten textured metallic cardstock that has been inlaid with a plaid pattern using the Pattern of Friendship die. I wrapped some Fresh Freesia velvet ribbon around the metallic panel before adhering to the base with dimensionals. The floral patterned focal panel is adhered over the metallic mat with several layers of dimensionals so that it would lie flat over the raised velvet ribbon. I stamped the sentiment from Mixed Labels in Fresh Freesia on white cardstock and then cut with the banner die from the Adventurous Sky dies. The sentiment is adhered to the floral panel with dimensionals. The paper butterfly is given a little sparkle with Wink of Stella before it’s adhered to the panel approaching a flower. A few two tone sparkle gems add the twinkle and draw the eye across the design to take in all the elements.

I hope you enjoyed getting a peek at a number of ways that you can use the Lovely Garden suite to make beautiful designs. This week, we’re going to getting a closer look at the Pattern of Friendship bundle. I think you’re going to love it!

Product List
Online Exclusives · Sketchy Fridays · Thankful Garden

Sketchy Fridays: Sympathy Garden

We’ve made it through another week, and I don’t know about you but this one went by quickly with Ash Wednesday in the middle. The start of Lent always means a lot more rehearsal time for me. Such is the life of a singer! Despite some crazy weather at the beginning of the week, we’re enjoying more springlike weather here in North Texas.

But the real business you’ve all come for is Sketchy Fridays, so we’ll get right to it! For those of you who are new here, Sketchy Fridays is a weekly series where we’re using a card sketch to design our featured card. Right now, we’re working through a full series of designs using the card sketches found in current Stampin’ Up! catalogs.

This week’s card is based on Sketch #16 from the Stampin’ Up! Annual Catalog. Today’s design features the Lovely Garden paper and decorative masks, along with the Textured Notes dies, all from the new Stampin’ Up! Online Exclusives release.

I decided to try a different technique with the decorative masks after seeing several other demos use it. The masks for the Thankful Garden stamp set are made, not only to use with the stamped images, but also can stand alone to make lovely watercoloresque images.

Our card starts with a base of Balmy Blue cardstock with a background panel of the Lovely Garden designer series paper. I decided to reiterate the floral images on the focal panel, so I used the masks and 3 shades of purpley-pink (Bubble Bath, Fresh Freesia, and Petunia Pop) to create the flowers. I cut them out with my paper snips. I created the focal panel by first using the Textured Notes dies to cut a piece of vellum (because I wanted the lovely background pattern to show through) and then the piece of black and white polka dot from the Lovely Garden pack. I tied some Fresh Freesia velvet ribbon around the background panel before adhering and then adhered the focal panel pieces over it. I layered the flowers with dimensionals to give some depth. I stamped the sentiment in Fresh Freesia on white using the Mixed Labels stamps and cut it out with the Something Fancy hexagon die. The sentiment mat is cut from Petunia Pop glimmer paper using the Mixed Labels dies. I put a twist of gold thread in between the two sentiment layers for a little added sparkle before adding some of the starburst sequins.

Today’s sketch inspired a few changes here and there to the suggested layout. Remember, a sketch should never tie you down but just make the process of getting started and finishing a lot easier. When all is said and done, I really like the softer look you can achieve by using the decorative masks by themselves like I did here, but I’m probably much more likely to use them in conjunction with the stamped images because I really like the definition and detail. But isn’t it fun to try new things?!

We’ll be closing out our series tomorrow. I hope you’ll pop in and see how we finish off our week!

Product List
Online Exclusives · Thankful Garden

Silent Garden

This week, I’m featuring the new Online Exclusive suite called Lovely Garden. And today’s card uses a twist on a fun fold I learned from fellow demo Jackie Bolhuis called the panel Z-Fold to showcase the beautiful patterned paper and the stamp, mask, die bundle. Let’s get a closer look.

We get started with our card base, which is a quarter-panel of Shaded Spruce cardstock. Our sheet of Lovely Garden patterned paper actually serves as the bulk of the structural paper for this design. We cut it to a standard size for making a portrait orientation card (with the score line at the top), but it’s important that you cut the paper so that your design will be running in the right direction for a landscape card. So when scoring this patterned sheet, the long edge will be on the top/bottom and then you’ll score at 5 1/2-inches, 2 3/4-inches, and 1 3/8-inches. The two smaller panels will be adhered together so that both sides of the patterned paper will now show when the card is closed. I used the middle sized die from the Textured Notes set to cut an inside sentiment panel and a piece of the Graceful Greenery vellum for the card front.

After deciding on the orientation of the front panel, I lined them both up to go ahead and adhere the inside sentiment panel to the base for safe keeping. I moved on to the focal image from the Thankful Garden stamp set which is stamped in black on white cardstock. I used a combination of Daffodil Delight, Crushed Curry, and Peach Pie and the masks to color the flowers and then Shy Shamrock and Shaded Spruce for the stems. Using the coordinating Thankful Garden dies, I cut out the floral image. I stamped the sentiment from Wonderful Thoughts in black on the far-right side of the vellum and heat embossed with black embossing powder. Before adhering the floral bunch next to the sentiment, I made a bow of cream woven ribbon. An assortment of embellishments, including rhinestone jewels, shimmer gems, and starburst sequins, bring it all together and add some pops of sparkle.

Tomorrow we’ll be pairing this beautiful suite with a sketch. I hope you’ll stop by and check it out!

Product List
Online Exclusives · Thankful Garden

You Matter

Stampin’ Up! just released a brand new batch of Online Wxclusives. Have you checked them out yet? We’re using one of the new suites as our design focus for this week — the Lovely Garden suite. And today’s card shows off the included stamp bundle — with its stamps, masks, and dies — beautifully.

This design gets started with a simple white base. The background panel is a sheet of striped paper from the Lovely Garden paper pack. I wanted to keep the color palette very simple for this design so that the focal image really takes the stage. Our focal image backdrop is a circle of Petunia Pop glimmer paper that is cut with the Spotlight on Nature dies. I love how this pinky-purple really teases out the color variations in our focal image.

The hydrangea image from Thankful Garden is stamped in black. Using the coordinating masks and my blending brushes, I added a layer of Pretty in Pink, then Fresh Freesia, and finally Blackberry Bliss to color the flowers. The leaves and stems combine Garden Green and Shaded Spruce. The trickiest part was figuring out how to orient the first mask to get it to line up properly with the image, but once you get the notch marked it’s easy breezy for every mask thereafter. (I’ll do a video for Terrific Tuesdays.) Using the coordinating die from the Thankful Garden set, I cut out the image. It’s mounted on the sparkly backdrop with dimensionals and then the panel is adhered to the base with dimensionals, as well.

I finished things off by building the sentiment panel. I stamped the banner from the Mixed Labels set in black on white cardstock. I chose a portion of a sentiment from the Wonderful Thoughts set and stamped it in the center of the banner with Blackberry Bliss. Using the Mixed Labels banner die, I cut the sentiment. It’s adhered at the bottom of the focal panel in the center with several layers of dimensionals so that it peeks out just a touch above the focal panel. I added a few of the new Starburst discs around the focal panel for some visual interest.

Are you loving this week’s featured bundle as much as I am? I’m looking forward to bringing you more design ideas. I hope you’ll tune in tomorrow for a cool fun fold idea!

Product List
Online Exclusives · Thankful Garden

Thankful Difference

Have you seen the new Stampin’ Up! Online Exclusives that launched today? There are so many wonderful new things in the store. I still have a number of things hanging out in my cart.

This week, we’re looking at the new Lovely Garden suite, which includes stamps, dies, masks, paper, ribbon, and embellishments. And today’s card also incorporates the new Textured Notes dies, as well as the Pattern of Friendship embossing panel.

Our card starts with a base of Basic Black cardstock. I love how this brings out the details in the floral sheet from the Lovely Garden paper pack which serves as our backdrop. A sheet of Fresh Freesia that’s been embossed with the new Pattern of Friendship die serves as the mat for our patterned paper. Next, I stamped the sentiment from Thankful Garden in Fresh Freesia on white and diecut it with the narrow Textured Notes die. I cut the small frame from Melon Mambo using the Mixed Labels dies. In between these two layers, we’ve sandwiched a bow of Fresh Freesia velvet ribbon and mounted the full sentiment panel over some sparkly foliage with dimensionals. I added purple sequins around the sentiment panel for a sparkly detail, which works well to draw our eyes right to the sentiment.

The paper in the Lovely Garden paper pack is so pretty that it’s hard not to grab for it each and every time I go to make a card! Tomorrow we’re going to pair up this lovely paper with the stamps and masks. Can’t wait for you to see!

Product List
Online Exclusives · Thankful Garden

Thankful Friend

We are already to another Monday – the first Monday of March. MARCH! Man, it seems like this year just got started. It was a busy weekend for us, so March definitely came marching’ on in. We had some beautiful weather and enjoyed a lot of together time that included time outside. One of my favorite things about spring is the return of all my sleeping plants and the chance to visit the nursery for new plants. My boys entertained me with a trip to our favorite local nursery and even helped pick out our new flowers.

And speaking of spring, there is a whole crop of brand new stamps releasing tomorrow with the launch of new Stampin’ Up! Online Exclusives. So this week, we’re going to be getting a closer look at the Thankful Garden bundle, which includes stamps, masks, dies, paper, ribbon, and embellishments. And today’s card showcases the beautiful paper.

Our card starts with a base of Night of Navy cardstock. Our focal background pattern is from the Lovely Garden paper pack. The sentiment from the Thankful Garden stamp set is stamped in Melon Mambo on white cardstock and then diecut with the Something Fancy dies. I cut the sentiment mat from Berry Burst glimmer paper using the larger Something Fancy die. A faux bow of Shaded Spruce satin ribbon is affixed to the back of the sentiment. The dainty dot patterned strip from the Lovely Garden paper pack serves as our sentiment backdrop. I cut a stem of greenery from Shaded Spruce with the Thankful Garden dies and adhered it under the sentiment panel which sits on top thanks to a layer of dimensionals. Regal foil dots dress things up a bit and bring our eyes front and center to the sentiment.

I hope you’ll pop in tomorrow to see more of this Thankful Garden!

Products used in today’s card:
Night of Navy, Shaded Spruce, Basic White cardstock
Lovely Garden (coming 3/4!), Berry Burst glimmer paper
Thankful Garden stamps & dies (coming 3/4!)
Something Fancy dies
Shaded Spruce satin ribbon
Regal foil dots
Dimensionals
Adhesives

Product List
Holidays

Love You Lots

This week, our design theme revolves around love. While love doesn’t really have a season, we do tend to focus on it a little bit more as we get into February each year. My main goal for this week’s design theme is to show you how you can use what’s in your crafting stash to make beautiful cards that really show a recipient how much you care.

Today’s card uses the current SU! Online Exclusive bundle called Otterly Adorable and it’s just as adorable as its name implies! We’re pairing up the adorable paper from the bundle with the Soft Waves embossing folder to create this design. I just love how these product pairing makes you feel like you’re by the river peeking in on these two twitterpated otters.

We get started on today’s card with a base of Lost Lagoon cardstock. The background panel consists of the Lost Lagoon base and Pretty Peacock glimmer paper, both of which have been embossed with the Soft Waves embossing folder to give the look of a moving brook. Our focal panel combines two patterns in the Otterly Adorable paper pack – the river rock and water weeds – and sits on a base of white cardstock for stability. This panel has been diecut using the Countryside Corners dies. For our scene, I started by cutting a pair of rocks from the mottled gray paper in the Otterly Adorable paper pack using the coordinating dies. I also cut some older water weeds from Crumb Cake and Pecan Pie, also using the coordinating Otterly Amazing dies. Our pair of otters is cut from the Otterly Adorable paper using the larger scene die from the set. I layered all of these elements on dimensionals to give depth to our focal scene and then mounted the full focal panel on the sparkly background with dimensionals. Some Lost Lagoon soft cording tied around the panel under the focal scene draws the eye in to both the focal scene and sentiment. The sentiment from Otterly Amazing is stamped in Pretty Peacock on white cardstock and then diecut with the smaller Countryside Corners die. A few riverside pearls and heart sequins finish off our scene and the theme of this card design.

Tomorrow we’re going to be headed to the mailbox. I hope you’ll pop in and check it out!

Products used in today’s card:
Lost Lagoon, Crumb Cake, Pecan Pie, Basic White cardstock
Three Color Glimmer, Otterly Adorable DSP
Otterly Amazing, Countryside Corners dies
Soft Waves embossing folder
Lost Lagoon soft cording
Heart sequins, riverside irregular pearls
Dimensionals
Adhesives

Product List