Christmas · Fun Folds · Holidays

Season of Evergreens

We’ve made our way to another weekend and halfway through the month of September already! This week, we’ve been All About Christmas and have been exploring a whole selection of Stampin’ Up! holiday products. Today, we’re revisiting a set of products that carried over from last year’s holiday release. And it’s no wonder because the Merriest Trees set and the Winter Meadow paper pack both offer so many ways to create beautiful cards and not just holiday designs!

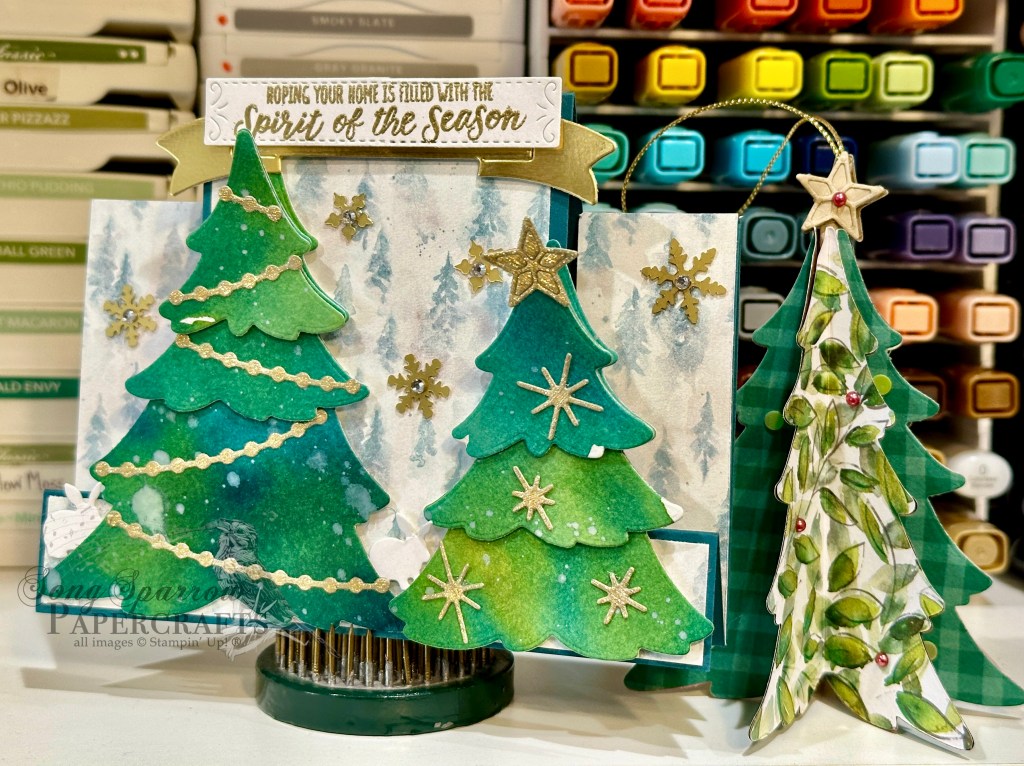
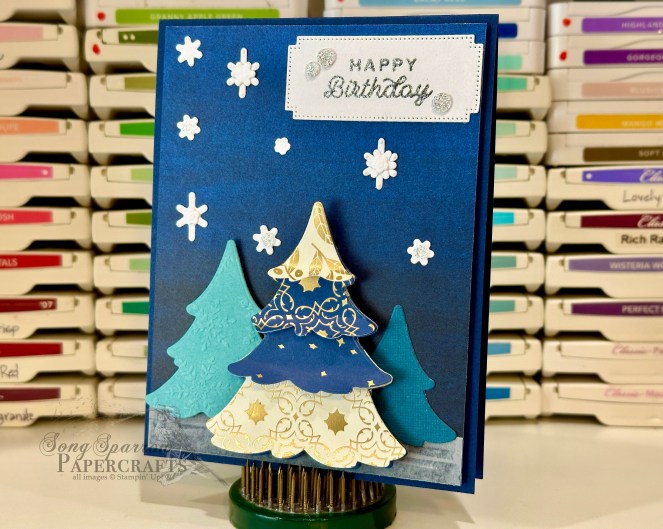
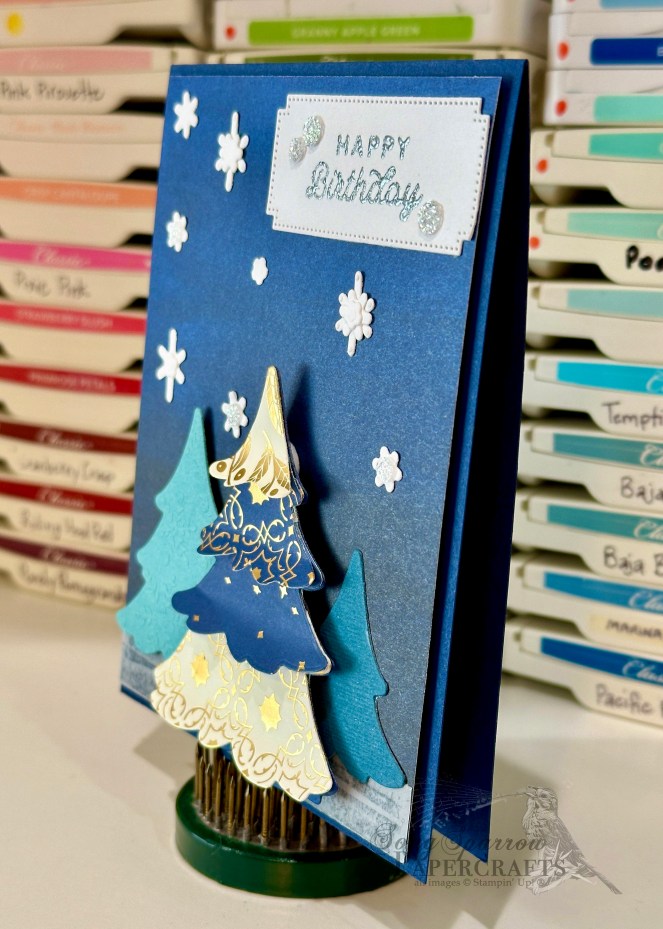
Today, we’re pairing up the Merriest Trees dies with one of my all-time favorite fun folds — the Center Step fun fold. I also gave a new coloring technique a try to make my own patterned paper for the trees. So let’s take a closer look at how this fun fold comes together.

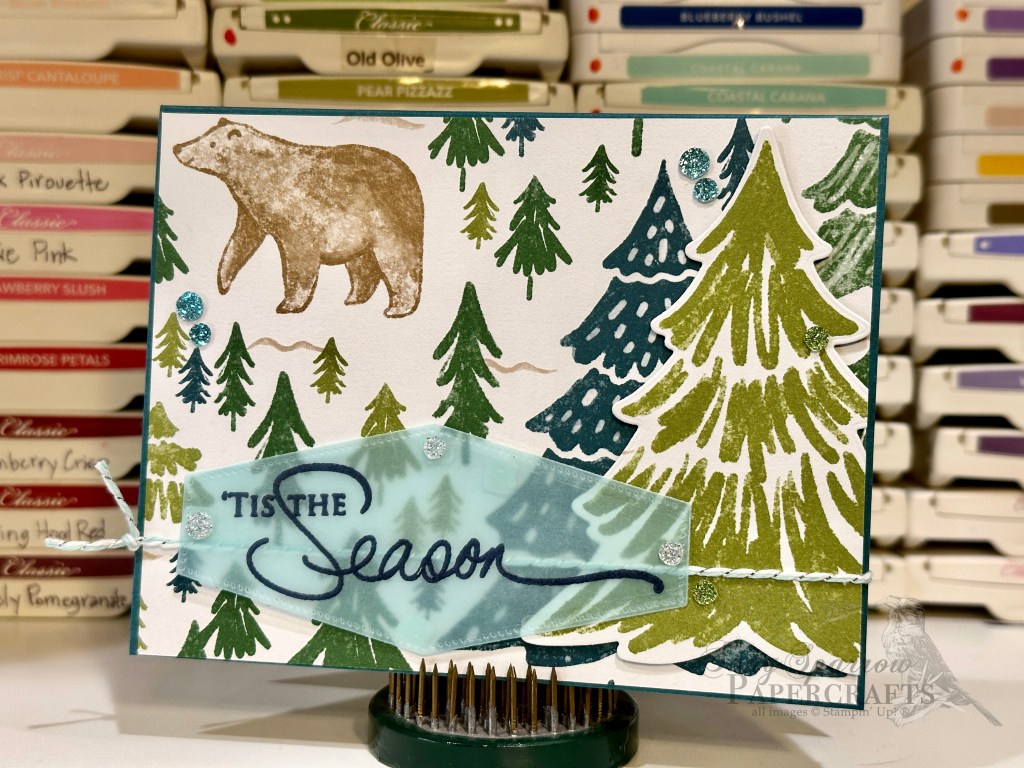
We get started with a base of Pretty Peacock cardstock. A sheet of the Winter Meadow designer series paper serves as our backdrop for the center focal panel. Our pair of trees start with a custom coloring technique using Pretty Peacock and Old Olive ink. (Tune in on my YouTube channel on Tuesday for a full tutorial during the next episode of Terrific Tuesdays!) I also splatter some white craft ink to give the look of snowflakes falling in front of the branches. Using all of the various sizes of trees in the Merriest Trees die set, I cut out tree panels and then selected ones to layer to create each tree. Dimensionals on the bottom fringes of the branches help give a little dimension and the look of the stacked branches. Each tree is then decorated with garland and stars cut from textured gold specialty paper. The trees are adhered to the bottom of the center fold portion of the card base with dimensionals. Our sentiment consists of a mat of gold foil cut with the banner die from the Peaceful Season die set. The sentiment from Merriest Trees is heat embossed in gold on white cardstock and then diecut using the Peaceful Season dies. It’s adhered to the top of the center panel with dimensionals. I tucked a few bunnies by the trees for a little added interest and then scattered snowflakes in the background.

Next week we’re going to be exploring the new Christmas ephemera. I hope you’ll tag along!

Products used in today’s card:
Pretty Peacock, Basic White cardstock
Watercolor paper, Winter Meadow, gold foil, textured gold DSP
Merriest Trees stamps & dies
Peaceful Season, Grove dies
Gold embossing powder
Pretty Peacock, Old Olive reinker
Snowflakes, rhinestone jewels
Dimensionals
Adhesives

Product List
Terrific Tuesdays

Merriest Evergreens

Have you been enjoying all of the cards using this week’s featured bundle of products called Merriest Trees? During this week’s episode of Terrific Tuesdays we looked at all the ways we can use the Merriest Trees bundle to create beautiful holiday cards, and today we’re focusing on how the stamps can do all the work.

Today’s card is one of the designs we made during the Terrific Tuesdays video. The stamps do all the heavy lifting in this card design—from the background to the focal point and everything in between. The coordinating suite of dies make cutting out the beautiful evergreen trees a breeze, even down to the stars on top.

This holiday card is built on a base of Shaded Spruce. The focal panel is matted with Pretty Peacock. The trees are stamped in a variety of colors to give a realistic look. The sentiment is nestled in the corner. I finished off the design with a sprinkling of Wink of Stella across the focal panel, which gives it a fine shimmer as it catches the light.

Wanna know more about how this card came together? Do you want to see what other designs we made using the Merriest Trees bundle? Check out this week’s Terrific Tuesdays video to learn more!

Products used for today’s card design:
Shaded Spruce, Pretty Peacock, Crushed Curry, Basic White cardstock
Merriest trees bundle
Wink of Stella
Faceted gems trio
Dimensionals
Adhesives

All ads on this site are posted by WordPress and are based on your personal browsing history. I do not control ad content.

Terrific Tuesdays

Merriest Sleigh Ride

Did you catch this week’s Terrific Tuesdays video? This week’s episode we looked at all the ways we can use the Merriest Trees bundle to create beautiful holiday cards, including pairing it with some of Stampin’ Up!’s popular designer series paper packs.

Today’s card is one of the designs we made during the Terrific Tuesdays video. I really love how the One Horse Open Sleigh paper provides the perfect backdrop for a single stamped image of the largest evergreen tree from the Merriest Trees stamp set. The coordinating set of dies makes it super easy to cut out the tree image. Pretty Peacock is currently one of my favorite shades of blue-green in the Stampin’ Up! color palette, and it takes center stage in this design.

Wanna know more about how this card came together? Do you want to see what other designs we made using the Merriest Trees bundle? Check out this week’s Terrific Tuesdays video to learn more!

Products used for today’s card design:
Pretty Peacock, Basic White cardstock
One Horse Open Sleigh DSP
Merriest trees bundle
Faceted gems trio
Dimensionals
Adhesives

All ads on this site are posted by WordPress and are based on your personal browsing history. I do not control ad content.

Terrific Tuesdays

Merriest Bobbles & Packages

Happy Thursday, crafty friends! I hope your week has been going well. For me, things are really gearing up in the singing department, so I’ve been busy rehearsing while working in the craft room. Do you ever multi-task during your crafting time?

Today, we’re taking a look at more of the detailed elements of the Merriest Trees bundle. The combination of stamps and dies allows you so much versatility and variety in your designs. This card design highlights yet another way you can build a beautiful scene with this bundle of products.

The base of today’s card is Cherry Cobbler cardstock. And in the spirit of this musical week, I also incorporated some Merry Melody in today’s card design by using the embossing folder for the top portion of the focal panel. I finished the focal panel with the fun argyle print from the Shining Christmas designer series paper pack, which is very sadly sold out. The four-panel tree is diecut from Mossy Meadow and adorned with gold trim and a star cut from Distressed Gold and sparkly ornaments cut from glitter paper. The packages under the tree are diecut from gold shimmer paper with the bows diecut from Distressed Gold and then the bow stamped in Early Espresso to give the details. The sentiment from Merriest Trees is stamped in gold and then heat embossed in gold on top of a Nested Essentials banner. The silver and gold trim in the center helps merry the two sections with a cohesive sparkle. I just love how Merriest Trees allows you to incorporate so much detail into a design without much effort.

A few tips from today’s card design:

  • Using an adhesive sheet on the back of your paper when cutting the finer elements, like the tree trim and star, allow for very easy application of your diecut element onto your tree.
  • Mini dimensionals are perfect for popping up the ornaments. Half of a mini dimensional is just right for the long, narrow ornament.
  • For a richer color when embossing metallics, try stamping tone-on-tone metallic ink instead of Versamark. For example, here I used Tsukineko Galaxy Gold ink under the layer of SU! gold embossing powder.

Wanna know the other ways we learned to use the Merriest Trees bundle? Check out this week’s episode of Terrific Tuesdays!

Products used for today’s card design:
Cherry Cobbler, Mossy Meadow cardstock
Shining Christmas, Distressed Gold DSP
Glitter and shimmer paper
Merriest Trees stamps and dies
Nested Essentials dies
Merry Melody embossing folder
Gold embossing powder
Gold & silver trim
Dimensionals
Adhesives

All ads on this site are posted by WordPress and are based on your personal browsing history. I do not control ad content.

Terrific Tuesdays

Layering Merriest Trees

Wonderful Wednesday, everyone! We’re beginning to have the chill of winter weather in the air here in North Texas and many mornings of heavy frost. Is it beginning to feel more like winter in your area?

And speaking of winter, today’s card tips the hat to winter birthdays AND shows yet another way that you can use the Merriest Trees bundle to create beautiful projects. Today, I wanted to share how you can layer the tree dies to give realistic depth and dimension to the trees on your projects.

In this week’s Terrific Tuesdays video, we spoke briefly about the various sizes of trees in the suite of dies. Not only does this make it quick and easy to cut trees of all sizes, but it also allows you to create beautiful layers on single tree for a more realistic look. This card design shows you both.

The base of this card is a sheet of Night of Navy cardstock. The background panel is the ombre night sky patterned sheet from the O Holy Night designer series paper pack. I decided on a trio of trees as the focal scene with the center tree as the focal image. I stuck with shades of blue and blue-green for a more visually unified scene. I used vellum as the backdrop for the trees. The smallest tree in the background is diecut from Pretty Peacock using the two-panel tree die. The medium-sized tree closer to the foreground is embossed with an older snowflake embossing folder (you could easily substitute the Snowflake Sky EF) and then diecut from Lost Lagoon using the three-panel tree. The base of the focal tree in the foreground is Night of Navy and is diecut using the four-panel tree die. I used several different sheets of the Shining Brightly designer series paper as the layers for the focal image, which are adhered to the tree base. Each tree layer is cut using a different sized tree die from the suite, which makes for very quick and easy layering without any fussy cutting. The edges of each of the layers is curled up for a realistic look of fluffy layers in the tree. Isn’t this a stunning effect? I finished off the scene with some snowflakes diecut from white cardstock and a sentiment. While the snowflake dies I used are from a retired set, there are beautiful snowflakes in a number of sets in the Holiday Mini Catalog, including Merriest Trees, Stars at Night (on sale), and Wishes All Around (on sale).

Wanna know the other ways we learned to use the Merriest Trees bundle? Check out this week’s episode of Terrific Tuesdays!

Products used for today’s card design:
Night of Navy, Basic White cardstock
Vellum
O Holy Night (sold out), Shining Brightly (sold out) DSP
Merriest Trees, Autumn Leaves, Twinkling Lights (retired) dies
Winter Snow (retired) embossing folder
Circle Sayings stamps
Silver embossing powder
Glitter sequins
Dimensionals
Adhesives

All ads on this site are posted by WordPress and are based on your personal browsing history. I do not control ad content.

Christmas

‘Tis the Season

Today, the bear is finishing its trek as we wrap up a sneak peek at the newest card pack called A Walk in the Forest. This designer series paper, which will be available in the Stampin’ Up! Holiday Mini catalog in just a few weeks, is simply lovely, and I was truly captivated by the sheet of paper with the bear traversing the evergreen forest.

For today’s design, I wanted the trees to be more of the focal point than the bear. You will note that the bear is making its way in the background of this scene, while the stately evergreens are front and center. I heat embossed the sentiment on vellum because I wanted each of the evergreens to show through on this design. I added an additional tree in the forefront on dimensionals and the shimmery sequins move the eye up and across the design, which adds to the feeling that you’re taking a walk up the mountain trail. Can you picture yourself on this trail?

Products used:
Pretty Peacock cardstock
Vellum
A Walk in the Forest DSP
PTI Think Big Favorites #8 stamps (retired)
Nested Essentials, Merriest Trees dies
Glitter sequins
Glitter twine (retired)
Embossing powder
Dimensionals
Adhesive

All ads on this site are posted by WordPress and are based on your personal browsing history. I do not control ad content.

Christmas

Winter Crossing

How have you enjoyed A Walk in the Forest so far? This pack of Stampin’Up! designer paper is simply delightful with a mixture of playful and wintery designs. On our journey with the bear thus far, you may have noticed that I have done a lot of punching and diecutting, which leaves an awful lot of scraps. Do you ever wonder what happens with those paper scraps?

Today’s design is a perfect example of how scraps can be put to use to create a beautiful card. The bear and tree images I have been highlighting thus far are all diecut/punched from the same sheet of designer paper. This particular sheet of paper also has beautiful groves of smaller evergreen trees and I really loved the look of them because they very much reminded me of the snowy mountains where I’ve been snow skiing. So when I cut the bear and trees for other cards, I carefully cut around the evergreen groves, leaving me some sizable ones to work with.

For this card design, I decided to mimic a scene I’ve seen in one of the Arctic adventure shows my hubby and I like to watch — with the bear looking out from the trees across a frozen river to the other side. I used a sheet of snowflakes from A Walk in the Forest to serve as the frozen river in this scene. I cut a few snowflakes from a sheet of Snowflake Magic designer paper to catch a little silvery sparkle. A few of these snowflakes are on dimensionals to give some depth, along with the bear to bring it to the forefront of the groves of evergreens. With the sentiment panel also on dimensionals, the eye moves easily across the card through each of the key elements.

Products used:
Balmy Blue cardstock
Shimmer cardstock
Vellum
A Walk in the Forest, Snowflake Magic DSP
Magical Meadow stamps
Nesting Labels (retired), Merriest Trees dies
Beary Cute punch
Embossing powder
Adhesive-backed sequins
Dimensionals
Adhesive

All ads on this site are posted by WordPress and are based on your personal browsing history. I do not control ad content.

Christmas

Peace, Love, Joy

We’re continuing our journey through A Walk in the Forest designer paper pack, which will be available to customers in the new Stampin’ Up! Holiday Mini catalog in just a few weeks. Earlier this week, we were trekking through the snow, while today’s card has us on a walk through an evergreen forest along with our friend, the bear.

In order to have the designer paper pop, I mounted the background scene on Pretty Peacock cardstock. This really brought out the smaller trees and gives a sense of realism to the scene. I used the Merriest Trees dies to cut the evergreen in the foreground from a sheet of A Walk in the Forest paper and punched the bear using the Beary Cute punch. Adding dimensionals of various heights allows the bear to stand out against the evergreen in the foreground. I set the tree and bear atop a strip of silver & white sheer ribbon (also from the Holiday Mini) to look as though they’re both on the edge of a frozen pond. The sentiment is heat embossed in a deep navy on a piece of vellum, which allows the background to show through for a snowy effect. I love the simplicity and realism of this cute forest scene. Do you feel like you’ve gone on a walk through the woods?

Products used:
Pretty Peacock, vellum cardstock
A Walk in the Forest DSP
PTI Stylish Sentiments: Holiday stamps (retired)
Merriest Trees, Nested Essentials dies
Beary Cute punch
Silver & White sheer ribbon
Navy embossing powder
Adhesive-backed sequins
Dimensionals
Adhesive

All ads on this site are posted by WordPress and are based on your personal browsing history. I do not control ad content.

Christmas

Love & Joy

When I saw this design in the new Stampin’ Up! Holiday Mini catalog, I knew I had to do a take on it. We’re continuing our travels through A Walk in the Forest paper pack and still find ourselves in the snowy woods. What really drew me to this design, aside from the beauty of a snowy scene, is the music in the background. For me, a soundtrack is always playing in my head. Do you hear music as you go about your day doing everyday things?

Although not seen, Night of Navy serves as the base for this scene. A sheet of music from the Joy of Christmas designer series paper pack is the backdrop. In my mind, Silent Night plays in the background. The grove of trees is nestled in a scene of falling snow — a lovely design included in A Walk in the Forest paper pack. The trees are diecut from a sheet of A Walk in the Forest designer series paper using the Merriest Trees dies. Fresh snow has begun to fall and the snowflakes in the foreground are diecut from white cardstock using Merriest Trees dies with a touch of sparkle in each center thanks to Wink of Stella. I pulled out an older banner die to cut the sentiments. Varying heights of dimensionals give depth to the scene. This design really brings to mind the Robert Frost poem Stopping by Woods on a Snowy Evening, don’t you think?

Products used:
Night of Navy, Basic White cardstock
A Walk in the Forest, Joy of Christmas DSP
Merriest Trees stamps
‘Tis the Season (retired), Merriest Trees dies
Festive pearls
Wink of Stella
Dimensionals
Adhesive

All ads on this site are posted by WordPress and are based on your personal browsing history. I do not control ad content.

Christmas

Beary Warm Wishes

I’ve started on a new pack of holiday cards and, although the designing is not completely finished, I just can’t wait to show you how things are turning out! This new pack of cards highlights an adorable pack of designer series paper from the new Stampin’ Up! Holiday mini catalog called A Walk in the Forest. Proceeds from the sale of this DSP will benefit organizations that provide support and cheer to people in need. How wonderful is that?!

A Walk in the Forest designer series paper features various forest scenes and this adorable bear. And there are dies and a punch that make building scenes with this paper pack SO much easier — the Merriest Trees dies and Beary Cute punch, both available in the new Holiday Mini. This paper pack, along with all of the other wonderful products in the new Holiday Mini catalog, will go live for ordering at 11:59 PM MST on September 5th.

I wanted to make a super simple snowy scene, so I diecut a few trees and punched the bear from a sheet of A Walk in the Forest and gave layers to the scene with varying heights of dimensionals. I used a sheet of the Snowflake Magic specialty paper as the snowy background and put it all atop a card base of Balmy Blue. The sentiment is heat embossed for a little extra pop. Super simple design with a lot of pizzazz!

Products used:
Balmy Blue cardstock
Snowflake Magic, A Walk in the Forest DSP
Magical Meadow stamps
Merriest Trees, Nested Essentials dies
Beary Cute punch
Navy embossing powder
Glitter sequins
Dimensionals
Adhesive

All ads on this site are posted by WordPress and are based on your personal browsing history. I do not control ad content.