Dies · Masculine Designs

Father’s Day in the Grove

We’re continuing our tour of Stampin’ Up! products that help us make the perfect Father’s Day cards. And today, we’re enjoying a quiet walk in the woods with the two grove sets — Grassy Grove and In the Grove. I really love these two sets because they allow you to create a whole myriad of beautiful scenes. I spent a lot of time in the woods growing up, and it’s fun to paint these pictures of memories in cards.

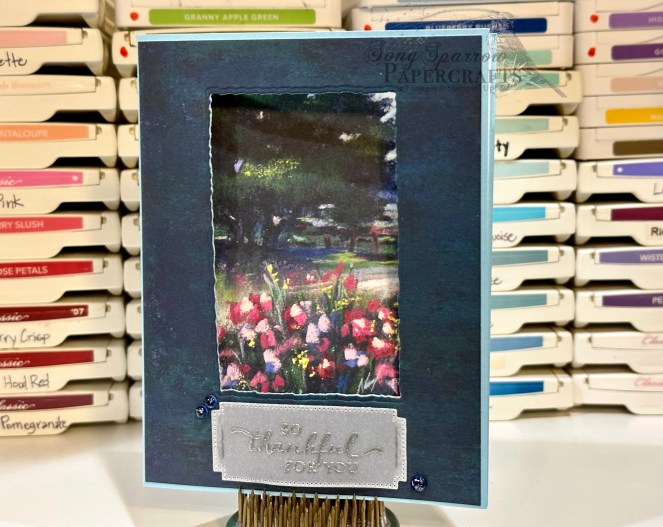
I wanted to give a lot of realism to this scene, so I combed through my designer paper stash to find just the right sheets for the background and leaves, and I found the Meandering Meadows paper pack to be the ticket.

We get started with a card base of Early Espresso cardstock. The background panel for our woodsy scene is a sheet of Meandering Meadow designer paper that, to me, very much resembles a morning sky. It’s been diecut with the largest Deckled Rectangles die. Next, using the grove of trees die from the Grove die set and the largest Deckled Rectangle simultaneously, I cut a quarter sheet of Early Espresso cardstock. This serves as the base for the leaf panel, which will sit above it for depth of field. Adhere this to the Meandering Meadow base. Using a sheet of green patterned paper from the Meandering Meadow paper pack, I diecut another grove of trees — this time without the Deckled Rectangle border. From this sheet, remove all of the branch portions of the green paper. Then cut this panel to size so that the Deckled Rectangle edge of the Early Espresso mat is revealed around the edges once the two layers are adhered together. Apply dimensionals to the back of the green panel and then adhere to the Early Espresso mat, ensuring that you line up the leaves of each layer precisely. From Crumb Cake cardstock, diecut a rabbit, squirrel, and deer using the Grove and In the Grove die sets. Adhere between your two tree layers using glue dots. Stamp the sentiment from Trusty Tools in Early Espresso ink on Crumb Cake cardstock and diecut using the Happy Little Things Banner die. Adhere at the center of the base of the focal panel using dimensionals.

Tomorrow we’re going to be trucking in some Father’s Day fun. I hope you’ll stop by and check it out!

Products used in today’s card:
Early Espresso, Crumb Cake Cardstock
Meandering Meadow DSP
Trusty Tools stamps
Grove, In the Grove dies
Dimensionals
Adhesives

Clean and Simple · Fun Folds

Picked for You

This week, we’ll be frolicking in the meadows and stopping to smell a few flowers along the way. Stampin’ Up! has a whole host of papers and stamps that put us squarely in the middle of beautiful fields and fragrant flower patches. And we’re going to explore some of my favorites throughout this week.

We begin today with a new take on an old fun fold. I recently ran across the hidden barn fold design and knew I had to give it a try. Why is it called a hidden fold? When the card is completely closed, the two sections of the front panel meet, they make the center cut virtually disappear.

So our take on this card begins with a base of Blackberry Bliss cardstock. The focal panel consists of a bottom mat of Lost Lagoon soft shimmer paper that is diecut using the largest Perennial Postage die, followed by a layer of Highland Heather cut just a tick smaller, and finally with our section of Meandering Meadow designer paper on top. To accomplish the two perfect sections, I cut the shimmery layer in half after I diecut it. I adhered the DSP and Highland Heather mat together first before also cutting them in half with the trimmer. Then these three layers were adhered together before carefully adhering them in place on the card front so that they meet together perfectly at the center. The sentiment from Charming Sentiments is stamped on white cardstock and diecut using the smallest Thoughtful Expressions die. The sentiment mat is cut from Lost Lagoon shimmer paper. A twist of silver & white sheer ribbon and Lost Lagoon bordered ribbon are adhered in between the two sentiment layers. Using dimensionals, the sentiment is adhered to the left flap of the card front. I added a few purple fine shimmer gems for sparkle and to move the eye diagonally across the card front.

This particular design is super easy to put together. And by changing the color palette and DSP, each card has a completely different look. This is going to be a go-to design for me if I need to make a whole host of simple yet beautiful cards!

Tune in tomorrow as we explore the rolling Hills of Tuscany!

Products used in today’s card:
Blackberry Bliss, Highland Heather, Basic White cardstock
Meandering Meadow, Lost Lagoon soft shimmer DSP
Charming Sentiments stamps
Thoughtful Expressions, Perennial Postage dies
Silver & white sheer trim, Lost Lagoon bordered ribbon
Purple fine shimmer gems
Dimensionals
Adhesives

Luv 2 Stamp Artisan Design Team · sketches

Celebrate Spring

Sketches are such a great crafting tool. I turn to them often when looking for design inspiration. And you don’t have to follow them to the letter (I often don’t), but they give you a great place to get started. I’ve gotten a lot of mileage out of the latest sketch by the crew over at Freshly Made Sketches.

For today’s card, I pulled one of my favorite 6×6 paper packs called Meandering Meadow. This pack is full of beautiful watercolor, impressionistic-looking designs and there’s a color palette for everyone! I decided to get out of my comfort zone and try working with yellow. The sheet of black-eyed Susans in Meandering Meadow serves as the square element in the sketch. And I built the remainder of the design around it. A sheet of Daffodil Delight serves as the card base and as the background panel. The background panel has been machine embossed using the Zinnia embossing folder, which is currently available as an Online Exclusive. For the circle element, I diecut a sheet of the white glimmer paper using the Thoughtful Expressions dies. The sentiment from Happy Little Things is stamped in Crushed Curry on a strip of Daffodil Delight and then cut using the paper trimmer and snips. A strip of silver trim, along with some white sequins, help tie the white and sparkly details together. I finished off the design with a paper butterfly.

I don’t often use yellow as a focal color in my designs because, quite frankly, I find it a little intimidating and often very overwhelming to my eye. But I really love how this design came together. Sometimes you just need the right combination of products to make a “hard color” work for you.

We’re going to continue our look into using sketches as our go-to starting point for our designs this week. I hope you’ll follow along and maybe even give one or two a try!

Products used in today’s design:
Daffodil Delight cardstock
Meandering Meadow, white shimmer DSP
Happy Little Things stamps
Thoughtful Expressions dies
Zinnia embossing folder
Silver trim
Neutrals sequins
Paper butterfly
Dimensionals
Adhesives


All ads on this site are posted by WordPress.  Song Sparrow Papercrafts is not responsible for ad content.

Fun Folds

You Are Loved

Happy Thursday, everyone! And more importantly for us here in the U.S., happy Thanksgiving! My family will be gathering today to celebrate but, more importantly, we will be together to laugh and spend time together. I am blessed to have a close-knit family who gathers together often, not just for holidays. We share in joys and sorrows and tough circumstances together. And when we have friends who are far away from their families for the holidays, we wrap them right into ours!

I hope you have reasons to offer thanksgiving today. And if you are far away from family, I hope God sends you friends who will love you like family. And it’s the idea of being part of a community that inspired this week’s card design. Let’s take a look!

The new Meandering Meadows designer series paper currently available in Online Exclusives is simply stunning, and each of the scenic sides of these papers lend themselves to beautiful cards with very little else needed outside of the gorgeous paper. There are a whole host of fun folds that allow us to retain large sections of paper while still providing variety of design and, of course, gorgeous cards.

Today’s card design is based on a fun fold, known as a Split Panel, that I learned from fellow demonstrator Jackie Bolhuis with Klompen Stampers. This fold came by its name because the front and back panels are split apart and held together by a Z-fold in the center. I chose the portrait orientation, but you could easily turn the design landscape.

The two panels of the base of this design are Pretty Peacock cardstock. I wanted to draw out the beautiful pinks in the clouds and flowers in the sheet of Meandering Meadow DSP I selected, so I chose to mat the sheet with Moody Mauve. I used the Deckled Rectangles dies to cut both the mat and DSP panel. I tied a piece of silver and white sheer ribbon around the bottom of the panel before adhering to the card front with dimensionals. A few pink tinsel gems in opposing corners add a little sparkle and allow the eye to move across the focal panel. Although difficult to see in these photos, I highlighted the pinks in the clouds and across the mountain front by going over them with Wink of Stella. It’s a truly stunning effect in person! I stamped the sentiment, from the Softly Said stamp set, in the center of the inside fold-out. The message panel is framed on one side by a scrap of the DSP I cut for the card front.

I made this card with a particular friend in mind. Life has thrown my friend a lot of difficult things lately, and I wanted to offer a word of support. You know, I think we should do more of that these days. Life is hard for so many people, and some feel like the whole world is against them and they have no one who cares about them. A simple word of support or encouragement can make all the difference in whether that person carries on. Food for thought as so many of us are blessed to celebrate Thanksgiving with family and friends today.

Products used:
Pretty Peacock, Moody Mauve, Basic White cardstock
Meandering Meadows DSP
Deckled Rectangles dies
Silver and white sheer ribbon
Tinsel gems
Dimensionals
Adhesives

All ads on this site are posted by WordPress and are based on your personal browsing history. I do not control ad content.

Fun Folds

Joy to my Heart

Sometimes I find myself a little stumped with design ideas for beautiful designer papers because the thought of cutting them up gives me pause. But I’ve learned that there are a whole host of fun folds that afford an inspired design while sparing gorgeous designer papers.

I recently ran across a small modification to the Z-fold that gives even more space for designer paper. As you look at the closed card, you may be thinking that the design looks oddly familiar. That’s because this fun fold is a combination of both a Z-fold and peek-through, but rather than cutting the one-inch strip from the card front, the card front is scored at the one-inch mark. Then this small flap is folded back toward the card front.

This card design begins with a base of Crushed Curry card stock. It is cut to a standard size of 4 1/4 x 5 1/2-inches with the 1-inch panel scored and folded back on the front panel. Two sheets of a single pattern of Meandering Meadow designer paper are needed for this design — one for the card front and flap and the other for the inside panel and inside base. I chose the beautiful fields of yellow daisies for this card because it perfectly represents the cheerful sentiment. The smaller strips of patterned paper are the reverse side of the sunny daisy paper. The focal sentiment panel is comprised of a vellum banner diecut using the Nested Essentials dies and a smaller sentiment panel diecut from Crumb Cake cardstock using the Autumn Leaves dies. The sentiment is from the So Sincere stamp set. To add a pop of additional color to the sentiment, a few sprigs of greenery cut from Pretty Peacock using the Bold Bouquet dies is tucked in the center. A scattering of sparkle gems add visual interest and move the eye across the design.

I really love this new fun fold variation and am looking forward to putting it to use with a few of my other favorite designer papers. What do you think of this fun fold variation? Interested in giving it a try? Check out the PDF tutorial here.

Products used:
Crushed Curry, Crumb Cake, Pretty Peacock, vellum cardstock
Meandering Meadow DSP
So Sincere stamps
Nested Essentials, Bold Bouquet, Autumn Leaves dies
Tinsel gems
Dimensionals
Adhesives

Fun Folds

Through the Garden Window

Happy Monday, everyone! I’m popping in today to share another fun fold card using the Meandering Meadow designer paper which will be available in the Online Exclusives section of the online store tomorrow (November 7th)!

For today’s design, I decided to try my hand at a window card, which I combined with a flap fun fold. The design starts with a base of Balmy Blue cardstock cut to standard size and scored in the center. I chose the sheet of Meandering Meadow with the tree and bench as the focal image to peek through the window. I paired it with the sheet of moody blues — a combination of Night of Navy and Pretty Peacock — which would serve as the window panel. After trying several combinations, I felt that this moody sheet really drew out the darker hues of the garden scene, which felt more true to a peek through a window. And I just love how the whole feel of the garden scene changes from the view through the window to the open flap.

The moody blues sheet is adhered to the card front. Basic White cardstock serves as the base for the flap panel. Adhere the flap panel base to the inside of the Balmy Blue card base. With the inside flap closed, the garden scene paper is adhered to the front of the flap. The window is cut using the Deckled Rectangles die. (TIP: Run the die back and forth through your diecutting machine several times to ensure a clean cut through all layers.) I used the cut rectangle as a focal image for the inside of the flap next to the message panel and decorated the rectangle using the scenic side of the roughly 2-inch strip of moody blue cut from the larger 6 x 6 panel. The sentiment from the So Sincere stamp set is heat embossed in silver on a vellum panel diecut using the Autumn Leaves dies. Pops of sparkle are added to the card front using tinsel gems and on the garden scene using glitter sequins.

What do you think? To see this design come together from start to finish, check out the reel over on Instagram. Want to recreate this design on your own? Here is a PDF tutorial to walk you through the process from start to finish.

Have you been enjoying the sprinkling of fun folds and how-I-made-it videos? If you’d like to continue seeing more of this type of content, please Like or comment on this post to let me know.

Products used:
Balmy Blue, Basic White, vellum cardstock
Meandering Meadow DSP (Online Exclusive available November 7th)
So Sincere stamps
Deckled Rectangles, Autumn Leaves dies
Tinsel gems
Glitter sequins
Silver embossing powder
Adhesive

All ads on this site are posted by WordPress and are based on your personal browsing history. I do not control ad content.

Fun Folds

So Appreciated

I wanted to give a fold-over flap fun fold another try, and I knew that the new Meandering Meadow designer series paper would be the perfect patterned paper to use. This new pack of 6 x 6 designs is set to launch as an Online Exclusive on November 7th and is a beautiful pack full of pastel chalk designs.

We begin with a base of Balmy Blue. I knew I wanted to highlight the bend in the water with the beautiful sunset reflection on the flap, so I chose Bubble Bath as the base for the flap in order to draw out those beautiful, subtle colors of the sunset and delicate flowers. This design calls for 2 sheets of the selected Meandering Meadow pattern. The middle section of the card front is comprised of almost an entire sheet. The flap is approximately 4″ x 3 3/4″ with the patterned panel just 1/8″ smaller all around. (The entirety of the Bubble Bath strip is 4″ x 7 1/2″ and scored in the center.) The front sentiment from the So Sincere stamp set is heat embossed in silver atop a vellum panel diecut using the Nested Essentials dies. A pop of sparkle comes from the tinsel gems nestled around the sentiment panel. For th inside message panel, I elected to use a sheet of cardstock to ensure good coverage over the flap base. I used scraps of the patterned paper to add interest to the message panel and flap inside the card. The inside sentiment is from the So Sincere stamp set.

What do you think of this fun fold? If you hop over to Instagram, you can watch how this whole design came together. It was a lot of fun to put together, even if I did make a boo-boo in my cuts while making it. Can you tell me where things went awry? I decided to leave that mistake in the video so you know that we ALL make them!

Products used:
Balmy Blue, Bubble Bath, Basic White, vellum cardstock
Meandering Meadow DSP (coming soon to Online Exclusives)
So Sincere stamps
Nested Essentials dies
Silver embossing powder
Tinsel gems
Adhesives

All ads on this site are posted by WordPress and are based on your personal browsing history. I do not control ad content.

Fun Folds

So Thankful for You

I’m excited to show you a sneak peek of a new designer series paper set to release on November 7th. Meandering Meadow is a gorgeous set of oil pastel designs turned to designer paper. Each of the designs in this pack is simply stunning and a little reminiscent of some of my favorite Renaissance paintings. Monet or Manet anyone?

For today’s card, I tried a new fun fold so that I could retain as much of this beautiful paper in the design as possible. The base of this card is a sheet of Balmy Blue cardstock in the standard 8.5 x 5.5 inch format and scored at the traditional 4 1/4-inch mark. To create the flap, a 1-inch strip is cut from each side of the card front flap. The 6 x 6-inch sheet of designer paper is first cut to 4 1/8 x 6 inches. I next cut 1 3/8″ from each side of the panel to create a 3 1/4 x 4 1/8-inch panel. A plain sheet of white paper serves as the message panel on the inside of the card, and each of the 1 3/8-inch strips are adhered on either side of the inside message panel so that a portion peeks through when the card is closed. The larger patterned paper panel is adhered to the front flap. The sentiment from the So Sincere stamp set is heat embossed on a vellum panel diecut using the Autumm Leaves dies. A strip of silver trim and a few fine sparkle gems draw the eye to the sentiment.

What do you think of this fun fold? You can find the PDF instructions here. And if you hop over to Instagram, you can watch how this whole design came together.

Products used:
Balmy Blue, vellum cardstock
Meandering Meadow DSP (coming soon to Online Exclusives)
So Sincere stamps
Autumn Leaves dies
Silver embossing powder
Silver trim
Fine sparkle gems
Adhesives

All ads on this site are posted by WordPress and are based on your personal browsing history. I do not control ad content.