Christmas · Holiday Mini Catalog · Holidays

Happy Holidays Greenery

How excited was I to wake up to a rainy cold front this morning?! While it’s not exactly fall cool yet, we’re definitely headed in the right direction.

Today, we’re continuing a closer look at the Stampin’ Up! Season of Green & Gold suite of products. This suite includes beautiful gold-foiled patterned papers, coordinating vellum, stamps & dies, and lovely satin ribbon. Today’s card is another take on a traditional holiday design.

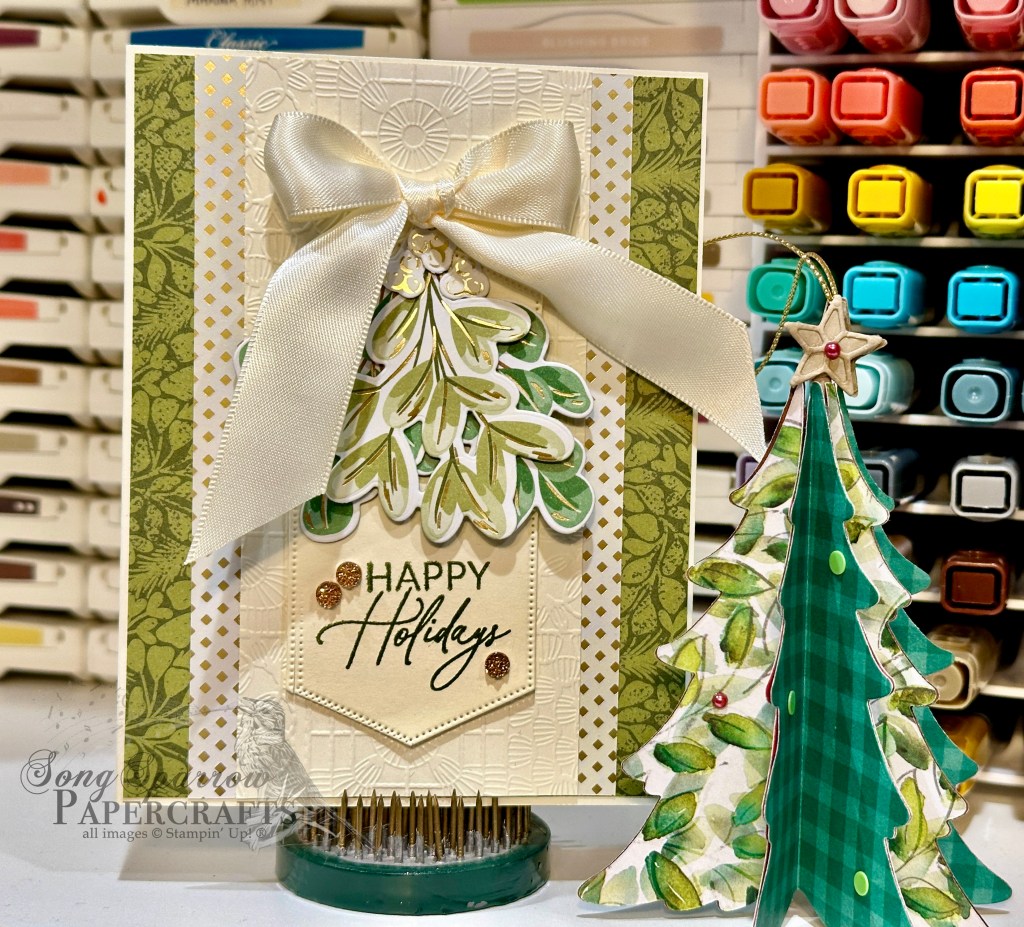
We started with a base of Basic Beige cardstock. Our background panel is a greenery pattern from the Season of Green & Gold designer series paper pack. Our focal panel background in the center is a strip of Basic Beige that is embossed using the Cute Crochet embossing folder and then matted with the backside foiled pattern of the background panel sheet. The sentiment panel is cut from Basic Beige using the Greetings of the Season dies. The sentiment from Greetings of the Season is stamped in Mossy Meadow toward the bottom of the tag. Using some of the leftover sprigs of greenery that I cut for yesterday’s card design, I affixed them to the sentiment panel to overlap the top of the tag and then tied a bow of Very Vanilla satin ribbon and affixed it in the center. A few drusy embellishments on either side of the sentiment help draw the eye and add a bit of finishing sparkle.

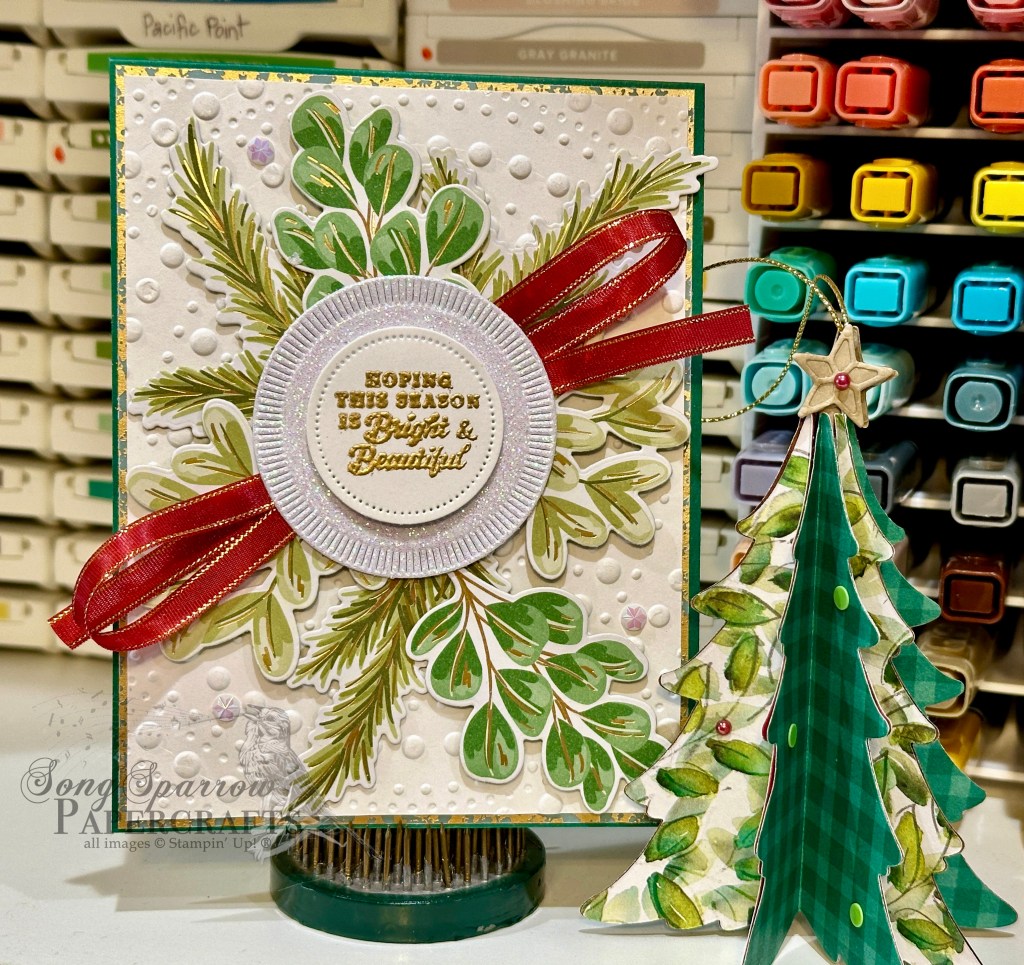
Tomorrow we’re going to round out our winter holiday designs before transitioning to a few out-of-the-box designs. I hope you’ll pop in.

Products used in today’s card:
Basic Beige cardstock
Season of Green & Gold DSP
Cute Crochet embossing folder
Golden Greenery dies
Greetings of the Season stamps &dies
Very Vanilla satin ribbon
Drusy embellishments
Dimensionals
Adhesives

Product List
Christmas · Holiday Mini Catalog · Holidays

Bright & Beautiful Greenery

Welcome to a brand new week and the start of FALL! Have I mentioned that fall is my absolute favorite season? Unfortunately, Texas isn’t being very cooperative with me right now, and it doesn’t feel a bit like fall. Not one bit!! In fact, it’s still feeling like we’ve been thrown into the deep end of the frying pan. But we’re only a couple of good cold fronts away from fall officially being here to stay! *wink-wink*

This week, we’re going to be spending time with the Season of Green & Gold suite of products by Stampin’ Up! And we’re going to mix it up with some obvious holiday designs and some out-of-the-box fall designs. Today’s card is solidly in the holiday mood.

We get started with a base of Shaded Spruce cardstock. Our focal panel is a sheet of white cardstock that has been diecut using the Dotted Circles embossing folder and then the panel is matted with gold mercury vellum. Using the Golden Greenery dies, we cut a variety of greenery from the Season of Green & Gold patterned paper with coordinating shapes. These are then layered on the focal panel using dimensionals to create several different visual planes. Our sentiment from Peaceful Season is stamped white cardstock in Versamark and then heat embossed with gold embossing powder. We cut it out with the smallest circle from the Everyday Details die set. This is then mounted on a circle of white glimmer paper cut using the Spotlight on Nature dies and adhered over a twist of Cherry Cobbler & Gold satin ribbon in the center of our greenery. A few iridescent faceted gems finish things off with a nice sparkle.

Tune in tomorrow as we keep things in the holiday zone.

Products used in today’s card:
Shaded Spruce, Basic White cardstock
White glimmer, gold mercury vellum, Season of Green & Gold DSP
Dotted Circles embossing folder
Golden Greenery, Spotlight on Nature, Everyday Details dies
Peaceful Season stamps
Versamark
Gold embossing powder
Cherry Cobbler & gold satin ribbon
Iridescent faceted gems
Dimensionals
Adhesives

Product List
Christmas · Holiday Mini Catalog · Holidays

Peace & Wonder

It’s hard to believe that we’re already to the end of another card series. I don’t know about you, but it seems like the closer we get to the end of a year the faster the time goes!

This week, we’ve been using the Joyful ephemera packs from Stampin’ Up! to create simple yet beautiful card designs. If you find yourself short on time, the full line of ephemera packs that SU! offers allow you to continue making beautiful cards. With or without any extras, ephemera cards are just as stunning.

Today, we’re mixing things up with a whole combination of elements from the crafting stash. I have a box of pre-cut card bases and typically have at least one or two pre-cut focal panel bases on hand, as well. And both were go-to items for creating this lovely card in a jiffy.

We get started with a base of Pretty Peacock cardstock. Our focal panel base is a sheet of the Season of Elegance designer series paper. I cut a circle from white glimmer paper using the Spotlight on Nature dies that is just a bit larger than the snowy cabin circle image from the Joyful Images ephemera pack. These are adhered with dimensionals over a twist of the Pretty Peacock & Gold metallic ribbon. The sentiment from Joyful Sayings is also adhered with dimensionals and just a bit higher than our image panel. Things are finished off with a few gold snowflakes with rhinestone centers for a bit of added twinkle.

Are you interested in learning how you can get started on your Christmas cards? Check out my upcoming card classes for both virtual and in-person options!

Next week, we’ll be using Season of Green & Gold to create our cards. I hope you’ll stop by and check it all out.

Products used in today’s card:
Pretty Peacock cardstock
Season of Elegance, white glimmer DSP
Spotlight on Nature dies
Joyful ephemera
Snowflake assortment, rhinestone jewels
Pretty Peacock & gold metallic ribbon
Dimensionals
Adhesives

Product List
Christmas · Holiday Mini Catalog · Sketchy Fridays

Sketchy Fridays: Holiday Joy

Do you ever have weeks where you aren’t sure which end is up much less what day it is? I’ve been confused about what day of the week it is all week and it’s NOT even a holiday week! Perhaps it’s a phase of the moon or something.

Today is another installment of Sketchy Fridays, where each week we’ll be using a card sketch to design our featured card. Right now, we’re working through a full series of designs using the card sketches found in current Stampin’ Up! catalogs.

This week’s card is based on Sketch #13 in the Holiday Mini catalog and features the Joyful ephemera packs and the fun Take a Bow designer series paper in the new Stampin’ Up! Holiday Mini catalog.

I know I probably say this often enough that you’re beginning to think that I’m a broken record, but what I love about using sketches to build a card design is that it’s merely a starting point. There aren’t any rules that say your card HAS to look exactly like the sketch that inspired it. Today, you’ll notice that I’ve taken some liberties with the sketch. Rather than using actual rectangles in the design, they’re a representation of the images from the Joyful Images ephemera pack. Can you see it?

We get started on this card design with a base of white cardstock. Our background panel is a sheet of the red polka dot Take a Bow patterned paper with a strip of the green star pattern from the same pack. In each of the places represented by rectangles in the sketch, I’ve put images from the Joyful Images ephemera pack, building a cute scene of a cup of cocoa surrounded by snacks you might enjoy with it. There’s a twist of the peppermint baker’s twine tied behind the images for a little visual interest. The sentiment down below is mounted on a banner from the Images pack while the word Joy is from the Joyful Sayings ephemera. A few adhesive peppermints and some drusy embellishments help the eye move across our design and add some pops of fun color and sparkle.

Tomorrow we’ll be rounding out this week’s series with a trip to grandma’s house. I hope you’ll come along!

Products used in today’s card:
Basic White cardstock
Take a Bow DSP
Joyful ephemera packs
Real Red & White twine
Real Red & White peppermints
Drusy embellishments
Dimensionals
Adhesives

Product List
Christmas · Holiday Mini Catalog · Holidays

‘Tis the Season

Are you looking for a way to make beautiful cards but are short on time? The ephemera packs by Stampin’ Up! are the perfect answer! The images and sentiments are beautifully detailed and make it a snap to create beautiful cards, especially if you’re short on time.

Today, we’re pairing the Joyful ephemera packs with a few extra elements to create this beautiful holiday card.

We get started with a green Gold Dipped card base. Our focal panel base is a piece of gold mercury vellum that has been diecut with the Spotlight on Nature dies. We then layer our drums and greenery from the Joyful Images ephemera pack on our focal panel using varying heights of dimensionals and then hang our sentiment from the Joyful Sayings pack above. For a pop of seasonal color, we add a twist of Cherry Cobbler & Gold satin ribbon behind our panel and red iridescent discs around.

Tomorrow, we’ll be pairing our ephemera with a sketch. I hope you’ll tune in for another installment in the Sketchy Fridays series!

Products used in today’s card:
Gold Dipped cards & envelopes
Joyful Images ephemera
Joyful Sayings ephemera
Gold mercury vellum
Spotlight on Nature dies
Cherry Cobbler & Gold satin ribbon
Iridescent discs
Dimensionals
Adhesives

Product List
Christmas · Holiday Mini Catalog · Holidays

Happy Holidays

This week, we’re exploring all of the ways we can use the new Joyful ephemera packs in the Stampin’ Up! Holiday Mini catalog. The ephemera packs provide both images and sentiments for super quick and simple cards. You can use the ephemera all on its own or dress up your card designs with additional elements.

Today, our clean and simple design includes one simple additional diecut piece that really packs a lot of design punch and completely transforms the look of this card.

We get started with a blue Gold Dipped card base. Our focal image panel base is a circle cut from white glimmer specialty paper using the Spotlight on Nature dies, and then we layer the set of skates and a blue bow from the Joyful Images ephemera pack on top using dimensionals. We break up our sentiment above and below the image panel and adhere both directly to our card base. A few snowflakes finish things off with an additional gold twinkle in the center of our design.

Beautiful cards do not have to take a lot of time. And when you’re short on time, I highly recommend giving the Stampin’ Up! ephemera packs a try!

Products used in today’s card:
Gold Dipped card & envelope
Joyful Images ephemera
Joyful Sayings ephemera
White glimmer paper
Spotlight on Nature dies
Snowflake assortment
Dimensionals
Adhesives

Product List
Christmas · Holidays · Terrific Tuesdays

Season’s Greetings

This week, we’re taking a closer look at the new Joyful ephemera packs available in the current Stampin’ Up! Holiday Mini catalog. Although ephemera packs have been available for some time, I’ve been hesitant to purchase them because I didn’t think I would like working with them. But let me tell you, these are a lifesaver if you’re wanting to create a card but are crunched for time!

We’re going to be using the Joyful ephemera packs this week in a number of different ways. You can use ephemera all on its own to create beautiful cards, just like I did yesterday with the Christmas mantle design. Or you can add additional elements to dress up your designs and add a bit more complexity, like we’re doing with today’s card.

This card begins with a green Gold Dipped card base. We’re using the reinker watercoloring technique I first introduced to you on Saturday to create a sheet of custom paper to cut our tree from using the Merriest Trees dies. Each of the tree layers is separated by dimensionals on the bottom edge to give it a more realistic look, and the bottom layer of the tree is adhered directly to the card front. Our bear and packages from the Joyful Images ephemera pack sit directly in front of the tree. The packages are adhered to the card front and the bear is adhered with dimensionals to have it appear to be oriented in front of our packages. I added a gold star to the top of the tree for a festive finish. The sentiment from the Joyful Sayings ephemera pack is adhered directly to the top layer of our tree. A few drusy embellishments add some sparkle and draw our eye across our card design.

Would you like to learn how to create your own watercolor paper and see this card come together from start to finish? Check out today’s episode of Terrific Tuesdays to watch the magic happen!

Products used in today’s card:
Gold dipped card & envelope
Joyful Images ephemera
Joyful Sayings ephemera
Watercolor paper
Water painter
Pretty Peacock, Old Olive ink
Merriest Trees dies
Drusy embellishments
Dimensionals
Adhesives

Product List
Christmas · Holiday Mini Catalog · Holidays

Peace on Earth

We’ve made it to another bright and shiny new week, friends! I hope you all enjoyed a restful weekend. Although we had places to be all weekend, all in all I would call it a relatively low-key weekend. It’s nice to have the opportunity to rest and recharge.

Today we begin a brand new series of card designs. And this week, we’re still in the Christmas spirit as we take a closer look at all that the new holiday ephemera packs to have to offer, particularly when you’re looking for gorgeous cards on the go! Today we get started with a festive mantle.

Our card base is the Real Red Gold Dipped card base. We use a combination of the Joyful Images and Joyful Sayings ephemera packs to build our mantle scene. We use the red rectangle as our mantle and then decorate with stockings, of course, and then add some larger ornaments and a bell. Our elements are layered with dimensionals to give many different depths in our scene. The sentiment is hung above our hearth as the perfect focal point. A few drusy embellishments add a little sparkle.

Tomorrow’s clean and simple holiday card design features another look at the watercoloring technique I shared last week. I hope you’ll pop in and check it out.

Products used in today’s card:
Gold Dipped cards & envelopes
Joyful Images ephemera
Joyful Saying ephemera
Drusy embellishments
Dimensionals

Product List
Holiday Mini Catalog · sketches

Sketches & More Sketches

I love a good sketch, and if you’ve followed along here for any length of time, you’ve heard and seen me refer to sketches I’ve used to make various cards. There are all sorts of places where you can find card sketches and you can even start your own sketch book based on card layouts you see and like. These are two things that I’ve been doing for years. But what I love is that Stampin’ Up! has begun to include a collection of sketches in catalogs.

There are quite a number of demonstrators who have turned the collection of sketches in the 2024-25 Annual Catalog into a large-scale file (letter-sized) that they’ve shared amongst their fellow demos and with their customers. I got mine from Frenchie Stamps and love the larger format because it helps me better visualize where I’m going with design and obviously because it’s much easier on the eyes. *wink wink*

Up until now, however, I have not seen any of the new sketches included in the Holiday Mini catalog in a larger format. So I’ve spent some time over the last week doing just that. About half of the sketches included in the catalog are for gift tags. But did you know they can easily be converted to card fronts? You will see each of those tags included as a card layout in this sketch collection file — to help you better visualize how each of the tags can become a card. But you’ll note that each of the tag sketches is otherwise completely unchanged outside of the outline of a card front.

You can download the full collection of 20 sketches included on page 16 of the 2024 Stampin’ Up! Holiday Mini catalog by clicking on the link below.

Christmas · Holiday Mini Catalog · Sketchy Fridays

Sketchy Fridays: Take a Bow, Frosty

Welcome to Friday, everyone! This week, we’ve been All About Christmas and have been taking a tour through all of the fun holiday products that Stampin’ Up! offers.

Today is another installment of Sketchy Fridays, where each week we’ll be using a card sketch to design our featured card. Right now, we’re working through a full series of designs using the card sketches found on page 22 of the current Stampin’ Up! Annual Catalog.

This week’s card is based on Sketch #17 and features the snowman from the Filled With Cheer stamp set and the fun Take a Bow designer series paper in the new Stampin’ Up! Holiday Mini catalog.

We get started with a base of Real Red cardstock. I chose a sheet of the new Take a Bow designer series paper for the strip elements in the sketch and used both sides of one sheet of paper. I felt like the focal panel needed to be more than simple strips of patterned paper and this is where I chose to add two additional layers to bring everything together. I used some of the red Festive glimmer paper as the mat immediately behind our paper strips, and this mat is cut using the Perennial Postage die. And then to help the whole focal panel pop against our card base, I added a mat of white cardstock that has been diecut with the Deckled Rectangle die and then embossed using the Snowflake Sky embossing folder. Our focal panel is stamped with the snowman from the Filled With Cheer stamp set and then diecut with the Perennial Postage dies so that we’re just capturing the snowman and Christmas tree. The snowman is colored with Stampin’ Blends. Red and white baker’s twine is twisted around the bottom of our panel to tie everything together (no pun intended). The top-right edge of our panel is lightly sponged with Real Red ink to create a nice backdrop for our separate sentiment panel. The sentiment from Greetings of the Season is stamped in red on white cardstock and then diecut with the circle die from Changing Leaves and then adhered over our sponged focal panel corner. The focal panel is adhered to the backdrop with dimensionals. A few peppermints and rhinestones finish things off and help draw the eye across and to the more important elements on our card.

I love sketches because they give me a great place to get started. Sometimes I stick to a sketch just as it is. And other times, like today, I venture just a tiny bit outside the lines. I really love the simplicity of today’s sketch, but as I started working with it in conjunction with all of the elements in today’s card design, I felt like we needed a few extra layers to be sure everything works together but also, and more importantly, to ensure that all of the elements really pop.

Tomorrow we’re revisiting a few old favorites as we make our way through the enchanted Christmas forest. I hope you’ll pop by and check it out!

Products used in today’s card:
Real Red, Basic White cardstock
Take a Bow, Festive glimmer DSP
Filled With Cheer, Greetings of the Season stamps
Stampin’ Blends
Snowflake Sky embossing folder
Perennial Postage, Deckled Rectangles, Changing Leaves dies
Red & white twine
Peppermints
Rhinestones
Dimensionals
Adhesives

Product List