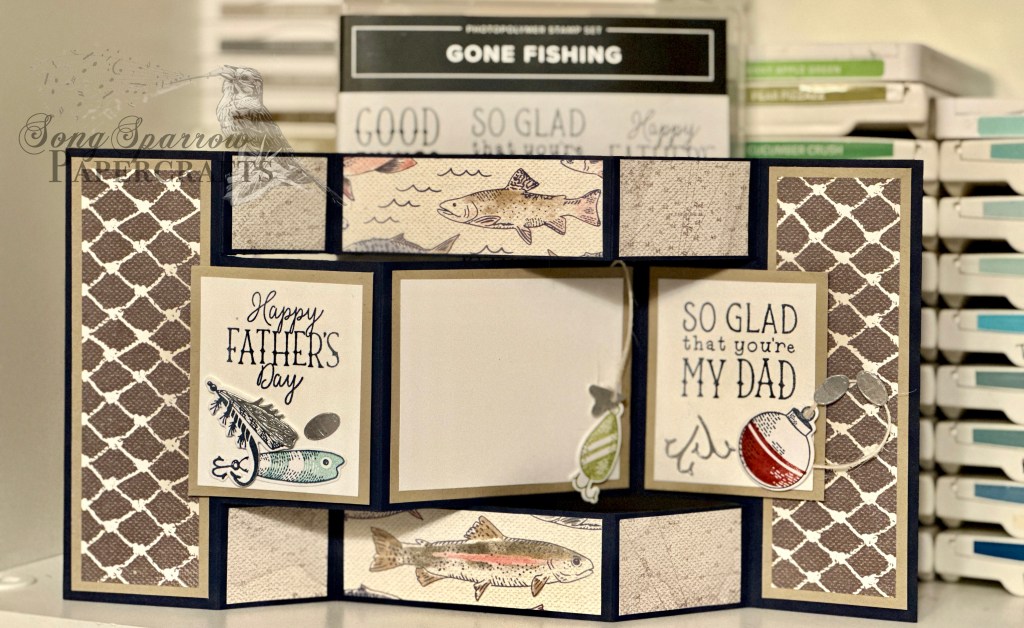
Welcome in, friends. We’re having fun trekking through the crafty stash this week to create Father’s Day designs, and today we’re headed to the pond. Today’s fun fold design uses the Gone Fishing bundle by Stampin’ Up! While the Gone Fishing bundle is quickly on its way out via the Last Chance List, it’s hard to resist this opportunity to create a fun card with this bundle, especially when you have avid fishermen in your family!
This standard sized card begins with a base of Mossy Meadow cardstock cut so that it opens in the center. Each of the bottom corners is cut at an angle. The top flaps of each side are turned down and affixed to the card front. A few Industrial Trinkets serve as the buttons at the top. This combination gives the look of a shirt or jacket. The pockets for the fishing jacket are cut from Mossy Meadow cardstock using the Countryside Corners dies. Each shape is then cut in half to create the four pockets. The pockets are each adhered to the card front with foam strips, ensuring that the top of each pocket is open to slide our tackle in. Using a combination of foil and glimmer papers and the Gone Fishing dies, I cut and assembled lures to tuck in each of the pockets. I used the Lost Lagoon soft cording to serve as a twist of extra line. The sentiment from the Gone Fishing stamp set is stamped on the pocket. HOT TIP: Be sure you stamp the sentiment before you decide to adhere the pocket to your card front. Otherwise, you’re going to have to punt in order to cover up your stamping boo-boo! *wink*
When the Gone Fishing suite first released, I saw so many cute designs. And one of the ones that really caught my eye was creating a fishing jacket. I didn’t get around to trying it out while the full suite was current, but I think the dies did a nice job of creating this fun card.
Tune in tomorrow as we take a trip through dad’s closet. You’re going to love it!
Happy Monday, everyone! We were thankful to have a few days of beautiful weather here in North Texas — with sunshine anyway. This summer we’ve done the abrupt gear shift from lovely spring to straight into the fire. But we were glad to see a string of dry days nonetheless. And we did our best to make the most of it. How about you?
This week, we’re going to be looking at a whole host of wonderful Stampin’ Up! products that you can use to honor the dads in your life. Today, we’re getting started with the Gone Fishing stamps and dies.
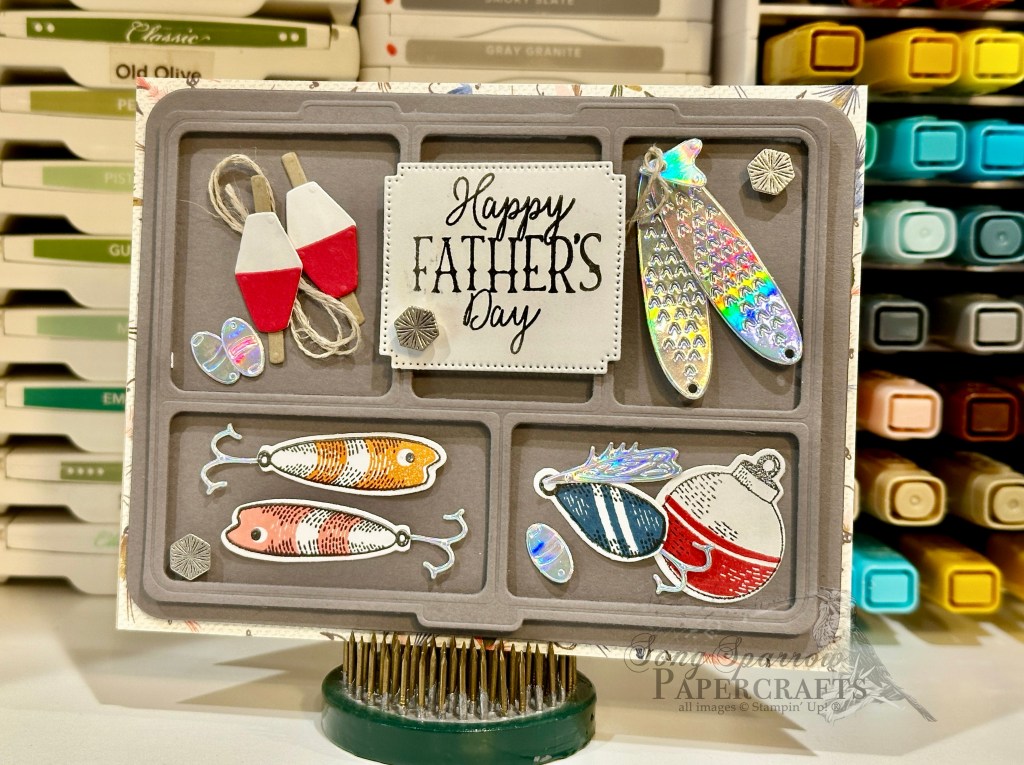
There are so many things that you can do with the combination of stamps and dies. And today’s card shows the most straight forward way — filling a tackle box. I don’t know about you, but I grew up fishing with my family. And it was always a treat when we could choose something to use from dad’s tackle box!
We get started with today’s card with a base of Crumb Cake cardstock, which won’t be visible when your card is closed. I chose a patterned background from the (now retired) Let’s Go Fishing designer paper pack. As you can see, only a tiny portion of the background pattern peeks out from behind the tackle box, so any subtle pattern will do. Next up, we diecut the tackle box from Basic Grey cardstock using the Gone Fishing dies. The tackle box is comprised of the base and topper dies. By using dimensionals to adhere to the two layers to the card front, you’ll get a realistic look into your tackle box from top view.
TIP: Don’t throw away the squares that are cut with the tackle box topper die. Save them to use as sentiment panels on other cards. You’re welcome! *grin* (Genius idea from my upline Patty Bennett!)
Now comes the fun part — filling your tackle box. On white cardstock, I stamped some of my favorite lures and tackle from the Gone Fishing stamp set. I chose minnows, a spoon, and a bobber. I used the detail stamps to fill in each image with some color. Then I diecut each one using the coordinating die. For added detail, I chose to remove the stamped hooks on the minnows and spoon and replaced them with hooks diecut from silver foil specialty paper, which gives the hooks a more realistic look. I added an additional spinner element to the spoon with the silver foil wing.
Now we fill the remaining bins in our tackle box. I assembled two peg-style bobbers. Using the larger bobber die, I cut white cardstock and then used the smaller portion to cut Real Red. The white pieces serve as the base for the red element. The bobber peg is cut from Crumb Cake and affixed to the back of each bobber. I used a twist of linen thread to represent fishing line behind one of the peg bobbers and added a few sinkers, diecut from silver foil, to the bin for a complete bobber setup. I adhered one bobber with a dimensional for a realistic look to the bin. From the silver foil specialty paper, I also diecut two larger spoons and a small triangular turning element. I tied them together using linen thread. The sentiment from the Gone Fishing stamp set is stamped on white cardstock that is diecut using the Autumn Leaves dies with the extension method. The sentiment is adhered over the tackle box to catch the eye. The scene is finished off with some Industrial Trinkets to catch the eye and draw it across the full scene.
This super cute design can be adapted with any sentiment to make a masculine card perfect for just about any occasion. And while it looks complicated to put together, it really does come together in a snap!
Tomorrow, we’ll be taking to the sky for our next design. And you won’t want to miss tomorrow’s episode of Terrific Tuesdays either — we’re going to learn a neat (and quick) fun fold and how to use the die extension method! I hope you’ll buzz by and check it all out!
Products used in today’s card: Crumb Cake, Basic Gray, Real Red, Basic White cardstock Let’s Go Fishing (retired), Silver Foil DSP Gone Fishing stamps & dies Autumn Leaves dies Linen thread Industrial Trinkets Dimensionals Adhesives
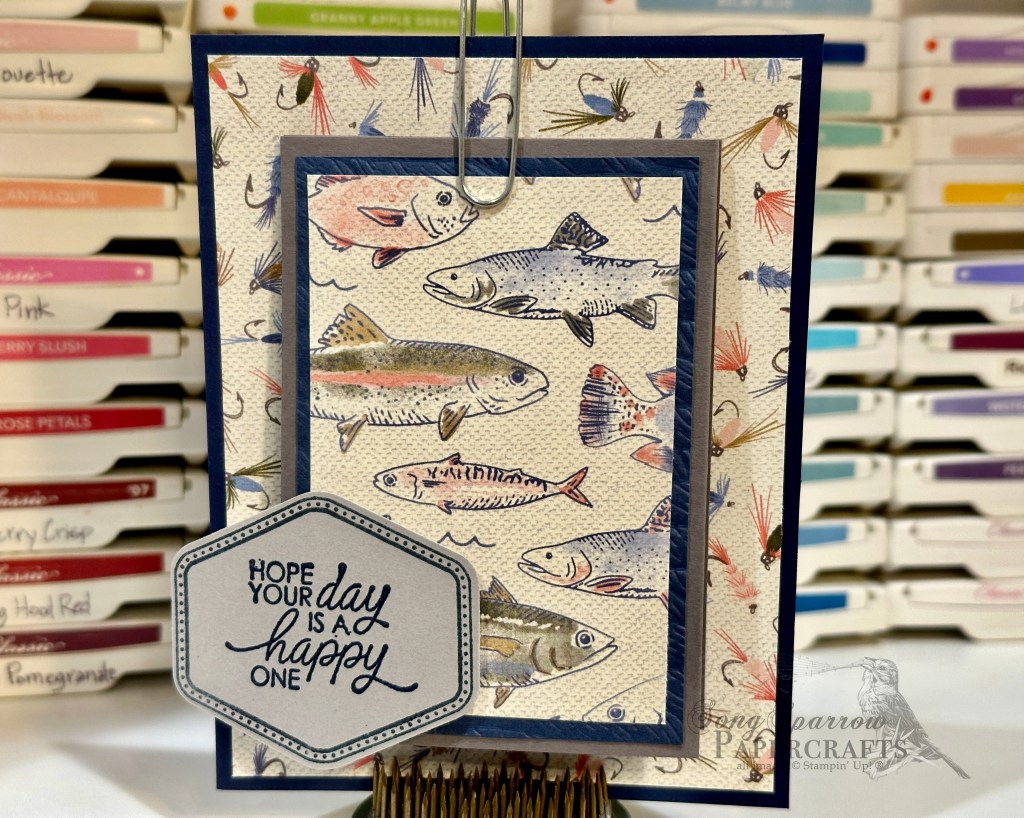
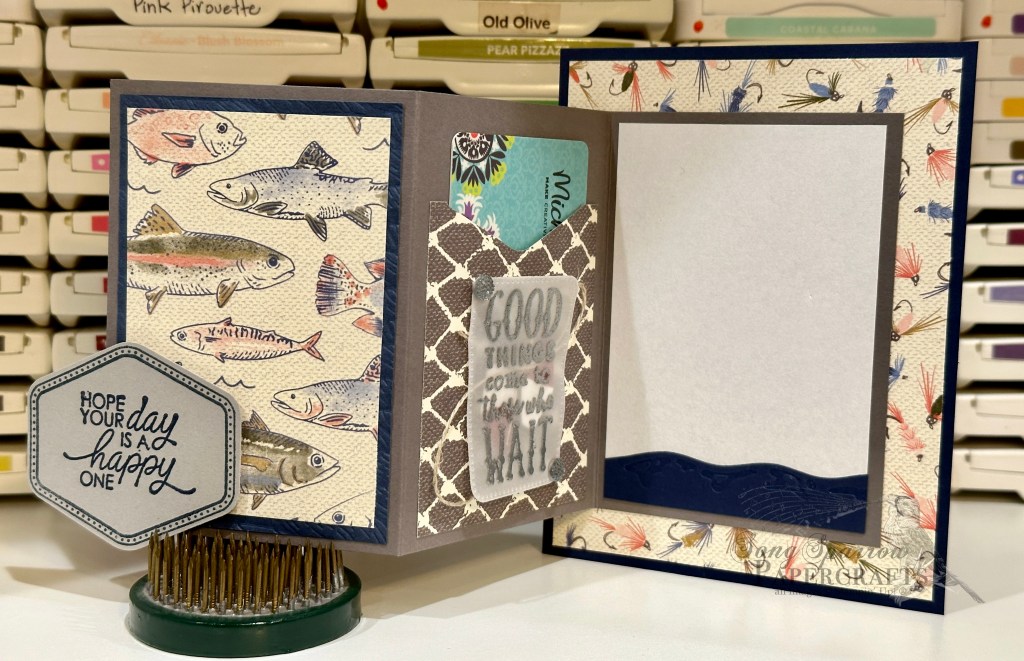
Did you catch yesterday’s Terrific Tuesdays video? This week’s episode is all about gift card holders and was inspired by today’s card design! I love finding fun ways to give gift cards. I recently ran across this super fun gift card holder shared by fellow demonstrator Heidi Collins. I knew this would be the perfect design for an upcoming family member’s birthday as this young man is all things outdoors.
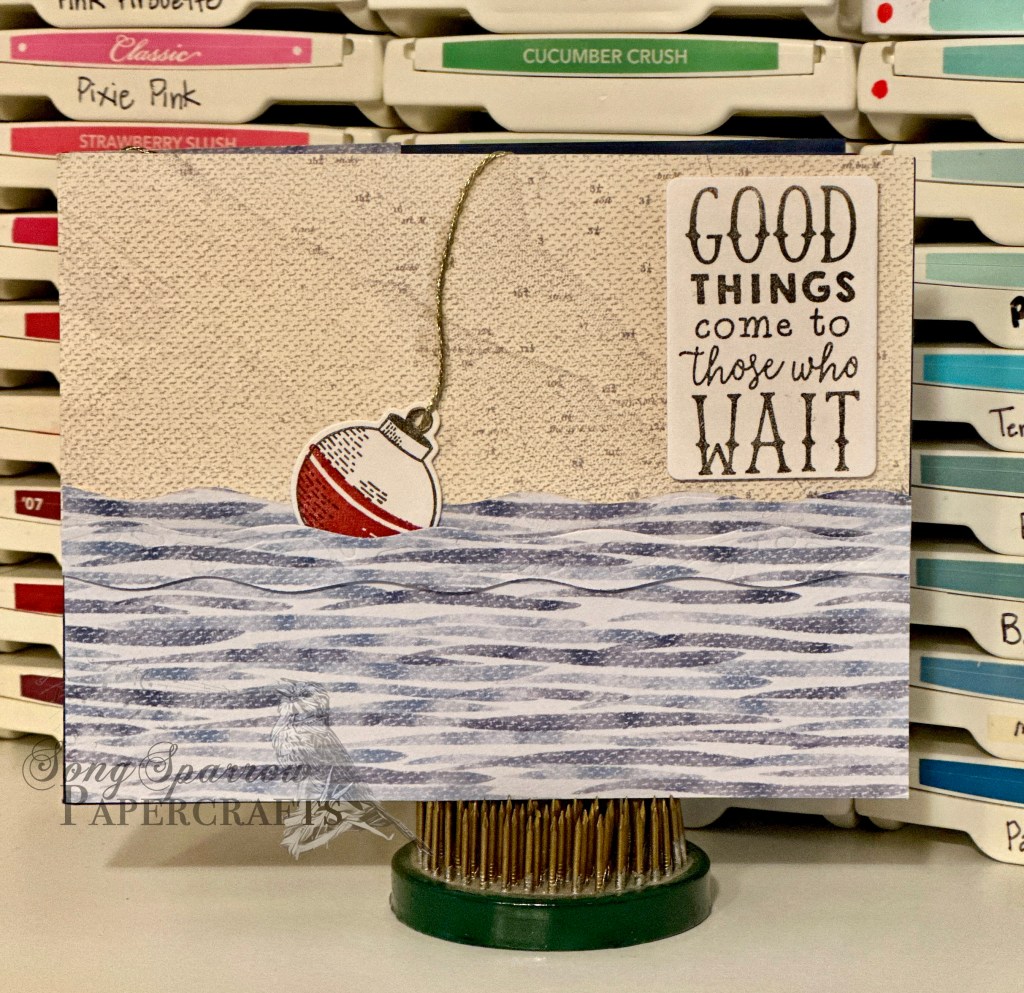
The gift card holder is built on a standard single-panel base of Night of Navy cardstock. The patterned papers are all from the Let’s Go Fishing designer series paper pack. The fold-out gift card holder portion in the center is built on a piece of Basic Gray cardstock, which is scored into thirds. For the front-facing panel, I decided to add a little interest to the navy mat by embossing it using the 3D Rope embossing folder. The sentiment panel is stamped on Smoky Slate cardstock with a border stamp from the Heartfelt Hexagon set and a sentiment from the So Sincere stamp set and then punched with the coordinating hexagon punch. The gift card pocket is made with a piece of Let’s Go Fishing DSP with the notch created by the hexagon punch. The cute vellum sentiment panel on the gift card pocket has a heat embossed sentiment from the Gone Fishing stamp set and is diecut using the Nested Essentials dies. There are a few bobbers and some line underneath the vellum panel to carry the theme through and for a bit of visual interest. The message panel is a simple piece of white paper with a strip of Night of Navy diecut and embossed using the Gone Fishing dies.
This gift card holder was super easy to put together! And with several more upcoming birthdays and the Christmas holidays just around the corner, as well, I love having a cute way to give gift cards that can easily be tailored to each individual recipient and occasion.
Wanna know more? Check out this week’s Terrific Tuesdays video to learn how this design was adapted for holiday gift-giving!
Products used for today’s design: Night of Navy, Basic Gray, Smoky Slate, Cherry Cobbler, Basic White, vellum cardstock Let’s Go Fishing DSP Gone Fishing stamps & dies Heartfelt Hexagon stamps & punch Faceted gems trio Linen thread Silver embossing powder Dimensionals Adhesives
All ads on this site are posted by WordPress and are based on your personal browsing history. I do not control ad content.
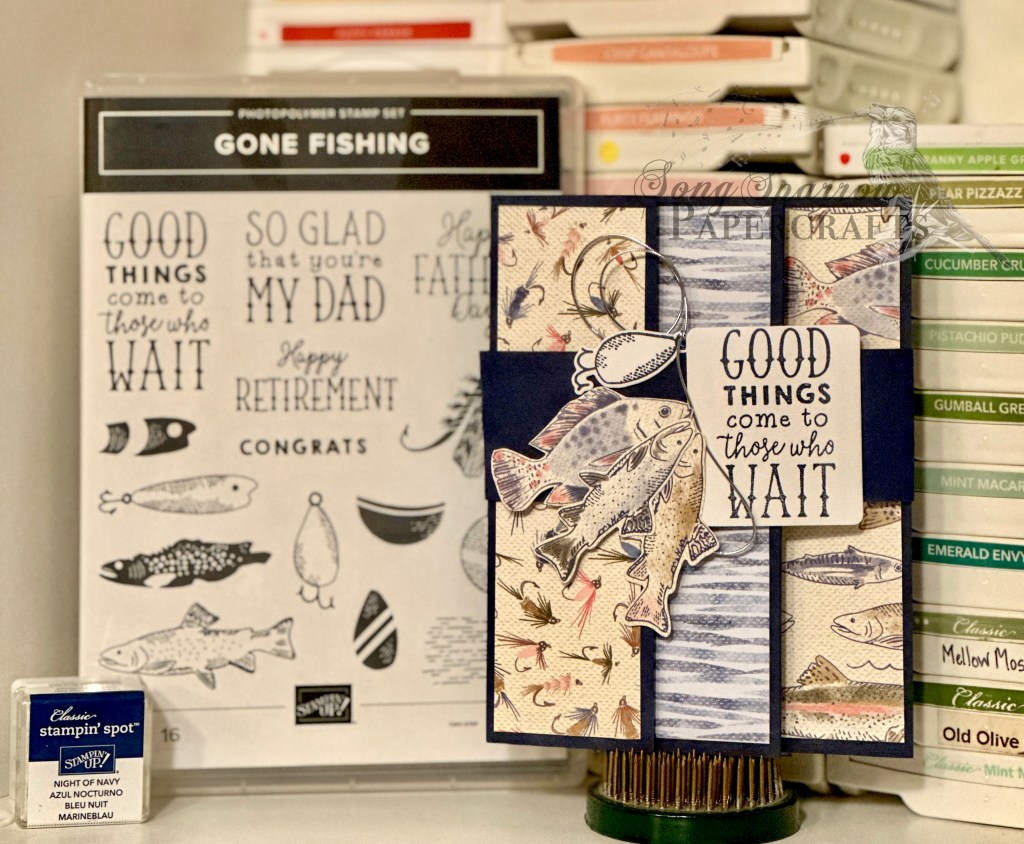
I ventured to try another fun fold technique today that I learned over at Klompen Stampers. I modified the template to create a pop-up card because I forgot how the template was supposed to fold, which created a whole lot of extra work. Because I was winging the pop-up portion of this design, there was way more cutting and measuring of smaller pieces than is really necessary for the original template. BUT in the end, I did like the result so I’m gonna go ahead and share my happy accident. (PRO TIP: just go back and rewatch a tutorial video when you can’t remember exactly how to make a fold work!)
I used the Gone Fishing Suite for this design. The front of the card is CASEd from the current catalog but flipped to accommodate the horizontal orientation of this design. The base of the card and pop-up segment is Night of Navy. I fussy cut the fish on the inside of the card and popped them up to give some depth of field.
Products used: Night of Navy, Basic White cardstock Gone Fishing stamps and dies Let’s Go Fishing DSP Silver embossing powder Gold trim Dimensionals Adhesives Sending You Thoughts stamps for inside sentiment (retired)
All ads on this site are posted by WordPress and are based on your personal browsing history. I do not control ad content.
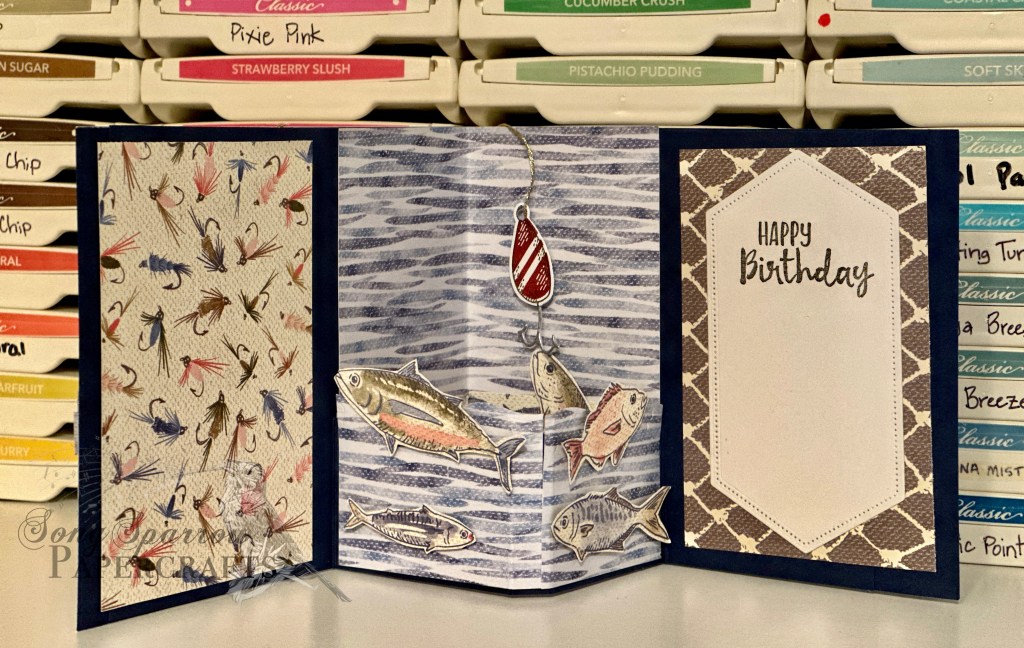
I’m excited to bring you another design using the Gone Fishing Suite and another fun fold technique. The StampingBae girls posted this terrific belly band fun fold card design today, and I just had to give it a whirl!
My favorite thing about this particular design is that it showcases so many of the wonderful elements of the Gone Fishing Suite, but especially the DSP. The card base is Night of Navy cardstock that is cut and scored. All of the patterned panels are comprised of strips of designer paper, and the sentiment panels are white cardstock. TIP: you can use the tackle box die to cut sentiment panels!
Products used: Night of Navy, Basic White cardstock Let’s Go Fishing DSP Gone Fishing stamps Gone Fishing dies Silver Simply Elegant Trim Adhesive Dimensionals
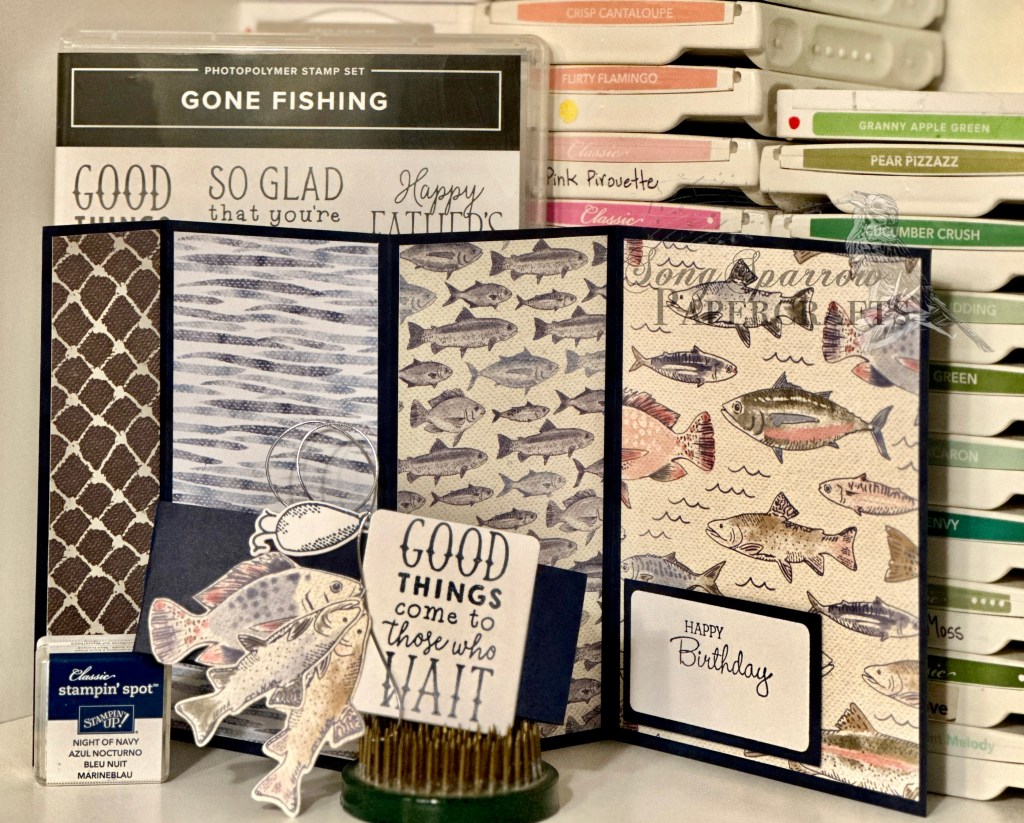
I’m excited to bring you another design using the Gone Fishing Suite. I also decided to tackle a new folding technique that Stampin’ with Kim shared this week, and I would highly recommend that you give it a try.
Today, we’re using the stamps, dies, and designer paper for this suite to create this stunning design. This design uses three sheets of the DSP—the swimming fish, the netting, and the map. The base of this design is made from Night of Navy cardstock. The matting is Crumb Cake cardstock, and the center panels are white. The tackle elements are stamped on white cardstock and cut out using the coordinating dies. The base of the card is cut and scored to create the folding portions of the design.
TIP: I wanted the sinkers, hooks, and spinner elements to be shiny but don’t have any silver paper right now. So I embossed a section of white cardstock with silver embossing powder and diecut these elements from the silver embossed section.
Here is a view of the card stretched out to see each of the panels and then a view of the collapsed card design.
Products used: Let’s Go Fishing DSP Night of Navy, Crumb Cake, Basic White cardstock Gone Fishing stamps Gone Fishing dies Silver embossing powder Linen thread Dimensionals Adhesives
All ads on this site are posted by WordPress and are based on your personal browsing history. I do not control ad content.

![Mossy Meadow 8-1/2" X 11" Cardstock [ 133676 ]](https://assets1.tamsnetwork.com/images/EC042017NF/133676s.jpg "Mossy Meadow 8-1/2\" X 11\" Cardstock [ 133676 ]")
![Basic White 8 1/2" X 11" Cardstock [ 166780 ]](https://assets1.tamsnetwork.com/images/EC042017NF/166780s.jpg "Basic White 8 1/2\" X 11\" Cardstock [ 166780 ]")
![Silver Foil 12" X 12" (30.5 X 30.5 Cm) Specialty Pack [ 163096 ]](https://assets1.tamsnetwork.com/images/EC042017NF/163096s.jpg "Silver Foil 12\" X 12\" (30.5 X 30.5 Cm) Specialty Pack [ 163096 ]")
![Berry Burst, Old Olive & White 12" X 12" (30.5 X 30.5 Cm) Glimmer Specialty Paper [ 163769 ]](https://assets1.tamsnetwork.com/images/EC042017NF/163769s.jpg "Berry Burst, Old Olive & White 12\" X 12\" (30.5 X 30.5 Cm) Glimmer Specialty Paper [ 163769 ]")
![Festive 12" X 12" (30.5 X 30.5 Cm) Glimmer Paper [ 164106 ]](https://assets1.tamsnetwork.com/images/EC042017NF/164106s.jpg "Festive 12\" X 12\" (30.5 X 30.5 Cm) Glimmer Paper [ 164106 ]")
![Countryside Corners Dies [ 161471 ]](https://assets1.tamsnetwork.com/images/EC042017NF/161471s.jpg "Countryside Corners Dies [ 161471 ]")
![Gone Fishing Dies [ 161541 ]](https://assets1.tamsnetwork.com/images/EC042017NF/161541s.jpg "Gone Fishing Dies [ 161541 ]")
![Gone Fishing Photopolymer Stamp Set (English) [ 161535 ]](https://assets1.tamsnetwork.com/images/EC042017NF/161535s.jpg "Gone Fishing Photopolymer Stamp Set (English) [ 161535 ]")
![Jet Black Stāzon Ink Pad [ 101406 ]](https://assets1.tamsnetwork.com/images/EC042017NF/101406s.jpg "Jet Black Stāzon Ink Pad [ 101406 ]")
![Pumpkin Pie Classic Stampin' Pad [ 147086 ]](https://assets1.tamsnetwork.com/images/EC042017NF/147086s.jpg "Pumpkin Pie Classic Stampin' Pad [ 147086 ]")
![Lost Lagoon Soft Cording [ 164938 ]](https://assets1.tamsnetwork.com/images/EC042017NF/164938s.jpg "Lost Lagoon Soft Cording [ 164938 ]")
![Industrial Trinkets [ 163450 ]](https://assets1.tamsnetwork.com/images/EC042017NF/163450s.jpg "Industrial Trinkets [ 163450 ]")
![Mini Stampin' Dimensionals [ 144108 ]](https://assets1.tamsnetwork.com/images/EC042017NF/144108s.jpg "Mini Stampin' Dimensionals [ 144108 ]")
![Mini Glue Dots [ 103683 ]](https://assets1.tamsnetwork.com/images/EC042017NF/103683s.jpg "Mini Glue Dots [ 103683 ]")
![Foam Adhesive Strips [ 141825 ]](https://assets1.tamsnetwork.com/images/EC042017NF/141825s.jpg "Foam Adhesive Strips [ 141825 ]")