Retiring · Zany Zoo

Zany Celebration

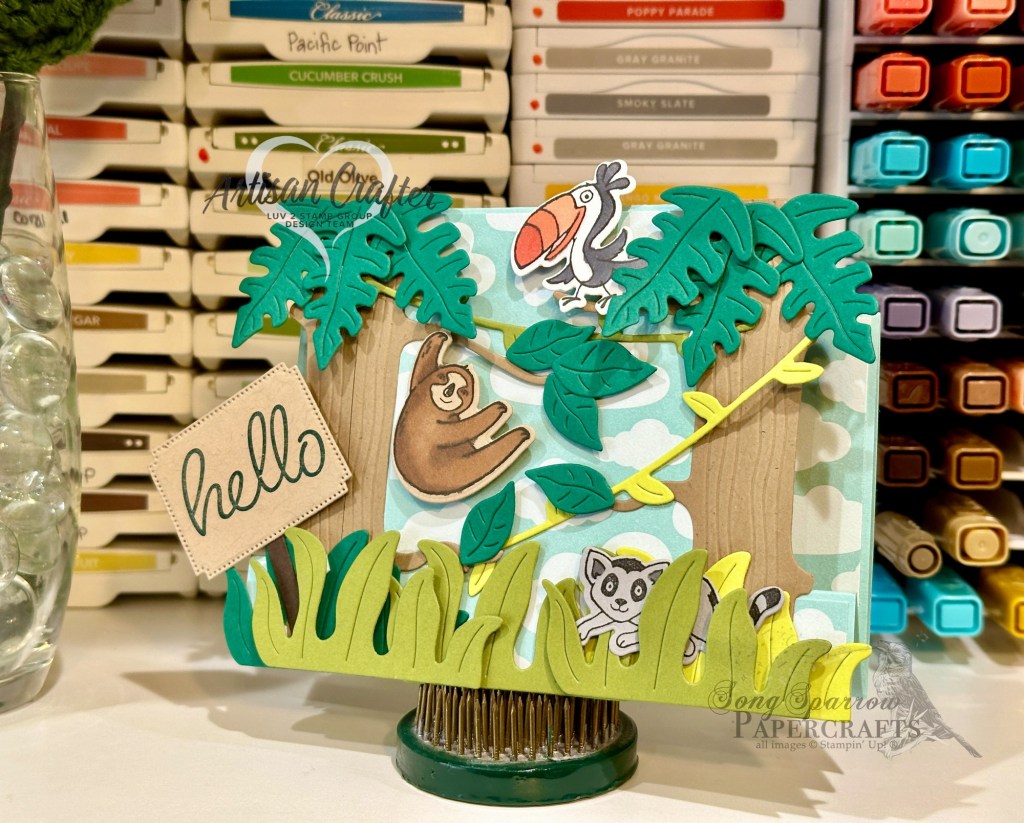
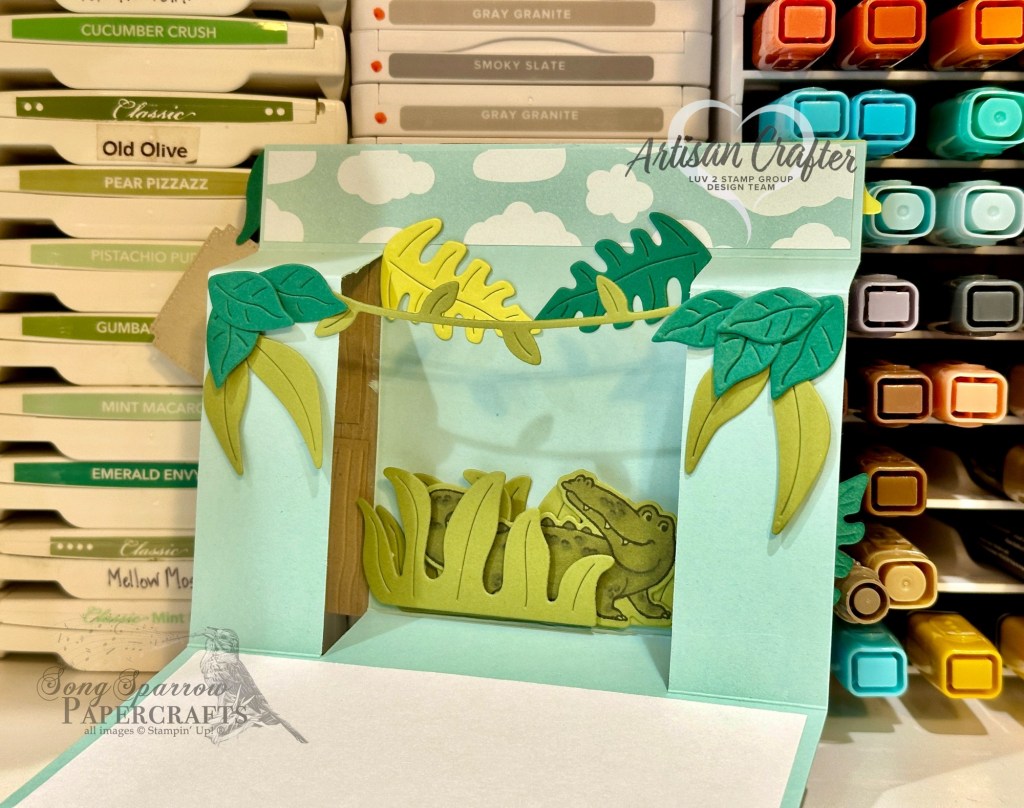
This week, we’re headed into the wild with the Zoo Crew. The Zany Zoo suite will be retiring with the current catalog, and I’m just a little sad about it. I love all of these fun critters and all of the many adventures they’ve had. So we’re tagging along for one last ride before the 2023-24 Annual Catalog retires.

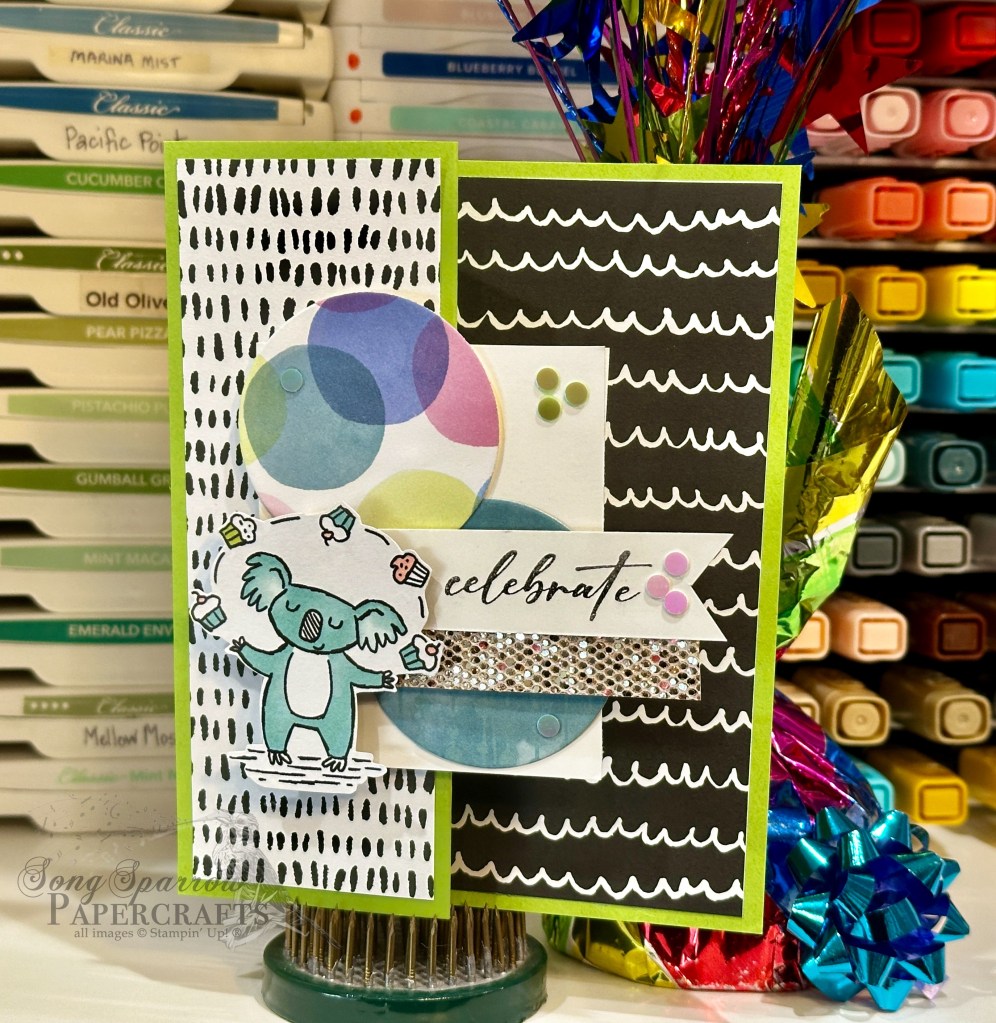
What better way to celebrate a birthday than with a juggling koala?! Today’s fun fold card begins with a base of Granny Apple Green cardstock. The Zoo Crew designer paper provides our neutral black and white base panels, as well as our main character on the focal panel. The focal panel consists of a small panel of white cardstock, along with two circles punched from Bright & Beautiful and Hello Irresistible designer paper packs. The sentiment from Something Fancy is stamped on white cardstock and then cut with paper snips into a banner. A small strip of More Dazzle specialty paper adds some sparkle. The koala is elevated on dimensionals to ensure it stands above the scene and draws the eye to the action. The iridescent discs bring the eye to our focal panel and add some visual interest.

Tune in tomorrow to see what our zoo friends get up to!

Products used in today’s card:
Granny Apple Green, Basic White cardstock
Zoo Crew, More Dazzle, Hello Irresistible, Bright & Beautiful DSP
Something Fancy stamps
Circle punch
Iridescent discs
Dimensionals
Adhesives

Clean and Simple · Fun Folds

Picked for You

This week, we’ll be frolicking in the meadows and stopping to smell a few flowers along the way. Stampin’ Up! has a whole host of papers and stamps that put us squarely in the middle of beautiful fields and fragrant flower patches. And we’re going to explore some of my favorites throughout this week.

We begin today with a new take on an old fun fold. I recently ran across the hidden barn fold design and knew I had to give it a try. Why is it called a hidden fold? When the card is completely closed, the two sections of the front panel meet, they make the center cut virtually disappear.

So our take on this card begins with a base of Blackberry Bliss cardstock. The focal panel consists of a bottom mat of Lost Lagoon soft shimmer paper that is diecut using the largest Perennial Postage die, followed by a layer of Highland Heather cut just a tick smaller, and finally with our section of Meandering Meadow designer paper on top. To accomplish the two perfect sections, I cut the shimmery layer in half after I diecut it. I adhered the DSP and Highland Heather mat together first before also cutting them in half with the trimmer. Then these three layers were adhered together before carefully adhering them in place on the card front so that they meet together perfectly at the center. The sentiment from Charming Sentiments is stamped on white cardstock and diecut using the smallest Thoughtful Expressions die. The sentiment mat is cut from Lost Lagoon shimmer paper. A twist of silver & white sheer ribbon and Lost Lagoon bordered ribbon are adhered in between the two sentiment layers. Using dimensionals, the sentiment is adhered to the left flap of the card front. I added a few purple fine shimmer gems for sparkle and to move the eye diagonally across the card front.

This particular design is super easy to put together. And by changing the color palette and DSP, each card has a completely different look. This is going to be a go-to design for me if I need to make a whole host of simple yet beautiful cards!

Tune in tomorrow as we explore the rolling Hills of Tuscany!

Products used in today’s card:
Blackberry Bliss, Highland Heather, Basic White cardstock
Meandering Meadow, Lost Lagoon soft shimmer DSP
Charming Sentiments stamps
Thoughtful Expressions, Perennial Postage dies
Silver & white sheer trim, Lost Lagoon bordered ribbon
Purple fine shimmer gems
Dimensionals
Adhesives

Fun Folds · Terrific Tuesdays · Tutorials

Terrific Tuesdays: Episode 13

Welcome to a new episode of Terrific Tuesdays, where each week we’ll explore new projects using some of the latest projects from Stampin’ Up! I know what you may be thinking….wait, it’s not Tuesday. And you’d be right. If you’ve followed me here or on any of the socials for the last several months, you may remember that I had to take a break due to a family emergency. And I want to take this opportunity to thank all of you for sticking around and waiting for my return. While I’m back to posting more regularly now, it will still be necessary for me to take breaks here and there as we continue to address some long-term medical needs.

But today, I’m bringing you a new Terrific Tuesdays video. Earlier this week, I shared a treat holder fun fold with a teaser that a video tutorial would be forthcoming and this is it! I walk you through this cute treat holder step-by-step and give you some pointers, i.e. lessons in avoiding mistakes that I learned the hard way! *wink* For those folks who like to watch and also follow along with written instructions, I’m including the PDF tutorial for FREE download.

I hope you enjoy this twist on our Terrific Tuesdays format!

All ads on this site are posted by WordPress.  Song Sparrow Papercrafts is not responsible for ad content.

Luv 2 Stamp Artisan Design Team

Field of Thanks

Our monthly Luv 2 Stamp Team challenge is to use all of our beautiful DSP — love it, chop it! As soon as I saw the beautiful Perennial Lavender designer series paper in the current mini catalog, it went in my cart. It’s just stunning in every possible way. It works well standing alone and pairs stunningly with the other products in the Perennial Lavender Suite.

For today’s card design, I opted to let the beautiful Perennial Lavender designer paper stand on its own. And I borrowed the corner fold-down technique from upline Patty Bennett to add a little interest and allow both sides of this gorgeous paper be able to shine on one design. A sheet of Blackberry Bliss cardstock serves as the base for this lovely card. I chose to mat the sheet of designer paper with a sheet of Pretty Peacock soft shimmer paper for a little added sparkle, particularly in the exposed corner. I thought the exposed corner was the perfect place to feature a paper butterfly from the Perennial Lavender Suite and help tease forward the little butterflies from the designer paper. The sentiment is stamped on white cardstock to coordinate with the white paper butterfly and then diecut using the Thoughtful Expressions dies. The Pretty Peacock & gold metallic ribbon provides the perfect backdrop for the sentiment and, along with the fine shimmer gems, brings sparkle to the bottom of the design, allowing the eye to pass easily diagonally across the card.

If you love beautiful cardstock as much as I do and also have a hard time cutting it, try finding layouts that allow the designer paper to take center stage. It makes using it the highlight of your crafting time!

Products used:
Blackberry Bliss, Basic White cardstock
Perennial Lavender, Soft shimmer DSP
Botanical Leaves stamps
Thoughtful Expressions dies
Paper butterflies
Fine shimmer gems
Pretty Peacock & gold metallic ribbon
Dimensionals
Adhesives

All ads on this site are posted by WordPress.  Song Sparrow Papercrafts is not responsible for ad content.

Fun Folds

Sprinkling of Love

The Bright Skies stamps and dies in the current Stampin’ Up! Mini catalog are some of my favorites because they allow you to make so many different cards for a variety of occasions. This is one of those sets that will remain in my stash even after the current mini catalog retires.

This card design uses a peek-through fun fold design to reveal the sentiment. And for me, the eye-catching twist on this fun fold is the use of the vellum.

This card is built on a base of Pretty Peacock. I removed 2 1/2-inches of the front panel to create the peek-through portion. A piece of the Sunny Days designer series paper serves as the base for the front panel. A sheet of vellum is diecut on each end using the Bright Skies cloud bank dies and then embossed with the Raindrops embossing folder. This vellum panel is adhered with dimensionals over the base. To create a variety of clouds, I stamped two of the four clouds on cardstock using the Bright Skies stamps and simply diecut two from colored cardstock. Dimensionals help create the cloud layers over the vellum.

The sentiment for this card is stamped in the inside message panel which is visible thanks to the peek-through panel we created with the front card panel. The little scene is created with the Bright Skies stamps and begins with the little hill of flowers. I used the back of one of the smaller clouds to stamp the hill and then filled in with the flower stems and tulips. And finished with the sentiment. A few foiled gems help the eye settle on the sentiment.

Peek-through designs are such a great way to dress the inside and outside of your cards at the same time.

Products used in today’s design:
Pretty Peacock, Shaded Spruce, Lost Lagoon, Smoky Slate, Basic White cardstock
Sunny Days DSP
Bright Skies stamps
Bright Skies dies
Gold foiled gems
Dimensionals
Adhesives

All ads on this site are posted by WordPress.  Song Sparrow Papercrafts is not responsible for ad content.

Luv 2 Stamp Artisan Design Team · Terrific Tuesdays

Jungle Hello

The Jungle Pals set is so fun to work with when you’re looking to build a scene. And for today’s card, I’m turning to one of my favorite fun folds — the Center Step fun fold.

I wanted to create a jungle scene with several of the adorable little jungle friends and especially wanted to have the sloth climbing between two trees on either side of the center section.

This fun fold design is built on a base of Pool party cardstock. I used the cloud pattern from the Sunny Days designer series paper pack to provide the background for the scene. I diecut two trees from Crumb Cake cardstock and placed them on either side of the pop up panel. This allows the space for the vines to run in the middle for the sloth. I used a combination of Shaded Spruce, Granny Apple Green, and Lemon Lime Twist for the greenery, vines, and leaves.

For a more realistic look for each of the animals within the scene, I diecut each of them from cardstock that would compliment their natural coloring. The sloth is stamped on Crumb Cake, the toucan on Basic White, and the lemur on Smoky Slate. Each one is colored with Stampin’ Blends to finish. The greeting from Heartfelt Hellos is stamped on Crumb Cake cardstock and diecut using the Autumn Leaves dies.

The inside of the card has its own adorable scene. I used the Sunny Days designer paper to provide a sky and used more of the leaves and vines to create a jungle scene. I tucked the alligator into the marshy weeds. He was stamped on Old Olive cardstock and then colored with Stampin’ Blends.

There are so many ways that you can use the Jungle Pals stamps and dies to create scenes. We’ll wrap up this week with another Jungle Pals scene building card tomorrow, so be sure you check back in!

Products used in today’s design:
Pool Party, Crumb Cake, Shaded Spruce, Granny Apple Green, Lemon Lime Twist, Smoky Slate, Early Espresso, Basic White cardstock
Sunny Days DSP
Jungle Pals, Heartfelt Hellos stamps
Jungle Pals, Autumn Leaves dies
Dimensionals
Adhesives

All ads on this site are posted by WordPress.  Song Sparrow Papercrafts is not responsible for ad content.

Terrific Tuesdays

No Terrific Tuesdays This Week

I have had to travel out of town unexpectedly, so I will not have a Terrific Tuesdays video for you this week. I will, however, still be bringing you some fun card designs with this week’s selected products.

This week, I’ll be featuring the Trusty Tools stamp set and the Jungle Pals bundle. The Jungle Pals stamps and dies are Sale-a-Bration items. The stamp set is available with 1 SAB credit, while the dies are available to you when you redeem 2 SAB credits. So while not quite a bundle in the traditional sense, they are a perfectly coordinated pair.

First up is this cute card using the Trusty Tools stamps and coordinating designer series paper. The Trusty Toolbox paper is another Sale-a-Bration item. This fun fold card begins with a base of standard sized Pebbled Path cardstock. We score in half and then another inch over to create this Book Binding Fold. The strip (or spine) created is adhered to the card base to finish the look.

I used the graph paper from the Trusty Tools paper pack to decorate the spine portion. I cut a sheet of the tool chest design to create the rolling tool chest. I opted to make it have four drawers and have cut an individual drawer and adhered with dimensionals in order to make it look as though the second drawer of the chest is open. The tools peeking out of the drawer were stamped with the Trusty Tools stamps, colored with Stampin’ Blends, and then cut out by hand. The tools are also adhered with dimensionals to give a more realistic look to the drawer. The sentiment is stamped centered above the tool chest with brushed metallic dots placed on either side.

This card speaks to a number of occasions and could easily be customized based on the sentiment placed on the inside message panel. Cute, right? And it really doesn’t take all that long to put together, which makes it easy to turn out a whole set in no time flat!

Products used in today’s design:
Pebbled Path, Basic White cardstock
Trusty Toolbox DSP
Trusty Tools stamps
Brushed metallic dots
Stampin’ Blends
Dimensionals
Adhesives

All ads on this site are posted by WordPress.  Song Sparrow Papercrafts is not responsible for ad content.

Sale-a-Bration · Terrific Tuesdays

Hello to Brighter Days

Today we’re continuing our tour of some Sale-a-Bration freebies. This week’s featured products are designer series paper packs. Did you know that Stampin’ Up! currently offers 7 different paper packs as Sale-a-Bration freebies? For the remainder of February, you can qualify for a FREE Sale-a-Bration credit with every $50 USD you spend. How cool is that?!

Today I’m bringing you a fun and funky design to show off the Sunny Days designer paper. This 12×12 paper pack includes a total of 12 cheerful designs across the 2-sided pages.

This card design is a modified Z-fold to allow for the greatest opportunity for a variety of paper patterns. The front-facing panels offer a simple and cheerful HELLO, while the full spread offers the complete message.

We start with a base of Pool Party cardstock and score in the center. To complete the Z-panel, the front panel is scored again at 2 1/2-inches. The front-facing panels are a combination of Softly Stippled and Sunny Days designer paper designs. The sentiment from the Sale-a-Bration set called Heartfelt Hellos is stamped on white cardstock and punched with the coordinating hexagon punch, along with the Real Red mats behind. The rainbow is constructed using circles diecut from cardstock using the Everyday Essentials dies and then cut in half with the paper trimmer.

Once the card is fully opened, the inside sentiment panel holds an adorable scene of two friends gazing at the rainbow. These cuties, along with the trees, are fussy cut from the Zoo Crew designer paper. The cloud is diecut from the Sunny Days paper using the coordinating Bright Skies die, while the sun is diecut from Crushed Curry. The sentiment is from the Bright Skies stamp set.

Interested in seeing each of the cards we made using 4 of the FREE Sale-a-Bration paper packs? Tune in to this week’s Terrific Tuesdays episode to catch them all!

Products used in today’s featured design:
Pool Party, Basic White, Real Red, Pumpkin Pie, Crushed Curry, Old Olive, Blueberry Bushel, Gorgeous Grape cardstoc
Sunny Days, Softly Stippled, Zoo Crew DSP
Heartfelt Hellos, Bright Skies stamps
Everyday Essentials, Bright Skies dies
Heartfelt Hexagon punch
Iridescent discs
Adhesive hearts & flowers
Stampin’ Blends
Dimensionals
Adhesives

All ads on this site are posted by WordPress.  Song Sparrow Papercrafts is not responsible for ad content.

Sale-a-Bration · Terrific Tuesdays

Congratulations on Retirement

This week is all about FREE paper. You heard that right! We’ve been making projects with free paper. Did you know that you can earn FREE product from Stampin’ Up! when you spend at least $50 USD this month? It’s called Sale-a-Bration and there’s a whole catalog full of items for you to choose from right now and thru the end of February!

Today’s card showcases the Sale-a-Bration designer series paper called Softly Stippled. This 12×12 pack, with its soft color palette and floral patterns, includes a total of 12 different designs on the two-sided sheets.

I designed this card for a team Mystery Packet challenge. The fun part of the team mystery packet challenge was figuring out how to use all of the components in the packet. I chose to make this Double Flap fun fold to showcase the beautiful coordinating floral patterns of the 2 sheets of Softly Stippled designer paper I received in my mystery packet, along with several other included elements.

The standard-sized base is made from a sheet of Lost Lagoon cardstock, which mats a slightly smaller sheet of the Softly Stippled designer paper. The smaller fold-over flap is a Basic White notecard. The outer-facing portion has been covered with a strip of the Pool Party floral DSP and serves as the base for the sentiment. The sentiment from Wonderful Thoughts is stamped on a tag (provided in my mystery packet) diecut using the Tailor Made Tags set. A strip of Pretty Peacock & Gold metallic ribbon and a few foiled gems finish off the front nicely.

To dress the inside of the small fold-over panel, I used the leftover portion of the Pool Party floral pattern in the center of the notecard. A piece of the Pretty Peacock ribbon serves as the mat for a small strip of the other coordinating floral pattern. The inside sentiment panel is stamped with a combination of stamps from Wonderful Thoughts and Gone Fishing and finished with some Pretty Peacock sequins.

I love the opportunity to get creative with products, like participating in this mystery packet challenge. Do you ever participate in challenges or events like this?

Interested in seeing the 4 cards we made using some current Sale-a-Bration designer series papers? You can check them all out in this week’s episode of Terrific Tuesdays!

Products used in today’s featured design:
Lost Lagoon, Basic White cardstock
Softly Stippled DSP
Wonderful Thoughts, Gone Fishing stamps
Tailor Made Tags dies
Pretty Peacock & Gold metallic ribbon
Pretty Peacock foiled gems
Sequins trio
Dimensionals
Adhesives

All ads on this site are posted by WordPress.  Song Sparrow Papercrafts is not responsible for ad content.

Sale-a-Bration · Terrific Tuesdays

Dad’s the Best

This week we’re taking a closer look at several of the FREE designer series paper packs available with a qualifying order between now and the end of February during Sale-a-Bration. Today’s designs are all about the dudes as we make some cool cards using the Trusty Tools designer paper.

Today’s post includes not one but TWO cards because these are designs I made for my dad’s birthday. As soon as I saw the Trusty Tools paper in the Sale-a-Bration catalog, I knew exactly who I would be designing cards for! My dad is a handyman and I grew up doing all sorts of projects with him using his favorite tools. Needless to say, I know my way around a toolbox and my husband is thankful for that everytime we take on a DIY project at home. *grin*

This adorable notecard accompanied my dad’s gift. A Basic White notecard serves as the base for this design. To get the most out of a quarter-sheet of Trusty Tools designer paper, I decided to make this a fun fold. That’s right, even smaller cards can be fun fold cards! I fussy cut a bunch of tools from the sheet of paper, including several of the ones on the edges because they’re perfect for the edges of the notecard. I combined the hammer and screwdriver patterns on the front of the notecard and covered them with some of the tools. 

I diecut a piece of Coastal Cabana cardstock with a Deckled Rectangles die to make the fold-over panel. The front-facing portion holds the sentiment from the coordinating Trusty Tool stamp set which is stamped on white cardstock diecut with the Radiating Stitches dies. A few additional tools are added to this panel and finished with classic matte dots. The fold-out portion is covered with Trusty Tools paper and a hand-cut screwdriver.

This fun card went by snail mail to arrive ON my dad’s birthday because who doesn’t love to get mail on their birthday?! We start with a base of Crushed Curry cardstock. I used the remaining portion of the quarter-sheet of the screwdriver print to serve as the decorative base for the card front. The argyle pieces are diecut from the Coastal Cabana cardstock (so that the two card designs coordinate). I chose to use the Happy Birthday abbreviation (HBD) as the center of the ribbon, which has been diecut from white cardstock and Pretty Peacock soft shimmer paper using Nested Essentials and All That dies. I tucked the remaining hand-cut tools behind. The classic matte dots give a more realistic look to the pliers and channel locks. 

If you missed this week’s Terrific Tuesdays episode, we made 4 cards together using 4 different Sale-a-Bration papers. And there’s still time to check it out here!

Products used in today’s notecard:
Basic White, Coastal Cabana cardstock
Trusty Tools DSP
Trusty Tools stamps
Deckled Rectangles, Radiating Stitches dies
Classic matte dots
Dimensionals
Adhesives

Products used in today’s card:
Crushed Curry, Coastal Cabana, Basic White cardstock
Trusty Tools, Soft shimmer, Gold foil DSP
All That, Nested Essentials, Alphabet a la Mode dies
Classic matte dots
Brushed metallic dots
Dimensionals
Adhesives

All ads on this site are posted by WordPress.  Song Sparrow Papercrafts is not responsible for ad content.