Christmas · Holiday Mini Catalog · Sketchy Fridays

Sketchy Fridays: Take a Bow, Frosty

Welcome to Friday, everyone! This week, we’ve been All About Christmas and have been taking a tour through all of the fun holiday products that Stampin’ Up! offers.

Today is another installment of Sketchy Fridays, where each week we’ll be using a card sketch to design our featured card. Right now, we’re working through a full series of designs using the card sketches found on page 22 of the current Stampin’ Up! Annual Catalog.

This week’s card is based on Sketch #17 and features the snowman from the Filled With Cheer stamp set and the fun Take a Bow designer series paper in the new Stampin’ Up! Holiday Mini catalog.

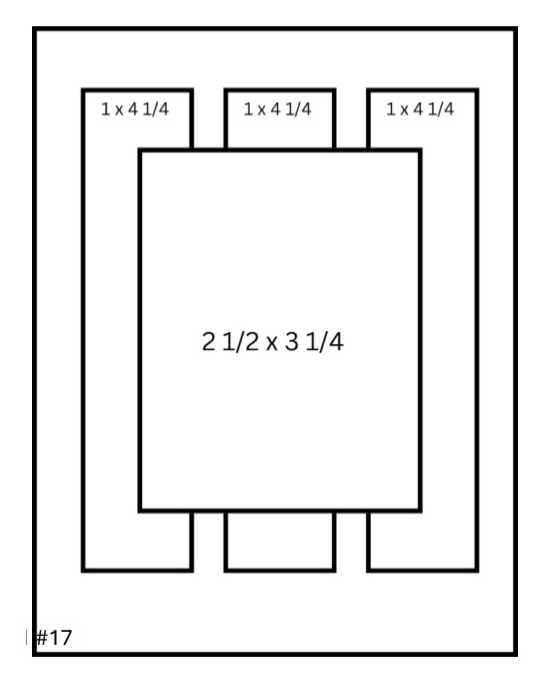
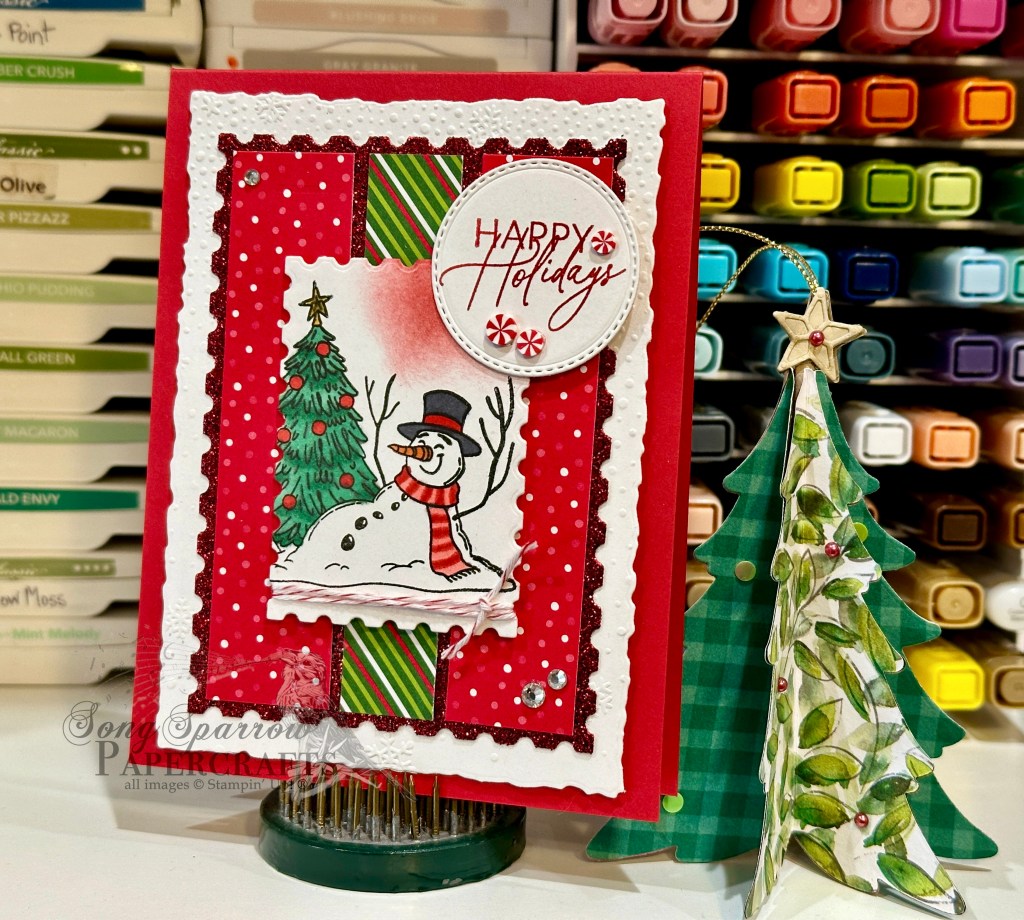
We get started with a base of Real Red cardstock. I chose a sheet of the new Take a Bow designer series paper for the strip elements in the sketch and used both sides of one sheet of paper. I felt like the focal panel needed to be more than simple strips of patterned paper and this is where I chose to add two additional layers to bring everything together. I used some of the red Festive glimmer paper as the mat immediately behind our paper strips, and this mat is cut using the Perennial Postage die. And then to help the whole focal panel pop against our card base, I added a mat of white cardstock that has been diecut with the Deckled Rectangle die and then embossed using the Snowflake Sky embossing folder. Our focal panel is stamped with the snowman from the Filled With Cheer stamp set and then diecut with the Perennial Postage dies so that we’re just capturing the snowman and Christmas tree. The snowman is colored with Stampin’ Blends. Red and white baker’s twine is twisted around the bottom of our panel to tie everything together (no pun intended). The top-right edge of our panel is lightly sponged with Real Red ink to create a nice backdrop for our separate sentiment panel. The sentiment from Greetings of the Season is stamped in red on white cardstock and then diecut with the circle die from Changing Leaves and then adhered over our sponged focal panel corner. The focal panel is adhered to the backdrop with dimensionals. A few peppermints and rhinestones finish things off and help draw the eye across and to the more important elements on our card.

I love sketches because they give me a great place to get started. Sometimes I stick to a sketch just as it is. And other times, like today, I venture just a tiny bit outside the lines. I really love the simplicity of today’s sketch, but as I started working with it in conjunction with all of the elements in today’s card design, I felt like we needed a few extra layers to be sure everything works together but also, and more importantly, to ensure that all of the elements really pop.

Tomorrow we’re revisiting a few old favorites as we make our way through the enchanted Christmas forest. I hope you’ll pop by and check it out!

Products used in today’s card:
Real Red, Basic White cardstock
Take a Bow, Festive glimmer DSP
Filled With Cheer, Greetings of the Season stamps
Stampin’ Blends
Snowflake Sky embossing folder
Perennial Postage, Deckled Rectangles, Changing Leaves dies
Red & white twine
Peppermints
Rhinestones
Dimensionals
Adhesives

Product List
Winter

Warm Hello

I hope you’re having as much fun with the wintery designs as I am this week! Ordinarily, I would be escaping the Texas heat by dreaming of winter, but we continue to enjoy unseasonably cool, spring-like weather here in North Texas and I’m not complaining a bit!

Today, we’re learning a new fun fold to build this super cute snowy scene using Merriest Trees and the new Online Exclusive stamp set called Filled With Cheer. The double easel fold is a cute way to showcase sets that create scenes or just to draw attention to beautiful patterned paper and a sentiment.

We get started on today’s snowy scene with a standard card base of Lost Lagoon cardstock. In this case, we’re cutting the base so that our center fold is oriented at the top of the portrait-oriented design. Our double easel is created with a sheet of Pretty Peacock, which also serves as the mat for our patterned paper on each front-facing panel. The small tree patterned sheet from the Winter Meadow designer series paper pack is our backdrop for this snowy scene. Our tree is diecut from Pretty Peacock cardstock using the Merriest Trees dies, which are designed to layer on top of one another to create the look of a fluffy evergreen tree. Layers of dimensionals help provide our fluffy look even after our card has made its trek through the mail. A dab of Wink of Stella across the bottom of each layer of branches adds some twinkle. The snowman from Filled With Cheer is stamped on white cardstock and is then separated from the remaining portion of the stamped scene with paper snips. A touch of color is added to the hat, scarf, and nose of the snowman using Stampin’ Blends. The snowman is adhered on top with layers of dimensionals to ensure he stands out against the background elements. I chose the “warm hello” sentiment from Filled With Cheer and stamped in Versamark on the snowy vellum sheet from the Graceful Greenery vellum pack. It’s then covered with white embossing powder and heat embossed. I just loved the play on words with the melting snowman. *grin* The transparent dots serve as cover for the dimensionals under the sentiment but also serve as subtle snowflakes across the card front.

Isn’t this just the cutest scene?! Today’s card is a part of the Luv 2 Stamp Group Instagram Hop, which goes live at 9 AM Pacific Time (PST)Click here to head over to my Instagram feed and check out what the other demos in our L2S Group have created for you today!

Want to see this card come together from start to finish? You can watch the full Terrific Tuesdays video tutorial. I’ve also added a FREE printable tutorial. Click here to download the PDF.

Products used in this card:
Lost Lagoon, Pretty Peacock, Basic White cardstock
Winter Meadow, Graceful Greenery vellum DSP
Filled With Cheer stamps
Merriest Trees, Spotlight on Nature dies
Embossing powder
Stampin’ Blends
Wink of Stella
Transparent dots
Dimensionals
Adhesives

Product List
Holidays · Winter

Loads of Cheer

We’re already halfway through this week, everyone. Can you believe it?! This week, we’re taking a look at some recently released Stampin’ Up! products, and a few more seasoned sets, that make us think of much cooler and more festive occasions. And today’s featured product is a new Online Exclusive stamp and die bundle called Filled With Cheer. This set coordinates with an earlier release called Filled With Fun.

So our card today is combining the festive Filled With Cheer bundle with the Merriest Trees stamp set to create this really fun gift-filled scene. I also used a few leftover pieces from diecutting the base of the sled for yesterday’s card. Did you know that the negative space pieces for the sled base are perfect little squares and rectangles? And that gave me an idea. So let’s get started on our card.

We start with a card base of Pool Party cardstock. On the bottom-left corner, I stamped the largest tree from the Merriest Trees stamp set in Shaded Spruce ink and then stamped the detail stamp on top in Versamark. I applied gold embossing powder and then heat embossed the tree. The ink on the tree was still a little wet, so I had extra powder coverage that I hadn’t necessarily intended but decided to keep because I like how it looks like a flocked tree. Using the leftover pieces from the sled diecut from yesterday’s card, I wrapped ribbon around each and placed a bow on top to make packages. To give the effect of snow on the ground, we use the snowy sheet of vellum from the Graceful Greenery vellum pack and diecut using the cloud die from the Bright Skies die set. When adhering, we add dimensionals on some pieces to add depth to the scene and then nestle the packages amongst the snow drifts across the front.

Our wagonload of gifts uses the new Filled With Cheer set. On Crumb Cake cardstock, stamp the wagon from the set and then color using Stampin’ Blends. I chose to use Cherry Cobbler and Crumb Cake. Diecut the wagon using the Filled With Fun dies. On Very Vanilla cardstock, stamp the package and poinsettia image and then color with Stampin’ Blends. For the poinsettias, I used a combination of Cherry Cobbler, Shaded Spruce, and Pumpkin Pie and then for the package ribbons, I used Pretty Peacock and Night of Navy. Using paper snips, we’ll cut closely around the image and then adhere to the wagon so be sure you leave a long tab at the bottom of the image. I diecut the handle and wagon wheels from black cardstock and the hub caps from a scrap of woodgrain from Country Woods. The wagon is adhered with dimensionals with the placement to look like you’ve just wheeled up a wagonload of goodies to the tree. Our sentiment and strings of lights from Filled With Cheer are stamped on Very Vanilla cardstock. The lights are colored with Stampin’ Blends. The sentiment is then diecut using the long banner from the Greetings of the Season die set and the lights using the banner die from Filled With Fun. I finished things off with a scattering of white sequins to look like snow.

Isn’t this such a fun combination? I remember the excitement of our big family Christmas gathering when everyone brought packages inside to place under the tree. While we didn’t use a wagon to haul the gifts, sometimes we should have! *wink* Tomorrow, we’re going to be frolicking with Frosty with a new fun fold. I hope you’ll pop by and join in the fun!

Good news for anyone who didn’t get an order placed yesterday. Stampin’ Up! has extended the free shipping special thru end of day TODAY. So now is the perfect time to stock up on all of the items on your shopping list because a $75 order (and above) qualifies for FREE shipping and for every $50 you spend you earn a bonus coupon to spend in August. But don’t delay — the sale ends today!

Products used in today’s card:
Pool Party, Crumb Cake, Basic Black, Very Vanilla cardstock
Country Woods, Gold Foil, Graceful Greenery vellum DSP
Filled With Cheer, Merriest Trees stamps
Filled With Fun, Sophisticated Sled, Bright Skies, Greetings of the Season dies
Gold embossing powder
Stampin’ Blends
Gold & silver trim
Blooming pearls, neutrals sequins
Dimensionals
Adhesives

Product List