January Mini Catalog

Filled With Happiness

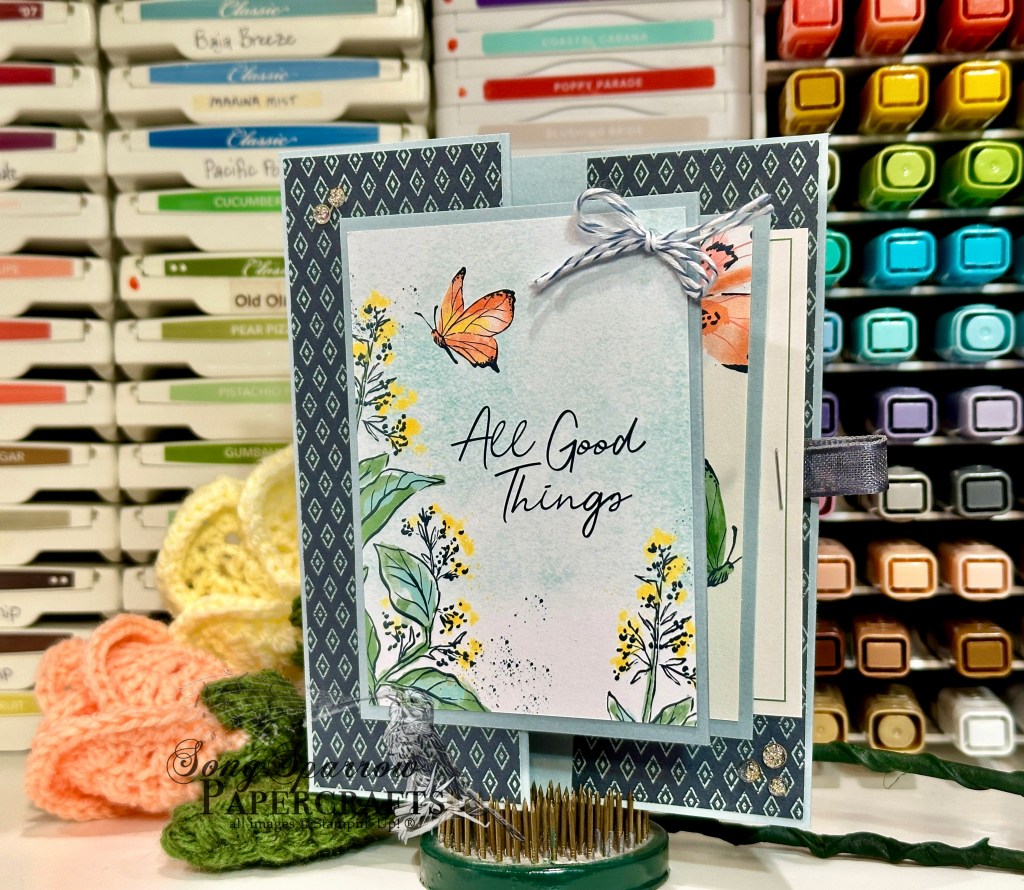
Welcome back for today’s bonus post! This week, we’re working with the new Memories & More card set from Stampin’ Up! called Days Like This. These notecards come in two sizes — 3×4 and 4×6 — and they can make it super easy to put a card together in a flash. And today’s bonus card is a perfect example of how you can do just that!

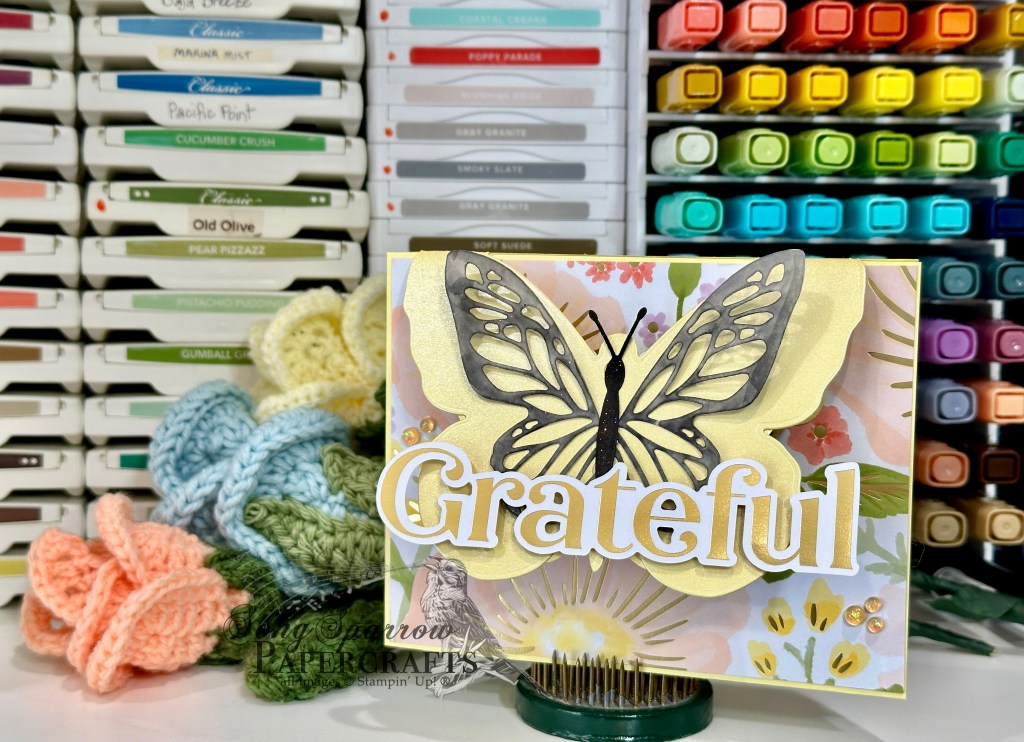
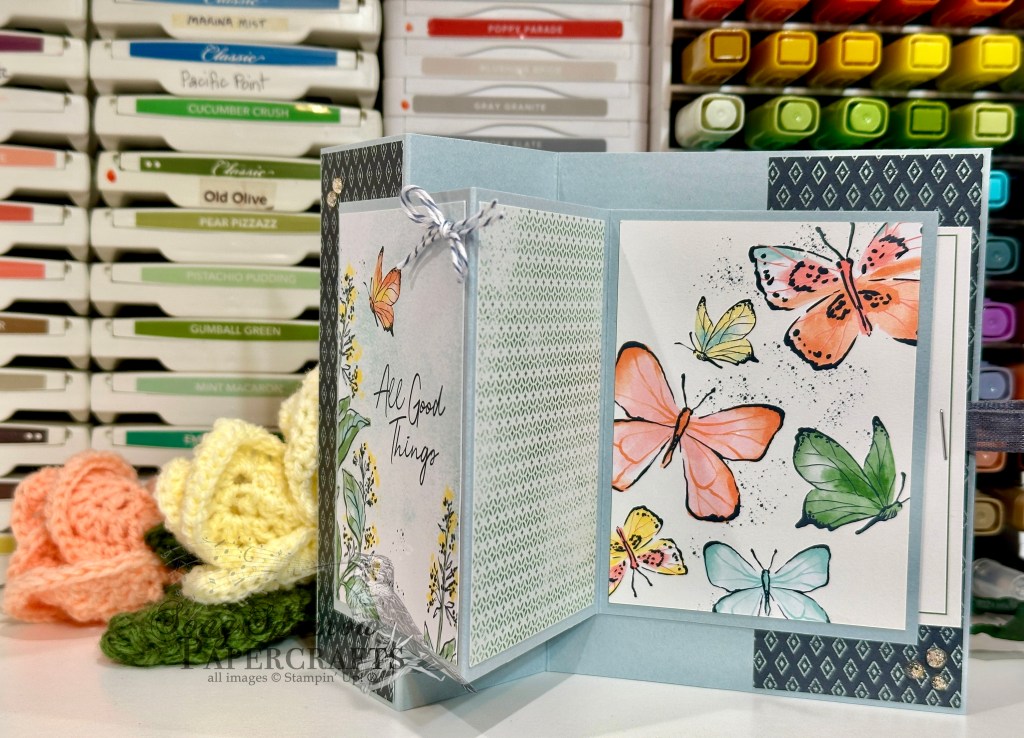
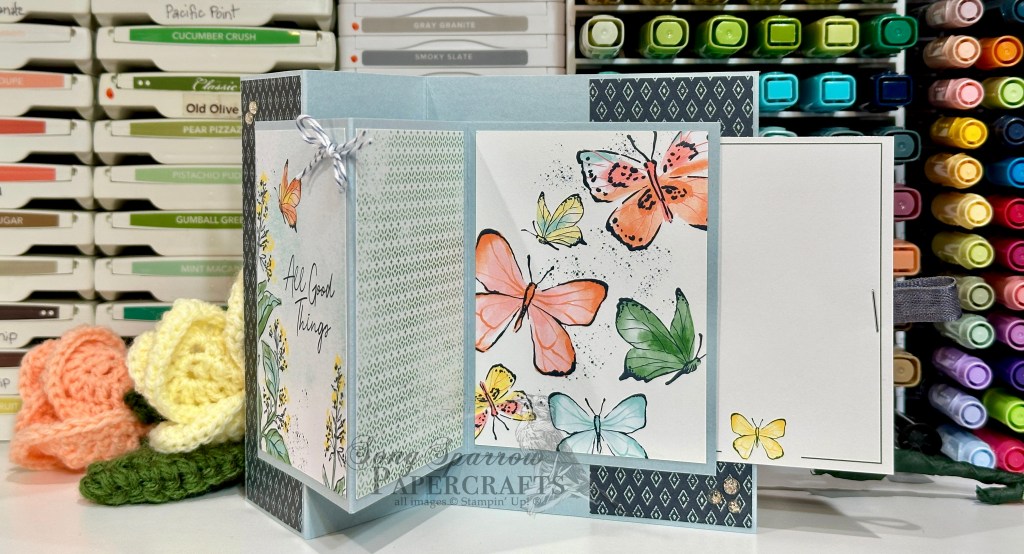
This card starts with a base of white cardstock. We use one of the 4×6 cards from the Days Like This pack and cut it down to size to serve as the backdrop for our focal panel. Using the largest banner die from the Stylish Shapes set, we cut out the sentiment from our backdrop panel before we adhere the background panel to the card front. To help our sentiment stand out and to add a bit more color to our design, we cut a rectangle from the small butterfly-patterned card with the Textured Notes Dies using the extension method. This rectangular piece is adhered over the cut-out in our background panel and adhered with dimensionals over it. Then we add our sentiment panel on top with dimensionals. I cut out the butterfly from a scrap of one of the smaller 3×4 cards I still had on hand and added some Wink of Stella and then tucked it behind the right-hand corner of the sentiment. I grabbed a few of the gold foil hearts from the Unforgettable Times ephemera pack and added them around the sentiment panel and finished things off with a few opal rounds and just a touch of Wink of Stella on the butterfly on our backdrop.

This one comes together in less than 5 minutes and is the perfect way to spread a little handmade kindness to someone who might need a little pick-me-up. Next week, we’re going to use the crafty stash to create more masculine designs. It’s going to be fun to pull together new & less-new products to make some projects for the fellas. I hope you’ll drop by and check them all out!

Product List
Fun Folds · January Mini Catalog

Grateful Forever

Welcome in, crafty friends, on this frigid Saturday! We had a brief warm-up yesterday with temps well above freezing and today we’re back down in the low 20s. We’re thankful for the brief period of time we had to thaw out from all of the ice and snow Winter Storm Fern left us. And we’re praying for all of those in the areas that are still in the midst of the freeze and are without power and basic utilities. Having been there during Winter Storm Uri back in 2021, we personally know all too well what that is like!

We’re continuing our design series using the new Days Like This Memories & More card pack from Stampin’ Up! I love having at least one set of Memories & More cards on hand for those times when I need to make a quick card for a specific occasion. Today we’re using the Beautiful Butterflies dies and Lovely & Beautiful paper to make a fun fold card. Our Memories & More cards are perfect for the finishing touches on the inside of our card. Let’s see how this one comes together.

We get started with a base of Lemon Lolly cardstock on a standard A2 card base. We’re using a sheet of the Lovely & Beautiful patterned paper as the backdrop for our card front. The front panel focal panel is a fold-over panel of Lemon Lolly shimmer paper cut using the Beautiful Butterflies dies. This fold-over panel is cut just large enough to give us our butterfly shape for the front with about a half-inch strip to adhere to the inside panel of our card. Our butterfly details are made from vellum and black cardstock cut with the Beautiful Butterflies dies. The vellum is colored with the black Stampin’ Blend and then a layer of Wink of Stella is added to both pieces for some nice subtle twinkle. The detail pieces are adhered to the butterfly panel with glue dots. The front-facing part of our sentiment is the word grateful from the Unforgettable Times ephemera pack and is adhered at the base of the fold-over butterfly panel with several layers of dimensionals. I added some clear opal rounds on either side of the butterfly panel to draw the eye in to our front focal section.

When you lift the butterfly panel, lots of extra detail is revealed, including the second portion of our sentiment. I used the hybrid embossing folder to cut a detail butterfly from the Lemon Lolly glimmer paper and adhered it to the back of the fold-over panel. I love this hidden detail and it makes the butterfly more realistic because there’s a front and back view to their wings, after all. I cut a smaller butterfly from the hybrid embossing folder panel and used gold foil to add the details to coordinate with the gold foil forever sentiment from the Unforgettable Times ephemera pack. A small bow tied from the black & gold baker’s twine ties the two sentiment panels together.

We open our card to reveal our sentiment panel — complete with additional butterfly detailing. Here we’re using our Memories & More cards to add the finishing touches to the inside of our card. A larger 4×6 card from the pack serves as the patterned panel for the left-hand side of the message panel. I had a scrap of one of the smaller 3×4 butterfly cards left in my stash, and I cut out one of the butterflies to add to the corner of the patterned sheet. We use half of the more subtle butterfly-patterned 3×4 card to decorate the message panel. A few Peach Pie pearls finish off the opposing corners of the inside panels.

I love how each of the panels of this card reveals a fun surprise. And while it looks like a super complicated design, it really comes together quickly thanks to beautiful paper and Memories & More cards. I have a super quick & easy bonus card to bring you this evening once I knock out today’s around-the-house to-do list. I hope you’ll drop back by to check it out.

Product List
January Mini Catalog · L2S Group Instahop

Smiles and Laughter

Howdy, everyone! Anybody know what day it is? I say that because the kiddos are once again out of school today due to the weather and we have all completely lost track of what day it is! Good news tho — temps have hovered just above freezing overnight so we’re expecting all of our slick roadways to completely thaw today so the kiddos can return to school tomorrow. Fingers crossed anyway!

This week we’re having fun with the new Days Like This Memories & More card pack that just released in the Stampin’ Up! January Mini catalog. Today we’re pairing it up with the new Lovely & Beautiful paper and Beautiful Butterflies dies to finish off the message panel of our card. Let’s see how it all comes together.

We get started with a base of Pool Party cardstock. Our card front begins with the larger floral pattern foil sheet from the Lovely & Beautiful patterned paper pack. The sentiment from the Lovely Arrangements stamp set is stamped in a combination of Versamark and Pretty Peacock and then heat embossed with clear embossing powder. We use the smaller banner die from the Stylish Shapes die set to cut out the sentiment using the extension method to get the full sentiment and a little border. The sentiment panel is adhered over a faux bow of black & gold bakers twine using dimensionals. Now we work on our sparkly butterflies. The detail portion of each set of butterfly wings is cut from Pool Party shimmer paper using the Beautiful Butterflies dies. The larger wings are cut from vellum that is covered with Wink of Stella. Each butterfly body is cut from black cardstock that is covered with Wink of Stella. We assemble our butterflies with glue dots and then adhere them to our card front on either side of the sentiment panel using varying layers of dimensionals. And just look at how those butterflies sparkle thanks to our shimmer paper and Wink of Stella! We finish off our card front with some of the white opal rounds.

Our message panel is where our Days Like This cards come to our aid. We use one of the larger 4×6 panels as the base layer and the grid pattern is perfect for writing a nice straight message. I used a leftover scrap of the reverse side of the large base panel as the detail piece on the left-hand side. We tie together our butterfly theme between front and inside panels by adding a touch of Wink of Stella to the small butterfly in our side accent panel. The inside sentiment is diecut from one of the smaller 3×4 cards in the Days Like This pack using the Nested Essentials banner dies. We finish off our inside message panel with a few yellow opal rounds.

Today’s card is a part of the Luv 2 Stamp Group Instagram Hop, which goes live at 9 AM Pacific Time (PST).  Click here to head over to my Instagram feed at 9 AM Pacific/11 AM Central and check out what the other demos in our L2S Group have created for you today! 

Product List
January Mini Catalog

Happy Day

We’ve made it to the midweek, friends! For us here in North Texas, where everything is still covered in a thick sheet of ice, that’s kinda saying something. Kiddos are out of school again today, and it’s a good thing given the current conditions. The sun is shining bright and we’re supposed to get above freezing today, so we will see if we have greater success than yesterday at thawing out.

This week, we’re using the new Days Like This Memories & More card pack to design our projects. And today’s card is another clean & simple design where we’re using a few dies, some patterned paper, and the new pack of Unforgettable Times ephemera to create a bright and happy card. (See what I did there? *wink*)

We get started with a base of Basic White cardstock that sits under all of our pretty patterns. A sheet of the green Pleasant Patterns foiled paper serves as the backdrop for our Days Like This card covered in butterflies that has been sized down using the Perennial Postage dies. We wrap some white with gold ribbon around the center of the butterfly panel before adhering to the card front with dimensionals. To help the sentiment from the Unforgettable Times ephemera pack really pop against the busy butterfly background (whew — that was a lot of Bs!), I cut a circle of vellum with the Spotlight on Nature Dies to break up the pattern just a bit. Both the sentiment and circle panel are adhered to the card front over the ribbon with dimensionals. I added a combo of green and pink In Color pearls on and around the sentiment.

This easy peasy card makes me happy just looking at it! It will be sure to brighten someone’s day, don’t you think? I hope you’ll tune in tomorrow when we pair the Days Like This cards with the Beautiful Butterflies bundle. It’s sure to make your heart flutter!

Product List
Fun Folds · January Mini Catalog · Online Exclusives

All Good Things

Howdy, friends, and welcome back on this bright & shiny Tuesday. We’re still frozen in under a pretty thick layer of ice here in North Texas, and it’s Day 2 of no school. That may sound a little strange to anyone who lives in a colder climate, but we don’t get very many days of ice or snow in winter so we’re not prepared to handle it. And we have a blanket of solid ice without any associated traction, so roads are a mess at best. But the goodness is that we’re finally expected to get above freezing this afternoon and should experience some thawing. Will it be enough to get us all back to work & school tomorrow? Well, that remains to be seen. But for now, I’m enjoying a beautiful sunrise out my craft room window.

This week, we’re using the new Days Like This Memories & More cards to create our projects. This pack contains a combination of 3×4 and 4×6 decorative cards that could be used for scrapbook pages or for cards and other projects. And today we’re using the smaller cards to create a double Z fun fold card.

I’m using a standard A2 card base (4.25 x 5.5-inch card front) for today’s card because I prefer to keep things sized so they’re easy to mail, but you might decide to size up to have the scale of the smaller Z-panel be more in line with the overall card size. We’re getting started with a base of Cloud Cover cardstock. We’re going to score as usual in the center to create a standard card base and then score again in the center of the front panel to create our base Z-fold. I used a scrap of Lovely Blossoms patterned paper to create the two 2-inch panels for the smaller front Z-flap and inside peek-through panel.

Then we start working on our focal Z-panel, which is a little smaller. I sized the Cloud Cover base so that none of the small cards from the Days Like This card pack had to be cut down. I wanted to preserve all of the pretty details of each of the patterns selected — the front sentiment panel, middle pattern, and inside butterflies. Caveat: this does impact how much you’re able to open the card — it will not lie flat when open. (Side note: I need to work on some kind of sliding mechanism for the next one I make like this.) To preserve all of the pretty card details means that our message panel — a blank card with tiny butterfly detail on the bottom — is a hidden, pull-out element. I used a piece of the Secret Sea bordered ribbon and stabled it in place to serve as the pull-out tab for the message panel. Some Wink of Stella on the smaller butterflies in each of the panels adds some twinkly interest, along with the Cloud Cover baker’s twine from the 2025 Advent Calendar and a few iridescent foil gems.

Today’s design is definitely a craft on the fly design, and there are a few things that I would change if I had taken more time. But sometimes the fun part of the creative process is just following an idea all the way through and seeing how it turns out. Do you ever just let yourself run with idea?

I hope you’ll tune in tomorrow for another look at the Days Like This Memories & More cards.

Product List
January Mini Catalog · Online Exclusives

Celebrate Days Like This

Happy Monday, crafty friends! Is it cold where you are today? We’re experiencing super cold temps here in North Texas as Winter Storm Fern has left a cold air mass in place. All of the sleet and snow that fell over the weekend is solidly frozen in place and a perfect slippery ice rink for the kiddos to play in. On days like this, I like to stay warm and craft. What about you?

Speaking of days like this, this week we’re beginning a new design series incorporating the new Memories & More pack called Days Like This. The pack includes a mix of 3×4 and 4×6 cards with an assortment of spring(ish) designs. Pair it up with some patterned paper, like I have a here, and add a sentiment, like this one from the Unforgettable Times ephemera pack and you’ve got a super quick — and cute — design!

We get started with a base of white cardstock, which isn’t visible on our card front. A full quarter panel of a sheet of the Lovely Blossoms paper serves as the backdrop by our large focal panel. I used one of the larger cards from the Days Like This card pack as the focal panel and matted it with Pool Party shimmer paper. The panel is wrapped with white & gold baker’s twine at the top, and then we adhere our sentiment from the Unforgettable Times ephemera pack on top with dimensionals. The full focal panel is adhered to the card front with dimensionals, as well. We finish things off with a touch of sparkle with some iridescent foil gems.

You could celebrate all kinds of occasions with this card, making it a good all-around design to have in the stash. I hope you’ll drop in tomorrow to see more of the Days Like This Memories & More pack.

Product List