Christmas

In the Trees

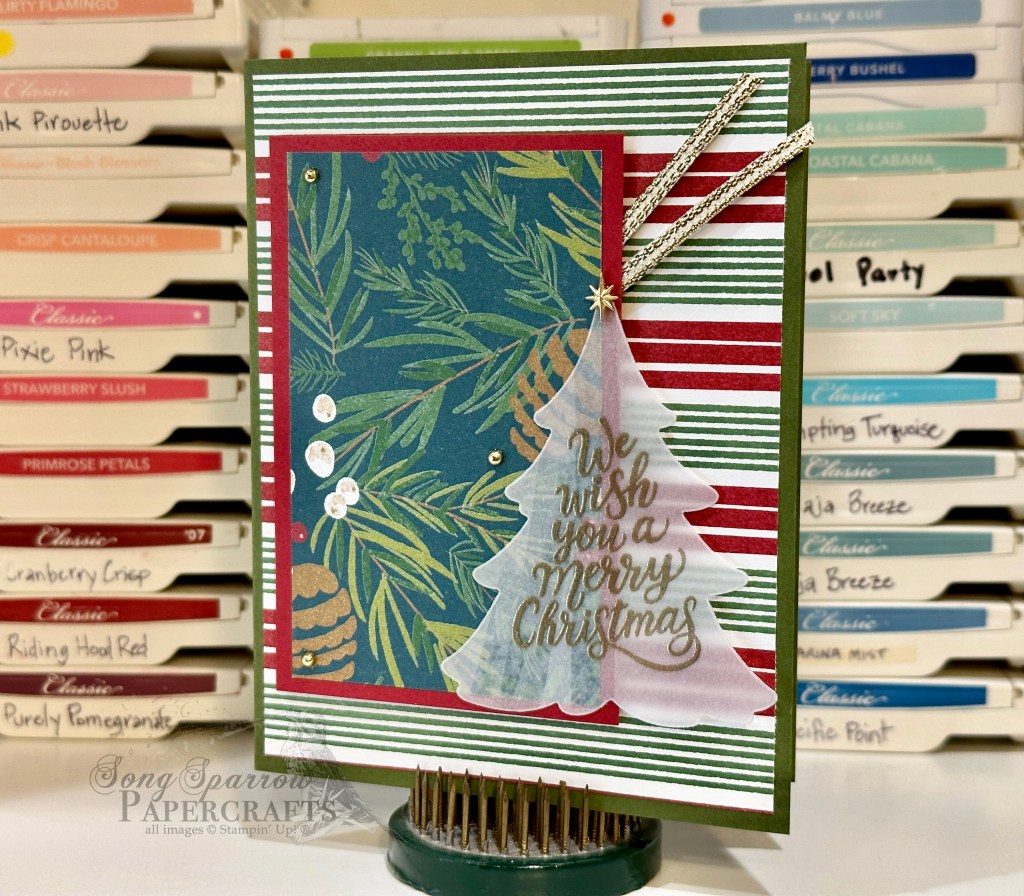
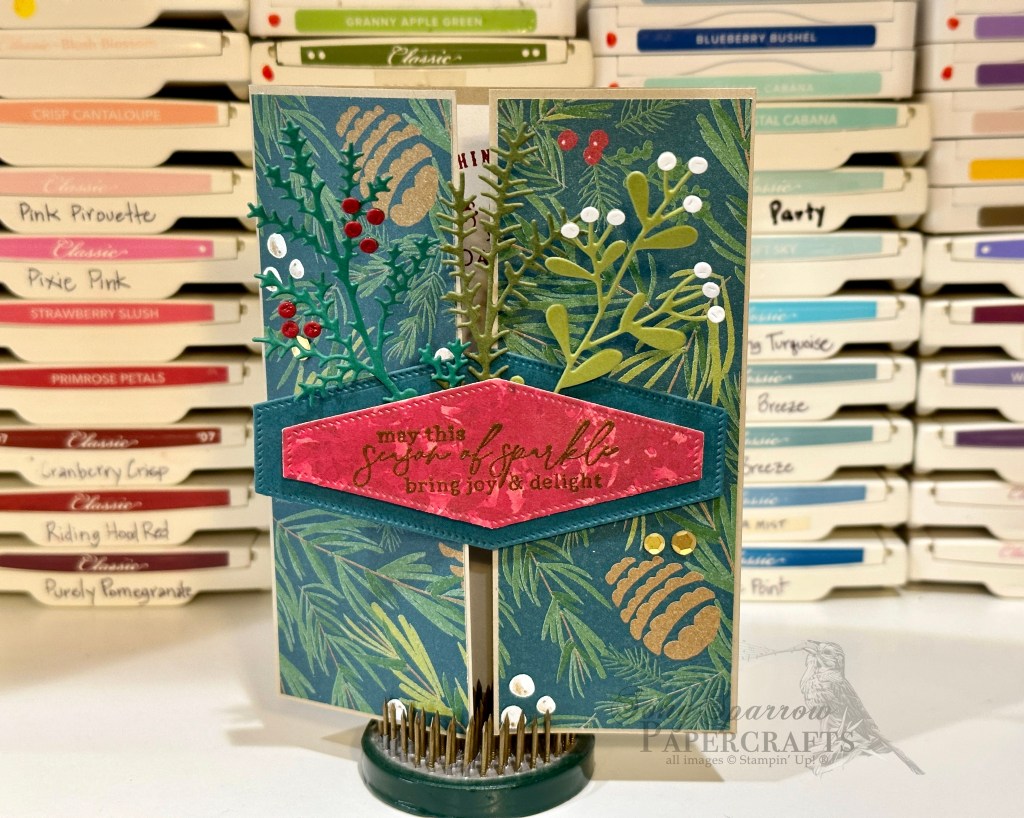
I ran across a super cute layout by Stamp It Up With Jaimie on one of my recent strolls through my Instagram feed. I loved the funky layout and how she brought out the Old Olive in the tree pattern from A Walk in the Forest designer paper. And isn’t there something about imitation is the best form of flattery?

I changed up a few of the elements from the inspiration design to fit with the supplies in my stash. I started with a card base of basic white cardstock. The Old Olive is cut to cover the entirety of the card front and is embossed using a retired snowflake embossing folder. The tree pattern is matted by Pretty Peacock while the evergreen pattern is mounted on white. The sentiment is embossed in gold on a white panel diecut using the All That dies and the panel sits atop a folded bunch of natural finish ribbon. A few faceted gems scattered about give a pop of sparkle and complete the visual triangle around the focal point of the card design.

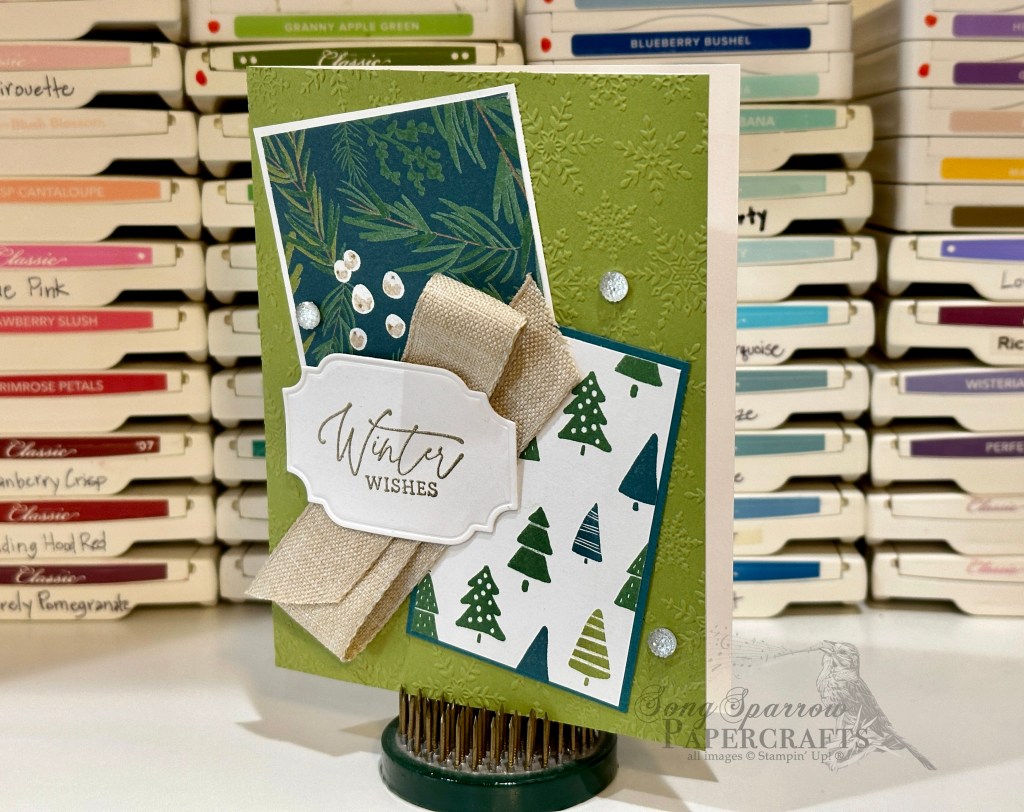
This particular layout is out of my wheelhouse, but I really love it and hope to incorporate it in some future designs to mix up my usual style. What do you think — is this layout a winner?

Products used:
Old Olive, Pretty Peacock, white cardstock
A Walk in the Forest DSP
All That dies
Gold embossing powder
Faceted gems
Magical Meadow stamps
Winter Snow embossing folder (retired)
Natural finish ribbon
Adhesives

All ads on this site are posted by WordPress and are based on your personal browsing history. I do not control ad content.

Christmas

We Wish You a Merry Christmas

During a recent stroll through the Instagram feed, I saw a lovely card design by LoritaMarie Crafts and immediately added it to the inspiration folder. It was the perfect combination of patterns and colors. I made a few modifications to paper selections and this design is the end result.

The card base is Mossy Meadow, which helps draw out the shades of green in the evergreen branches in the greenery panel. The evergreen panel is matted by Cherry Cobbler cardstock and mounted on dimensionals. The tree is diecut using the Merriest Trees dies and the sentiment is heat embossed in gold in the center of the tree. To keep the tree topper more delicate, I placed a star trinket at the top. The gold trim is tucked behind the elevated focal panel and gold pearls are scattered on the focal panel for visual interest. My favorite part of this design is the Christmas tree. What is yours?

My son helped me place a few of the elements, including the tree topper. We both decided that the end result is a really nice design that will be included in those that we personally send out to our holiday mailing list.

Products used:
Mossy Meadow, Cherry Cobbler, vellum cardstock
A Walk in the Forest DSP
Merriest Trees stamps & dies
Gold trim
Star trinkets
Gold pearls
Gold embossing powder
Dimensionals
Adhesives

All ads on this site are posted by WordPress and are based on your personal browsing history. I do not control ad content.

Christmas

Christmas Holly

I always find it funny when I can take an inspiration design and then have the end product look nothing like it! That’s definitely the case for today’s card. And all I did was tweak the look of the sentiment panel to achieve a completely different look.

A base of Cherry Cobbler provides the festive backdrop for the holly designer paper. The inspiration design had a solid sentiment panel with a diecut holly wreath. Because I wanted to see more of the beautiful foiled designer paper, I used a sheet of vellum for the sentiment panel and chose to stamp the holly wreath and nestle the sentiment in the center. Rather than placing the bow atop the wreath, I chose to use it as a design element along the side of the wreath instead.

As I was looking at the completed design, it seemed to be missing a little something. And if I had it to do over, the sentiment needs to be heat embossed in red rather than stamped. That would help it to have the *pop* it deserves. What do you think? Embossed sentiment or no?

Products used:
Cherry Cobbler, vellum cardstock
Shining Christmas DSP
Come to Bethlehem stamps (retired)
Bells & Boughs stamps (retired)
Adhesive-backed sequins
Faux linen ribbon (retired)
Dimensionals
Adhesives

All ads on this site are posted by WordPress and are based on your personal browsing history. I do not control ad content.

Christmas

Beary Happy Christmas

Did you know that even seasoned stampers look for inspiration? Sometimes designs just come to you and other times you have to look high and low for them! I actually stumbled across this design by Susan Campfield in my daily stroll through my Facebook feed and knew it needed to go in the Inspiration file. It can easily be adapted to so many different occasions, which makes it a design you can turn to again and again.

I love how the buffalo plaid is reminiscent of a warm winter flannel, making it a perfect design element for this holiday card. The base of the card is black cardstock and the plaid paper is matted by a sheet of Cherry Cobbler and black cardstock. The bear is punched from black cardstock using the Beary Cute punch. The red and white gingham ribbon allows the sentiment panel to function visually as a banner across the focal panel. If you’re making a set of cards, you can alternate the direction of the bear for some added interest. The sentiment panel is diecut from white cardstock using the Nested Essentials die and then the sentiment is stamped in Real Red using the Merriest Trees stamps. The adhesive hexagons help draw the eye across this playful design.

I just love the rustic feel of this card. It reminds me of a homey cabin in the snowy woods. Don’t you think?

Products used:
Cherry Cobbler, Basic Black and White cardstock
A Walk in the Forest DSP
Merriest Trees stamps
Beary Cute punch
Real Red and White gingham ribbon (retired)
Adhesive hexagons (retired)
Adhesives

All ads on this site are posted by WordPress and are based on your personal browsing history. I do not control ad content.

Christmas

Festive Tannenbaum

I have a thing for foiled papers. Nothing says festive quite like the sparkle of foiled paper! When Stampin’ Up! recently released some new foiled holiday designs in the Online Exclusives, I just had to have them.

I’ve been playing one of my favorite Christmas albums in the craft room this week because it seems to keep my newest office assistant (aka Nolan the 6-week-old kitten) from going full tilt all the time. There’s a particularly lovely arrangement of O Tannenbaum on the album which inspired this card design.

The beauty of the Shining Christmas specialty paper pack is how beautifully each of the patterns stands on its own. The lovely sheet of trees just called for a prominent spot, and so it comprises most of the front of the card with a sheet of Cherry Cobbler serving as the base. And all of the remaining design elements are simple to allow the trees to shine (literally). The velvet ribbon adds a little texture, while the gold holly leaves carry the sparkle across the design. With just the right group of elements, a simple design can still have eye-catching appeal!

Products used:
Cherry Cobbler, white cardstock
Shining Christmas DSP
All That dies
Gold holly leaves (retired)
Glitter sequins
Adhesive-backed sequins
Papertrey Ink Think Big Favorites #8 (sentiment)(retired)
Velvet ribbon (retired)
Dimensionals
Adhesives

All ads on this site are posted by WordPress and are based on your personal browsing history. I do not control ad content.

Christmas

Behold the Star

I’ve been busy in craft fair mode for many weeks now. I’m teaming up with my mom, who also happens to be my upline, and sponsoring a booth in a local fair at the end of the month. And to boot, the church where I work is having a craft fair this weekend, and last week I offered to contribute some items for the church’s booth. So I have been working on new designs for that.

I wanted to use the beautiful O Holy Night suite of products for at least one card. The paper is so thoughtfully designed, which makes it easy to put together beautiful cards with very few elements.

Here, I started with a base of Night of Navy cardstock. I selected the Bethlehem scene from the O Holy Night designer paper pack. I wanted the Star of Bethlehem to be shining brightly over the city and I wanted to capture the ethereal look of that bright and magical heavenly star. Using the Stars at Night stamp set, the largest star is heat embossed in gold atop vellum and then diecut using the accompanying dies. The sentiment is heat embossed directly atop the designer paper as if the words of the angels’ song is hanging over the blessed city. Just a few simple elements with such a stunning impact, don’t you think?

Products used:
Night of Navy, vellum cardstock
O Holy Night DSP
Stars at Night stamps & dies
Adhesive-backed sequins
Dimensionals
Adhesives

All ads on this site are posted by WordPress and are based on your personal browsing history. I do not control ad content.

Christmas

Holiday Greenery

Our family makes it a point to gather together often and especially for holidays. One of my favorite things about Christmas gatherings is dressing the table, and my favorite part of table dressing is a fresh holiday centerpiece.

I designed this card with a holiday centerpiece in mind. A piece of Cherry Cobbler cardstock serves as the card base. I chose a sheet of Joy of Christmas designer paper that resembled a bed of greenery, and I love the surprise of it being printed in shades of red rather than green. The sentiment panel is heat embossed on vellum to allow the lovely patterned paper to shine through. To provide a more realistic look of holiday evergreens, I pulled several different shades of green from which I diecut each branch. The evergreen branches are tied together with both sheer ribbon and twine. The gold sequins provide a touch of sparkle and allow the eye to pass easily from left to right.

I’m super pleased with this design because it reminds me of my grandmother’s Christmas dinner table! ❤️ Do you have any favorite parts about preparing for holiday dinners?

Products used:
Cherry Cobbler, Granny Apple Green, Mossy Meadow, Shaded Spruce, white cardstock
Joy of Christmas DSP
Vellum
Magical Meadow, Nested Essentials dies
Merriest Trees stamps (sentiment)
Sheer ribbon
Gold embossing powder
Adhesive-backed sequins
Adhesives

All ads on this site are posted by WordPress and are based on your personal browsing history. I do not control ad content.

Christmas · Clean and Simple

Joy to the World

I love making designs that are out of my comfort zone, particularly when I know a design is going to require a bit of “winging it” when I don’t have the materials to copy it exactly. When I saw the inspiration design for this card, originally posted by Linda Dalke on Instagram, I was immediately struck by it. It was so simple and not my usual style.

The base is a simple piece of white cardstock. I loved the natural look of the gold woodgrain pattern from the Joyful designer paper pack, which is a substitute for the more streaky gold pattern of the card base from the inspiration card. The beautiful starry night sky is diecut from a sheet of Shining Brightly DSP using the Nested Essentials dies. I wanted the star element to be more ethereal so I chose to diecut each layer from a sheet of gold shimmer vellum using the Stars at Night dies. As I was arranging the layers, I felt like the dimensionals behind the middle layer added more visual interest and depth to the panel, particularly when paired with the star trinkets. The sentiment is stamped directly on the card base below the star panel with the blue and gold glittered ribbon completing the visual triangle.

I just love how this turned out and the gold elements really shimmer in the light in person!

Products used:
Basic White cardstock
Shining Brightly, Joyful DSP
Gold shimmer vellum (retired)
Stars at Night, Nested Essentials dies
Papertrey Ink Christmas Blessings stamps (sentiment) (retired)
Night of Navy & Gold glittered ribbon
Star trinkets
Gold pearls
Dimensionals
Adhesives

All ads on this site are posted by WordPress and are based on your personal browsing history. I do not control ad content.

Christmas · Fun Folds

Sparkle Barn Fold

It was fun to take a little break from holiday cards last week to participate in the Thinking of You card challenge to send at least 7 cards in 7 days. I really hope that the cards received spread a little joy and made some folks smile. Did you participate in the challenge? Were you a recipient of a card?

Now I’m circling back to designing for a few upcoming craft fairs and working on a custom order for a dear client. Today’s design is a fun take on the barn fold. I love the versatility of this fun fold and how just a little tweak or two can make all the difference in how a card feels when it’s finished. This card feels like you’re pushing through the lush evergreen forest to see what awaits you at the end of the trail, don’t you think?

A piece of Crumb Cake cardstock serves as the base of the card to keep with the natural feel. A sheet of A Walk in the Forest designer paper provides the lush evergreen background of the two front panels. The sentiment panel and mat were diecut using the Nested Essentials dies. The pop of red of the sentiment panel, cut from a sheet of Joy of Christmas designer paper, provides the perfect backdrop for the gold embossed sentiment. The twigs of greenery diecut using the Magical Meadow dies tie everything together nicely. What do you think?

Products used:
Crumb Cake, Shaded Spruce, Mossy Meadow, Granny Apple Green, Cherry Cobbler, white cardstock
A Walk in the Forest, Joy of Christmas DSP
Nested Essentials, Magical Meadow dies
Magical Meadow stamps
Adhesive-backed sequins
Wink of Stella (red berries)
Dimensionals
Adhesives

All ads on this site are posted by WordPress and are based on your personal browsing history. I do not control ad content.

Christmas

Peaceful Season

At quick glance, you maybe thought that I’m repeating the card design from yesterday. I am, in fact, using the same sheet of paper. But today’s card uses a different fun fold design and really showcases the versatility of this sheet of the Winter Meadow designer series paper.

This design uses the single Z fun fold. A sheet of Basic Gray serves as the card base and the same sheet of Winter Meadow is our focal image for the front when the card is closed. One thing you’ll notice when dividing this sheet of designer paper is how the placement of the deer in the evergreens moves across the paper when you cut the full 12×12 sheet into pieces, which works beautifully for different fun fold designs. For this card, I selected the piece where the deer was off to one side — the left in this case. The single Z fold creates two 2″ folding panels, and this perfectly aligned the deer for the left fold-over panel and I placed the remaining portion on the base on the right so that, when the card is closed, the two pieces meet to complete the scene, and I added a touch of Wink of Stella to the deer and white tree for some ethereal sparkle. For the remaining 2″ panel, I used the backside of the deer pattern, which reminds me of a snowy fog, and I used the snow pattern from the Stars at Night stamp set to give the feeling of falling snow. I completed the snowy theme by adding some white adhesive sequins throughout the design to draw the eye across the full design of the card and highlight the sparkle of freshly falling snow in each panel.

Products used:
Basic Gray cardstock
Winter Meadow DSP
Stars at Night, Peaceful Cabin (retired) stamps
Adhesive-backed sequins
Wink of Stella
Adhesives

All ads on this site are posted by WordPress and are based on your personal browsing history. I do not control ad content.