Uncategorized

Celebrate!

Welcome to a bright & shiny new week, everybody! I don’t know about you, but my weekend was BUSY! I spent a lot of time catching up on the homefront after being gone for training in the middle of the week. And my best laid plans for having time in the craft room totally went awry.

This week, I’ve decided to pick back up with last week’s design theme — nature. We’ll be looking at all of the current sets on the shelf this week to work in our theme. And today we’re getting started with the lovely floral bundle called Layers of Beauty, which includes stamps, dies, and coordinating decorative masks. I’ve borrowed the layout from fellow demo Stamping Beauty (@stampingbeautynz).

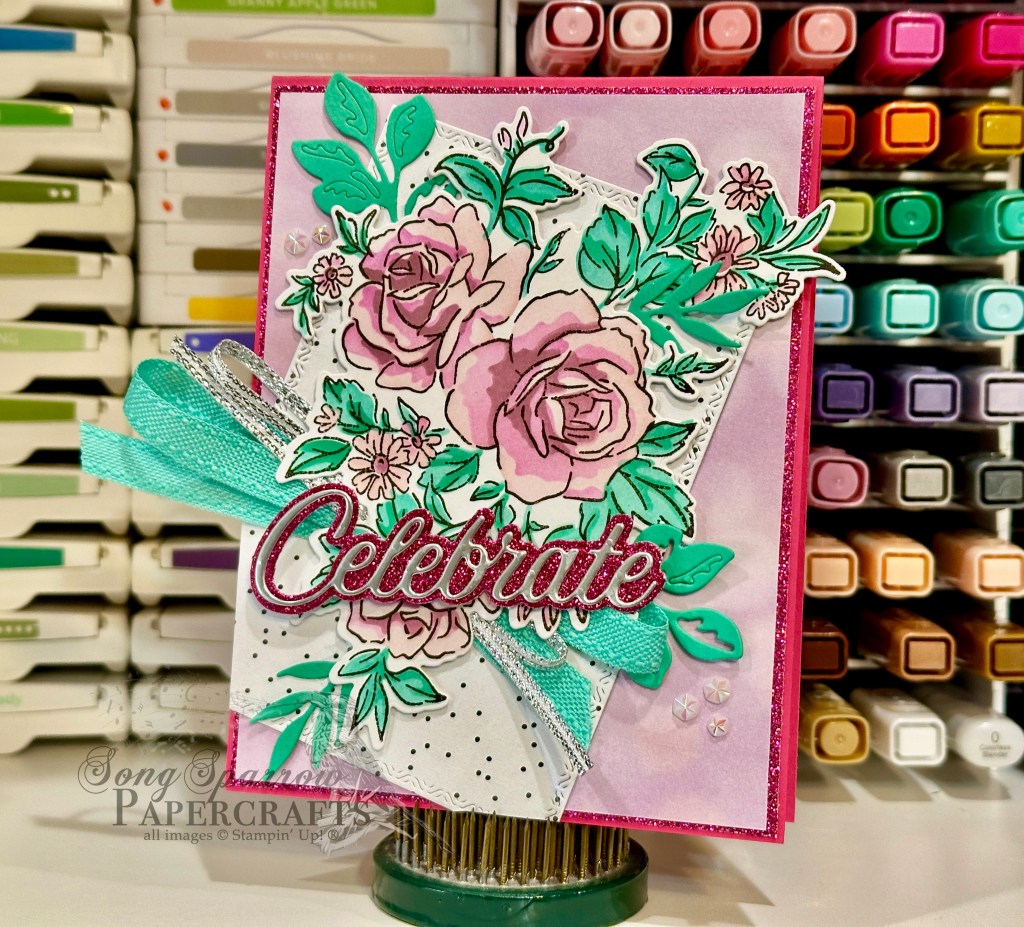
We get started with a base of Melon Mambo cardstock. The focal panel background is a sheet of the pinkish Beautiful Bokeh pattern and matted in Berry Burst glimmer paper. The focal panel itself is a sheet of the Lovely Garden paper that is cut with the Textured Notes dies and affixed slightly askew. I stamped the full Layers of Beauty image in Early Espresso ink and then colored using the masks and an assortment of pinks and greens. The image is cut out using the coordinating die and then affixed to the focal panel with dimensionals over a twist of Summer Splash ribbon and silver trim. I cut a few sprigs of leaves from Summer Splash cardstock with the Layers of Beauty dies and then tucked them behind the raised focal image. The sentiment is cut from silver foil and Berry Burst cardstock using the Wanted to Say dies and then mounted with dimensionals over the focal image. A few iridescent faceted gems finish things off with some subtle sparkle.

I must say that I wasn’t a huge fan of the decorative masks when they first came out, but they’ve really grown on me. Using them to color images makes quick work of beautiful shading — something that I’m not always the best at! Have you tried a bundle that includes masks? What are your thoughts on them? I’d love to know!

I hope you’ll pop in tomorrow as we revisit an older stamp set for a more masculine design that’s most certainly all about nature!

Product List
Uncategorized

Trust Fall

Fall is my absolute favorite season of the year. I love watching the leaves change colors. Our drive in and out of our neighborhood each day turns to fire when the trees are putting on their full display. Have you ever thought about the trust a tree has in its Creator when it falls into a deep sleep through fall and winter to awaken and begin anew in the spring? The fall season always makes me think of this verse in Proverbs and it seemed fitting to incorporate in today’s card.

Today, we’re combining the old and new to make this lovely card. Our design today uses a modified Cut and Twist Fun Fold to create the perfect layout for our fall foliage.

We get started with a base of Cajun Craze cardstock cut so that our score mark is at the top in the portrait orientation. Our cut and twist panel is the standard 3-inches and will serve as the mat for our embossed panel. To connect our two smaller top and bottom panels, we’re using a quarter-sheet of the vanilla Season of Elegance gold foiled specialty paper. Each smaller panel then has a strip of Copper Clay Tartan Foil. The embossed panel starts with a piece of the pinkish woodgrain pattern from the Country Woods designer series paper pack. This is then embossed with the Leaf Fall embossing folder. I then used my finger and Copper Clay ink to go over the embossed leaves, giving them more depth and dimension against the woodgrain. The embossed panel is matted with Rose Gold textured specialty paper and our cut and twist panel and is adhered to the card front with dimensionals. The sentiment from Courage & Faith is heat embossed in copper on Cajun Craze cardstock and then diecut with the Autumn Leaves die using the extension method. A piece of the Rose Gold textured paper serves as the mat for the sentiment panel. To add some additional pops of color, I diecut leaves from Garden Green and Blackberry Bliss cardstock using the Autumn Leaves dies and adhered them to the sentiment panel with dimensionals. I added a twist of the Blackberry Bliss & Gold textured ribbon behind the sentiment panel before it adhering it to the card front with two layers of dimensionals. I scattered copper sequins across the card front to draw the eye diagonally across the design.

Isn’t this a fun twist on some techniques? I really love how everything works together and really gives you the fall vibes. Tune in tomorrow for another installment in our Sketchy Fridays series.

Products used in today’s card:
Cajun Craze, Garden Green, Blackberry Bliss cardstock
Tartan Foil, Country Woods, Season of Elegance, Rose Gold textured DSP
Courage & Faith stamps
Autumn Leaves dies
Leaf Fall embossing folder
Copper embossing powder
Blackberry Bliss & Gold textured ribbon
Copper neutrals sequins
Dimensionals
Adhesives

Product List
Uncategorized

You Can Do This

Why is it that Monday always gets here quickest after a vacation? We enjoyed a little family get-away last week. It was nice to have a change of scenery, even if it was still a typical Texas roaster of a week! So I’m off to a little slower start this week.

Together we’re going to be working with the Saying Hey stamp set by Stampin’ Up! this week. This set coordinates with the Heartfelt Hexagon punch, but it goes beautifully with many other current SU! shapes. We’re going to be pairing this super versatile stamp set with a whole host of products this week.

Today, we get started with a sketch from my sketch book. This sketch was inspired by a card from StampwithBrenda over on Insta. I loved the layout because it works with both large images and fonts.

Our card starts with a base of Balmy Blue cardstock. The bottom panel of our background panel is a sheet of the blue woodgrain pattern from the Country Woods designer series paper pack. This patterned paper is complimented with an embossed sheet of white cardstock using the Distressed Tile embossing folder. To help the embossed pattern pop, I applied some Misty Moonlight ink with my finger. A strip of Night of Navy cardstock in the center brings our background panel elements together.

For this card, our focal panel is comprised of the sentiment panel. The background panel is Smoky Slate diecut using the radiating stitch circle from the Spotlight on Nature die set. The HEY sentiment from the Saying Hey stamp set is stamped in Versamark and then heat embossed using the silver powder from the WOW! metallics set. Although not intentional, it didn’t heat set evenly which gives it this neat distressed look that coordinates perfectly with the embossed panel. I just love happy little accidents like that! The second portion of our sentiment panel is a strip of Night of Navy cardstock with the sentiment from Saying Hey stamped in Versamark and then heat embossed with the white WOW! basics embossing powder. The grey woodgrain banners underneath the navy panel helps bring all of our color elements together. Each of the sentiment panel layers is adhered together to make one flat sentiment panel. The full panel is popped up on dimensionals. I decided to add one additional shabby chic element with the frayed Night of Navy linen thread from the not-yet-released Natural Tones linen thread pack. You could achieve the same effect using a Night of Navy Stampin’ Blend to color linen thread. Our card is finished off with a grouping of white sequins from the Neutrals pack.

Tomorrow we’re going to be pairing our stamp set with several patterns of designer series paper for a fun masculine card. I hope you’ll pop by and check it out!

Products used in this card:
Balmy Blue, Night of Navy, Smoky Slate, Basic White cardstock
Country Woods DSP
Saying Hey stamps
Distressed Tile embossing folder
Spotlight on Nature, Nested Essentials, Happy Little Things dies
Basics, Metallics embossing powders
Natural Tones linen thread (coming Fall ’24)
Neutrals sequins
Dimensionals
Adhesives

Product List