Christmas · Holidays · Terrific Tuesdays

Season’s Greetings

This week, we’re taking a closer look at the new Joyful ephemera packs available in the current Stampin’ Up! Holiday Mini catalog. Although ephemera packs have been available for some time, I’ve been hesitant to purchase them because I didn’t think I would like working with them. But let me tell you, these are a lifesaver if you’re wanting to create a card but are crunched for time!

We’re going to be using the Joyful ephemera packs this week in a number of different ways. You can use ephemera all on its own to create beautiful cards, just like I did yesterday with the Christmas mantle design. Or you can add additional elements to dress up your designs and add a bit more complexity, like we’re doing with today’s card.

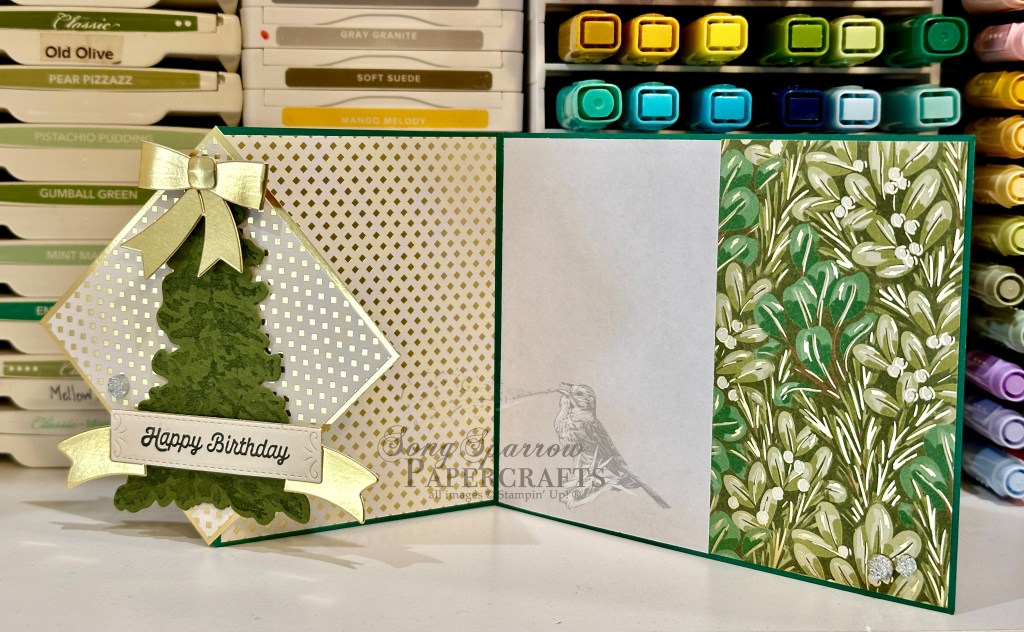
This card begins with a green Gold Dipped card base. We’re using the reinker watercoloring technique I first introduced to you on Saturday to create a sheet of custom paper to cut our tree from using the Merriest Trees dies. Each of the tree layers is separated by dimensionals on the bottom edge to give it a more realistic look, and the bottom layer of the tree is adhered directly to the card front. Our bear and packages from the Joyful Images ephemera pack sit directly in front of the tree. The packages are adhered to the card front and the bear is adhered with dimensionals to have it appear to be oriented in front of our packages. I added a gold star to the top of the tree for a festive finish. The sentiment from the Joyful Sayings ephemera pack is adhered directly to the top layer of our tree. A few drusy embellishments add some sparkle and draw our eye across our card design.

Would you like to learn how to create your own watercolor paper and see this card come together from start to finish? Check out today’s episode of Terrific Tuesdays to watch the magic happen!

Products used in today’s card:
Gold dipped card & envelope
Joyful Images ephemera
Joyful Sayings ephemera
Watercolor paper
Water painter
Pretty Peacock, Old Olive ink
Merriest Trees dies
Drusy embellishments
Dimensionals
Adhesives

Product List
Terrific Tuesdays

Autumn Birthday

We’re continuing our All About Autumn design series today, and I’m excited to bring you the much-anticipated in-depth look at the acetate rub technique that I first mentioned in my post on Saturday.

Today’s card mixes things up just a little bit to give us a different look to Saturday’s card design. We start with a card base of Pretty Peacock. Our focal panel background starts with a piece of white cardstock. Using the acetate sheet and 4 colors of Stampin’ Blends — Daffodil Delight, Calypso Coral, Cherry Cobbler, and Pool Party, we create another dusky backdrop for our trees in the midst of a wardrobe change. To achieve that look, we’re using the Pretty Peacock Oxidized Copper and the Real Red Season of Elegance specialty papers and Frosted Forest dies to create the foliage for our trees. Our groves of trees are diecut from Early Espresso cardstock using the Frosted Forest dies. To help our focal panel stand out against our card base, we mat it with a combination of Country Woods woodgrain patterned paper and the Real Red & Gold satin ribbon. The sentiment from Simply Said is heat embossed in gold and then flanked with some drusy embellishments. A few extra drusy embellishments are added in opposing corners to help draw the eye across our focal panel to the sentiment.

You can learn all about the acetate rub technique and how to make this card from start to finish in this week’s episode of Terrific Tuesdays.

I hope you’ll tune in tomorrow to check out a cool technique to try with your embossing folders.

Products used in today’s card:
Pretty Peacock, Early Espresso, Basic White cardstock
Country Woods, Oxidized Copper, Season of Elegance (out tomorrow!) DSP
Window sheets
Simply Said stamps
Frosted Forest dies
Stampin’ Blends
Gold embossing powder
Cherry Cobbler & Gold satin ribbon (out today!)
Drusy embellishments (out tomorrow!)
Adhesives

Product List
Terrific Tuesdays · Winter

Warm Feelings

We’re continuing our trek through the woods today with a fun new-to-me card technique called a fractured card design. I’ve seen this card layout featured a number of times in my inspiration searches but, honestly, thought it was going to be too difficult to learn and so I passed it by. But I decided to do a little more research on fractured card designs and do you want to know what I discovered? It’s probably the easiest “hard” card you’ll ever learn! Let’s take a look and you’ll see what I mean.

What I love about this particular card layout is that it’s a great way to showcase designer series paper patterns. And there are all kinds of variations that make this card layout easy to adapt to any patterned paper and keep your cards interesting even when using the same patterns multiple times.

For today’s card, we get started with a base of Blueberry Bushel cardstock. I used white cardstock as the backing for the fractured panel. I chose to showcase the Winter Meadow designer series paper and chose two coordinating patterns. Silver serves as a nice compliment to the wintery feel and a terrific sparkly backdrop. Pretty Peacock serves as our fracture strips and draws out the predominant color in our patterned paper pieces. The sentiment from the new Peaceful Season stamp set is stamped in Blueberry Bushel and then diecut on the diagonal using the Perennial Postage die. A faux bow of silver ribbon and few iridescent faceted gems draw the eye front and center to the sentiment.

Want to know how to make today’s card step-by-step? You can catch this week’s of episode of Terrific Tuesdays to see a fractured card design come together from start to finish and see first-hand how versatile this design can be. I’ve also provided a FREE PDF tutorial here. Please note that some of the products shown will not be available until September 4th.

Products used in today’s card:
Blueberry Bushel, Pretty Peacock, Basic White cardstock
Winter Meadow, silver foil DSP
Peaceful Season stamps (coming soon!)
Perennial Postage dies
Silver trim
Iridescent faceted gems
Dimensionals
Adhesives

Product List
Fun Folds · Terrific Tuesdays

Diamond Birthday

Do you ever see a special fold and think WOW? That’s precisely what happened when a fellow demonstrator shared the Diamond Fold with our team. And I’m glad to finally have the time to sit down and learn this fold. It looks far more complicated than it is, and it is absolutely a perfect way to spotlight beautiful patterned paper!

This week, we’re looking at all the ways we can use traditional holiday products in everyday designs. Today, we’re pairing the Season of Gold & Green designer paper with part of the new Season of Elegance suite to make this gorgeous Diamond Fold card.

We get started on today’s fun fold design with a base of Shaded Spruce cardstock. We cut a standard-sized base but in landscape orientation with a fold in the center and then one to divide the second half. I chose two different patterns from the Season of Green & Gold designer series paper pack, a current Stampin’ Up! Online Exclusive. We’re bringing out the gold foiling by using the gold foil specialty paper as an accent color on our diamond panel. Our focal image is the largest tree from the new Peaceful Evergreens bundle. It’s stamped and diecut from Mossy Meadow with a gold bow diecut and added to the top. The new Peaceful Evergreens die set that will release on September 6th with the Holiday Mini catalog includes a set of dies to make paper bows and it really makes it easy to have perfect bows for your cards! Our sentiment from Adventurous Sky is stamped in black on Very Vanilla cardstock and then diecut using the Peaceful Season dies. This panel is mounted on a gold foil banner diecut with the largest banner from that same die set. I added some drusy embellishments for lots of extra sparkle and to help draw the eye across the card front.

Tomorrow we’ll be using a sketch to create a super fun thank-you design. I hope you’ll stop by and check it out.

Want to know how to make today’s card step-by-step? You can catch this week’s of episode of Terrific Tuesdays to see this card come together from start to finish. I’ve also provided a FREE PDF tutorial here. Please note that some of the products shown will not be available until September 6th.

Products used in today’s card:
Shaded Spruce, Mossy Meadow, Very Vanilla, Basic White cardstock
Season of Green & Gold, gold foil DSP
Adventurous Sky stamps
Peaceful Evergreens stamps & dies (coming soon!)
Peaceful Season dies (coming soon!)
Drusy embellishments (coming soon!)
Dimensionals
Adhesives

Botanicals · Terrific Tuesdays

Busy Florals

We are already halfway through this week. Every time I get to Wednesday, I feel like the week is just whizzing by! Maybe it’s because it feels like we still have so much to do before the regular routine of school days gets started. Or maybe it just comes with getting older.

This week, we’re tiptoeing through the garden as we make cards inspired by the beauty of nature. And today, I’m going to show you ways to use “difficult” patterned paper. Do you ever fall in love with a pack of patterned paper but then find yourself stumped when it comes to actually using it? That’s precisely what has happened to me with the Unbounded Beauty paper pack by Stampin’ Up! I fell in love with the patterns but then just haven’t been able to find designs where the patterns make sense. Until now.

In this week’s episode of Terrific Tuesdays, we are using two card layouts to showcase that paper that you are finding hard to use. We get started with a card that I like to call the tuxedo fold. We choose two complimentary paper patterns, bearing in mind the backside of one sheet will be visible and must also be considered in our paper choice. And one sheet will be folded to reveal a portion underneath so that it almost looks like the collar of a tux shirt on each end. Then our sentiment panel sits on top as a prominent feature on our card. Suddenly, our overwhelming pattern now fits perfectly in a design — no longer overwhelming but instead a beautiful backdrop.

Our second design literally cuts our busy patterns down to size. I like to call this design a patterned paper or designer paper (DSP) grid since we use strips of busy patterns to build a grid on our card front, leaving the center section for a small sentiment. The patterned paper strips can be of any size from 1- to 2-inches, depending on how large you wish to make your center sentiment. Not only does this design tame some wild patterns, it also allows you to use up scraps of even your favorite patterned papers.

To see the tuxedo fold and DSP grid designs at work, tune in to this week’s episode of Terrific Tuesdays where we made 2 cards from scratch using these two card layouts.

Tomorrow, we’re making things easy with the Nature’s Sweetness paper. Pop by and check it out.

Products used in card above — tuxedo fold:
Summer Splash, Pretty in Pink, Basic White cardstock
Unbounded Beauty DSP
Inspiring Snapdragons, Something Fancy stamps
Spotlight on Nature, Inspiring Snapdragons dies
Pretty in Pink ribbon
In Color shimmer gems, tinsel gems
Dimensionals
Adhesives

Products used in card above — DSP grid:
Basic White cardstock
Berry Burst, Unbounded Beauty DSP
Unbounded Love stamps
Everyday Details dies
Iridescent striped trim
Iridescent discs
Dimensionals
Adhesives

Product List
Product List
Fun Folds · Terrific Tuesdays · Tutorials

Terrific Tuesdays: Episode 13

Welcome to a new episode of Terrific Tuesdays, where each week we’ll explore new projects using some of the latest projects from Stampin’ Up! I know what you may be thinking….wait, it’s not Tuesday. And you’d be right. If you’ve followed me here or on any of the socials for the last several months, you may remember that I had to take a break due to a family emergency. And I want to take this opportunity to thank all of you for sticking around and waiting for my return. While I’m back to posting more regularly now, it will still be necessary for me to take breaks here and there as we continue to address some long-term medical needs.

But today, I’m bringing you a new Terrific Tuesdays video. Earlier this week, I shared a treat holder fun fold with a teaser that a video tutorial would be forthcoming and this is it! I walk you through this cute treat holder step-by-step and give you some pointers, i.e. lessons in avoiding mistakes that I learned the hard way! *wink* For those folks who like to watch and also follow along with written instructions, I’m including the PDF tutorial for FREE download.

I hope you enjoy this twist on our Terrific Tuesdays format!

All ads on this site are posted by WordPress.  Song Sparrow Papercrafts is not responsible for ad content.

Sale-a-Bration · Terrific Tuesdays

Terrific Tuesdays: Jungle Pals Tip

Welcome to this week’s Terrific Tuesdays short. Today, I’m going to share a little tip about using the tree in the Jungle Pals die set.

The Jungle Pals stamps and dies are a part of the current Sale-a-Bration offerings. For those who aren’t familiar with Sale-a-Bration, you can earn FREE product from Stampin’ Up!’s SAB catalog now through the end of February. For every $50 USD spent, you earn 1 SAB credit to redeem in FREE product from the SAB catalog. Stampin’ Up! offers the SAB promotion twice per year and we’re currently celebrating the first Sale-a-Bration period for 2024.

All ads on this site are posted by WordPress and are based on personal browsing history.  Song Sparrow Papercrafts is not responsible for ad content.

Terrific Tuesdays

You’re Amazing

Today we’re continuing to look at the Jungle Pals stamps and dies, which are currently available in the Sale-a-Bration catalog through the end of February. I love all of the cute jungle critters in this set, but is there anything cuter than a sloth?!

For today’s card, I wanted to create a window design. When I noticed that the backside of a sheet of Softly Stippled designer paper had a jungle leaf pattern on the back, I knew I wanted to incorporate it as the background for my sloth scene in the window. I used Sketch 620 from Freshly Made Sketches for the layout.

We begin with a base of Pretty Peacock. The focal panel base is the Pool Party linen patterned sheet from the Softly Stippled paper pack. I began by choosing my window size and shape and diecutting it from the patterned paper. I chose the Everyday Essentials circle that cut both the larger and smaller portions at one time.

I used the reverse side of the smaller circle with the jungle leaf pattern on it to serve as the base for the window portion. I diecut my tree and sloth from Crumb Cake cardstock using the Jungle Pals dies. The sloth is colored using Stampin’ Blends. The tree leaves are diecut from Shaded Spruce.

The sentiment panel is diecut from white cardstock using the Thoughtful Expressions dies and stamped the sentiment from Wonderful Thoughts in the center. The flowers are diecut from soft shimmer paper and More Dazzle paper using the Jungle Pals dies, which the stems behind are diecut from Shaded Spruce using the Thoughtful Expressions dies. Opaque faceted gems are placed so that your eye naturally flows diagonally across the card.

Products used in today’s design:
Pretty Peacock, Shaded Spruce, Basic White cardstock
Softly Stippled, Melon Mambo fine shimmer, Bubble Bath fine shimmer DSP
Jungle Pals, Wonderful Thoughts stamps
Jungle Pals, Everyday Essentials, Thoughtful Expressions dies
Opaque faceted gems
Dimensionals
Adhesives

All ads on this site are posted by WordPress.  Song Sparrow Papercrafts is not responsible for ad content.

Luv 2 Stamp Artisan Design Team · Terrific Tuesdays

Jungle Hello

The Jungle Pals set is so fun to work with when you’re looking to build a scene. And for today’s card, I’m turning to one of my favorite fun folds — the Center Step fun fold.

I wanted to create a jungle scene with several of the adorable little jungle friends and especially wanted to have the sloth climbing between two trees on either side of the center section.

This fun fold design is built on a base of Pool party cardstock. I used the cloud pattern from the Sunny Days designer series paper pack to provide the background for the scene. I diecut two trees from Crumb Cake cardstock and placed them on either side of the pop up panel. This allows the space for the vines to run in the middle for the sloth. I used a combination of Shaded Spruce, Granny Apple Green, and Lemon Lime Twist for the greenery, vines, and leaves.

For a more realistic look for each of the animals within the scene, I diecut each of them from cardstock that would compliment their natural coloring. The sloth is stamped on Crumb Cake, the toucan on Basic White, and the lemur on Smoky Slate. Each one is colored with Stampin’ Blends to finish. The greeting from Heartfelt Hellos is stamped on Crumb Cake cardstock and diecut using the Autumn Leaves dies.

The inside of the card has its own adorable scene. I used the Sunny Days designer paper to provide a sky and used more of the leaves and vines to create a jungle scene. I tucked the alligator into the marshy weeds. He was stamped on Old Olive cardstock and then colored with Stampin’ Blends.

There are so many ways that you can use the Jungle Pals stamps and dies to create scenes. We’ll wrap up this week with another Jungle Pals scene building card tomorrow, so be sure you check back in!

Products used in today’s design:
Pool Party, Crumb Cake, Shaded Spruce, Granny Apple Green, Lemon Lime Twist, Smoky Slate, Early Espresso, Basic White cardstock
Sunny Days DSP
Jungle Pals, Heartfelt Hellos stamps
Jungle Pals, Autumn Leaves dies
Dimensionals
Adhesives

All ads on this site are posted by WordPress.  Song Sparrow Papercrafts is not responsible for ad content.