Retiring · Take to the Sky

Flying By

The Take to the Sky suite has officially hit the Last Chance list. If you’ve been eying this fantastic set, now is your chance to add it to the crafty stash before it’s gone! I know that I’ll be sad to see it go and fully intend to keep it in my stash even after it’s gone from the shelves.

The stamps and dies offer you a variety of plane sizes to use on your designs. Earlier today, I wanted a larger-scaled plane to take center stage, but for this card, I wanted to scale things back a little and so I chose the larger biplane stamp for this fun card.

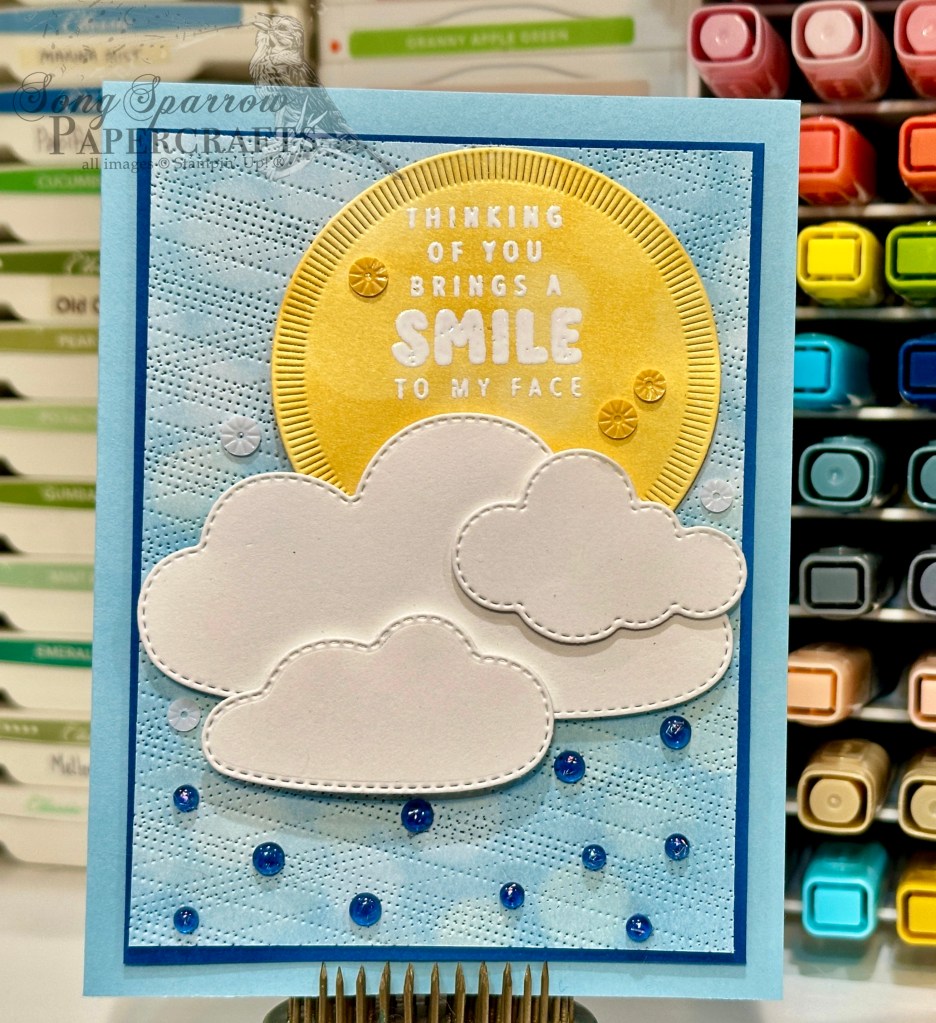
We get started with a base of Basic Black cardstock. A sheet of the grey plaid paper from the Take to the Sky paper pack serves as our backdrop, and I decided to mat it with a sheet of textured silver specialty paper for just a hint of twinkle in the background. I wanted it to look as though our focal image is bursting through the clouds, so I began setting up the focal scene by cutting clouds from Azure Afternoon cardstock using the Bright Skies dies (also a set that is retiring!). I cut the map background panel with the Countryside Corners die and arranged the clouds and map so that our plane would sit front and center and look as though it’s mid-flight.

Our plane is stamped in black on Smoky Slate cardstock and then colored with the Night of Navy Stampin’ Blends. The propellers are cut from silver foil and an industrial trinket serves as the hub. Wink of Stella helps give our propeller the look of spinning. The sentiment from the Adventurous Sky stamp set is stamped on a smaller cloud cut with the Bright Skies dies. A few of the iridescent white sequins from the sequins trio pack further the illusion of being in the clouds and help draw the eye to the focal panel and sentiment.

The combination of products in the suite offer endless possibilities for so many fun designs — from super simple to detailed. It’s perfect for all the flight enthusiasts in your life.

Product List
Retiring · Take to the Sky

Up, Up and Away Birthday

This week, we’re exploring some of my favorite sets that are on the Stampin’ Up! Last Chance List. Today, we’re playing around with the Take to the Sky suite. As the spouse of a heavy jet pilot, this whole suite was a no-brainer for me and will definitely be sticking around in my crafty stash even after it officially retires!

For today’s card, we’re keeping it pretty simple and letting our dies and paper do the heavy lifting for this design.

We get started with a base of Night of Navy cardstock. I chose the cloud patterned sheet from the Take to the Sky paper pack as the backdrop for our flying biplane. Our plane is constructed using the Adventurous Sky dies and is a combination of the red Season of Elegance foiled paper and textured gold specialty paper. To give a realistic look to our spinning props, I added a small circle of Graceful Greenery vellum cut using the Spotlight on Nature dies. A few gold textured dots serve as the wheel and prop hubs.

The sentiment from the Hot Air Balloon stamp set is stamped in Real Red on Smoky Slate cardstock and diecut with the coordinating Hot Air Balloon banner die. The sentiment backdrop is a combination of grey and blue plaid patterns from the Take to the Sky paper pack with a strip of Cherry Cobbler & Gold metallic ribbon in the center to help things pop. A few red iridescent discs finish things off by drawing the eye to the sentiment. I added some starburst sequins in the opposing corners for a little extra pop of shimmer in the clouds.

We’ll be putting the stamps to work this afternoon. I hope you’ll fly by and check it out!

Product List
Changing Leaves · Retiring

A Little Note

This week, we’re taking a look at some of my favorite sets that made it to the SU! Last Chance list. And first up is the beautiful Changing Leaves bundle. I’ve learned to get a little out of my comfort zone and play around with unique color combinations, and when you really think about it, there truly is a tree representing just about every color in the rainbow!

Our base for this design, though not visible from the card front, is Melon Mambo cardstock. A strip of the gold leaf-patterned paper from the Nature’s Sweetness paper pack serves as the right edge of the card front with the gold-splattered newsprint as the larger backdrop for our card front. I sandwiched a strip of Melon Mambo foil paper in between the two Nature’s Sweetness patterns to complement the focal images. The leaves are cut from Melon Mambo foil paper using the Changing Leaves hybrid embossing folder. They’re layered on top of the gold mercury vellum disc cut using the Spotlight on Nature dies. The sentiment from Changing Leaves is stamped in Melon Mambo on white and then cut with the longer sentiment die from the coordinating die set. The sentiment panel is adhered over twists of gold thread at the base of the focal panel using dimensionals. I added a few Sunny Days dots and purple sequins to add some pops of pink across the otherwise white backdrop.

Using unexpected colors with the Changing Leaves bundle really ups its utility factor in the craft room, knowing that simply rethinking the color palette can change a design from something more feminine to a design that is much more neutral. And that’s more than half the fun of any set in your crafty stash — rethinking how you’re using it to transform utility!

Product List
Changing Leaves · Retiring

Everyday Magic

Welcome to this soggy Monday. It poured most of the weekend for us, so everything is wet and squishy now as we endure a late-season cold snap here in North Texas. What about you?

Have you checked out all of the products on the Stampin’ Up! Last Chance List that updated last week? I always have mixed feelings when the list is updated — I’m excited for deals but sad to see some favorites go. And I must say that this time around, there are a LOT of my favorites on the Last Chance list!

So this week, we’re going to be taking a look at some of them. And I hope to bring you not one but TWO designs with each of the featured retiring products as we move through the list this week. First up is the Online Exclusive bundle called Changing Leaves, which includes coordinating stamps, dies, and a hybrid embossing folder. I just love the detail included in this set and have found that it’s exceedingly versatile. This is one that will definitely remain in my crafty stash after it officially retires!

We start this design with a base of Pecan Pie cardstock. I used a sheet of the white woodgrain pattern from the Country Woods patterned paper pack as the backdrop for our focal section. Using the Changing Leaves dies and hybrid embossing folder, I cut an assortment of leaves and greenery from gold foil, Season of Elegance foiled paper, and Granny Apple green foil. I layered them with dimensionals and glue dots in the center of the card. The sentiment from Something Fancy is stamped in Shaded Spruce on white cardstock and then cut with the coordinating die from the set. The sentiment panel is adhered over gold thread and natural linen thread using dimensionals. A strip of the Nature’s Sweetness gold foil leaf pattern serves as the backdrop for our sentiment and hides the stems of our leaves festively. I added a combination of gold sequins, gold textured dots, and transparent dots for some visual interest across our design.

I think one of the hardest things about cards with lots of foil elements is that a photo can never do them justice! Tune in a little later as we take one more look at the lovely Changing Leaves bundle.

Product List
Online Exclusives · Pattern of Friendship

Joy & Laughter

TGIF, everybody! We’ve made it to the end of the week. And it’s certainly been a busy one. Finishing up the work week and packing for a trip is no small task, and that completely put me off schedule yesterday. But in between packing and cleaning today in preparation for our family spring break trip, I squeezed in a little time to make this cutie.

This week, we’ve been exploring all of the cute ways that we can use the new Pattern of Friendship bundle from Stampin’ Up! And today, we’re pairing it up with the Bright Skies and Playing in the Rain dies to make this chipper scene. I also tried a new stamp technique to create an ombré effect with the sentiment and I’m pretty pleased with how it turned out!

This design starts with a base of white cardstock. I love how it makes the scene really pop. The scene is built on a base of Balmy Blue cardstock. I wanted the grassy hills to look like they were freshly mowed and so I began by using the Pattern of Friendship die to make the mower lines in the Lemon Lime Twist panel before cutting the hills using the Bright Skies long cloud die. I already had the flowers cut from a previous project — they’re a combination of Mossy Meadow and Pretty in Pink. I adhered the grass and flowers with dimensionals and create depth with different heights. I added a few clouds to the sky that are cut from Graceful Greenery vellum with the Bright Skies dies. The sentiment is stamped in between in Misty Moonlight that is stamped off using different pressure across the stamp to create an ombré look to the stamped sentiment. I finished things off by cutting a butterfly from the pastel ombré glimmer paper using the Playing in the Rain dies and added two tone sparkle gems to the wings to give some definition to the butterfly. A few starburst sequins finish things off with a little detailed sparkle.

I’ll be taking tomorrow off to enjoy some time with the family. I hope you all have a fantastic weekend! I’ll be popping in on Monday to bring you a perfectly festive design. ☘️ I hope you’ll check it out!

Products used in today’s card:
Basic White, Balmy Blue, Lemon Lime Twist, Mossy Meadow, Pretty in Pink cardstock
Graceful Greenery vellum, pastel ombré glimmer paper
Pattern of Friendship bundle
Bright Skies, Playing in the Rain dies
Two tone sparkle gems, starburst sequins
Dimensionals

Online Exclusives · Pattern of Friendship

Let’s Keep in Touch

We’re already halfway through this week, folks! My fellow demos are off to North Carolina for the annual Stampin’ Up! convention. And I’m here at home prepping for a little spring break adventure with the fam in just a few days. Needless to say, I’m actually a little sad that this week is halfway gone!

This week, our designs feature the new Online Exclusive bundle called Pattern of Friendship. I’ve had a lot of fun coming up with different ways to use this fun set. Today we’re pairing it up with the Hot Air Balloon dies and Everyday Skies paper. See if you can spot where the fun texture die comes into play.

We get started with a base of white cardstock. I chose white to provide contrast with the focal panel. Our focal panel starts with a piece of Petal Pink glimmer paper that is diecut with the Textured Notes dies. This serves as the eye-catching mat for our focal sheet of Everyday Skies patterned paper that is diecut with the Perennial Postage dies. I cut two hot air balloons with the Hot Air Balloon dies. And for a fun little twist, I add texture to both balloons with the Pattern of Friendship die and the Painted Texture embossing folder. To give some dimension to the scene, I adhered the balloons on dimensionals of different heights. I added a few clouds that I cut from Graceful Greenery vellum using the Hot Air Balloon dies. The sentiment from Pattern of Friendship is stamped in Cajun Craze on white cardstock and then cut with the small banner die from the Countryside Corners dies. I scattered some shiny sequins across the panel for some eye-catching sparkle.

We’ll look for more fun ways to make patterns as we continue our design series through the week. I hope you’ll stop in and check it out.

Product List
Online Exclusives · Pattern of Friendship

Birthday Plaid

Our featured product for this week’s designs is the new Pattern of Friendship bundle that just released in the Stampin’ Up! Online Exclusives section. This fun bundle comes with a set of stamps and a large-scale pattern die. And today we’re pairing it up with the Timeless Plaid and Wildflower Birthday papers to create a fun birthday card.

We get started with a base of Lost Lagoon cardstock. I used a sheet of Crumb Cake as the mat for the focal panel to provide some structure and stability to the panel. The mat has some detailing on the edges thanks to the Textured Notes die. I chose a sheet of the blue-green Timeless Plaid paper as the focal panel background and added some additional detailing with the Pattern of Friendship die before cutting it down to size with a smaller Textured Notes die. I loved the smaller cupcake panel from the Wildflower Birthdays accessories set and cut it down a little smaller using the Greetings of the Season dies. I ended up deciding not to use the decorative portion with the hole in the center and instead option to make a square with rounded corners instead. The sentiment from Pattern of Friendship is stamped in Misty Moonlight on Very Vanilla and then cut with the Autumn Leaves die using the extension method. I wrapped the ends with gold thread to tie the sentiment and focal image together with their gold elements. I added a few gold low profile dots for a pop of shimmer.

Sometimes our patterns don’t have to be complicated to be interesting. And playing up the plaid pattern was just the ticket for today’s card. I hope you’ll tune in tomorrow for another fun way to have the new Pattern of Friendship set work for you.

Product List
Online Exclusives · Pattern of Friendship

A Smile to My Face

This week, our featured design product is the Pattern of Friendship bundle by Stampin’ Up! This stamp and die bundle just released with the new Online Exclusive products. It’s not your typical stamp and die bundle though. The accompanying die is a full-size background die that leaves delicate lines of dots in your paper. What I love about this die is being able to create so many different looks with this one very simple die. Let’s check out today’s card to see what I mean.

This design was inspired by a card I saw made by fellow demo Mikaela Titheridge over at the Crafty O’ Ink Pen. We get started with a base of Balmy Blue cardstock. The focal panel has a mat of Misty Moonlight cardstock which serves to give some structure and stability to our focal panel and some depth to our color palette. The focal panel is a sheet of the blue Beautiful Bokeh that has been cut with the Pattern of Friendship die on the diagonal to create an argyle pattern. I love how this pattern gives the illusion of blowing rain. Using the Bright Skies dies, I cut several different sized clouds from white cardstock and adhered them in several different layers onto our focal panel. I stamped the sentiment from Pattern of Friendship in Versamark and then heat embossed with white embossing powder onto a sheet of the yellow Beautiful Bokeh paper and then cut a circle using the Spotlight on Nature dies to create the sun for the scene. I tucked the sun behind the clouds. I added some raindrops under the clouds using the blue tinsel gems and then added some bits of sparkly interest with the white and yellow starburst sequins.

Reimagining how to pair products in our crafty stash is what making a papercrafter so much fun. When I’m looking for a unique spin on an otherwise very traditional idea, I try to think of how I can use something from my stash differently. Like using the Pattern of Friendship background die to create the look of rain. How can you reimagine some of your favorites?

I hope you’ll pop in tomorrow to see what else we can get up to with this week’s featured bundle!

Product List
Online Exclusives · Thankful Garden

You’re On My Mind

Happy Saturday….uh, I mean Monday? As I’m sure you could tell, Saturday came and went and all was quiet here. Saturday turned out to be a much busier day than we had originally anticipated. The kiddo had an Academic Pentathlon tournament and then we had dinner with friends. I expected to have enough time in between to make charcuterie boards AND a card. But those best laid plans didn’t quite pan out. But I had this idea in my head and wanted to share one final card to wrap up our week with the Lovely Garden suite. So today, you’ll be getting TWO posts!

Our final card in the Lovely Garden design series pairs this lovely paper with the new Pattern of Friendship die, Mixed Labels stamps, and paper butterflies (one of my favorite accessories). I wanted to try something a little different with the Pattern of Friendship die and double cut to create a pattern, and I really love how it turned out and am looking forward to trying out some other pattern ideas.

Our card gets started with a base of Fresh Freesia cardstock. I used the small floral pattern sheet from the Lovely Garden paper pack as the backdrop for our focal panel. The focal panel is also a sheet of the Lovely Garden pack and is matted with a sheet of the tungsten textured metallic cardstock that has been inlaid with a plaid pattern using the Pattern of Friendship die. I wrapped some Fresh Freesia velvet ribbon around the metallic panel before adhering to the base with dimensionals. The floral patterned focal panel is adhered over the metallic mat with several layers of dimensionals so that it would lie flat over the raised velvet ribbon. I stamped the sentiment from Mixed Labels in Fresh Freesia on white cardstock and then cut with the banner die from the Adventurous Sky dies. The sentiment is adhered to the floral panel with dimensionals. The paper butterfly is given a little sparkle with Wink of Stella before it’s adhered to the panel approaching a flower. A few two tone sparkle gems add the twinkle and draw the eye across the design to take in all the elements.

I hope you enjoyed getting a peek at a number of ways that you can use the Lovely Garden suite to make beautiful designs. This week, we’re going to getting a closer look at the Pattern of Friendship bundle. I think you’re going to love it!

Product List
Online Exclusives · Sketchy Fridays · Thankful Garden

Sketchy Fridays: Sympathy Garden

We’ve made it through another week, and I don’t know about you but this one went by quickly with Ash Wednesday in the middle. The start of Lent always means a lot more rehearsal time for me. Such is the life of a singer! Despite some crazy weather at the beginning of the week, we’re enjoying more springlike weather here in North Texas.

But the real business you’ve all come for is Sketchy Fridays, so we’ll get right to it! For those of you who are new here, Sketchy Fridays is a weekly series where we’re using a card sketch to design our featured card. Right now, we’re working through a full series of designs using the card sketches found in current Stampin’ Up! catalogs.

This week’s card is based on Sketch #16 from the Stampin’ Up! Annual Catalog. Today’s design features the Lovely Garden paper and decorative masks, along with the Textured Notes dies, all from the new Stampin’ Up! Online Exclusives release.

I decided to try a different technique with the decorative masks after seeing several other demos use it. The masks for the Thankful Garden stamp set are made, not only to use with the stamped images, but also can stand alone to make lovely watercoloresque images.

Our card starts with a base of Balmy Blue cardstock with a background panel of the Lovely Garden designer series paper. I decided to reiterate the floral images on the focal panel, so I used the masks and 3 shades of purpley-pink (Bubble Bath, Fresh Freesia, and Petunia Pop) to create the flowers. I cut them out with my paper snips. I created the focal panel by first using the Textured Notes dies to cut a piece of vellum (because I wanted the lovely background pattern to show through) and then the piece of black and white polka dot from the Lovely Garden pack. I tied some Fresh Freesia velvet ribbon around the background panel before adhering and then adhered the focal panel pieces over it. I layered the flowers with dimensionals to give some depth. I stamped the sentiment in Fresh Freesia on white using the Mixed Labels stamps and cut it out with the Something Fancy hexagon die. The sentiment mat is cut from Petunia Pop glimmer paper using the Mixed Labels dies. I put a twist of gold thread in between the two sentiment layers for a little added sparkle before adding some of the starburst sequins.

Today’s sketch inspired a few changes here and there to the suggested layout. Remember, a sketch should never tie you down but just make the process of getting started and finishing a lot easier. When all is said and done, I really like the softer look you can achieve by using the decorative masks by themselves like I did here, but I’m probably much more likely to use them in conjunction with the stamped images because I really like the definition and detail. But isn’t it fun to try new things?!

We’ll be closing out our series tomorrow. I hope you’ll pop in and see how we finish off our week!

Product List