Welcome to the midweek, everyone! My best intentions of getting this post wrapped up and published yesterday didn’t come to pass. My day just didn’t quite go as planned. We’re still working to get back into the groove of all the things after the holiday break and I forgot how busy Tuesdays typically turn out to be.
This week, we’re continuing to take a look at some of the new products that hit the store last week. If you haven’t checked out all that’s new, click here to take a look. It’s definitely worth the peek!
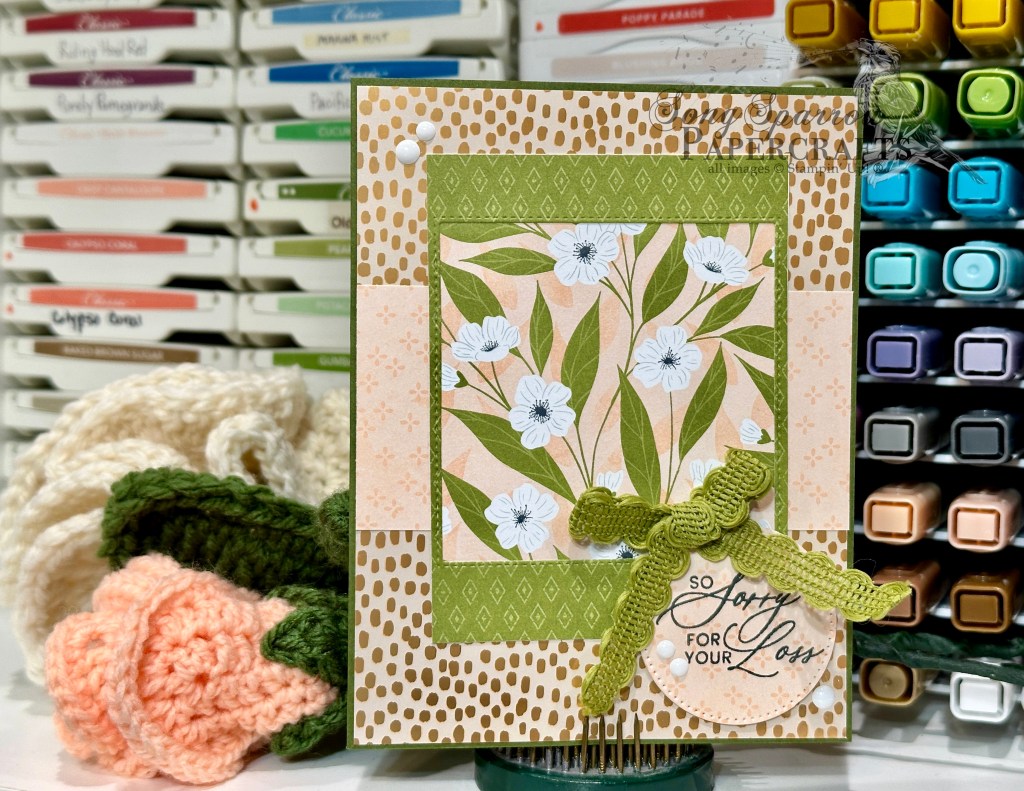
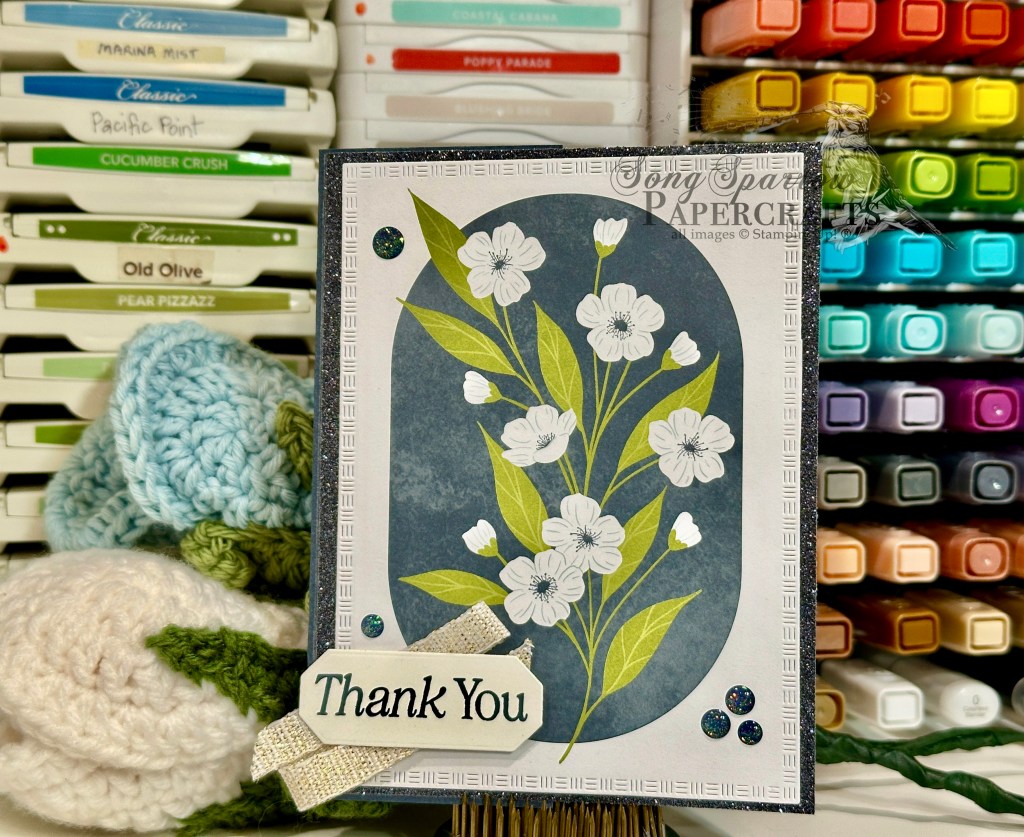
So this week we’re working with the new Prayers & Promises stamp set. These sentiments cover a whole bunch of occasions and help with those “difficult” cards. Today we’re making a get well card using a whole host of new products, including paper, laser cut elements, ribbon, and embellishments!

We get started with a base of white cardstock. A sheet of the Lovely Blossoms patterned paper serves as our backdrop. I love the combination of the soft background with the bold Secret Sea accents. Our focal panel combines several elements. We start with a base of the January Product of the Month (still available!) called True Blue Florals and then layer the new Pleasant Patterns foiled paper on top. The sentiment from the Prayers & Promises set is stamped in Secret Sea on one of the diecut sentiment panels included in the 2025 Advent Calendar, which is adhered in the bottom corner with dimensionals. I layered some Covered in Flowers accents, colored with Wink of Stella, over a twist of the new white with gold ribbon. We finish things off with some sparkle dot essentials for an additional pop of twinkle.
This card comes together in a flash and is sure to be the perfect pick-me-up for a friend who’s under the weather. We’ll be staying with our botanical theme tomorrow as we pair our sentiment set with two new multi-image bundles. I hope you’ll drop in to see which bundles are coming to the stage!
Product List![Basic White 8 1/2" X 11" Cardstock [ 166780 ]](https://assets1.tamsnetwork.com/images/EC042017NF/166780s.jpg "Basic White 8 1/2\" X 11\" Cardstock [ 166780 ]")
![Pleasant Patterns 12" X 12" (30.5 X 30.5 Cm) Specialty Designer Series Paper [ 166950 ]](https://assets1.tamsnetwork.com/images/EC042017NF/166950s.jpg "Pleasant Patterns 12\" X 12\" (30.5 X 30.5 Cm) Specialty Designer Series Paper [ 166950 ]")
![Lovely Blossoms 12" X 12" (30.5 X 30.5 Cm) Designer Series Paper [ 167168 ]](https://assets1.tamsnetwork.com/images/EC042017NF/167168s.jpg "Lovely Blossoms 12\" X 12\" (30.5 X 30.5 Cm) Designer Series Paper [ 167168 ]")
![12 Days Of Crafting Advent Calendar (English) [ 167335 ]](https://assets1.tamsnetwork.com/images/EC042017NF/167335s.jpg "12 Days Of Crafting Advent Calendar (English) [ 167335 ]")
![Prayers & Promises Photopolymer Stamp Set (English) [ 167014 ]](https://assets1.tamsnetwork.com/images/EC042017NF/167014s.jpg "Prayers & Promises Photopolymer Stamp Set (English) [ 167014 ]")
![Secret Sea Classic Stampin' Pad [ 165285 ]](https://assets1.tamsnetwork.com/images/EC042017NF/165285s.jpg "Secret Sea Classic Stampin' Pad [ 165285 ]")
![Clear Wink Of Stella Glitter Brush [ 141897 ]](https://assets1.tamsnetwork.com/images/EC042017NF/141897s.jpg "Clear Wink Of Stella Glitter Brush [ 141897 ]")
![White With Gold 3/8" (1 Cm) Ribbon [ 166979 ]](https://assets1.tamsnetwork.com/images/EC042017NF/166979s.jpg "White With Gold 3/8\" (1 Cm) Ribbon [ 166979 ]")
![Sparkle Dot Essentials [ 166991 ]](https://assets1.tamsnetwork.com/images/EC042017NF/166991s.jpg "Sparkle Dot Essentials [ 166991 ]")
![Stampin' Dimensionals [ 104430 ]](https://assets1.tamsnetwork.com/images/EC042017NF/104430s.jpg "Stampin' Dimensionals [ 104430 ]")
![Mossy Meadow 8-1/2" X 11" Cardstock [ 133676 ]](https://assets1.tamsnetwork.com/images/EC042017NF/133676s.jpg "Mossy Meadow 8-1/2\" X 11\" Cardstock [ 133676 ]")
![Stylish Shapes Dies [ 159183 ]](https://assets1.tamsnetwork.com/images/EC042017NF/159183s.jpg "Stylish Shapes Dies [ 159183 ]")
![Old Olive 3/8" (1 Cm) Specialty Rickrack [ 167006 ]](https://assets1.tamsnetwork.com/images/EC042017NF/167006s.jpg "Old Olive 3/8\" (1 Cm) Specialty Rickrack [ 167006 ]")
![Moody Palette Glossy Dots [ 167180 ]](https://assets1.tamsnetwork.com/images/EC042017NF/167180s.jpg "Moody Palette Glossy Dots [ 167180 ]")
![Mini Stampin' Dimensionals [ 144108 ]](https://assets1.tamsnetwork.com/images/EC042017NF/144108s.jpg "Mini Stampin' Dimensionals [ 144108 ]")
![Cloud Cover 8 1/2" X 11" Cardstock [ 165621 ]](https://assets1.tamsnetwork.com/images/EC042017NF/165621s.jpg "Cloud Cover 8 1/2\" X 11\" Cardstock [ 165621 ]")
![Soft Sea Foam 8-1/2" X 11" Cardstock [ 146988 ]](https://assets1.tamsnetwork.com/images/EC042017NF/146988s.jpg "Soft Sea Foam 8-1/2\" X 11\" Cardstock [ 146988 ]")
![Vellum 12" X 12" (30.5 X 30.5 Cm) Specialty Paper [ 167099 ]](https://assets1.tamsnetwork.com/images/EC042017NF/167099s.jpg "Vellum 12\" X 12\" (30.5 X 30.5 Cm) Specialty Paper [ 167099 ]")
![Peaceful Garden 12" X 12" (30.5 X 30.5 Cm) Glimmer Paper [ 165929 ]](https://assets1.tamsnetwork.com/images/EC042017NF/165929s.jpg "Peaceful Garden 12\" X 12\" (30.5 X 30.5 Cm) Glimmer Paper [ 165929 ]")
![Lovely Stripes 3 D Embossing Folder [ 167179 ]](https://assets1.tamsnetwork.com/images/EC042017NF/167179s.jpg "Lovely Stripes 3 D Embossing Folder [ 167179 ]")
![Delicate Pines Dies [ 166073 ]](https://assets1.tamsnetwork.com/images/EC042017NF/166073s.jpg "Delicate Pines Dies [ 166073 ]")
![Lovely Arrangements Bundle (English) [ 167176 ]](https://assets1.tamsnetwork.com/images/EC042017NF/167176s.jpg "Lovely Arrangements Bundle (English) [ 167176 ]")
![Cloud Cover Classic Stampin' Ink Refill [ 165279 ]](https://assets1.tamsnetwork.com/images/EC042017NF/165279s.jpg "Cloud Cover Classic Stampin' Ink Refill [ 165279 ]")
![Cloud Cover 5/8" (1.6 Cm) Textured Ribbon [ 167182 ]](https://assets1.tamsnetwork.com/images/EC042017NF/167182s.jpg "Cloud Cover 5/8\" (1.6 Cm) Textured Ribbon [ 167182 ]")
![Secret Sea 8 1/2" X 11" Cardstock [ 165624 ]](https://assets1.tamsnetwork.com/images/EC042017NF/165624s.jpg "Secret Sea 8 1/2\" X 11\" Cardstock [ 165624 ]")
![Words Of Beauty Dies (English) [ 167089 ]](https://assets1.tamsnetwork.com/images/EC042017NF/167089s.jpg "Words Of Beauty Dies (English) [ 167089 ]")
![Pretty In Pink Stampin’ Blends Combo Pack [ 163824 ]](https://assets1.tamsnetwork.com/images/EC042017NF/163824s.jpg "Pretty In Pink Stampin’ Blends Combo Pack [ 163824 ]")
![Calypso Coral Stampin' Blends Combo Pack [ 154881 ]](https://assets1.tamsnetwork.com/images/EC042017NF/154881s.jpg "Calypso Coral Stampin' Blends Combo Pack [ 154881 ]")
![Daffodil Delight Stampin' Blends Combo Pack [ 154883 ]](https://assets1.tamsnetwork.com/images/EC042017NF/154883s.jpg "Daffodil Delight Stampin' Blends Combo Pack [ 154883 ]")
![Pool Party Stampin' Blends Combo Pack [ 154894 ]](https://assets1.tamsnetwork.com/images/EC042017NF/154894s.jpg "Pool Party Stampin' Blends Combo Pack [ 154894 ]")
![Garden Green Classic Stampin' Pad [ 147089 ]](https://assets1.tamsnetwork.com/images/EC042017NF/147089s.jpg "Garden Green Classic Stampin' Pad [ 147089 ]")
![Versamark Pad [ 102283 ]](https://assets1.tamsnetwork.com/images/EC042017NF/102283s.jpg "Versamark Pad [ 102283 ]")
![Metallics Wow! Embossing Powder [ 165678 ]](https://assets1.tamsnetwork.com/images/EC042017NF/165678s.jpg "Metallics Wow! Embossing Powder [ 165678 ]")
![Traditional Sparkling Sequins [ 165875 ]](https://assets1.tamsnetwork.com/images/EC042017NF/165875s.jpg "Traditional Sparkling Sequins [ 165875 ]")
![Mini Glue Dots [ 103683 ]](https://assets1.tamsnetwork.com/images/EC042017NF/103683s.jpg "Mini Glue Dots [ 103683 ]")
![Gold Striped 3/8" (1 Cm) Mesh Ribbon [ 165599 ]](https://assets1.tamsnetwork.com/images/EC042017NF/165599s.jpg "Gold Striped 3/8\" (1 Cm) Mesh Ribbon [ 165599 ]")

![Traditions Of Christmas 12" X 12" (30.5 X 30.5 Cm) Specialty Designer Series Paper [ 165853 ]](https://assets1.tamsnetwork.com/images/EC042017NF/165853s.jpg "Traditions Of Christmas 12\" X 12\" (30.5 X 30.5 Cm) Specialty Designer Series Paper [ 165853 ]")
![Words Of Beauty Bundle (English) [ 167090 ]](https://assets1.tamsnetwork.com/images/EC042017NF/167090s.jpg "Words Of Beauty Bundle (English) [ 167090 ]")
![Basics Wow! Embossing Powder [ 165679 ]](https://assets1.tamsnetwork.com/images/EC042017NF/165679s.jpg "Basics Wow! Embossing Powder [ 165679 ]")


 Designer Series Paper")
 Specialty Designer Series Paper")
 Glimmer Paper")


 Striped Trim")
 Satin Ribbon")
 Trim Combo Pack")


 Specialty Designer Series Paper")
 Specialty Paper")
")


 Designer Series Paper & Sticker Sheet (English)")
")


