Inspiration

Miss You

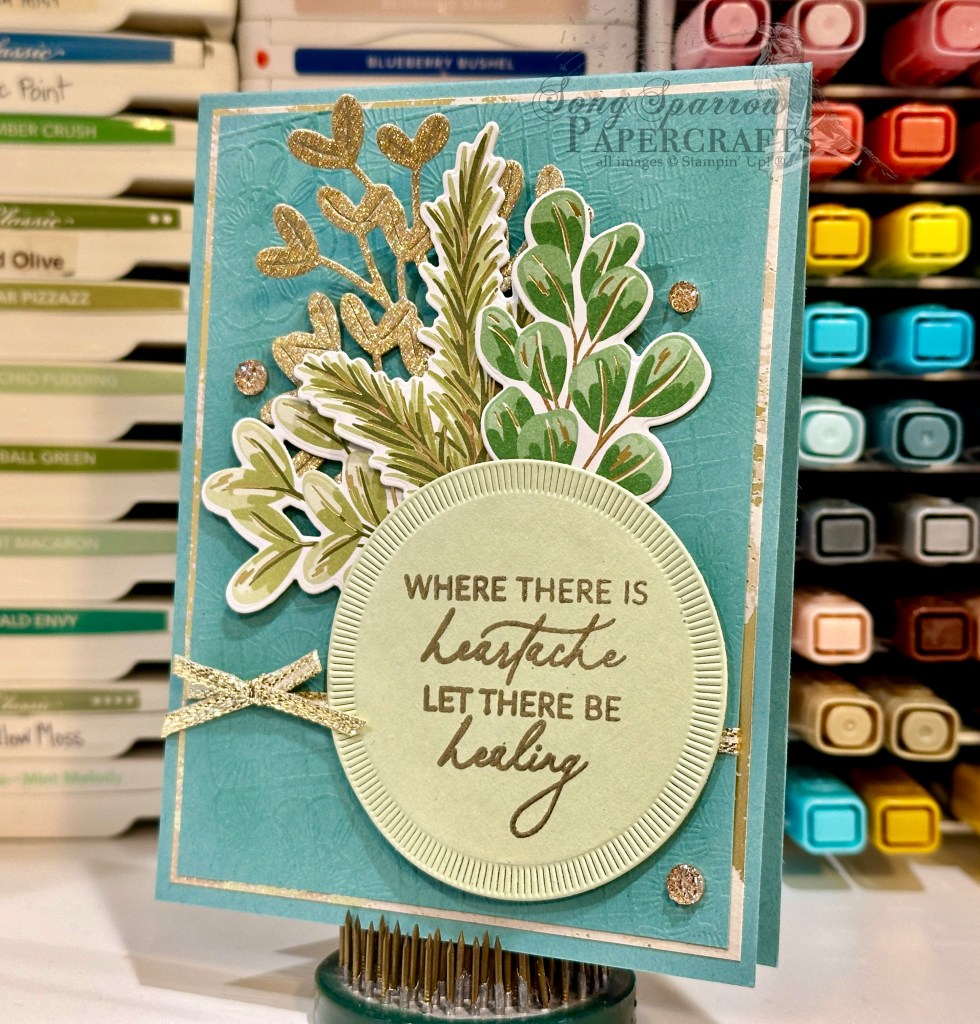
Welcome to this wonderful Wednesday. I’m telling myself it’s wonderful even though our temps here in North Texas are currently in the teens and wind chills are below zero. 🥶 For some of you, this is a typical winter day, but we are simply not accustomed to brutally cold and windy days.

This week, our design theme explores pattern & texture with sentiments. And today’s design is totally inspired by a card by fellow demo over at Creative Stamping Designs. I don’t often make shaker cards, but when I saw this combination of Beautiful Butterflies and Bloom Impressions, I just had to give it a go!

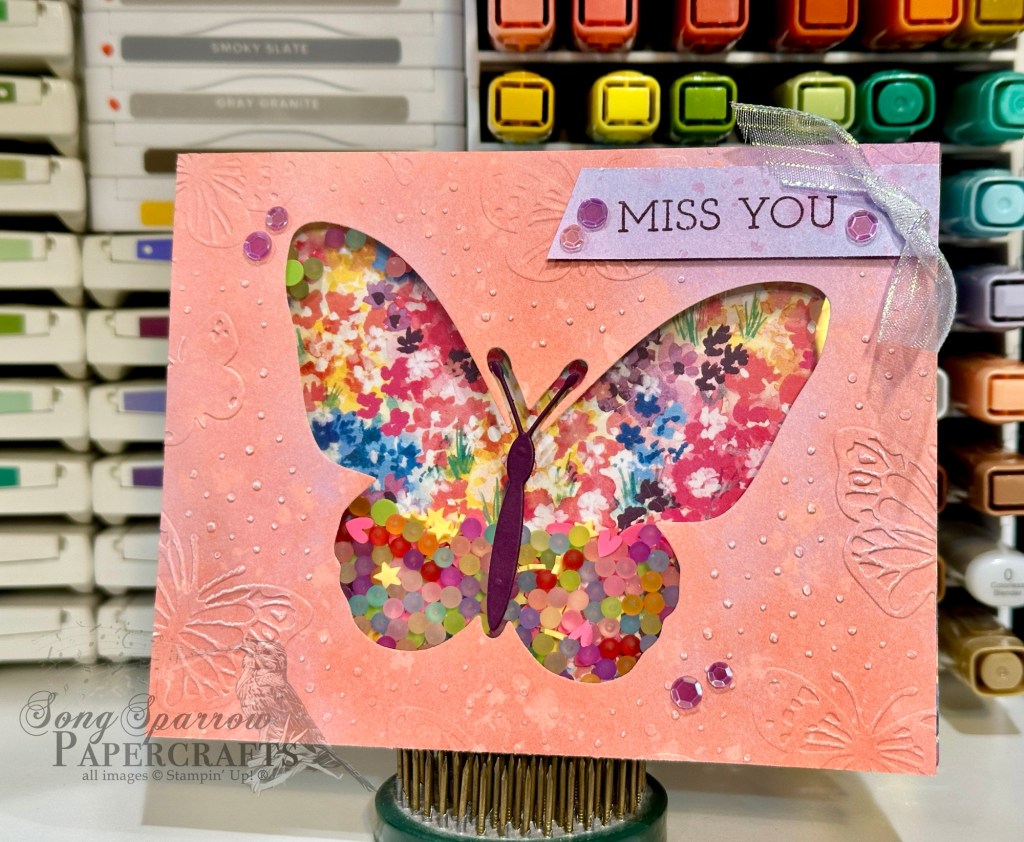
We get started with a base of white cardstock. Since the base is only visible on the inside, I keep things simple. But you could easily choose a complimentary color if you wish. A quarter sheet of the rainbow Bloom Impressions paper covers the card front and serves as the base for our shaker elements. I chose a coordinating pink/orange/purple medley sheet from the Beautiful Bokeh paper pack and machine embossed it with the Beautiful Butterflies hybrid embossing folder to imprint the butterfly pattern and cut the center butterfly at the same time. I made a deep impression by passing the embossing folder through my machine twice, which allows the white center of the paper to show through for a distressed look. I used the butterfly cutout on the inside panel of my card (not shown).

Next, we construct our shaker cover by adhering a window sheet to the back of the Beautiful Bokeh panel using tear-n-tape for a strong hold. (Tip: I save the acetate sheets from new stamp sets to use a window sheets. Simply give them a good wipe with a damp cloth on both sides and you’re good to go!) Apply a square of foam tape around the butterfly (still on the back of the sheet), leaving plenty of room for your shaker pieces to move. Be sure your foam strips meet and overlap at each corner to prevent any shaker pieces from escaping! Apply dimensionals around the edges (or you could use foam strips) to adhere this panel to your card front over the Bloom Impressions paper. Remove all of the backings, fill the center with your chosen shaker elements (I used a stash of retired shaker pieces I had on hand), and then adhere your card front over the filled shaker panel as it stays flat on your craft table.

I used a scrap of the Beautiful Bokeh to stamp the sentiment from Friends for Life in Blackberry Bliss and cut the end on the diagonal with my paper snips. Adhere in the upper corner with dimensionals. I added a knot of iridescent striped trim on the straight end. The card front is embellished with purple sequins to help our eyes pass across the design over the major elements. Voila!

Tomorrow we’ll be tiptoeing through the toadstools. I hope you’ll come along!

Product List
Inspiration

Inspired by You

Happy Tuesday, crafty friends! We enjoyed a very restful day off yesterday. We got to enjoy a bonus day off doing things together as a family, which is always nice. And it was a beautifully sunny day, so we got to enjoy time outside before we get another round of arctic air.

This week, we’re using patterns and textures to help our sentiments really shine. And today we’re pairing up the lovely Bloom Impressions Sale-a-Bration paper with the Inspiring Snapdragons bundle for this encouragement card.

We started with a base of Blackberry Bliss cardstock. I used both sides of the sheet of Bloom Impressions paper for the patterned element. Using the Inspiring Snapdragons dies, we create two stems. I used Fresh Freesia and Petunia Pop as the base colors and then the Fresh Freesia glimmer paper as the detail piece on top. The sprig of grass is cut from Shaded Spruce. They’re all adhered to the base with layers of dimensionals. The sentiment from Inspiring Snapdragons is stamped in BlackBerry Bliss on white cardstock and then cut out with the large banner die from Greetings of the Season (but could also be cut with paper snips). A bow of Fresh Freesia seam binding ribbon and Blackberry Bliss & Gold metallic ribbon finish off the sentiment panel which is adhered across the card front using dimensionals. Some purple sequins add a touch of sparkle and help the eye move across the design.

Tomorrow things will take flight as we continue this fun pattern & sentiment series. I hope you’ll stop in.

Product List
Inspiration

Patterned Thoughts

Happy Monday, everyone! For those in the U.S., happy Presidents’ Day. Did you know that the holiday we commonly call Presidents’ Day was originally established to celebrate George Washington our nation’s founding father’s birthday? It wasn’t until an ad campaign in the 1980s that the 3rd Monday in February came to be known as it is today as Presidents’ Day.

As we do each Monday, we’re introducing a new design theme today. I enjoyed last week’s textures & sentiments so much that I thought we would expand on the theme this week and incorporate patterns. So we’ll be exploring the combination of patterns & textures to highlight some of the wonderful sentiments in the current Stampin’ Up! lineup. Today we’re getting started with a more masculine-feeling design with a combination of the Timeless Plaid paper, Distressed Tiles embossing folder, and With You in Mind stamp set.

Our design gets started with a base of Early Espresso cardstock. I machine embossed a quarter-panel of Early Espresso with the Distressed Tiles embossing folder and then cut it down to serve as the backdrop for this design. I rubbed the panel with some gold ink to highlight the embossing. A strip of the brown Timeless Plaid paper is adhered to a piece of the gold-splattered text sheet from Nature’s Sweetness and adhered over the embossed panel. A 3×3 panel serves as the backdrop for our oversized sentiment. The square of textured gold paper serves as the mat for piece of the gold-splattered text paper that is adhered slightly off-center onto our card front. The sentiment from With You in Mind is stamped in Early Espresso on white cardstock and then diecut with the Countryside Corners dies. The sentiment panel is adhered over gold trim to the backdrop with dimensionals. A few drusy embellishments and low profile dots finish things off with a little sparkly pizzazz.

I love showing how designs can have lots of sparkle and still be more masculine-looking. Never be afraid to add some touches of bling to a masculine card design. Just think of it like the sprinkles on a cupcake! Tune in tomorrow for an “inspiring” design.

Product List
Inspiration

Birthday Waves

This week, our designs are focused on the combination of texture and sentiments. Today, I’m veering away from the simplicity of the design theme just a smidge as I incorporate more products in this design as we combine the Soft Waves embossing folder with the Wildflower Birthday accessories. And you may notice that while this design has a lot more accoutrement, it lacks nothing in the texture department – from embossing to chunky glimmer paper, there’s a lot going on here!

Our card gets started with a base of Flirty Flamingo cardstock. The background is a quarter-sheet of Flirty Flamingo that has been machine embossed with the Soft Waves embossing folder and then mounted on a mat of Night of Navy cardstock. Our focal section has a lot of elements from the Wildflower Birthday accessories, including the strip of blue polka-dotted paper that serves as the anchor element. Then we have the foiled and striped tag that serves as the base for everything else in our focal panel. Our cupcakes sit atop a piece of the pastel ombre glimmer paper that is diecut with the Mixed Labels dies and the small circle cut with the Spotlight on Nature dies. Dimensionals provide some depth and give plenty of room for our pop of gold thread. The sentiment from Simply Said is stamped in Night of Navy on white and then cut with paper snips and mounted on top of the decorative banner cut with the Mixed Labels die from a sheet of Petunia Pop glimmer paper. Petal Pink foil gems finish things off and tie all our peachy colored elements together.

Tomorrow we’ll be pairing up our weekly design theme with a sketch. Any guesses on what catalog I may choose?

Product List
Inspiration

Blissful Thanks

This week, our designs feature texture and sentiments. It’s so easy to grab for the pretty paper, but our embossing tools allow us to add texture that can be just as stunning and eye-catching as a beautiful sheet of patterned paper. Today, we’re combining the Distressed Tile embossing folder with the With You in Mind stamp set.

Our design begins with a base of Blackberry Bliss cardstock. I machine embossed a quarter-sheet of Pool Party cardstock with the Distressed Tiles embossing folder and then cut it down to leave about one-third of the base showing at the top. I covered the seam between the two colors with a combination of Very Vanilla satin ribbon and Blackberry Bliss & gold ribbon. The sentiment from With You in Mind is stamped in Blackberry Bliss on Very Vanilla and then diecut using the Something Fancy set. The sentiment mat is cut from pastel ombré glimmer paper. I added some regal foil gems to the sentiment panel for a little sparkle. The sentiment panel is adhered over the ribbon with dimensionals. Some vanilla natural tones shimmer gems across the front finish things off and help the eye move across our design.

A fairly clean and simple design that packs some eye-catching punch, don’t you think? Tune in tomorrow to see where our design theme takes us next!

Product List
Inspiration

Hey Friend

This week, we’re having fun with textures and sentiments. While we all love to reach for those gorgeous patterned papers, we can make equally as wonderful designs when our embossing tools take center stage. Today we’re combining a new Sale-a-Bration embossing folder called Starstruck with the Friends for Life bundle and a selection of In Colors to create a cheery design for a friend.

Our card design gets started with a base of Petunia Pop cardstock. Our background panel of Peach Pie is machine embossed with the SAB Starstruck embossing folder and oriented so that the negative side is facing up. I tied a strip of Summer Splash trim around the center of the embossed panel before adhering it to the base with dimensionals. The sentiment from Saying Hey is stamped in Petunia Pop ink before getting punch with the Heartfelt Hexagon punch and then adhered over the ribbon with dimensionals. I cut the word FRIEND from two different glimmer papers. The outline is from Summer Splash glimmer paper while the word FRIEND itself is from the pastel ombre glimmer paper. An extra layer of dimensionals helps FRIEND to stand out. A few purple sequins and some Sunny Days transparent dots bring the eye squarely to the party in the middle.

I just love how the embossed panel in this design almost looks to be a sheet of patterned paper, and it does make you think about how patterned papers ultimately get started. Sometimes the inspiration is literally a textured pattern.

Tune in tomorrow as things turn a bit more regal for some thankful thoughts.

Product List
Inspiration

He Will Direct Your Path

Welcome to a bright and shiny new week, crafty friends! It was a busy weekend around here as we did indeed finish up our big storage unit swap. Not something I really wanted to do but it was great to clean out and pare down through the process. We had record high temps here in North Texas, so we were completely spent by the time we wrapped up our big project!

BUT a cold and dreary day on Sunday meant an afternoon playing in the crafty goodness, working on designing for this week’s theme. I’ve been dialed in in all of the pretty patterned papers here lately and have been neglecting some of my favorite crafty tools—embossing tools. This week, our designs will focus on texture and sentiments. And today we get started with the Beautiful Butterflies embossing folder and the scripture from the You Are Beautiful stamp set.

We get started with a base of white cardstock. Our textured backdrop is a sheet of Lost Lagoon cardstock that is machine embossed with the Beautiful Butterflies embossing folder. I stamped the scripture from You Are Beautiful in Pretty Peacock on white cardstock and then cut using the Countryside Corners die. Two sparkly banners cut from Pretty Peacock glimmer paper with the Nested Essentials dies flank our sentiment and make it the eye-catching showpiece of our design. I looped a faux bow of iridescent striped ribbon behind the sentiment panel and riverside irregular pearls on either side of the panel for some added pop.

Tomorrow we’re paying homage to our friends with a fun and funky color palette. I hope you’ll come check it out!

Product List
Inspiration

Where There is Heartache

I love finding new ways to use product in my stash. And I realized that I often look at the “holiday” products as just that – products for the holidays and not for the everyday. So I wanted to challenge myself to expand designs with those holiday products.

Today, we’re using the Season of Green & Gold patterned paper to create a stunning sympathy card. I feel like sympathy cards should offer love, hope, and encouragement. And while it’s certainly a somber occasion, a design of carefully selected colors and elements can convey hope without words.

We get started on our card with a base of Lost Lagoon cardstock. Our focal panel backdrop consists of a panel of Lost Lagoon embossed on an angle with the Cute Crochet embossing folder and then matted with the gold mercury vellum. The Lost Lagoon panel has gold trim tied around it with a small bow. The sentiment from Everyday Greetings is stamped in Versamark on Soft Sea Foam and then heat embossed in gold. This is then diecut with the Spotlight on Nature dies. I love that the Season of Green & Gold designer paper coordinates with the Golden Greenery dies and have used the two together to cut out several of the stalks of greenery for the sentiment panel. I also cut a sheet of textured gold with the greenery dies. All of these greenery pieces are layered behind the sentiment panel. The drusy embellishments add extra sparkle.

Next week, we’re going to be in the woods. I hope you’ll come along!

Products used in today’s card:
Lost Lagoon, Soft Sea Foam cardstock
Season of Green & Gold, mercury vellum, textured gold DSP
Cute Crochet embossing folder
Everyday Greetings stamps
Spotlight on Nature, Golden Greenery dies
Gold embossing powder
Gold trim
Drusy embellishments
Dimensionals
Adhesives