Fun Folds

Through the Garden Window

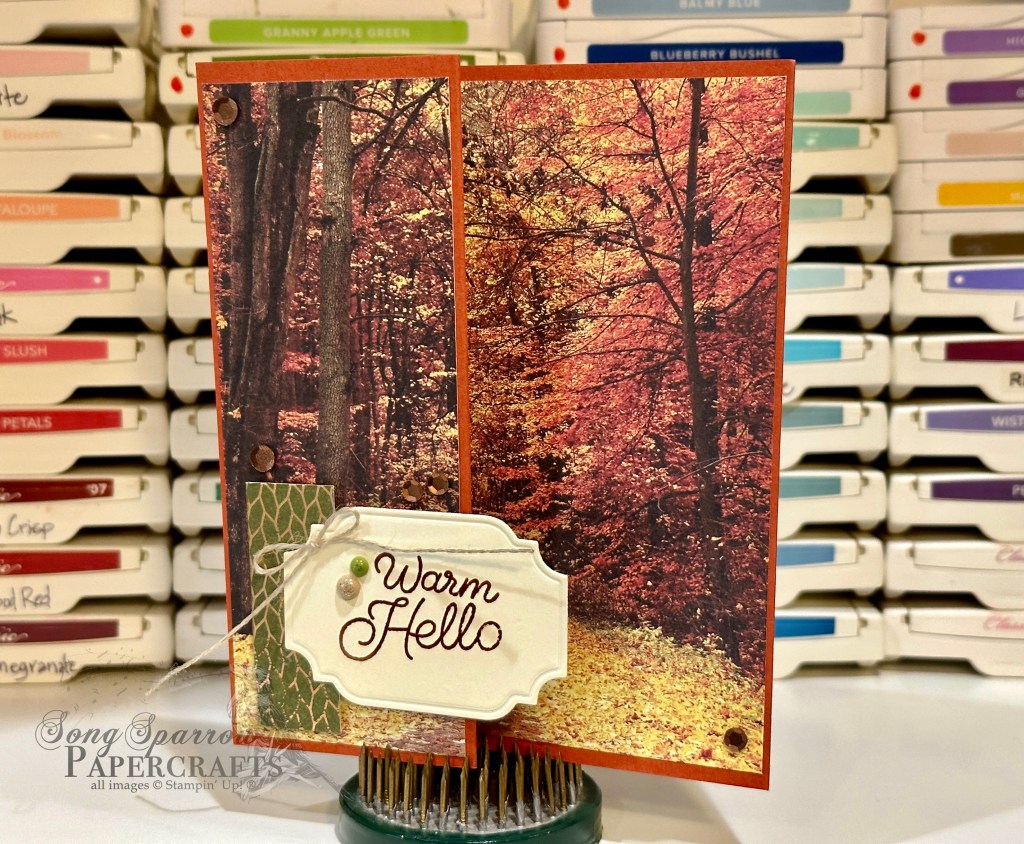
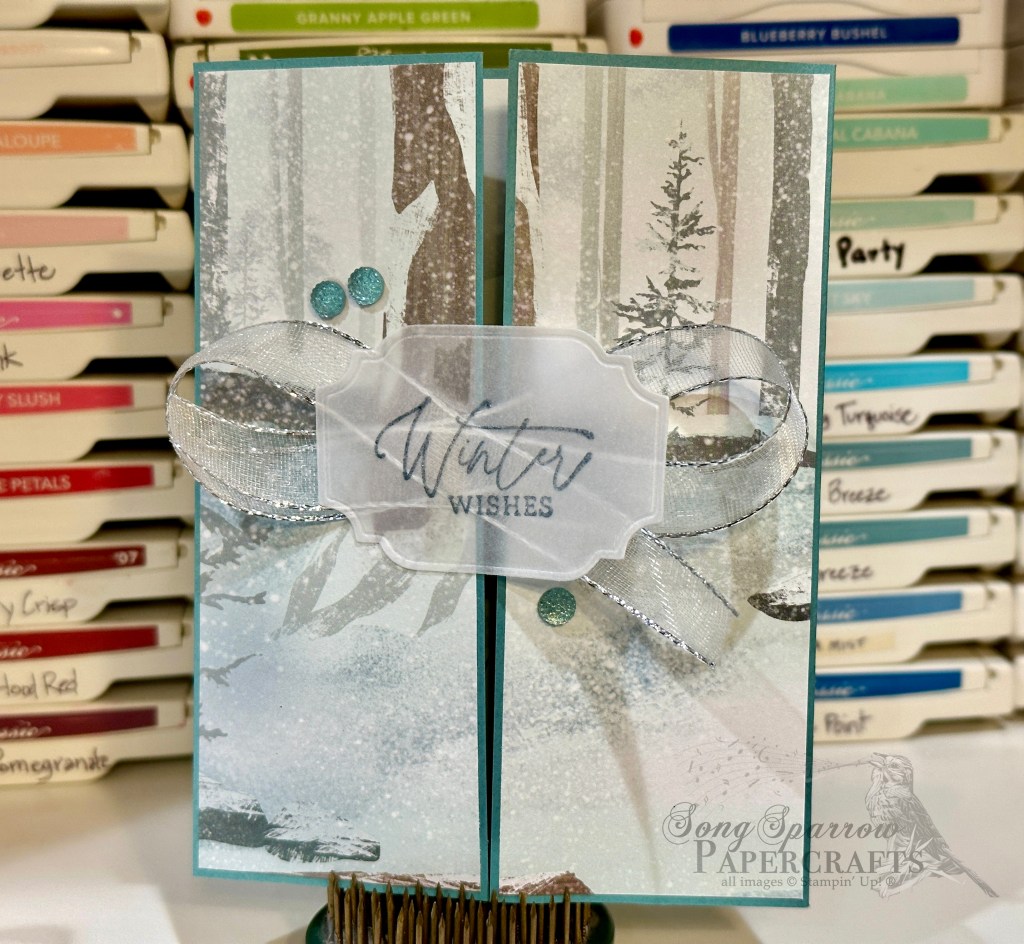
Happy Monday, everyone! I’m popping in today to share another fun fold card using the Meandering Meadow designer paper which will be available in the Online Exclusives section of the online store tomorrow (November 7th)!

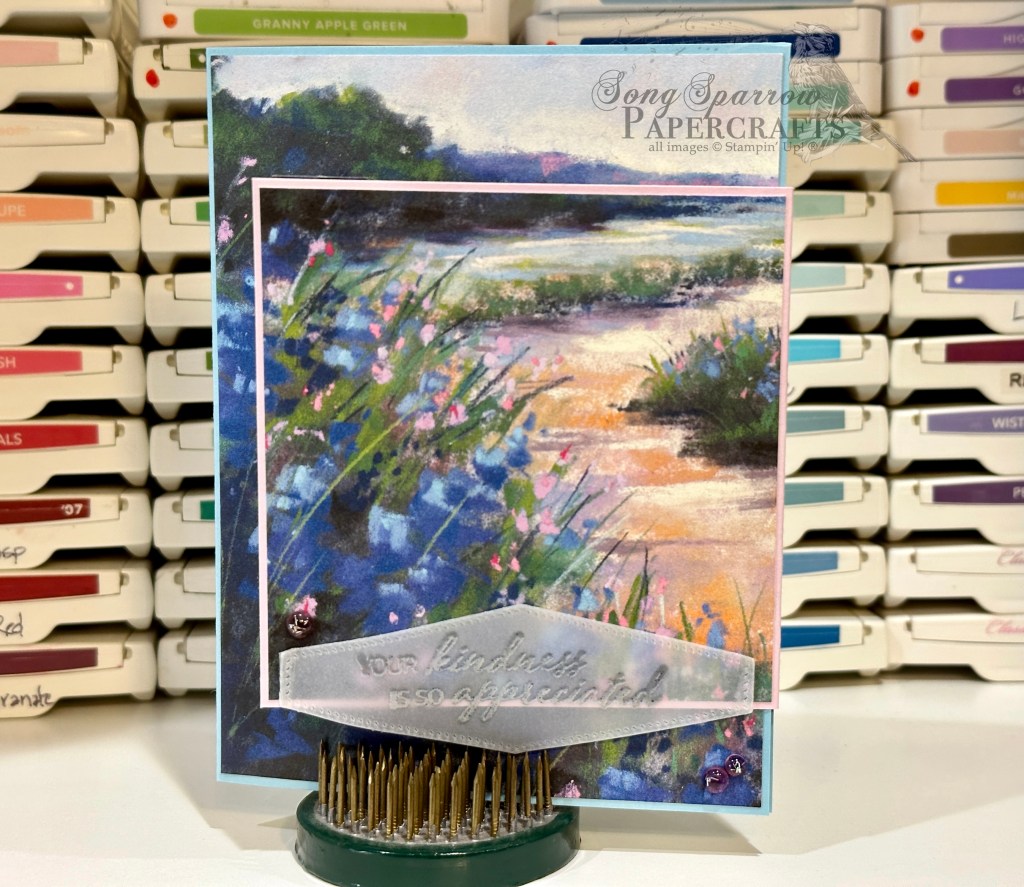
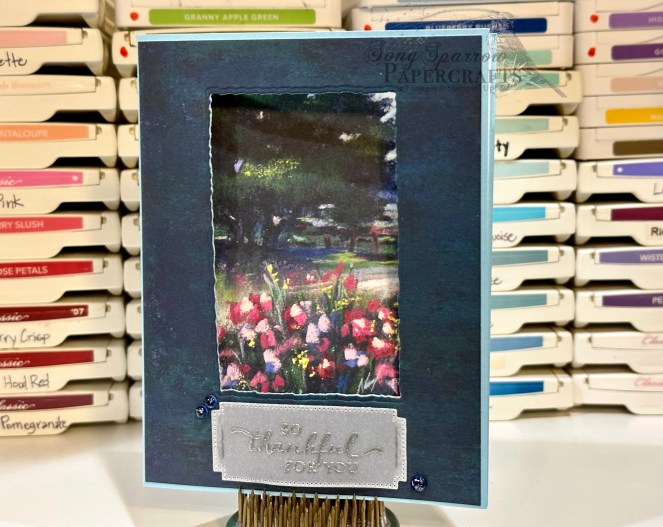
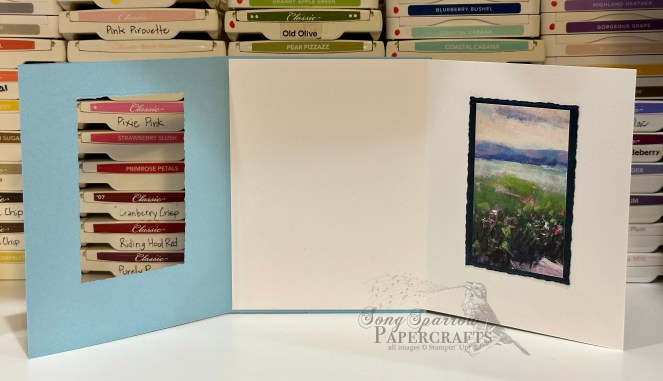
For today’s design, I decided to try my hand at a window card, which I combined with a flap fun fold. The design starts with a base of Balmy Blue cardstock cut to standard size and scored in the center. I chose the sheet of Meandering Meadow with the tree and bench as the focal image to peek through the window. I paired it with the sheet of moody blues — a combination of Night of Navy and Pretty Peacock — which would serve as the window panel. After trying several combinations, I felt that this moody sheet really drew out the darker hues of the garden scene, which felt more true to a peek through a window. And I just love how the whole feel of the garden scene changes from the view through the window to the open flap.

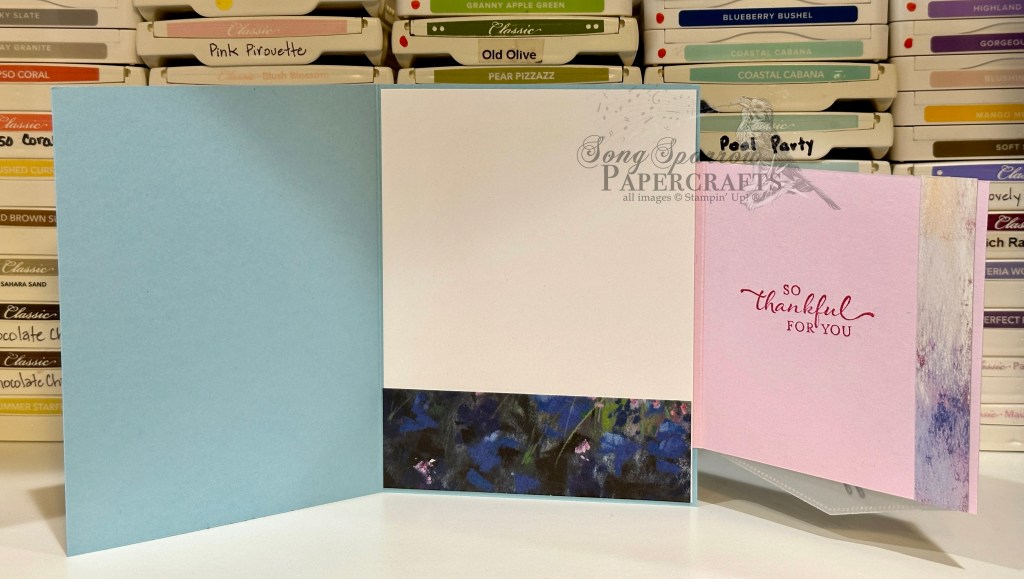
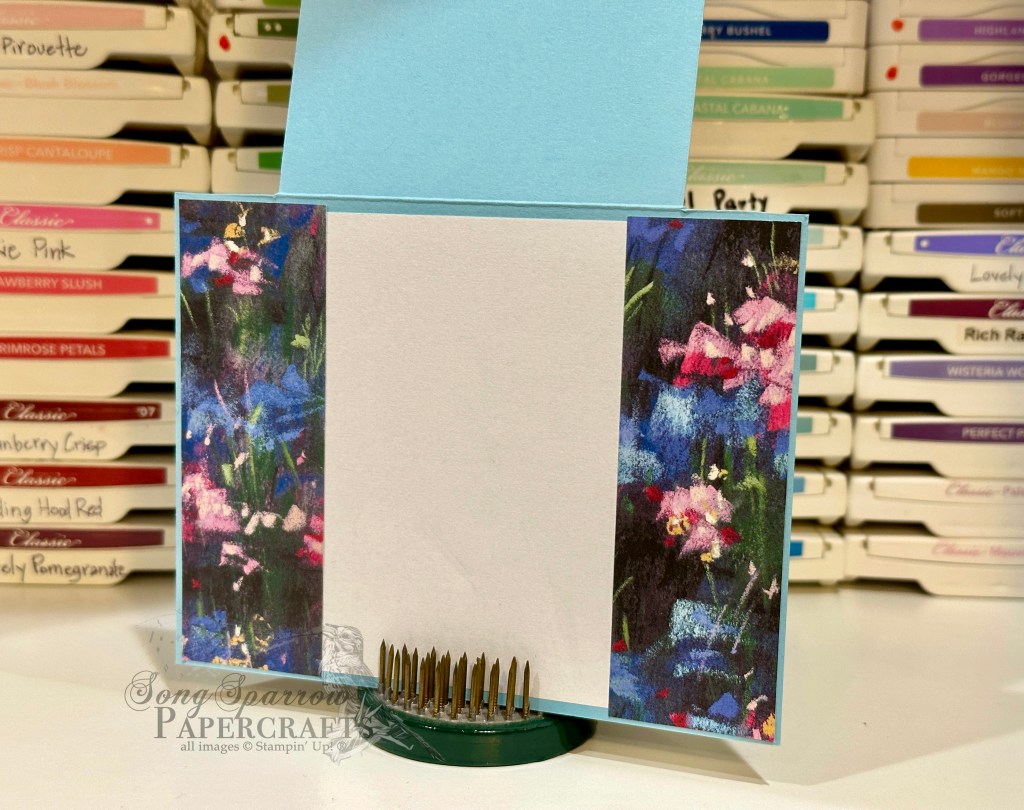
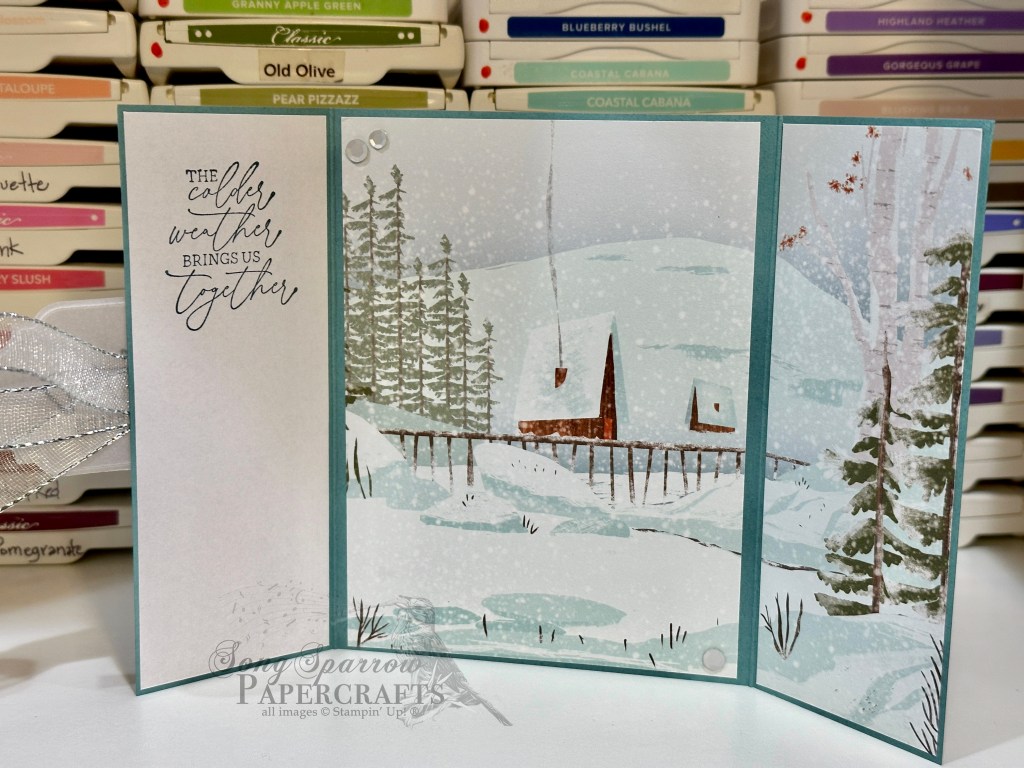
The moody blues sheet is adhered to the card front. Basic White cardstock serves as the base for the flap panel. Adhere the flap panel base to the inside of the Balmy Blue card base. With the inside flap closed, the garden scene paper is adhered to the front of the flap. The window is cut using the Deckled Rectangles die. (TIP: Run the die back and forth through your diecutting machine several times to ensure a clean cut through all layers.) I used the cut rectangle as a focal image for the inside of the flap next to the message panel and decorated the rectangle using the scenic side of the roughly 2-inch strip of moody blue cut from the larger 6 x 6 panel. The sentiment from the So Sincere stamp set is heat embossed in silver on a vellum panel diecut using the Autumn Leaves dies. Pops of sparkle are added to the card front using tinsel gems and on the garden scene using glitter sequins.

What do you think? To see this design come together from start to finish, check out the reel over on Instagram. Want to recreate this design on your own? Here is a PDF tutorial to walk you through the process from start to finish.

Have you been enjoying the sprinkling of fun folds and how-I-made-it videos? If you’d like to continue seeing more of this type of content, please Like or comment on this post to let me know.

Products used:
Balmy Blue, Basic White, vellum cardstock
Meandering Meadow DSP (Online Exclusive available November 7th)
So Sincere stamps
Deckled Rectangles, Autumn Leaves dies
Tinsel gems
Glitter sequins
Silver embossing powder
Adhesive

All ads on this site are posted by WordPress and are based on your personal browsing history. I do not control ad content.

Fall · Fun Folds

Warm Hello

We have a beautiful ash tree in our front yard, and just this week it has really begun to turn. This beautiful designer paper from the All About Autumn pack reminds me of our tree right now with the stunning yellow leaves strewn about.

This card design is set atop a piece of Cajun Craze cardstock. The z-fold design allows the use of the entire sheet of DSP, minus a small half-inch strip at the bottom. I kept the front sentiment panel small to ensure the inside message panel is easily accessible. The sentiment from Circle Sayings is stamped on a Very Vanilla panel diecut using the All That dies. To draw the eye, I used a small scrap of the foiled side of the tree sheet leftover from the Fabulous Friend card (see that design here) and added a small twine bow, along with some speckled dots and sequins.

I really wanted the gorgeous designer paper to be center stage, and I think the smaller sentiment panel does the trick. What do you think?

Wanna see how the design came together? Check out the reel over on Instagram.

Products used:
Cajun Craze, Very Vanilla cardstock
All About Autumn DSP
Circle Sayings stamps
All That dies
Adhesive-backed speckled dots, sequins
Linen thread
Dimensionals
Adhesives

All ads on this site are posted by WordPress and are based on your personal browsing history. I do not control ad content.

Fun Folds

So Appreciated

I wanted to give a fold-over flap fun fold another try, and I knew that the new Meandering Meadow designer series paper would be the perfect patterned paper to use. This new pack of 6 x 6 designs is set to launch as an Online Exclusive on November 7th and is a beautiful pack full of pastel chalk designs.

We begin with a base of Balmy Blue. I knew I wanted to highlight the bend in the water with the beautiful sunset reflection on the flap, so I chose Bubble Bath as the base for the flap in order to draw out those beautiful, subtle colors of the sunset and delicate flowers. This design calls for 2 sheets of the selected Meandering Meadow pattern. The middle section of the card front is comprised of almost an entire sheet. The flap is approximately 4″ x 3 3/4″ with the patterned panel just 1/8″ smaller all around. (The entirety of the Bubble Bath strip is 4″ x 7 1/2″ and scored in the center.) The front sentiment from the So Sincere stamp set is heat embossed in silver atop a vellum panel diecut using the Nested Essentials dies. A pop of sparkle comes from the tinsel gems nestled around the sentiment panel. For th inside message panel, I elected to use a sheet of cardstock to ensure good coverage over the flap base. I used scraps of the patterned paper to add interest to the message panel and flap inside the card. The inside sentiment is from the So Sincere stamp set.

What do you think of this fun fold? If you hop over to Instagram, you can watch how this whole design came together. It was a lot of fun to put together, even if I did make a boo-boo in my cuts while making it. Can you tell me where things went awry? I decided to leave that mistake in the video so you know that we ALL make them!

Products used:
Balmy Blue, Bubble Bath, Basic White, vellum cardstock
Meandering Meadow DSP (coming soon to Online Exclusives)
So Sincere stamps
Nested Essentials dies
Silver embossing powder
Tinsel gems
Adhesives

All ads on this site are posted by WordPress and are based on your personal browsing history. I do not control ad content.

Fun Folds

So Thankful for You

I’m excited to show you a sneak peek of a new designer series paper set to release on November 7th. Meandering Meadow is a gorgeous set of oil pastel designs turned to designer paper. Each of the designs in this pack is simply stunning and a little reminiscent of some of my favorite Renaissance paintings. Monet or Manet anyone?

For today’s card, I tried a new fun fold so that I could retain as much of this beautiful paper in the design as possible. The base of this card is a sheet of Balmy Blue cardstock in the standard 8.5 x 5.5 inch format and scored at the traditional 4 1/4-inch mark. To create the flap, a 1-inch strip is cut from each side of the card front flap. The 6 x 6-inch sheet of designer paper is first cut to 4 1/8 x 6 inches. I next cut 1 3/8″ from each side of the panel to create a 3 1/4 x 4 1/8-inch panel. A plain sheet of white paper serves as the message panel on the inside of the card, and each of the 1 3/8-inch strips are adhered on either side of the inside message panel so that a portion peeks through when the card is closed. The larger patterned paper panel is adhered to the front flap. The sentiment from the So Sincere stamp set is heat embossed on a vellum panel diecut using the Autumm Leaves dies. A strip of silver trim and a few fine sparkle gems draw the eye to the sentiment.

What do you think of this fun fold? You can find the PDF instructions here. And if you hop over to Instagram, you can watch how this whole design came together.

Products used:
Balmy Blue, vellum cardstock
Meandering Meadow DSP (coming soon to Online Exclusives)
So Sincere stamps
Autumn Leaves dies
Silver embossing powder
Silver trim
Fine sparkle gems
Adhesives

All ads on this site are posted by WordPress and are based on your personal browsing history. I do not control ad content.

Fall · Fun Folds

Fabulous Friend

It’s really beginning to feel and look like fall here in Texas. Fall is my favorite season. At its peak, the main street to our house is lined with trees that look like fire. I try to run errands often once the trees begin to turn just to be able to watch the progression and transformation into a street lined with the beautiful colors of a warm fire.

And that brings us to today’s design which uses the beautiful All About Autumn designer paper. It has been so popular that it sells out as quickly as Stampin’ Up! can restock the shelves. I was lucky enough to get a sampling and just this week snagged a whole pack!

The card base for today’s card is Mossy Meadow cardstock. The fun fold design begins with the single Z-fold. (Hop over here for a PDF tutorial.) I selected the beautiful grove of trees and the foiled side of the limbs of leaves sheets of DSP. The grove of trees pattern is cut into 2-inch strips and adhered on the left of the outside and inside panels. The foiled sheet is approximately 3 inches wide to allow some overlap with the tree pattern. The inside sentiment from Heartfelt Hexagon is stamped on a 2-inch strip of white paper and the panel is adhered in the center on the left side of the center card fold (at 4 1/4 inches).

The outside sentiment from Bold Bouquet is stamped on a Very Vanilla banner diecut using the Nested Essentials dies. A strip of natural finish ribbon is layered behind the sentiment panel and adhered to the outside tree panel. Because I wanted a large focal point on the front of the card, the z-fold must be modified to a half-barn fold by adhering the two smaller panels together to ensure the sentiment and message panel inside the card are visible and accessible. And I absolutely love the result! If you want to see the evolution of this design, hop on over to Instagram to catch the reel.

TIPS for this design: 1) you can turn a one-line sentiment into a block using a simple masking technique. I inked each word individually and covered the inky words I didn’t want to stamp using a piece a masking tape; 2) you can keep a ribbon in place using staples.

Products used:
Mossy Meadow, Very Vanilla cardstock
All About Autumn DSP
Bold Bouquet, Heartfelt Hexagon stamps
Nested Essentials dies
Adhesive-backed speckled dots
Natural finish ribbon
Adhesives

All ads on this site are posted by WordPress and are based on your personal browsing history. I do not control ad content.

Fun Folds

Clouds of Love

I don’t know about you, but I like to keep an assortment of cards on hand that I can tuck into my hubby’s suitcase. As a commercial pilot, my husband is gone fairly often. With modern technology, he never feels very far away, even when he’s halfway across the globe. But even so, it can get a little lonely on the road, so I like to sneak a note in his suitcase every now and then. Do you ever do things like this for your loved ones?

For today’s design, I started with a card base of Cherry Cobbler and paired it with another of the designs from the Country Floral Lane designer paper pack. I decided to do a center barn fold, which simply meant scoring the card base at 2 1/8″ from each edge rather than at 4 1/4″ in the center. The sentiment panel is diecut from Petal Pink cardstock using the PTI Mat Stack 6 die. The hearts are punched from Cherry Cobbler, and the sentiment is diecut from Bubble Bath using a PTI die. I used dimensionals under the sentiment and one heart for a little added interest. The adhesive-backed sequins give a little sparkle and reinforce the center focal point.

Products used:
Cherry Cobbler, Petal Pink, Bubble Bath cardstock
Country Floral Lane DSP (retired)
PTI dies (retired)
Heart punch (retired)
Adhesive-backed sequins
Dimensionals
Adhesives

All ads on this site are posted by WordPress and are based on your personal browsing history. I do not control ad content.

Christmas · Fun Folds

Sparkle Barn Fold

It was fun to take a little break from holiday cards last week to participate in the Thinking of You card challenge to send at least 7 cards in 7 days. I really hope that the cards received spread a little joy and made some folks smile. Did you participate in the challenge? Were you a recipient of a card?

Now I’m circling back to designing for a few upcoming craft fairs and working on a custom order for a dear client. Today’s design is a fun take on the barn fold. I love the versatility of this fun fold and how just a little tweak or two can make all the difference in how a card feels when it’s finished. This card feels like you’re pushing through the lush evergreen forest to see what awaits you at the end of the trail, don’t you think?

A piece of Crumb Cake cardstock serves as the base of the card to keep with the natural feel. A sheet of A Walk in the Forest designer paper provides the lush evergreen background of the two front panels. The sentiment panel and mat were diecut using the Nested Essentials dies. The pop of red of the sentiment panel, cut from a sheet of Joy of Christmas designer paper, provides the perfect backdrop for the gold embossed sentiment. The twigs of greenery diecut using the Magical Meadow dies tie everything together nicely. What do you think?

Products used:
Crumb Cake, Shaded Spruce, Mossy Meadow, Granny Apple Green, Cherry Cobbler, white cardstock
A Walk in the Forest, Joy of Christmas DSP
Nested Essentials, Magical Meadow dies
Magical Meadow stamps
Adhesive-backed sequins
Wink of Stella (red berries)
Dimensionals
Adhesives

All ads on this site are posted by WordPress and are based on your personal browsing history. I do not control ad content.

Christmas · Fun Folds

Magic of the Season

If you have followed me for the last month or so, you probably will recall that I have mentioned how much I love the Winter Meadow designer series paper that Stampin’ Up! just launched in its Holiday Mini catalog. And you may have heard me talk about how much I love this particular sheet of paper from that paper pack. I come from a family of avid hunters, so I’m always drawn to well-designed craft products that lend themselves well to documenting a hunt or simply the majesty of wildlife.

What I love, in particular, about this sheet of paper is the repeating pattern of the deer in the forest. It feels like you’re seeing the deer through the fog of fall morning. Pairing this design with different background colors allows for many different moods and lends itself well to different occasions. A while back, I used this paper to make a birthday card. Today, I’m focusing on the muted colors of a snowy winter to make this holiday card. And I tried my hand at a variation on the two-flip fun fold.

I used Basic Gray as the base for the card design as a whole. I also pulled a sheet of shimmer white cardstock to serve as the base for the front flip and inside panels. The gorgeous scene of the deer standing in the grove of evergreens serve as the focal image on the front of the card. Although it’s difficult to capture in photographs, the shimmer of the white cardstock and the touch of Wink of Stella on the deer really give the feel of a cold winter morning.

When you flip up the front panel, a new scene is revealed. This view of the forest from the open prairie is created atop another sheet of paper from the Winter Meadow paper pack. On its own, this design looks like a gray wash, but to me, it still spoke to the feeling of a snowy morning. I simply stamped the forest scene and sentiment in Basic Gray using the Magical Meadow stamp set. The Basic Gray card base serves as the base for this panel and gives some depth to the snowy grays. The sentiment stamp itself is one long strip, but I wanted two lines for better symmetry so I masked portions of the sentiment stamp to create it across two stacked lines. I added a little sparkle with the glitter sequin.

When you flip down the center panel, you reveal the inside of the card. Since this section is intended for a message to your card recipient, it’s very simple with just a sentiment panel over the shimmer white cardstock. I added a few stars diecut from a sheet of the Snowflake Magic designer paper for a little visual interest and to carry the snow theme through to the inside message panel.

Overall, everything about this design is simple and muted because I wanted the beauty of winter and the pizzazz of the fun fold to be the stars of the show. How do you think it turned out? Would you like to see a video on how this card is made?

Products used:
Basic Gray, shimmer white (retired) cardstock
Winter Meadow, Snowflake Magic DSP
Magical Meadow stamps
Stars at Night dies
Whisper White, silver ribbon
Glitter sequins
Wink of Stella
Adhesives

All ads on this site are posted by WordPress and are based on your personal browsing history. I do not control ad content.

Christmas · Fun Folds

What Brings Us Together

Happy Monday, everyone! I really love the various wintery/holiday paper designs that Stampin’ Up! has introduced lately. Have you had a chance to check them out? I just recently got the One Horse Open Sleigh DSP pack and I am loving all of the fun folds you can do to really show off these beautiful paper designs.

A week or so ago, I shared a video of how I made a barn fold card using a different set of designs from the One Horse Open Sleigh paper pack. In that video, I showed how you could vary the placement of pieces to make it work for what you have on hand. I loved this variation so much that I felt it was worthy of having its own post to show you how you can make stunning cards with just a few supplies and just moving things around, like the placement of a sentiment panel, can make it feel like a completely new design even when it’s the same fun fold.

For this design, I started with a base of Lost Lagoon cardstock. I chose two different designs from the One Horse Open Sleigh designer paper pack — a lovely snowy woods scene and a gorgeous cabin across a frozen pond scene. Because I wanted the cabins to remain a whole panel and not be separated, I decided to use this particular sheet of paper on the inside of the card. And as I began working with this sheet of paper, it naturally lent itself to being cut into a 4″ and 2″ panels with the cabin portion in the inside center and the trees on the smaller right inside panel. So the snowy woods cover the outside of the card design and really set the mood for this beautiful theme of Winter Wishes. The sparkly touches of gems, ribbon, and sequins complete the feel of the twinkle of freshly falling snow.

Interested in making this card? You can check out the video tutorial here or download the PDF here.

Products used:
Lost Lagoon, vellum cardstock
One Horse Open Sleigh DSP
Magical Meadow stamps
All That dies
Versamark
Clear embossing powder
Faceted gems
Adhesive-backed sequins
Silver & white sheer ribbon
Adhesives

All ads on this site are posted by WordPress and are based on your personal browsing history. I do not control ad content.

Christmas · Fun Folds · Tutorials

Oh Deer

We’re taking another tour of the One Horse Open Sleigh designer series paper pack. There are so many beautiful winter scenes in this 6×6 paper pack. I’ll be making a variety of fun fold cards to show you how you can take beautiful paper that you’re hesitant to use and turn it into gorgeous cards that really allow the paper designs to shine.

Today’s design focuses on the sheet of paper with the deer in the grove of snowy trees. The gate fold is the perfect design to allow you to look through the trees.

In this video, you’ll learn how to make this card design and how easily you can adapt it to showcase other vignette paper designs. So grab a cup of tea and let’s make a card!

Products used:
Balmy Blue, vellum cardstock
One Horse Open Sleigh DSP
All That dies
Magical Meadow stamps
Silver & white ribbon
Faceted gems
Adhesive-backed sequins
Adhesives

All ads on this site are posted by WordPress and are based on your personal browsing history. I do not control ad content.