Terrific Tuesdays

Merriest Evergreens

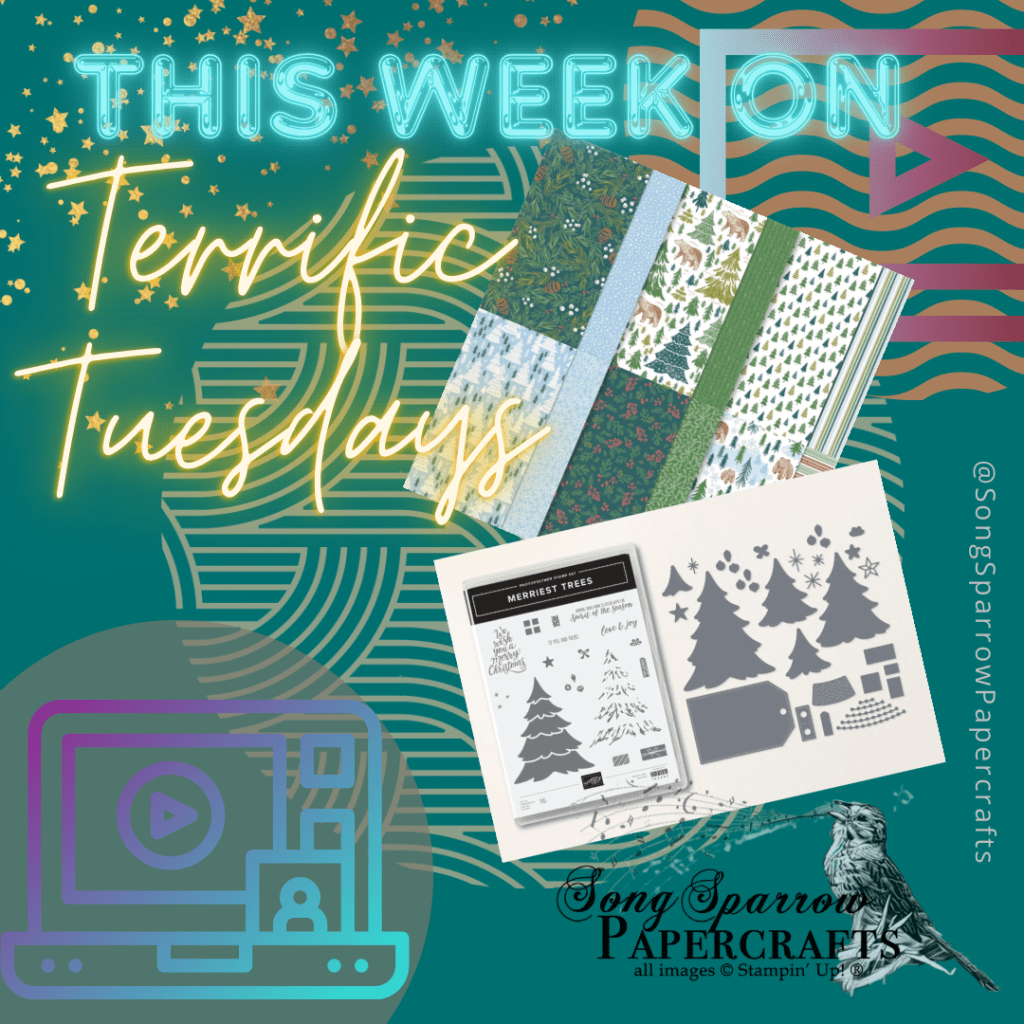
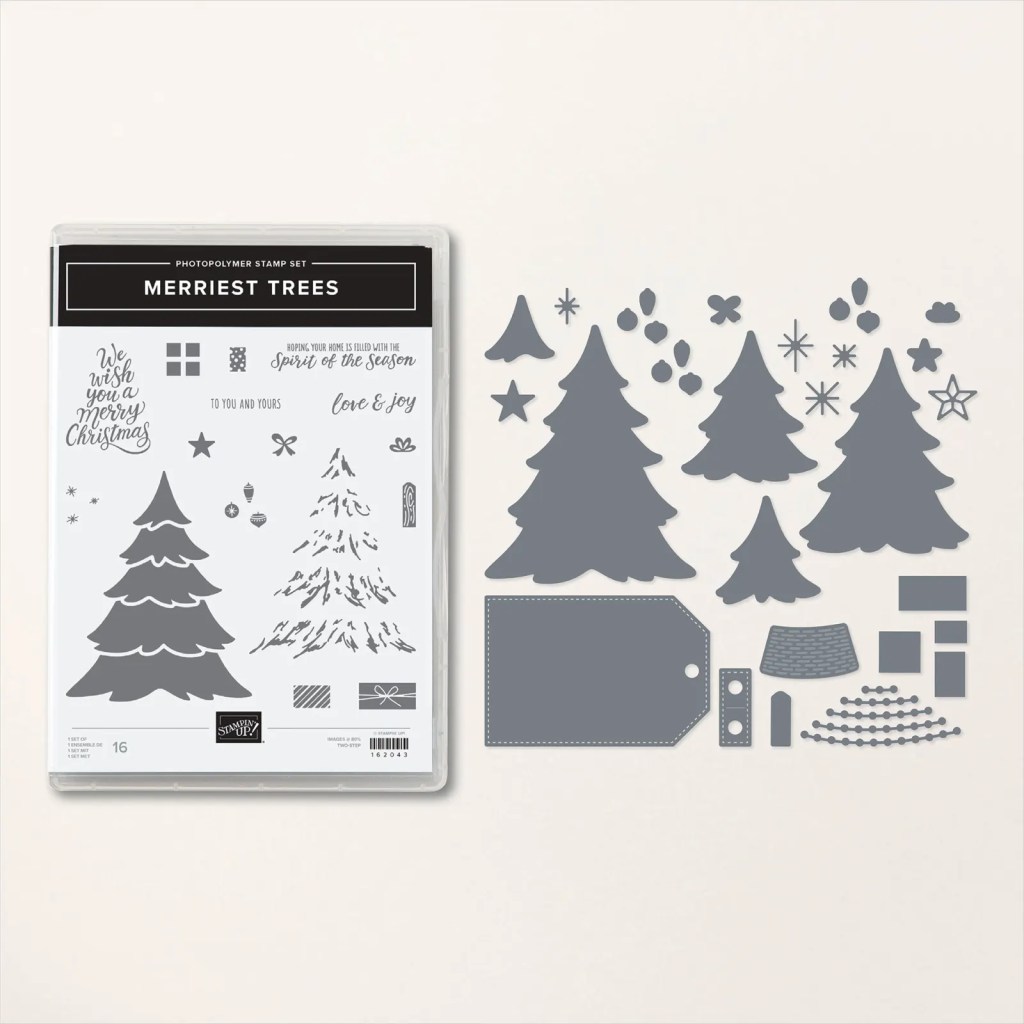
Have you been enjoying all of the cards using this week’s featured bundle of products called Merriest Trees? During this week’s episode of Terrific Tuesdays we looked at all the ways we can use the Merriest Trees bundle to create beautiful holiday cards, and today we’re focusing on how the stamps can do all the work.

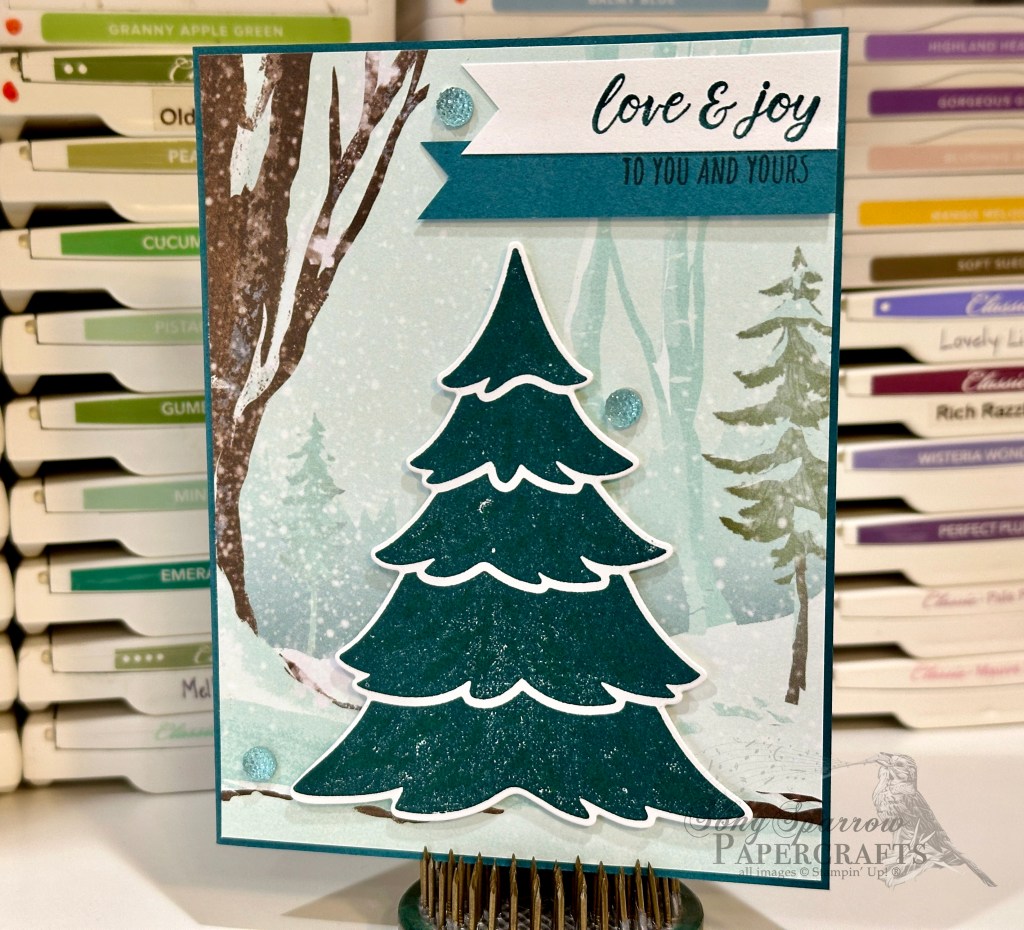
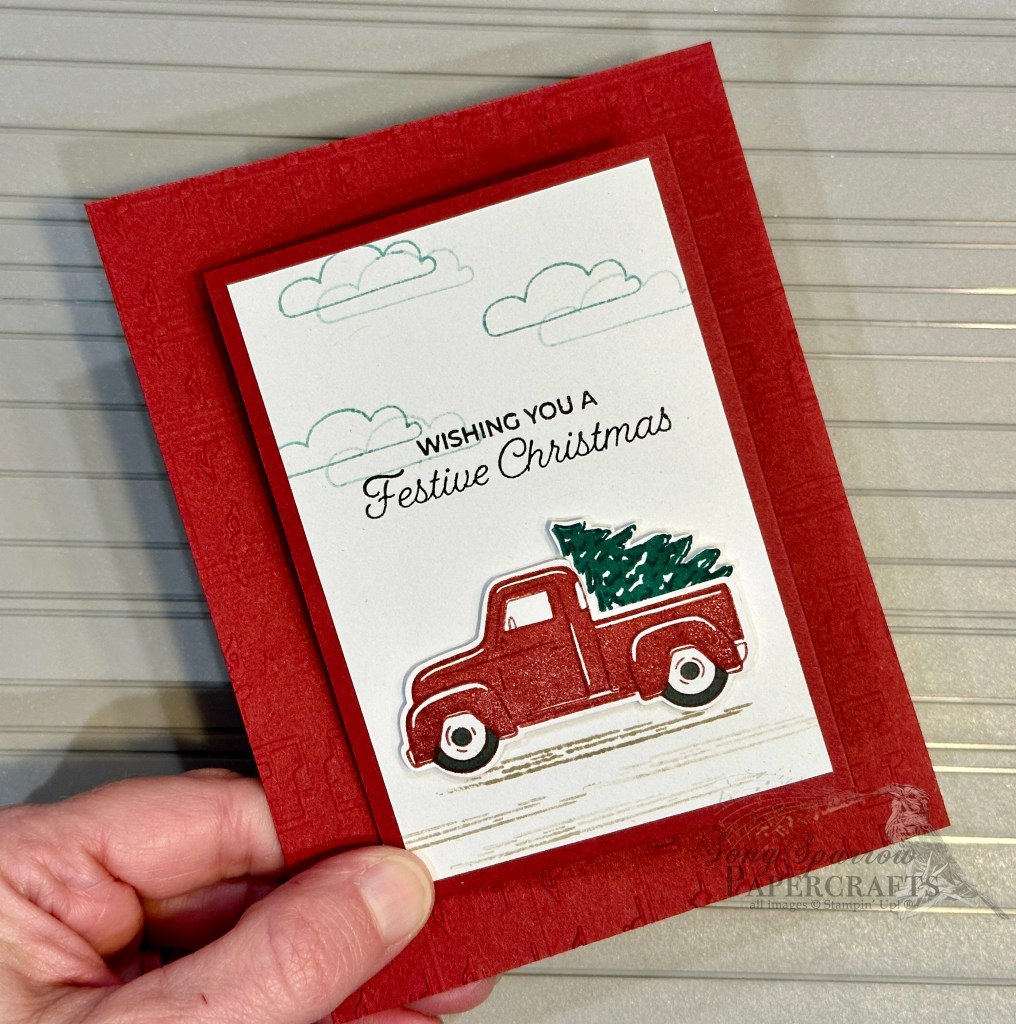
Today’s card is one of the designs we made during the Terrific Tuesdays video. The stamps do all the heavy lifting in this card design—from the background to the focal point and everything in between. The coordinating suite of dies make cutting out the beautiful evergreen trees a breeze, even down to the stars on top.

This holiday card is built on a base of Shaded Spruce. The focal panel is matted with Pretty Peacock. The trees are stamped in a variety of colors to give a realistic look. The sentiment is nestled in the corner. I finished off the design with a sprinkling of Wink of Stella across the focal panel, which gives it a fine shimmer as it catches the light.

Wanna know more about how this card came together? Do you want to see what other designs we made using the Merriest Trees bundle? Check out this week’s Terrific Tuesdays video to learn more!

Products used for today’s card design:
Shaded Spruce, Pretty Peacock, Crushed Curry, Basic White cardstock
Merriest trees bundle
Wink of Stella
Faceted gems trio
Dimensionals
Adhesives

All ads on this site are posted by WordPress and are based on your personal browsing history. I do not control ad content.

Terrific Tuesdays

Merriest Sleigh Ride

Did you catch this week’s Terrific Tuesdays video? This week’s episode we looked at all the ways we can use the Merriest Trees bundle to create beautiful holiday cards, including pairing it with some of Stampin’ Up!’s popular designer series paper packs.

Today’s card is one of the designs we made during the Terrific Tuesdays video. I really love how the One Horse Open Sleigh paper provides the perfect backdrop for a single stamped image of the largest evergreen tree from the Merriest Trees stamp set. The coordinating set of dies makes it super easy to cut out the tree image. Pretty Peacock is currently one of my favorite shades of blue-green in the Stampin’ Up! color palette, and it takes center stage in this design.

Wanna know more about how this card came together? Do you want to see what other designs we made using the Merriest Trees bundle? Check out this week’s Terrific Tuesdays video to learn more!

Products used for today’s card design:
Pretty Peacock, Basic White cardstock
One Horse Open Sleigh DSP
Merriest trees bundle
Faceted gems trio
Dimensionals
Adhesives

All ads on this site are posted by WordPress and are based on your personal browsing history. I do not control ad content.

Terrific Tuesdays

Merriest Bobbles & Packages

Happy Thursday, crafty friends! I hope your week has been going well. For me, things are really gearing up in the singing department, so I’ve been busy rehearsing while working in the craft room. Do you ever multi-task during your crafting time?

Today, we’re taking a look at more of the detailed elements of the Merriest Trees bundle. The combination of stamps and dies allows you so much versatility and variety in your designs. This card design highlights yet another way you can build a beautiful scene with this bundle of products.

The base of today’s card is Cherry Cobbler cardstock. And in the spirit of this musical week, I also incorporated some Merry Melody in today’s card design by using the embossing folder for the top portion of the focal panel. I finished the focal panel with the fun argyle print from the Shining Christmas designer series paper pack, which is very sadly sold out. The four-panel tree is diecut from Mossy Meadow and adorned with gold trim and a star cut from Distressed Gold and sparkly ornaments cut from glitter paper. The packages under the tree are diecut from gold shimmer paper with the bows diecut from Distressed Gold and then the bow stamped in Early Espresso to give the details. The sentiment from Merriest Trees is stamped in gold and then heat embossed in gold on top of a Nested Essentials banner. The silver and gold trim in the center helps merry the two sections with a cohesive sparkle. I just love how Merriest Trees allows you to incorporate so much detail into a design without much effort.

A few tips from today’s card design:

  • Using an adhesive sheet on the back of your paper when cutting the finer elements, like the tree trim and star, allow for very easy application of your diecut element onto your tree.
  • Mini dimensionals are perfect for popping up the ornaments. Half of a mini dimensional is just right for the long, narrow ornament.
  • For a richer color when embossing metallics, try stamping tone-on-tone metallic ink instead of Versamark. For example, here I used Tsukineko Galaxy Gold ink under the layer of SU! gold embossing powder.

Wanna know the other ways we learned to use the Merriest Trees bundle? Check out this week’s episode of Terrific Tuesdays!

Products used for today’s card design:
Cherry Cobbler, Mossy Meadow cardstock
Shining Christmas, Distressed Gold DSP
Glitter and shimmer paper
Merriest Trees stamps and dies
Nested Essentials dies
Merry Melody embossing folder
Gold embossing powder
Gold & silver trim
Dimensionals
Adhesives

All ads on this site are posted by WordPress and are based on your personal browsing history. I do not control ad content.

Terrific Tuesdays

Layering Merriest Trees

Wonderful Wednesday, everyone! We’re beginning to have the chill of winter weather in the air here in North Texas and many mornings of heavy frost. Is it beginning to feel more like winter in your area?

And speaking of winter, today’s card tips the hat to winter birthdays AND shows yet another way that you can use the Merriest Trees bundle to create beautiful projects. Today, I wanted to share how you can layer the tree dies to give realistic depth and dimension to the trees on your projects.

In this week’s Terrific Tuesdays video, we spoke briefly about the various sizes of trees in the suite of dies. Not only does this make it quick and easy to cut trees of all sizes, but it also allows you to create beautiful layers on single tree for a more realistic look. This card design shows you both.

The base of this card is a sheet of Night of Navy cardstock. The background panel is the ombre night sky patterned sheet from the O Holy Night designer series paper pack. I decided on a trio of trees as the focal scene with the center tree as the focal image. I stuck with shades of blue and blue-green for a more visually unified scene. I used vellum as the backdrop for the trees. The smallest tree in the background is diecut from Pretty Peacock using the two-panel tree die. The medium-sized tree closer to the foreground is embossed with an older snowflake embossing folder (you could easily substitute the Snowflake Sky EF) and then diecut from Lost Lagoon using the three-panel tree. The base of the focal tree in the foreground is Night of Navy and is diecut using the four-panel tree die. I used several different sheets of the Shining Brightly designer series paper as the layers for the focal image, which are adhered to the tree base. Each tree layer is cut using a different sized tree die from the suite, which makes for very quick and easy layering without any fussy cutting. The edges of each of the layers is curled up for a realistic look of fluffy layers in the tree. Isn’t this a stunning effect? I finished off the scene with some snowflakes diecut from white cardstock and a sentiment. While the snowflake dies I used are from a retired set, there are beautiful snowflakes in a number of sets in the Holiday Mini Catalog, including Merriest Trees, Stars at Night (on sale), and Wishes All Around (on sale).

Wanna know the other ways we learned to use the Merriest Trees bundle? Check out this week’s episode of Terrific Tuesdays!

Products used for today’s card design:
Night of Navy, Basic White cardstock
Vellum
O Holy Night (sold out), Shining Brightly (sold out) DSP
Merriest Trees, Autumn Leaves, Twinkling Lights (retired) dies
Winter Snow (retired) embossing folder
Circle Sayings stamps
Silver embossing powder
Glitter sequins
Dimensionals
Adhesives

All ads on this site are posted by WordPress and are based on your personal browsing history. I do not control ad content.

Terrific Tuesdays

Terrific Tuesdays: Episode 2

Welcome to a brand new video series called Terrific Tuesdays. Each Tuesday at 10 AM CST, I’ll be launching a new video where I’ll share three fun projects with you using current Stampin’ Up! products. Each week you’ll have the opportunity to receive a Kit to Go for FREE, and each Kit to Go will include the supplies needed to complete the week’s projects.

This week’s episode of Terrific Tuesdays focuses on the Merriest Trees bundle, which includes a photopolymer stamp set and die collection. Watch today’s video to see how you can use this bundle to create 3 stunning holiday cards.

How do I get a FREE Kit to Go?

To receive a FREE kit, simply place an order of at least $40 in my online store (excluding tax and shipping) using host code CPDMD4QK at checkout OR simply click on the link below to start shopping with the host code:

https://www.stampinup.com/?hostcode=CPDMD4QK

In order to qualify for this week’s free Kit to Go, all orders must be placed by Monday, December 4, 2023 at 11:59 PM CST and must use this week’s host code.

Each Kit to Go will make 6 projects (2 each of 3 designs) plus this week’s BONUS project. Each kit includes the cardstock or designer paper required for the week’s projects. Any machine embossing, if applicable, will be done for you. If a die or punch is part of the week’s featured bundle, those pieces will not be included in the kit. However, any punched or diecut element outside of the week’s featured bundle will be pre-cut for you and provided in the kit. Per Stampin’ Up! policy, I do not include any stamped images in the Kit to Go.

For this week’s projects, you’ll need the following items in addition to the kit to complete the projects as instructed. You are free to make substitutions for any of the supplies listed below for items that you already own.

  • STAMPS: Merriest Trees
  • DIES/PUNCHES: Merriest Trees dies
  • INK: Pretty Peacock, Shaded Spruce, Garden Green, Old Olive, Mossy Meadow, Cherry Cobbler
  • EMBELLISHMENTS/TOOLS: Faceted gems trio, scissors, Tear-n-Tape, adhesive, dimensionals, glue dots

Remember: If your order is $150 or greater before tax and shipping, do NOT use the host code. I want you to earn your FREE product from Stampin’ Up! AND you will still qualify for this week’s free Kit to Go!

Your qualifying order must be placed no later than Monday, December 4, 2023 at 11:59 PM CST using the host code CPDMD4QK in order to receive the FREE Kit to Go. Kits will ship no later than Friday, December 8th.

All ads on this site are posted by WordPress and are based on your personal browsing history. I do not control ad content.

Kits · Terrific Tuesdays

Last Day for Episode 1 Kit to Go

Don’t forget… TODAY is the last day to place your order to receive this week’s Terrific Tuesdays Kit to Go! All orders must be placed by 11:59 PM CST and must use the host code. Remember, if your order equals or exceeds $150, do NOT use the host code and you’ll still get this week’s Kit to Go!

On this week’s episode of Terrific Tuesdays, we made 3 gift card holders together using the Truck Along bundle. This gift card holder design is so versatile. It comes together quickly and you can use any combination of papers and stamps to make a wonderful gift.

To receive this week’s Kit to Go for FREE, simply place an order of at least $40 in my online store (excluding tax and shipping) using host code U23PF2CZ at checkout OR click on the link below to start shopping now with the host code:

https://www.stampinup.com/?hostcode=U23PF2CZ

Each Kit to Go will make 6 projects (2 each of 3 designs). Each kit includes the cardstock or designer paper required for the week’s projects. Any machine embossing, if applicable, will be done for you. If a die or punch is part of the week’s featured bundle, those pieces will not be included in the kit. However, any punched or diecut element outside of the week’s featured bundle will be pre-cut for you and provided in the kit. Per Stampin’ Up! policy, I do not include any stamped images in the Kit to Go.

For this week’s projects, you’ll need the following items in addition to the kit to complete the projects as instructed. You are free to make substitutions for any of the supplies listed below for items that you already own.

  • STAMPS: Trucking Along
  • PUNCHES: Trucking Along
  • INK: Basic Black, Real Red, Pretty Peacock, Shaded Spruce, Crumb Cake, Basic Gray, Pool Party
  • TOOLS: scissors, Tear-n-Tape, adhesive, dimensionals, glue dots

In order to qualify for this week’s free Kit to Go, all orders must be placed by 11:59 PM CST TONIGHT and must use the host code.

Did you miss this week’s episode of Terrific Tuesdays? You can watch it here:

Products used for today’s design:
Cherry Cobbler, Basic White cardstock
One Horse Open Sleigh DSP
Trucking Along bundle
Heartfelt Hexagon punch
Dimensionals
Adhesives

All ads on this site are posted by WordPress and are based on your personal browsing history. I do not control ad content.

Christmas · Inspiration · No Stamp Design

More Than Cards

One of the fun things about the art of papercrafting is that it is so much more than just cards or scrapbooks or gift packaging. You can also create beautiful 3D projects using the supplies you already have in your crafting stash. Today’s designs are just 2 of the most recent projects I’ve created with current Stampin’ Up! products.

I love a good opportunity to get out of my comfort zone, and sometimes all you need is a little prompting to get the wheels turning. For me, that came in the form of a team event. I needed an ornament and a 3D project for our team Bingo event, so I got to work looking for inspiration on Pinterest.

After seeing a lot of different ornament designs where circles were layered to created an ornament, that got me thinking about the dies I had in my stash that could be layered in the same way. On the left is a super fun Christmas ornament I put together using the Joy of Christmas designer series paper and the Merriest Trees die set. I used a repeating pattern of 2 different patterns from the Joy of Christmas paper pack. I really liked the look of the green plaid with the sheet of evergreen branches. I used a combination of red festive pearls and green iridescent discs as ornaments. The star tree topper is diecut from Crumb Cake cardstock.

For my 3D project, I knew that I had an upcoming Advent Tea for which I volunteered to create table decorations. I knew I wanted the design to be elegant to fit the occasion. The lantern I created was inspired by a small votive box ornament that our team made together during a recent craft-together. I decided a tabletop lantern would be more appropriate for my tea, and I was able to find a tutorial created by Rick Adkins. This beautiful lantern was created with the O Holy Night suite of dies. I substituted current products from my stash to meet the theme of the tea. The lantern and window elements are constructed of Early Espresso cardstock, and a layer of vellum in each window provides the backdrop for the ethereal glow of the tealight. Don’t you just love it?!

What do you have coming up that could be accomplished with your craft stash rather than a trip to the store? I would love to see what you create!

Products used for today’s projects:

Christmas ornament
Joy of Christmas DSP
Crumb Cake cardstock
Merriest Trees dies
Festive pearls
Iridescent discs
Gold trim
Adhesives

Christmas lantern
Early Espresso, distressed gold cardstock
Gold shimmer paper
Vellum
Night Divine, Stars at Night dies
Dimensionals
Adhesives

All ads on this site are posted by WordPress and are based on your personal browsing history. I do not control ad content.

Packaging · Terrific Tuesdays

Easy Gift Card Holder

Did you catch the premier episode of Terrific Tuesdays this week? Together we made 3 super fun gift card holders using the Trucking Along bundle. This gift card holder comes together quickly and easily, which is perfect for your holiday gift-giving.

Missed this week’s episode of Terrific Tuesdays? You can catch it here:

Products used for today’s design:
Cherry Cobbler, Basic White cardstock
Trucking Along bundle
Merry Melody embossing folder
Heartfelt Hexagon punch
Dimensionals
Adhesives

All ads on this site are posted by WordPress and are based on your personal browsing history. I do not control ad content.

Fun Folds

You Are Loved

Happy Thursday, everyone! And more importantly for us here in the U.S., happy Thanksgiving! My family will be gathering today to celebrate but, more importantly, we will be together to laugh and spend time together. I am blessed to have a close-knit family who gathers together often, not just for holidays. We share in joys and sorrows and tough circumstances together. And when we have friends who are far away from their families for the holidays, we wrap them right into ours!

I hope you have reasons to offer thanksgiving today. And if you are far away from family, I hope God sends you friends who will love you like family. And it’s the idea of being part of a community that inspired this week’s card design. Let’s take a look!

The new Meandering Meadows designer series paper currently available in Online Exclusives is simply stunning, and each of the scenic sides of these papers lend themselves to beautiful cards with very little else needed outside of the gorgeous paper. There are a whole host of fun folds that allow us to retain large sections of paper while still providing variety of design and, of course, gorgeous cards.

Today’s card design is based on a fun fold, known as a Split Panel, that I learned from fellow demonstrator Jackie Bolhuis with Klompen Stampers. This fold came by its name because the front and back panels are split apart and held together by a Z-fold in the center. I chose the portrait orientation, but you could easily turn the design landscape.

The two panels of the base of this design are Pretty Peacock cardstock. I wanted to draw out the beautiful pinks in the clouds and flowers in the sheet of Meandering Meadow DSP I selected, so I chose to mat the sheet with Moody Mauve. I used the Deckled Rectangles dies to cut both the mat and DSP panel. I tied a piece of silver and white sheer ribbon around the bottom of the panel before adhering to the card front with dimensionals. A few pink tinsel gems in opposing corners add a little sparkle and allow the eye to move across the focal panel. Although difficult to see in these photos, I highlighted the pinks in the clouds and across the mountain front by going over them with Wink of Stella. It’s a truly stunning effect in person! I stamped the sentiment, from the Softly Said stamp set, in the center of the inside fold-out. The message panel is framed on one side by a scrap of the DSP I cut for the card front.

I made this card with a particular friend in mind. Life has thrown my friend a lot of difficult things lately, and I wanted to offer a word of support. You know, I think we should do more of that these days. Life is hard for so many people, and some feel like the whole world is against them and they have no one who cares about them. A simple word of support or encouragement can make all the difference in whether that person carries on. Food for thought as so many of us are blessed to celebrate Thanksgiving with family and friends today.

Products used:
Pretty Peacock, Moody Mauve, Basic White cardstock
Meandering Meadows DSP
Deckled Rectangles dies
Silver and white sheer ribbon
Tinsel gems
Dimensionals
Adhesives

All ads on this site are posted by WordPress and are based on your personal browsing history. I do not control ad content.