Welcome to the start of a brand new week. I hope you enjoyed a restful weekend. We had gorgeous weather in our area for the Palm Sunday weekend and spent a fair amount of time outside enjoying it. Any my allergies would certainly concur!
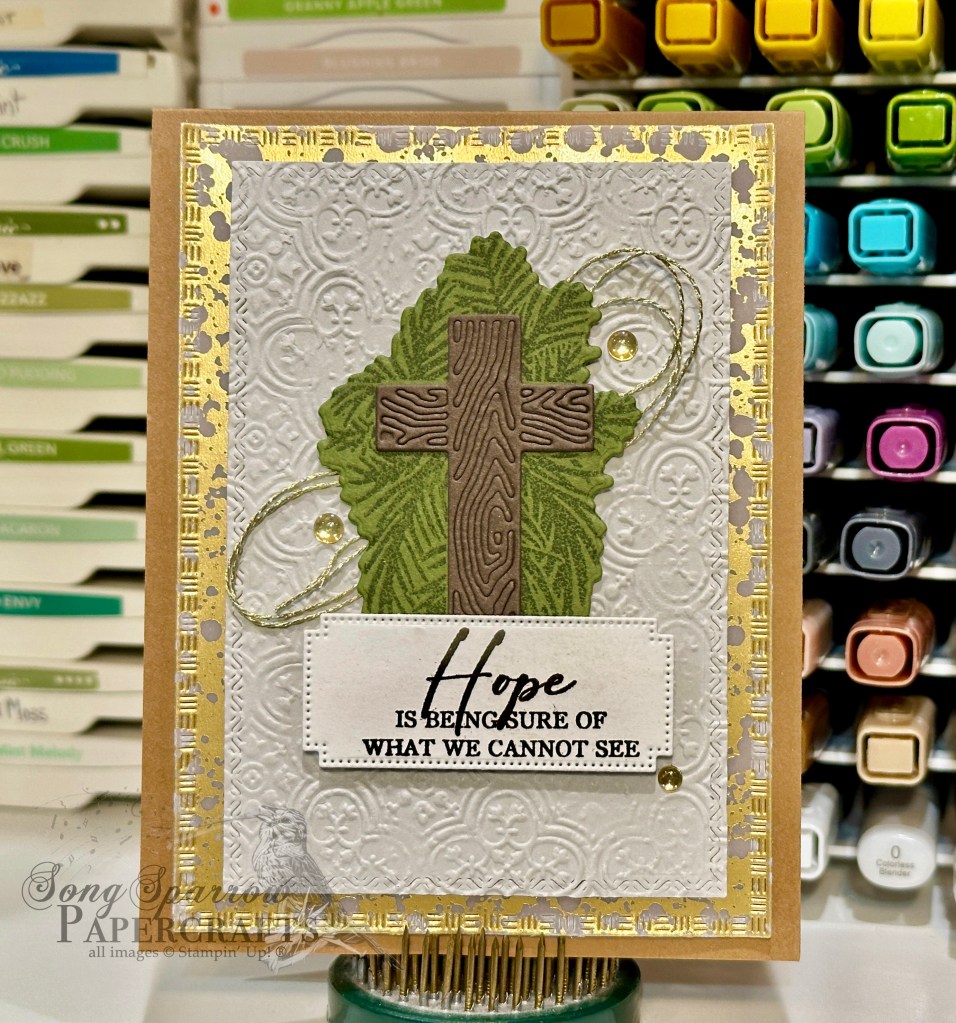
As we embark on Holy Week this week, we’ll be using our crafty stash to make cards appropriate for the occasion. And today’s card aptly pays tribute to Palm Sunday as the entirety of Easter season reminds us that we have an everlasting hope in what we cannot see!
We get started on today’s card with a base of Pecan Pie cardstock. The focal panel background consists of two panels cut using the Textured Notes dies. The main panel is a quarter sheet of Smoky Slate that is machine embossed with the Distressed Tiles embossing folder and then the mat is a sheet of the gold mercury vellum. Our focal image is a two-parter. The cross is cut from Early Espresso using the Faith Collection dies and that’s mounted on top of the coordinating palm branches that are stamped tone-on-tone onto Mossy Meadow before being diecut with the coordinating die. A twist of gold thread behind ties our gold elements together nicely. The sentiment from Unbounded Love is stamped in Early Espresso on white cardstock and then diecut with the Autumn Leaves sentiment banner. A few low profile dots around the focal section draw the eye in.
I hope you’ll follow along this week as create Easter designs.
We’re closing out this week’s series of card designs using some of my favorite products from the Stampin’ Up! Last Chance list with this clean and simple design. We’re pairing up the Saying Hey stamp set with the Friends for Life dies to create this friendly hello.
We get started with a base of Azure Afternoon cardstock. The focal panel is a sheet of the Everyday Skies patterned paper matted with Pretty in Pink. A strip of Pretty in Pink bordered ribbon is tied around the bottom of the panel before it’s affixed to the card base. The sentiment panel is a piece of white cardstock punched with the Heartfelt Hexagon punch. The sentiment from Saying Hey is stamped in a combination of Balmy Blue and Blueberry Bushel so that there’s a small shadow effect. A combination of Everyday Skies and pastel ombre glimmer paper are cut with the Friends for Life dies to create the second portion of our Hey Friend sentiment. Dimensionals are used to give height and dimension to both portions of the sentiment so they stand proud above the ribbon. The dragonfly is cut from a combination of purple silver foil and pastel ombre glimmer paper and adhered with a dimensional above the sentiment panel. I love how the small dragonfly breaks up the sky and really draws the eye down to the sentiment. A scattering of pink sequins from the sequins trio give us some subtle twinkle across the clouds.
Last Chance items are quickly disappearing from the shelves. Did you see any sets this week that need to be in your stash? Don’t delay or you might miss them for good!
Next week, we’re going to be looking toward Easter with our card designs. I hope you’ll hop along!
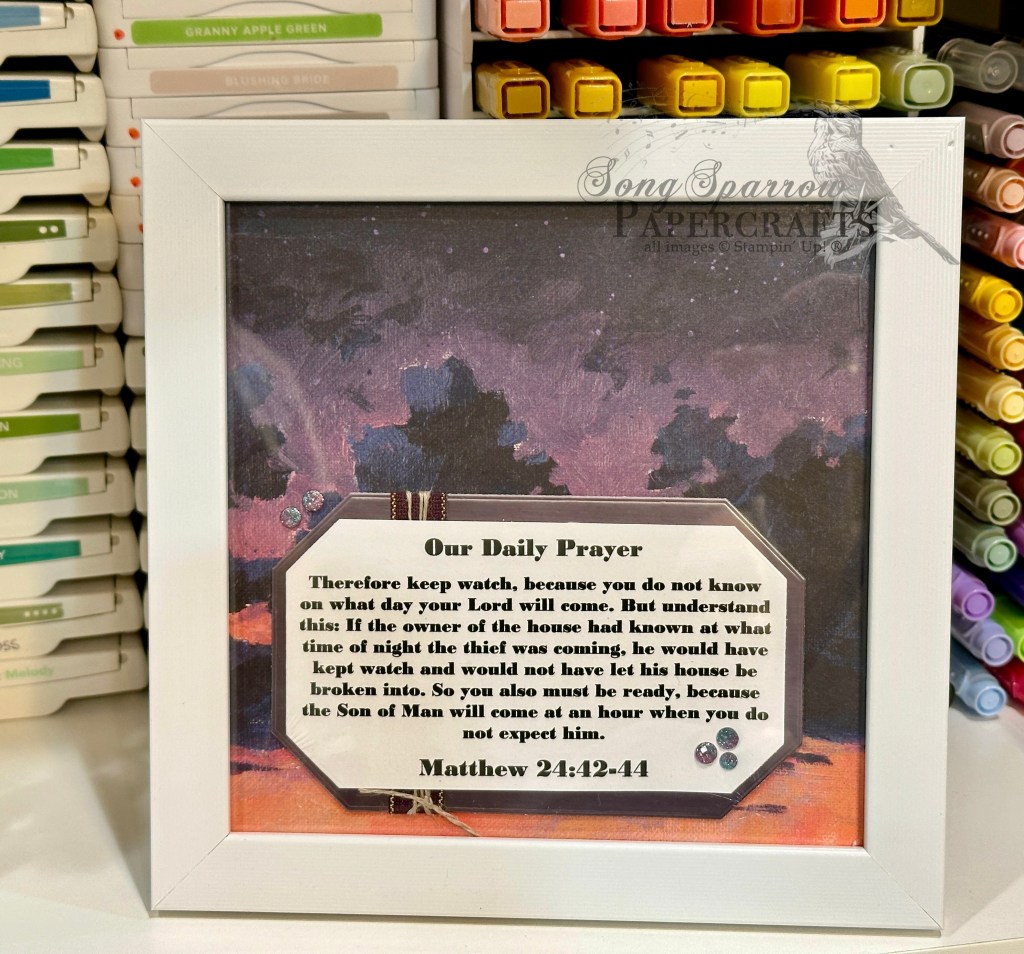
If you’ve followed me for any amount of time, you may remember me mentioning our daily family prayer. Our daily family prayer is a selected scripture that is appropriate for the season on the church calendar or even just the time of year. I rotate these scriptures periodically, in particular as we enter different seasons in the church (liturgical) calendar. What I love most about this is that we ultimately memorize the scripture because we’ve said it each day. So as I’m choosing scriptures, I try to bear that in mind and choose scriptures that I think are important for us to take with us each day.
As we enter Holy Week, it’s time for a new family prayer and that means a new layout for our prayer frame. The 6×6 frame is from Amazon.
For the Holy Week prayer, I chose a darker backdrop that felt most appropriate for the significance of this upcoming week. This happens to be a sheet of the Everyday Skies paper. I printed the scripture on a quarter sheet of white cardstock and then cut it out using one of the Countryside Corners dies. I trimmed it slightly to reduce the white space on top and bottom. I then used the same die to cut the mat from a sheet of the purple Silver Foil specialty paper using the die extension method. I wrapped some Blackberry Bliss & gold metallic ribbon and linen thread around one end of the mat before adhering the sentiment on top with dimensionals. I used dimensionals to adhere the sentiment panel to the patterned paper and then added a few two tone sparkle gems for just a touch of moody sparkle.
Whew, we’ve made it to the weekend! I don’t know about you guys, but I really ride the struggle bus toward the end of the week. The week is go-go and my energy is no-no. And my crafty mojo just hasn’t been very cooperative lately. Anyone else?
This week, we’re looking at some of my favorite sets that have made it to the Stampin’ Up! Last Chance list. If any of these happen to be your favorites, now is the time to add to cart before they’re gone for good! Today’s design uses a combination of my crafty favorites — Cute Crochet embossing folder, Country Flowers and Sending Love dies, and an already-retired sentiment called Heartfelt Hellos. I’ve seen so many cute designs that incorporate an envelope exploding with flowers and just knew I had to take a stab at it. Our color palette is inspired by two colors from a triad — with hues of turquoise and purple.
We get started with a neutral base of basic white cardstock. I embossed a quarter panel of Fresh Freesia with the Cute Crochet embossing folder and then diecut with the largest Perennial Postage die to serve as the backdrop for our main focal panel. I cut an envelope from white cardstock using the Sending Love dies and then foliage and flowers using the Country Flowers dies. The foliage is a combination of Old Olive cardstock and Season of Elegance papers and then the flowers are cut from a variety of glimmer papers, including pastel ombre, Summer Splash, and white. The florals are spilling out of the envelope with layers of dimensionals giving us our realistic-looking arrangement. A combination of gems give us our floral centers, including In Color, two tone sparkle, and purple shimmer gems and iridescent faceted gems. The sentiment from the retired Heartfelt Hellos set is stamped in Fresh Freesia on Pool Party cardstock and then cut with the Mixed Labels dies. I cut a second Mixed Label banner from Highland Heather glimmer paper, cut the banner in half, and then offset the pieces on either side to create a mat for the sentiment panel. I tied some Fresh Freesia seam binding ribbon around the embossed panel before adhering the other elements with dimensionals. A few purple sequins add an extra touch of sparkle and draw the eye to our sentiment.
I still have a few more of my retiring favorites to show you, so I hope you’ll pop back by over the weekend to see how we can use these sets!
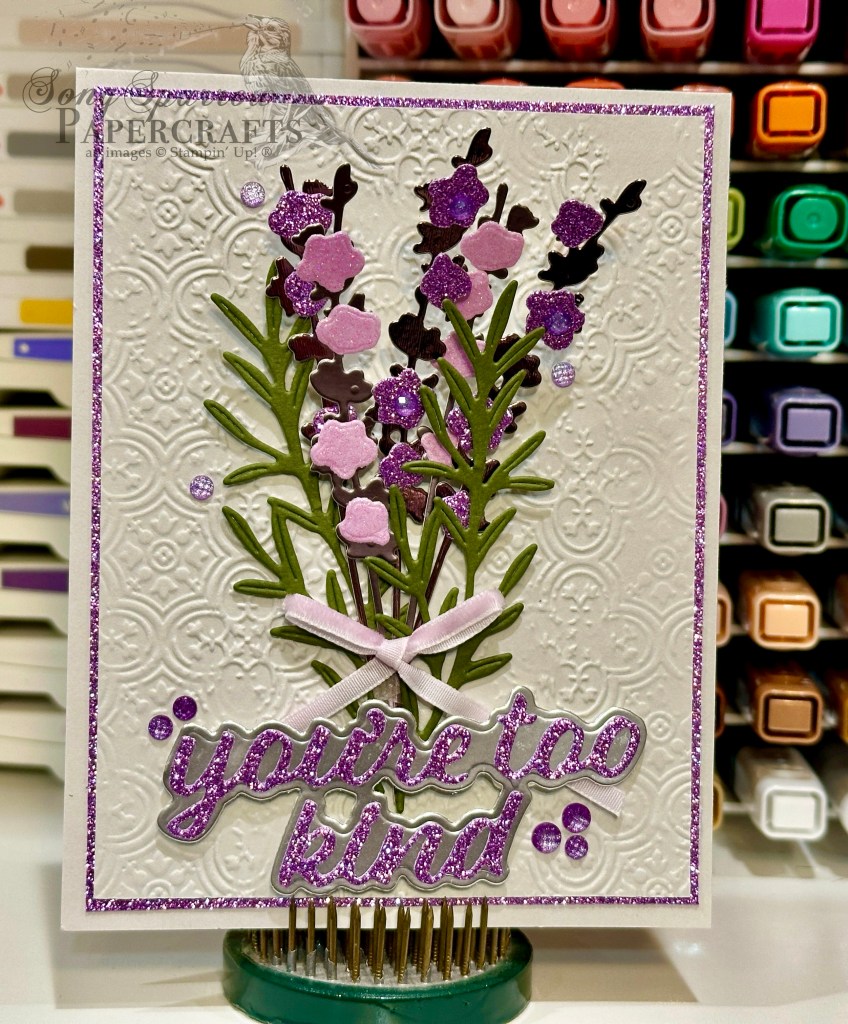
With the release of new products to the Last Chance products list, it seemed like a fitting time to revisit some of my favorite products that will be leaving us for good. And today’s card combines quite a few of my faves in one design — Painted Lavender, Distressed Tiles embossing folder, and the Wanted to Say sentiment die set.
I really wanted the lavender to take center stage, so I kept the color palette super simple. We start with a backdrop of Smoky Slate cardstock. I machine embossed a quarter panel of slate using the Distressed Tiles embossing folder and then cut it down by about a quarter-inch. I matted the panel with Highland Heather glimmer paper to really help our purple elements pop. The focal floral stems in the center are all cut using the Painted Lavender dies. The grass is cut from Mossy Meadow and the lavender stems are cut from a combination of the purple-hued silver foil specialty paper (retired). The lavender blooms are cut from a combination of pastel ombré glimmer paper and the (retired) Highland Heather glimmer paper and are adhered to the stems with glue dots. I arranged the greenery to overlap like a hand-tied floral bundle and secured the stems together with a small strip of tape and adhered to the background panel with a dimensional. I used a small bow of velvet ribbon to cover the tape and dimensional and to solidify the look of a hand-tied bundle of flowers. The sentiment is cut from silver foil sheets and Highland Heather glimmer paper using the Wanted to Say dies. The sentiment is adhered together using a glue pen and then affixed to the background panel at the base of the floral stems with dimensionals. I added purple shimmer gems for pops of purple shimmer across the card front and to accentuate a few of the lavender flower centers.
You could very easily transform the look of this lavender nosegay by simply swapping out the purple accents for another color. There are many wildflowers that resemble lavender stems but with florets in a variety of colors.
The Take to the Sky suite has officially hit the Last Chance list. If you’ve been eying this fantastic set, now is your chance to add it to the crafty stash before it’s gone! I know that I’ll be sad to see it go and fully intend to keep it in my stash even after it’s gone from the shelves.
The stamps and dies offer you a variety of plane sizes to use on your designs. Earlier today, I wanted a larger-scaled plane to take center stage, but for this card, I wanted to scale things back a little and so I chose the larger biplane stamp for this fun card.
We get started with a base of Basic Black cardstock. A sheet of the grey plaid paper from the Take to the Sky paper pack serves as our backdrop, and I decided to mat it with a sheet of textured silver specialty paper for just a hint of twinkle in the background. I wanted it to look as though our focal image is bursting through the clouds, so I began setting up the focal scene by cutting clouds from Azure Afternoon cardstock using the Bright Skies dies (also a set that is retiring!). I cut the map background panel with the Countryside Corners die and arranged the clouds and map so that our plane would sit front and center and look as though it’s mid-flight.
Our plane is stamped in black on Smoky Slate cardstock and then colored with the Night of Navy Stampin’ Blends. The propellers are cut from silver foil and an industrial trinket serves as the hub. Wink of Stella helps give our propeller the look of spinning. The sentiment from the Adventurous Sky stamp set is stamped on a smaller cloud cut with the Bright Skies dies. A few of the iridescent white sequins from the sequins trio pack further the illusion of being in the clouds and help draw the eye to the focal panel and sentiment.
The combination of products in the suite offer endless possibilities for so many fun designs — from super simple to detailed. It’s perfect for all the flight enthusiasts in your life.
This week, we’re exploring some of my favorite sets that are on the Stampin’ Up! Last Chance List. Today, we’re playing around with the Take to the Sky suite. As the spouse of a heavy jet pilot, this whole suite was a no-brainer for me and will definitely be sticking around in my crafty stash even after it officially retires!
For today’s card, we’re keeping it pretty simple and letting our dies and paper do the heavy lifting for this design.
We get started with a base of Night of Navy cardstock. I chose the cloud patterned sheet from the Take to the Sky paper pack as the backdrop for our flying biplane. Our plane is constructed using the Adventurous Sky dies and is a combination of the red Season of Elegance foiled paper and textured gold specialty paper. To give a realistic look to our spinning props, I added a small circle of Graceful Greenery vellum cut using the Spotlight on Nature dies. A few gold textured dots serve as the wheel and prop hubs.
The sentiment from the Hot Air Balloon stamp set is stamped in Real Red on Smoky Slate cardstock and diecut with the coordinating Hot Air Balloon banner die. The sentiment backdrop is a combination of grey and blue plaid patterns from the Take to the Sky paper pack with a strip of Cherry Cobbler & Gold metallic ribbon in the center to help things pop. A few red iridescent discs finish things off by drawing the eye to the sentiment. I added some starburst sequins in the opposing corners for a little extra pop of shimmer in the clouds.
We’ll be putting the stamps to work this afternoon. I hope you’ll fly by and check it out!
This week, we’re taking a look at some of my favorite sets that made it to the SU! Last Chance list. And first up is the beautiful Changing Leaves bundle. I’ve learned to get a little out of my comfort zone and play around with unique color combinations, and when you really think about it, there truly is a tree representing just about every color in the rainbow!
Our base for this design, though not visible from the card front, is Melon Mambo cardstock. A strip of the gold leaf-patterned paper from the Nature’s Sweetness paper pack serves as the right edge of the card front with the gold-splattered newsprint as the larger backdrop for our card front. I sandwiched a strip of Melon Mambo foil paper in between the two Nature’s Sweetness patterns to complement the focal images. The leaves are cut from Melon Mambo foil paper using the Changing Leaves hybrid embossing folder. They’re layered on top of the gold mercury vellum disc cut using the Spotlight on Nature dies. The sentiment from Changing Leaves is stamped in Melon Mambo on white and then cut with the longer sentiment die from the coordinating die set. The sentiment panel is adhered over twists of gold thread at the base of the focal panel using dimensionals. I added a few Sunny Days dots and purple sequins to add some pops of pink across the otherwise white backdrop.
Using unexpected colors with the Changing Leaves bundle really ups its utility factor in the craft room, knowing that simply rethinking the color palette can change a design from something more feminine to a design that is much more neutral. And that’s more than half the fun of any set in your crafty stash — rethinking how you’re using it to transform utility!
Welcome to this soggy Monday. It poured most of the weekend for us, so everything is wet and squishy now as we endure a late-season cold snap here in North Texas. What about you?
Have you checked out all of the products on the Stampin’ Up! Last Chance List that updated last week? I always have mixed feelings when the list is updated — I’m excited for deals but sad to see some favorites go. And I must say that this time around, there are a LOT of my favorites on the Last Chance list!
So this week, we’re going to be taking a look at some of them. And I hope to bring you not one but TWO designs with each of the featured retiring products as we move through the list this week. First up is the Online Exclusive bundle called Changing Leaves, which includes coordinating stamps, dies, and a hybrid embossing folder. I just love the detail included in this set and have found that it’s exceedingly versatile. This is one that will definitely remain in my crafty stash after it officially retires!
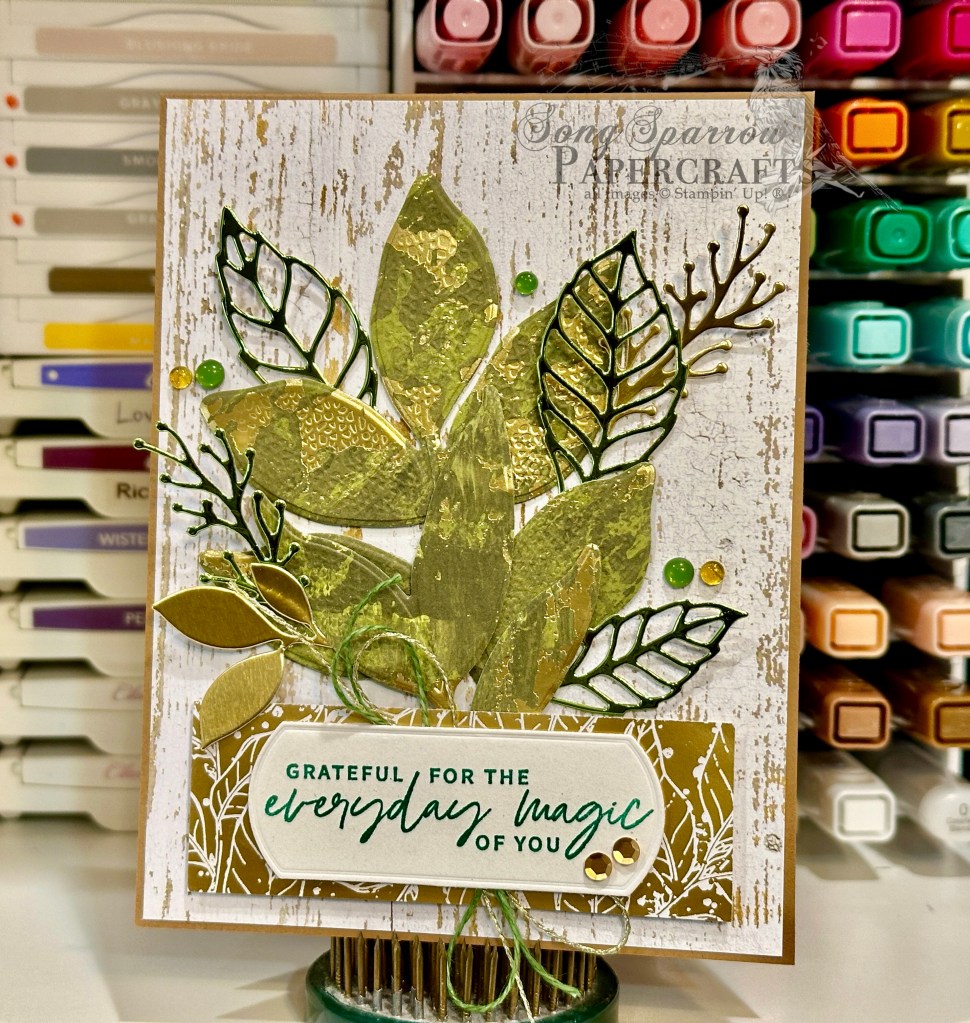
We start this design with a base of Pecan Pie cardstock. I used a sheet of the white woodgrain pattern from the Country Woods patterned paper pack as the backdrop for our focal section. Using the Changing Leaves dies and hybrid embossing folder, I cut an assortment of leaves and greenery from gold foil, Season of Elegance foiled paper, and Granny Apple green foil. I layered them with dimensionals and glue dots in the center of the card. The sentiment from Something Fancy is stamped in Shaded Spruce on white cardstock and then cut with the coordinating die from the set. The sentiment panel is adhered over gold thread and natural linen thread using dimensionals. A strip of the Nature’s Sweetness gold foil leaf pattern serves as the backdrop for our sentiment and hides the stems of our leaves festively. I added a combination of gold sequins, gold textured dots, and transparent dots for some visual interest across our design.
I think one of the hardest things about cards with lots of foil elements is that a photo can never do them justice! Tune in a little later as we take one more look at the lovely Changing Leaves bundle.
As I mentioned in my earlier post today, my week kind-of got away from me. So we’re having our Sketchy Fridays post today instead. This week, we’re working with a nature theme and with a dreary, rainy day here in North Texas, I’m finding myself leaning into a water theme for our next card design.
For those of you who are new here, Sketchy Fridays is a weekly series where we’re using a card sketch to design our featured card. Right now, we’re working through a full series of designs using the card sketches found in current Stampin’ Up! catalogs.
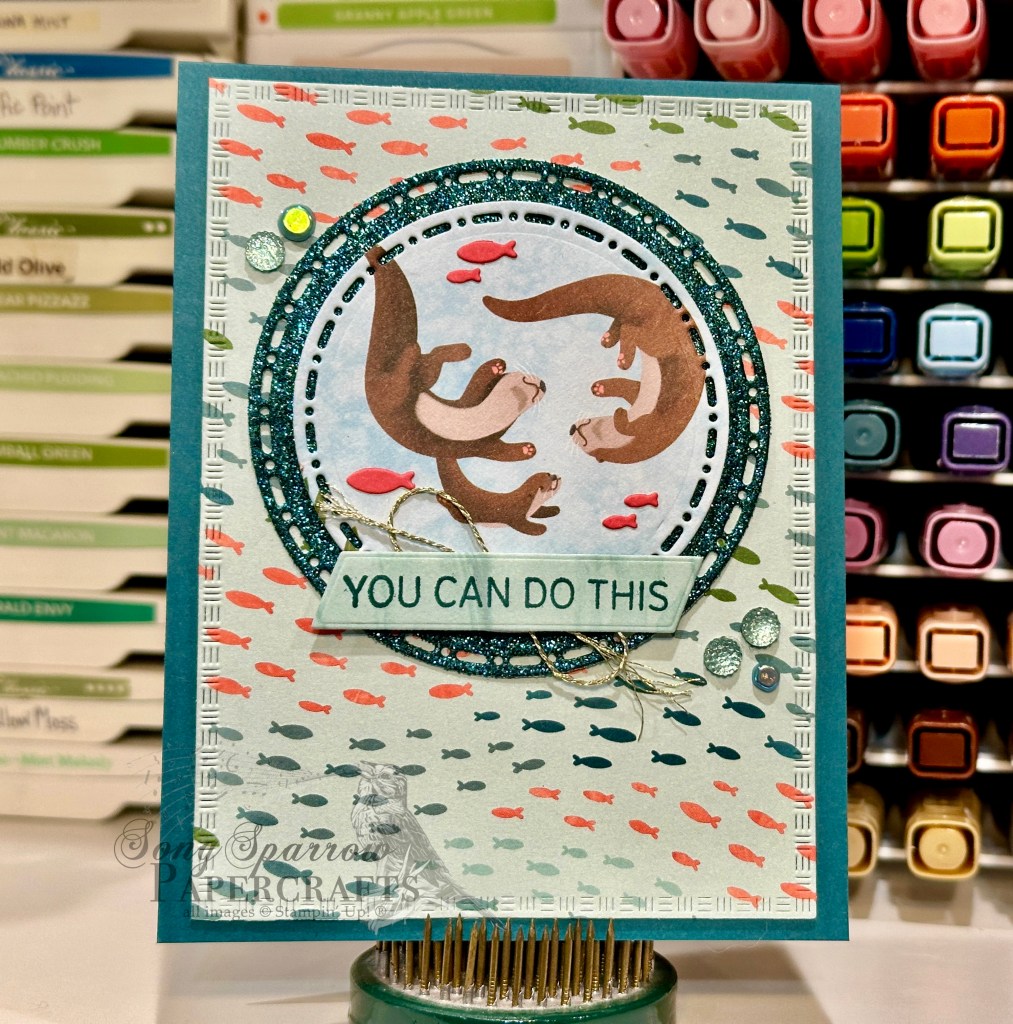
This week’s card is based on Sketch #7 from the Stampin’ Up! Annual Catalog. Today’s design features the Otterly Adorable suite from one of the latest Stampin’ Up! Online Exclusives releases.
I just love the Otterly Adorable suite and was actually just mentioning to my husband how I hadn’t used it much. So as I was looking for a sketch, I had this set on my mind. One of the things we’ve talked about throughout our Sketchy Fridays series is that sometimes your final design follows a sketch to a tee, while other times the sketch was just your jumping off point. And I think for today’s card, my selected sketch from the SU! Annual Catalog was more of an inspiration for the placement of the card elements I had in mind. The beautiful thing about crafting is that there are NO rules!
We get started on this card with a base of Pretty Peacock cardstock. I chose the fish pattern from the Otterly Adorable paper pack as the focal panel backdrop and cut it out using the largest Textured Notes die. For the focal image, I chose the baby otter swimming with its parents because it seemed to work perfectly for the chosen sentiment of “you can do this.” I cut out the otters using the Spotlight on Nature dies. I wanted the focal image to stand out against the backdrop, so I matted it with some Pretty Peacock glimmer paper cut out with a slightly larger circle from the Spotlight on Nature die set. To add a bit more color and visual interest around the otters, I cut the smaller fish from Flirty Flamingo cardstock using the Otterly Amazing dies and then used my glue pen to adhere them. The otters are adhered to the sparkly mat with dimensionals and then adhered directly to the fishy backdrop. The sentiment from Saying Hey (currently on the Last Chance list!) is stamped in Pretty Peacock on a panel of the water paper from the Otterly Amazing paper pack that has been diecut using the Something Fancy banner die. I adhered this over a twist of some gold thread with two layers of dimensionals to be sure the sentiment really stands out. The full focal panel is adhered to the card base with dimensionals and we finish things off with a few Lost Lagoon faceted gems and riverside irregular pearls.
Next week, we’re going to look at some of my favorites that are on the Last Chance list. I hope you’ll follow along!
![Pecan Pie 8 1/2" X 11" Cardstock [ 161717 ]](https://assets1.tamsnetwork.com/images/EC042017NF/161717s.jpg "Pecan Pie 8 1/2\" X 11\" Cardstock [ 161717 ]")
![Mossy Meadow 8-1/2" X 11" Cardstock [ 133676 ]](https://assets1.tamsnetwork.com/images/EC042017NF/133676s.jpg "Mossy Meadow 8-1/2\" X 11\" Cardstock [ 133676 ]")
![Early Espresso 8-1/2" X 11" Cardstock [ 119686 ]](https://assets1.tamsnetwork.com/images/EC042017NF/119686s.jpg "Early Espresso 8-1/2\" X 11\" Cardstock [ 119686 ]")
![Smoky Slate 8-1/2" X 11" Cardstock [ 131202 ]](https://assets1.tamsnetwork.com/images/EC042017NF/131202s.jpg "Smoky Slate 8-1/2\" X 11\" Cardstock [ 131202 ]")
![Basic White 8 1/2" X 11" Cardstock [ 166780 ]](https://assets1.tamsnetwork.com/images/EC042017NF/166780s.jpg "Basic White 8 1/2\" X 11\" Cardstock [ 166780 ]")
![Gold Mercury Vellum 12" X 12" (30.5 X 30.5 Cm) Specialty Designer Series Paper [ 164142 ]](https://assets1.tamsnetwork.com/images/EC042017NF/164142s.jpg "Gold Mercury Vellum 12\" X 12\" (30.5 X 30.5 Cm) Specialty Designer Series Paper [ 164142 ]")
![Distressed Tile 3 D Embossing Folder [ 162189 ]](https://assets1.tamsnetwork.com/images/EC042017NF/162189s.jpg "Distressed Tile 3 D Embossing Folder [ 162189 ]")
![Faith Collection Bundle (English) [ 164796 ]](https://assets1.tamsnetwork.com/images/EC042017NF/164796s.jpg "Faith Collection Bundle (English) [ 164796 ]")
![Unbounded Love Photopolymer Stamp Set (English) [ 163378 ]](https://assets1.tamsnetwork.com/images/EC042017NF/163378s.jpg "Unbounded Love Photopolymer Stamp Set (English) [ 163378 ]")
![Early Espresso Classic Stampin' Pad [ 147114 ]](https://assets1.tamsnetwork.com/images/EC042017NF/147114s.jpg "Early Espresso Classic Stampin' Pad [ 147114 ]")
![Mossy Meadow Classic Stampin' Pad [ 147111 ]](https://assets1.tamsnetwork.com/images/EC042017NF/147111s.jpg "Mossy Meadow Classic Stampin' Pad [ 147111 ]")
![Autumn Leaves Dies [ 162185 ]](https://assets1.tamsnetwork.com/images/EC042017NF/162185s.jpg "Autumn Leaves Dies [ 162185 ]")
![Textured Notes Dies [ 165555 ]](https://assets1.tamsnetwork.com/images/EC042017NF/165555s.jpg "Textured Notes Dies [ 165555 ]")
![Gold Twisted Thread [ 164603 ]](https://assets1.tamsnetwork.com/images/EC042017NF/164603s.jpg "Gold Twisted Thread [ 164603 ]")
![Low Profile Dots [ 164658 ]](https://assets1.tamsnetwork.com/images/EC042017NF/164658s.jpg "Low Profile Dots [ 164658 ]")
![Stampin' Dimensionals [ 104430 ]](https://assets1.tamsnetwork.com/images/EC042017NF/104430s.jpg "Stampin' Dimensionals [ 104430 ]")

![Azure Afternoon 8 1/2" X 11" Cardstock [ 161719 ]](https://assets1.tamsnetwork.com/images/EC042017NF/161719s.jpg "Azure Afternoon 8 1/2\" X 11\" Cardstock [ 161719 ]")
![Pretty In Pink 8 1/2" X 11" Cardstock [ 163793 ]](https://assets1.tamsnetwork.com/images/EC042017NF/163793s.jpg "Pretty In Pink 8 1/2\" X 11\" Cardstock [ 163793 ]")
![Everyday Skies 6" X 6" (15.2 X 15.2 Cm) Designer Series Paper [ 164622 ]](https://assets1.tamsnetwork.com/images/EC042017NF/164622s.jpg "Everyday Skies 6\" X 6\" (15.2 X 15.2 Cm) Designer Series Paper [ 164622 ]")
![Pastel Ombre Glimmer 12" X 12" (30.5 X 30.5 Cm) Specialty Paper [ 164851 ]](https://assets1.tamsnetwork.com/images/EC042017NF/164851s.jpg "Pastel Ombre Glimmer 12\" X 12\" (30.5 X 30.5 Cm) Specialty Paper [ 164851 ]")
![Silver Foil 12" X 12" (30.5 X 30.5 Cm) Specialty Pack [ 163096 ]](https://assets1.tamsnetwork.com/images/EC042017NF/163096s.jpg "Silver Foil 12\" X 12\" (30.5 X 30.5 Cm) Specialty Pack [ 163096 ]")
![Saying Hey Photopolymer Stamp Set (English) [ 163697 ]](https://assets1.tamsnetwork.com/images/EC042017NF/163697s.jpg "Saying Hey Photopolymer Stamp Set (English) [ 163697 ]")
![Balmy Blue Classic Stampin' Pad [ 147105 ]](https://assets1.tamsnetwork.com/images/EC042017NF/147105s.jpg "Balmy Blue Classic Stampin' Pad [ 147105 ]")
![Blueberry Bushel Classic Stampin' Pad [ 147138 ]](https://assets1.tamsnetwork.com/images/EC042017NF/147138s.jpg "Blueberry Bushel Classic Stampin' Pad [ 147138 ]")
![Heartfelt Hexagon Punch [ 162888 ]](https://assets1.tamsnetwork.com/images/EC042017NF/162888s.jpg "Heartfelt Hexagon Punch [ 162888 ]")
![Friends For Life Dies (English) [ 163364 ]](https://assets1.tamsnetwork.com/images/EC042017NF/163364s.jpg "Friends For Life Dies (English) [ 163364 ]")
![Inspiring Snapdragons Dies [ 163673 ]](https://assets1.tamsnetwork.com/images/EC042017NF/163673s.jpg "Inspiring Snapdragons Dies [ 163673 ]")
![Pretty In Pink 3/8" (1 Cm) Bordered Ribbon [ 163784 ]](https://assets1.tamsnetwork.com/images/EC042017NF/163784s.jpg "Pretty In Pink 3/8\" (1 Cm) Bordered Ribbon [ 163784 ]")
![Adhesive Backed Sequins Trio [ 161206 ]](https://assets1.tamsnetwork.com/images/EC042017NF/161206s.jpg "Adhesive Backed Sequins Trio [ 161206 ]")
![Mini Glue Dots [ 103683 ]](https://assets1.tamsnetwork.com/images/EC042017NF/103683s.jpg "Mini Glue Dots [ 103683 ]")
![Fine-Tip Glue Pen [ 138309 ]](https://assets1.tamsnetwork.com/images/EC042017NF/138309s.jpg "Fine-Tip Glue Pen [ 138309 ]")
![Countryside Corners Dies [ 161471 ]](https://assets1.tamsnetwork.com/images/EC042017NF/161471s.jpg "Countryside Corners Dies [ 161471 ]")
![Blackberry Bliss & Gold 1/2" (1.3 Cm) Textured Ribbon [ 164039 ]](https://assets1.tamsnetwork.com/images/EC042017NF/164039s.jpg "Blackberry Bliss & Gold 1/2\" (1.3 Cm) Textured Ribbon [ 164039 ]")
![Linen Thread [ 104199 ]](https://assets1.tamsnetwork.com/images/EC042017NF/104199s.jpg "Linen Thread [ 104199 ]")
![Two Tone Sparkle Gems [ 164633 ]](https://assets1.tamsnetwork.com/images/EC042017NF/164633s.jpg "Two Tone Sparkle Gems [ 164633 ]")

![Fresh Freesia 8 1/2" X 11" Cardstock [ 155613 ]](https://assets1.tamsnetwork.com/images/EC042017NF/155613s.jpg "Fresh Freesia 8 1/2\" X 11\" Cardstock [ 155613 ]")
![Pool Party 8-1/2" X 11" Cardstock [ 122924 ]](https://assets1.tamsnetwork.com/images/EC042017NF/122924s.jpg "Pool Party 8-1/2\" X 11\" Cardstock [ 122924 ]")
![Old Olive 8-1/2" X 11" Cardstock [ 100702 ]](https://assets1.tamsnetwork.com/images/EC042017NF/100702s.jpg "Old Olive 8-1/2\" X 11\" Cardstock [ 100702 ]")
![Season Of Elegance 12" X 12" (30.5 X 30.5 Cm) Specialty Designer Series Paper [ 164144 ]](https://assets1.tamsnetwork.com/images/EC042017NF/164144s.jpg "Season Of Elegance 12\" X 12\" (30.5 X 30.5 Cm) Specialty Designer Series Paper [ 164144 ]")
![2024–2026 In Color™ Glimmer 12" X 12" (30.5 X 30.5 Cm) Specialty Paper [ 163771 ]](https://assets1.tamsnetwork.com/images/EC042017NF/163771s.jpg "2024–2026 In Color™ Glimmer 12\" X 12\" (30.5 X 30.5 Cm) Specialty Paper [ 163771 ]")
![Berry Burst, Old Olive & White 12" X 12" (30.5 X 30.5 Cm) Glimmer Specialty Paper [ 163769 ]](https://assets1.tamsnetwork.com/images/EC042017NF/163769s.jpg "Berry Burst, Old Olive & White 12\" X 12\" (30.5 X 30.5 Cm) Glimmer Specialty Paper [ 163769 ]")
![Three Color Glimmer 12" X 12" (30.5 X 30.5 Cm) Specialty Paper [ 162813 ]](https://assets1.tamsnetwork.com/images/EC042017NF/162813s.jpg "Three Color Glimmer 12\" X 12\" (30.5 X 30.5 Cm) Specialty Paper [ 162813 ]")
![Heartfelt Hellos Cling Stamp Set (English) [ 162964 ]](https://assets1.tamsnetwork.com/images/EC042017NF/162964s.jpg "Heartfelt Hellos Cling Stamp Set (English) [ 162964 ]")
![Fresh Freesia Classic Stampin' Pad [ 155611 ]](https://assets1.tamsnetwork.com/images/EC042017NF/155611s.jpg "Fresh Freesia Classic Stampin' Pad [ 155611 ]")
![Perennial Postage Dies [ 162607 ]](https://assets1.tamsnetwork.com/images/EC042017NF/162607s.jpg "Perennial Postage Dies [ 162607 ]")
![Sending Love Dies [ 162879 ]](https://assets1.tamsnetwork.com/images/EC042017NF/162879s.jpg "Sending Love Dies [ 162879 ]")
![Country Flowers Dies [ 163410 ]](https://assets1.tamsnetwork.com/images/EC042017NF/163410s.jpg "Country Flowers Dies [ 163410 ]")
![Mixed Labels Dies [ 164652 ]](https://assets1.tamsnetwork.com/images/EC042017NF/164652s.jpg "Mixed Labels Dies [ 164652 ]")
![Fresh Freesia 3/8" (1 Cm) Seam Binding Ribbon [ 164971 ]](https://assets1.tamsnetwork.com/images/EC042017NF/164971s.jpg "Fresh Freesia 3/8\" (1 Cm) Seam Binding Ribbon [ 164971 ]")
![Purple Fine Shimmer Gems [ 162611 ]](https://assets1.tamsnetwork.com/images/EC042017NF/162611s.jpg "Purple Fine Shimmer Gems [ 162611 ]")
![2024–2026 In Color™ Shimmer Gems [ 163781 ]](https://assets1.tamsnetwork.com/images/EC042017NF/163781s.jpg "2024–2026 In Color™ Shimmer Gems [ 163781 ]")
![Iridescent Faceted Gems [ 163368 ]](https://assets1.tamsnetwork.com/images/EC042017NF/163368s.jpg "Iridescent Faceted Gems [ 163368 ]")
![Purple Adhesive Backed Sequins [ 164970 ]](https://assets1.tamsnetwork.com/images/EC042017NF/164970s.jpg "Purple Adhesive Backed Sequins [ 164970 ]")
![Silver 12" X 12" (30.5 X 30.5 Cm) Foil Sheets [ 163387 ]](https://assets1.tamsnetwork.com/images/EC042017NF/163387s.jpg "Silver 12\" X 12\" (30.5 X 30.5 Cm) Foil Sheets [ 163387 ]")
![Painted Lavender Dies [ 162596 ]](https://assets1.tamsnetwork.com/images/EC042017NF/162596s.jpg "Painted Lavender Dies [ 162596 ]")
![Wanted To Say Dies [ 161594 ]](https://assets1.tamsnetwork.com/images/EC042017NF/161594s.jpg "Wanted To Say Dies [ 161594 ]")
![Fresh Freesia 1/8" (3.2 Mm) Faux Velvet Ribbon [ 165540 ]](https://assets1.tamsnetwork.com/images/EC042017NF/165540s.jpg "Fresh Freesia 1/8\" (3.2 Mm) Faux Velvet Ribbon [ 165540 ]")

![Basic Black 8-1/2" X 11" Cardstock [ 121045 ]](https://assets1.tamsnetwork.com/images/EC042017NF/121045s.jpg "Basic Black 8-1/2\" X 11\" Cardstock [ 121045 ]")
![Textured Metallic 12" X 12" (30.5 X 30.5 Cm) Specialty Paper [ 163772 ]](https://assets1.tamsnetwork.com/images/EC042017NF/163772s.jpg "Textured Metallic 12\" X 12\" (30.5 X 30.5 Cm) Specialty Paper [ 163772 ]")
![Bright Skies Dies [ 162793 ]](https://assets1.tamsnetwork.com/images/EC042017NF/162793s.jpg "Bright Skies Dies [ 162793 ]")
![Take To The Sky Suite Collection (English) [ 163832 ]](https://assets1.tamsnetwork.com/images/EC042017NF/163832s.jpg "Take To The Sky Suite Collection (English) [ 163832 ]")
![Clear Wink Of Stella Glitter Brush [ 141897 ]](https://assets1.tamsnetwork.com/images/EC042017NF/141897s.jpg "Clear Wink Of Stella Glitter Brush [ 141897 ]")
![Jet Black Stāzon Ink Pad [ 101406 ]](https://assets1.tamsnetwork.com/images/EC042017NF/101406s.jpg "Jet Black Stāzon Ink Pad [ 101406 ]")
![Night Of Navy Stampin' Blends Combo Pack [ 154891 ]](https://assets1.tamsnetwork.com/images/EC042017NF/154891s.jpg "Night Of Navy Stampin' Blends Combo Pack [ 154891 ]")
![Basic Black Stampin' Blends Combo Pack [ 154843 ]](https://assets1.tamsnetwork.com/images/EC042017NF/154843s.jpg "Basic Black Stampin' Blends Combo Pack [ 154843 ]")
![Smoky Slate Stampin' Blends Combo Pack [ 154904 ]](https://assets1.tamsnetwork.com/images/EC042017NF/154904s.jpg "Smoky Slate Stampin' Blends Combo Pack [ 154904 ]")

![Night Of Navy 8-1/2" X 11" Cardstock [ 100867 ]](https://assets1.tamsnetwork.com/images/EC042017NF/100867s.jpg "Night Of Navy 8-1/2\" X 11\" Cardstock [ 100867 ]")
![Graceful Greenery Vellum 12" X 12" (30.5 X 30.5 Cm) Specialty Designer Series Paper [ 164118 ]](https://assets1.tamsnetwork.com/images/EC042017NF/164118s.jpg "Graceful Greenery Vellum 12\" X 12\" (30.5 X 30.5 Cm) Specialty Designer Series Paper [ 164118 ]")
![Hot Air Balloon Bundle (English) [ 162755 ]](https://assets1.tamsnetwork.com/images/EC042017NF/162755s.jpg "Hot Air Balloon Bundle (English) [ 162755 ]")
![Spotlight On Nature Dies [ 163580 ]](https://assets1.tamsnetwork.com/images/EC042017NF/163580s.jpg "Spotlight On Nature Dies [ 163580 ]")
![Real Red Classic Stampin' Pad [ 147084 ]](https://assets1.tamsnetwork.com/images/EC042017NF/147084s.jpg "Real Red Classic Stampin' Pad [ 147084 ]")
![Cherry Cobbler & Gold 1/2'' (1.3 Cm) Metallic Ribbon [ 156312 ]](https://assets1.tamsnetwork.com/images/EC042017NF/156312s.jpg "Cherry Cobbler & Gold 1/2'' (1.3 Cm) Metallic Ribbon [ 156312 ]")
![Gold Textured Adhesive Backed Dots [ 164027 ]](https://assets1.tamsnetwork.com/images/EC042017NF/164027s.jpg "Gold Textured Adhesive Backed Dots [ 164027 ]")
![Iridescent Adhesive Backed Discs [ 161954 ]](https://assets1.tamsnetwork.com/images/EC042017NF/161954s.jpg "Iridescent Adhesive Backed Discs [ 161954 ]")
![Starburst Sequins [ 165539 ]](https://assets1.tamsnetwork.com/images/EC042017NF/165539s.jpg "Starburst Sequins [ 165539 ]")
![Melon Mambo 8-1/2" X 11" Cardstock [ 115320 ]](https://assets1.tamsnetwork.com/images/EC042017NF/115320s.jpg "Melon Mambo 8-1/2\" X 11\" Cardstock [ 115320 ]")
![Nature's Sweetness 12" X 12" (30.5 X 30.5 Cm) Specialty Designer Series Paper [ 162616 ]](https://assets1.tamsnetwork.com/images/EC042017NF/162616s.jpg "Nature's Sweetness 12\" X 12\" (30.5 X 30.5 Cm) Specialty Designer Series Paper [ 162616 ]")
![Melon Mambo & Granny Apple Green 12" X 12" (30.5 X 30.5 Cm) Foil Sheets [ 161953 ]](https://assets1.tamsnetwork.com/images/EC042017NF/161953s.jpg "Melon Mambo & Granny Apple Green 12\" X 12\" (30.5 X 30.5 Cm) Foil Sheets [ 161953 ]")
![Melon Mambo Classic Stampin' Pad [ 147051 ]](https://assets1.tamsnetwork.com/images/EC042017NF/147051s.jpg "Melon Mambo Classic Stampin' Pad [ 147051 ]")
![Changing Leaves Bundle (English) [ 164139 ]](https://assets1.tamsnetwork.com/images/EC042017NF/164139s.jpg "Changing Leaves Bundle (English) [ 164139 ]")
![Sunny Day Iridescent Dots [ 164696 ]](https://assets1.tamsnetwork.com/images/EC042017NF/164696s.jpg "Sunny Day Iridescent Dots [ 164696 ]")
![Country Woods 12" X 12" (30.5 X 30.5 Cm) Designer Series Paper [ 163393 ]](https://assets1.tamsnetwork.com/images/EC042017NF/163393s.jpg "Country Woods 12\" X 12\" (30.5 X 30.5 Cm) Designer Series Paper [ 163393 ]")
![Gold Foil Sheets [ 132622 ]](https://assets1.tamsnetwork.com/images/EC042017NF/132622s.jpg "Gold Foil Sheets [ 132622 ]")
![Something Fancy Bundle (English) [ 160425 ]](https://assets1.tamsnetwork.com/images/EC042017NF/160425s.jpg "Something Fancy Bundle (English) [ 160425 ]")
![Shaded Spruce Classic Stampin' Pad [ 147088 ]](https://assets1.tamsnetwork.com/images/EC042017NF/147088s.jpg "Shaded Spruce Classic Stampin' Pad [ 147088 ]")
![Natural Tones Linen Thread [ 164071 ]](https://assets1.tamsnetwork.com/images/EC042017NF/164071s.jpg "Natural Tones Linen Thread [ 164071 ]")
![Transparent Adhesive Backed Dots [ 163432 ]](https://assets1.tamsnetwork.com/images/EC042017NF/163432s.jpg "Transparent Adhesive Backed Dots [ 163432 ]")
![Neutrals Adhesive Backed Sequins [ 161627 ]](https://assets1.tamsnetwork.com/images/EC042017NF/161627s.jpg "Neutrals Adhesive Backed Sequins [ 161627 ]")

![Pretty Peacock 8-1/2" X 11" Cardstock [ 150880 ]](https://assets1.tamsnetwork.com/images/EC042017NF/150880s.jpg "Pretty Peacock 8-1/2\" X 11\" Cardstock [ 150880 ]")
![Flirty Flamingo 8-1/2" X 11" Cardstock [ 141416 ]](https://assets1.tamsnetwork.com/images/EC042017NF/141416s.jpg "Flirty Flamingo 8-1/2\" X 11\" Cardstock [ 141416 ]")
![Otterly Adorable Suite Collection (English) [ 164939 ]](https://assets1.tamsnetwork.com/images/EC042017NF/164939s.jpg "Otterly Adorable Suite Collection (English) [ 164939 ]")
![Something Fancy Dies [ 160424 ]](https://assets1.tamsnetwork.com/images/EC042017NF/160424s.jpg "Something Fancy Dies [ 160424 ]")
![Pretty Peacock Classic Stampin’ Pad [ 150083 ]](https://assets1.tamsnetwork.com/images/EC042017NF/150083s.jpg "Pretty Peacock Classic Stampin’ Pad [ 150083 ]")
![Faceted Gems Trio Pack [ 162148 ]](https://assets1.tamsnetwork.com/images/EC042017NF/162148s.jpg "Faceted Gems Trio Pack [ 162148 ]")
![Riverside Irregular Pearls [ 164937 ]](https://assets1.tamsnetwork.com/images/EC042017NF/164937s.jpg "Riverside Irregular Pearls [ 164937 ]")
