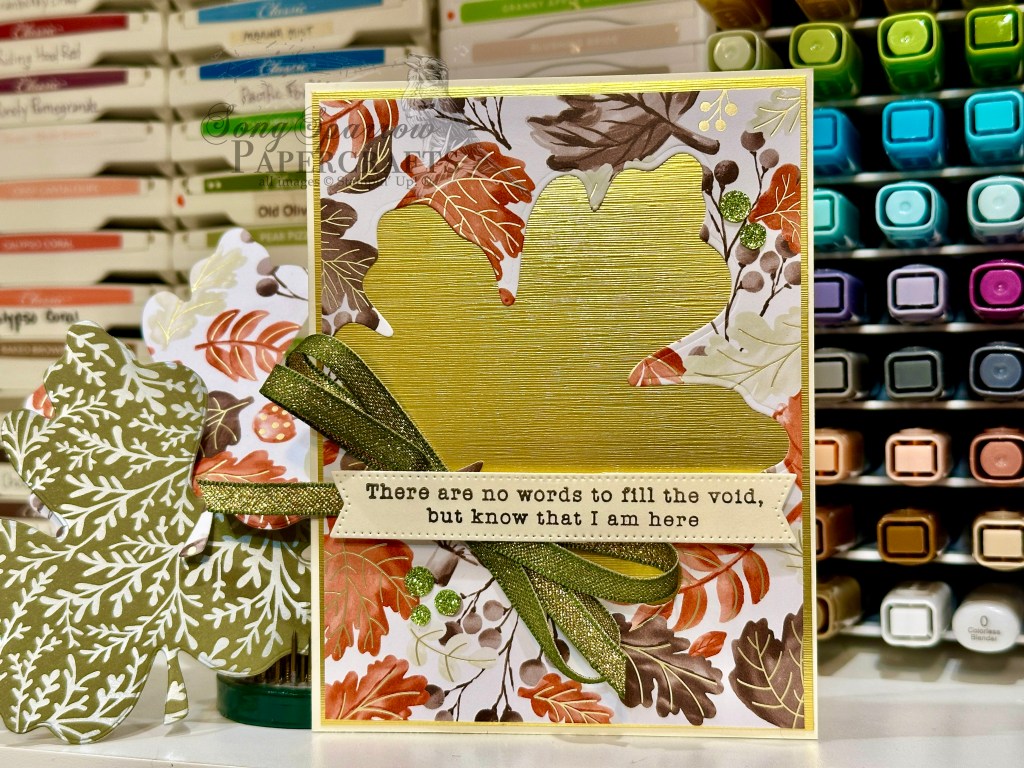
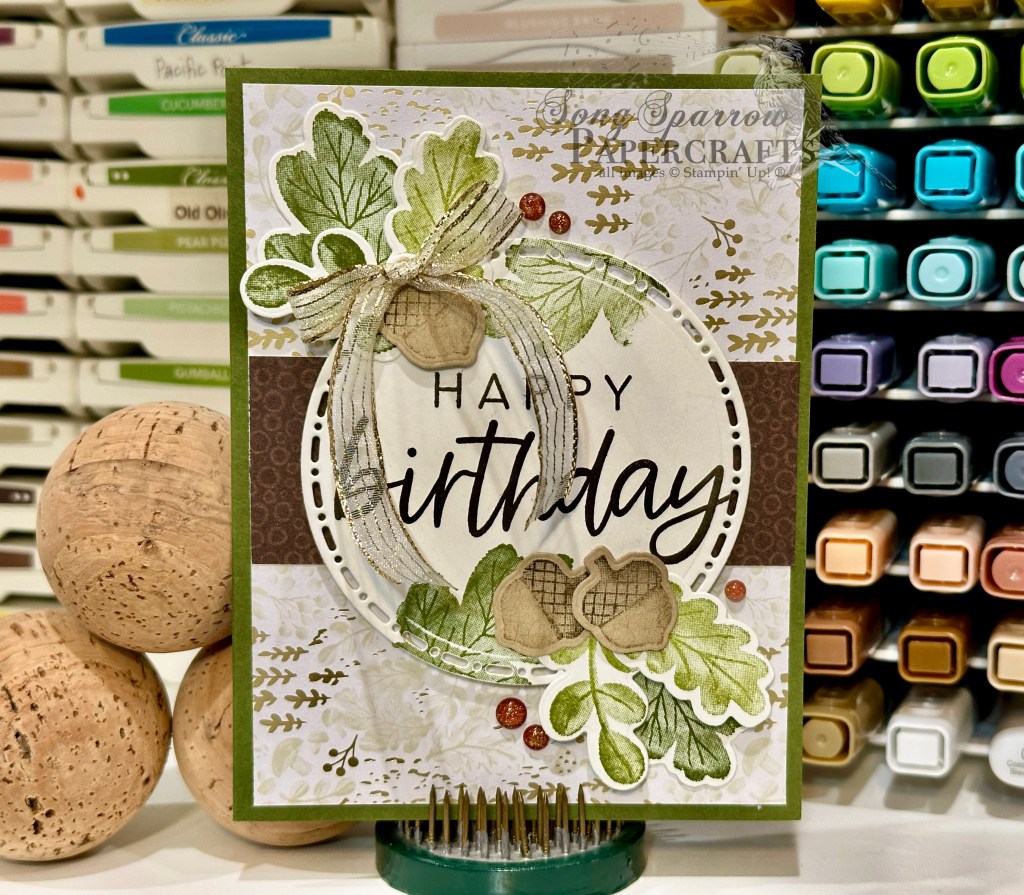
Happy midweek, friends! This week we’re exploring a fun design theme – all that glitters is gold. And we’re using all kinds of golden crafty goodies, new and old, to create our projects. Today’s clean and simple design uses a die negative as the star of the show and combines some Gathering Together products with the Sentimental Framing stamps.
We get started with a neutral base of Very Vanilla cardstock. Our focal panel is the backdrop of our card front and combines a sheet of the Gathering Moments paper pack with some gold textured metallic paper. The largest leaf die from the Gathering Moments die set provides our negative that allows that beautiful gold focal image to take center stage. Our sentiment from the Sentimental Framing stamp set is stamped in Early Espresso and then cut out with the Stylish Shapes banner die using the extension method. I really love the play on words with this sentiment and the negative space of this card design – it really couldn’t have worked out more perfectly! The sentiment is adhered at the bottom-third of the card with dimensionals over a double twist of Mossy Meadow & Gold ribbon. We finish things off with some green Traditional Sparkling sequins – a perfect way to tie it all together.
I’ll be bringing you some more shiny goodness tomorrow. I hope you’ll drop in and check it out!
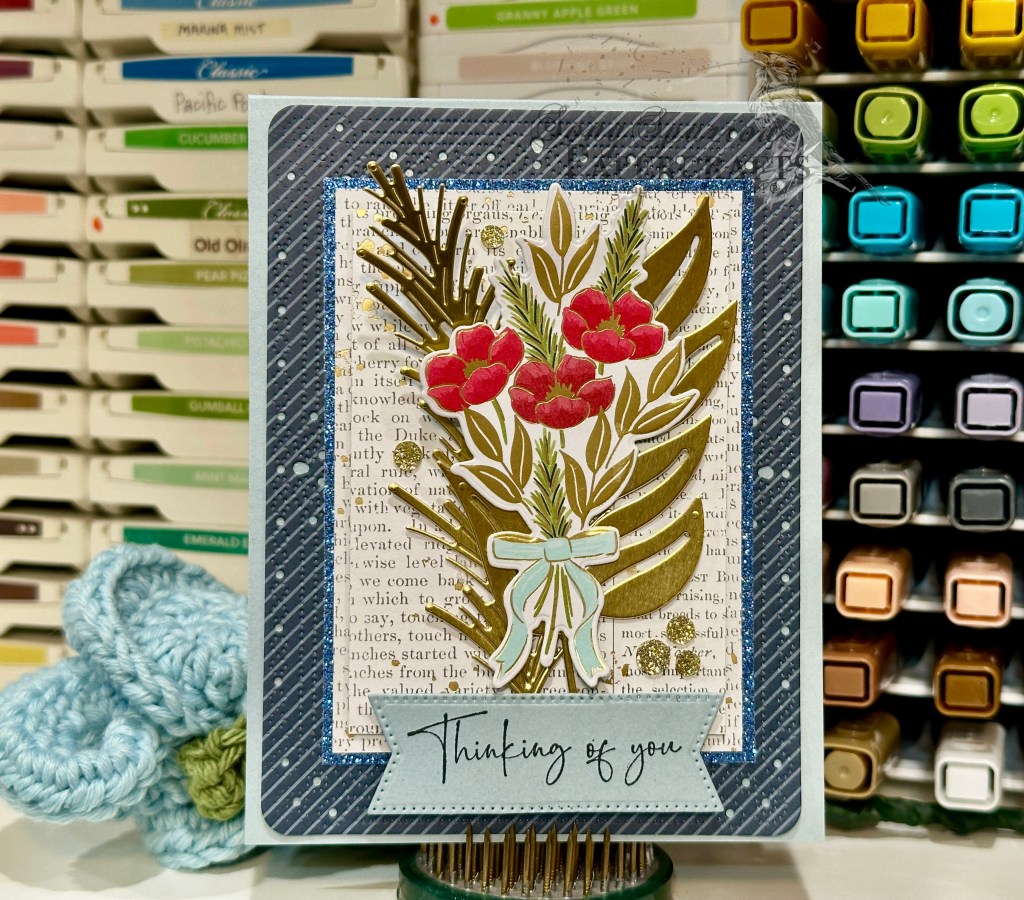
Howdy, everybody, and happy Tuesday to you! This week we are exploring a new design theme – all that glitters is gold. And we’re using all of the sparkly gold goodies in our crafty stash. Today’s card combines the new Traditions of Christmas paper with a few classics, like Nature’s Sweetness and some gold foil.
What I love about the new papers is that, while they lean easily toward holiday project designs, they are equally as versatile in making more general projects, as well. Today, for instance, we’re using Christmas greenery to create a thinking of you card.
We get started with a base of Cloud Cover cardstock. The background panel is a sheet of the Secret Sea & Cloud Cover stripe from the Traditions of Christmas paper pack and cutting it with the Sentimental Framing dies. The focal panel in the center of our card front starts with a double stack of the foiled script sheet from the Nature’s Sweetness pack. I liked the picture-in-picture look of the nesting rectangles with the top layer on dimensionals. These two panels are matted with some Misty Moonlight glimmer paper from the Peaceful Garden glimmer paper pack. Our focal image combines three dies from the Christmas Greenery set. The background greenery is cut from gold foil and mounted behind the focal spray which is diecut from a sheet of the Traditions of Christmas paper and mounted over the greenery sprigs with dimensionals. The sentiment from The Right Words set is stamped in Secret Sea on Cloud Cover and then diecut using the Stylish Shapes banner die using the extension method. The sentiment is popped up with dimensionals for extra eye-catching height. We finish things off with a scattering of Traditional Sparkling sequins.
We’re going to be pairing up some more fun glittery gold products from the crafty stash tomorrow. I hope you’ll drop by and check it out!
Welcome to a new week, everybody! It was a relatively busy weekend for us with lots of bowling for the kiddo, but we spent it together and that sure made it fun! We capped off the weekend by bringing our feral momma kitty and her five precious week-old babies inside in preparation from exterior housework we’re having done this week that would have upended her cozy hiding spot. So we scooped up her little birthing hut (thank goodness she used it this time!) and brought her and the crew inside where they’ll all stay until babies are big enough to go to the local rescue group for adoption and mom is recovered enough to (finally) get fixed. I’ll have to share some precious baby photos once I can get momma to let me take some good ones.
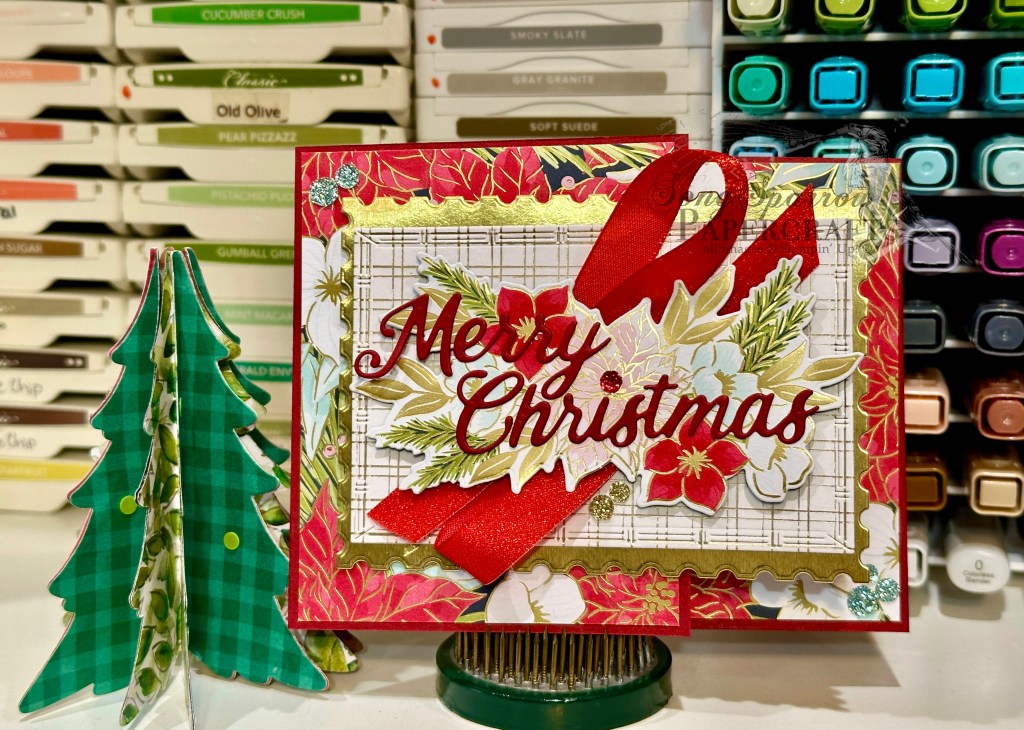
This week we’re on to a new design theme — all that glitters is gold. With so many beautiful gold foiled and glittery products in the Stampin’ Up! lineup, it should be a week of shiny goodness! We get started with some goodies from the new suite called Traditions of Christmas and pair them up with a few oldies, like gold foil sheets, Regal Distressed Patterns paper, and a few die sets.
You might recognize this gift card layout and think that it looks familiar. And you would be exactly right! We’re flipping our new slider fun fold on its side to create today’s beautiful gift card design. I’m currently working on the tutorial and hope to have that up on the site later this week!
We get started with a base of Cherry Cobbler cardstock and score it to create the off-center barn fold look with the right panel serving as the pocket for our slider section. A sheet of the beautiful Traditions of Christmas paper serves as the backdrop for our card front. The overlapping focal panel backdrop is a combination of gold foil cut with the Perennial Postage dies and a sheet of the Regal Distressed Patterns paper cut with the Textured Notes dies. We use a combination of the Christmas Greenery dies and paper snips to cut the floral elements from another sheet of the Traditions of Christmas paper. The larger spray of florals is the focal image for the front panel, while the smaller fussy-cut elements serve as the cover for the slider pocket of the gift card panel. The front floral spray is adhered over a twist of the Real Red shiny ribbon using several layers of dimensionals. We finish everything off with a scattering of the Traditional Sparkling sequins across the front panel and add just a few on the gift card panel.
When adhering the florals on the sliding panel, ensure that they are flat for a fully unobstructed open/close of the inside slider gift card panel.
I hope you’ll drop in tomorrow to see what we have glittering next!
Welcome in, crafty friends, and welcome to the weekend! After a busy morning, we are enjoying some family downtime this afternoon before we hit some projects while the weather is nice. What do you have on the weekend agenda?
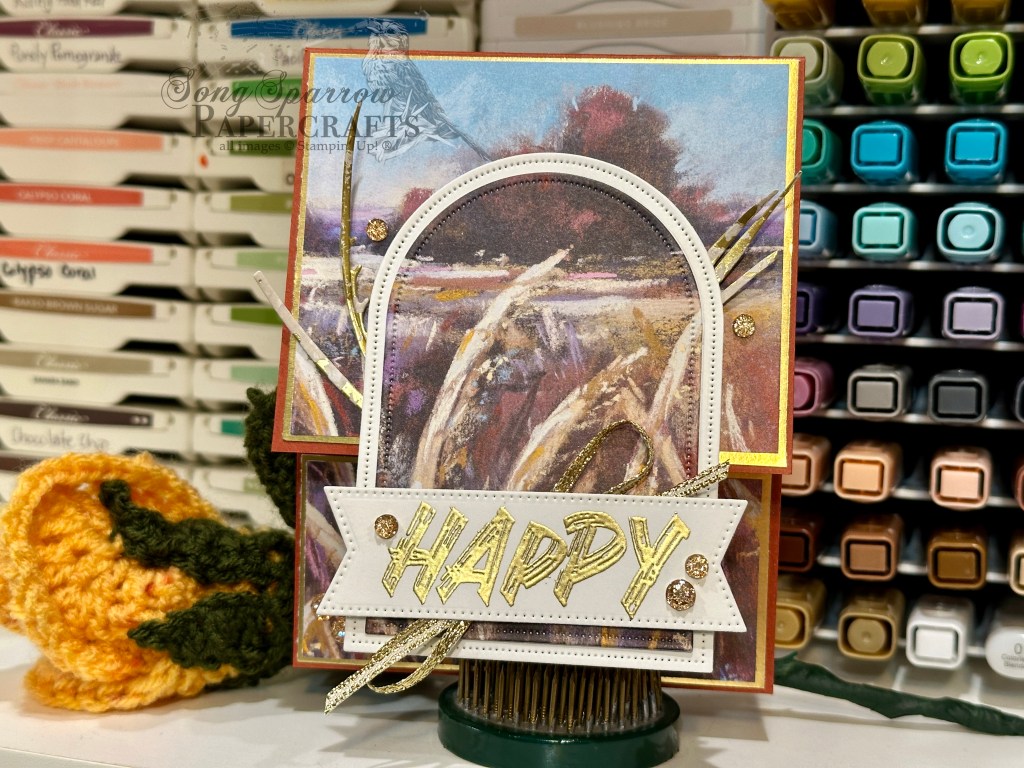
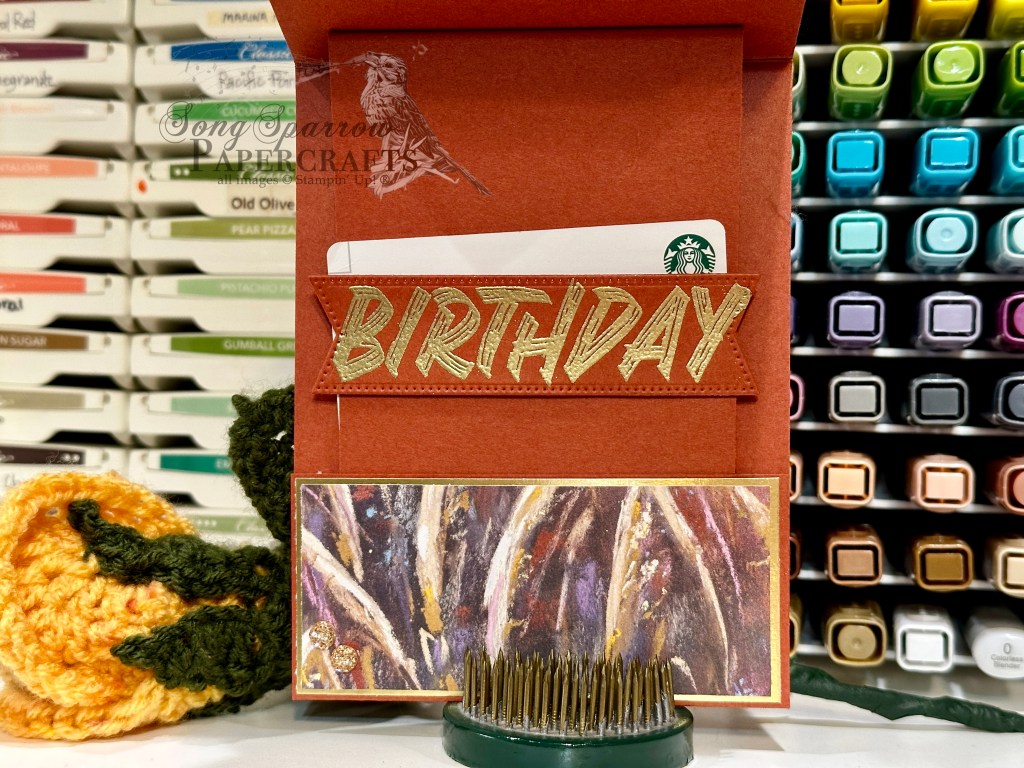
We’re rounding out our series this week where we’ve been restocking the birthday card stash, and there’s nothing better than a fun fold gift card holder to close things out for this series! I found the cutest (and easiest) pop-up gift card holder over at Klompen Stampers and just had to give it a try. I combined this cool fun fold with a picture-in-picture design using the Splendid Autumn paper and Layered Thoughts stamps. And I can’t wait to try this again with a scene building set!
We get started with a base of Cajun Craze cardstock, which serves as both the card base and the inside gift card panel. The front picture-in-picture panel starts with the background sheet from the Splendid Autumn paper pack that is matted with gold foil specialty paper. The window section is a second sheet of the same Splendid Autumn pattern that is cut using the Everyday Arches dies and matted with a larger-sized arch of Basic White. I used the negatives from the grass die from the Mixed Florals set cut from a sheet of the cream Season of Elegance paper and tucked the grass behind the panel inset to make it look like grass is waving outside the window. The sentiment is from the Layered Thoughts stamp set and the first portion of our birthday greeting is stamped on white cardstock, heat embossed in gold, and then cut with the largest banner from the Stylish Shapes die set. The sentiment panel is mounted over a bow of gold trim on dimensionals. The front panel is finished with a scattering of gold drusy embellishments.
The inside of our card is our pop-up gift card panel which is cut from Cajun Craze cardstock. It tucks behind the bottom panel of the card front to create the gift card movement when the card opens and closes. The second portion of our birthday greeting is on the bottom panel of the gift card section. It’s stamped on Cajun Craze cardstock, heat embossed in gold, and then cut with the largest Stylish Shapes banner die using the extension method. It’s a tight fit, but it works. This panel is adhered to the gift card panel with the dimensionals.
Here’s a quick look at this gift card in action.
My newest batch of Holiday Mini catalog and Online Exclusives have arrived, so I’m looking forward to bringing you a closer look at those as we explore the theme all that glitters is gold. I hope you’ll drop in and see what that’s all about!
So sorry to disappear on you yesterday. By the time our day wound down and I got yesterday’s card finished, it was far too dark to take a photo that would do the project any justice.
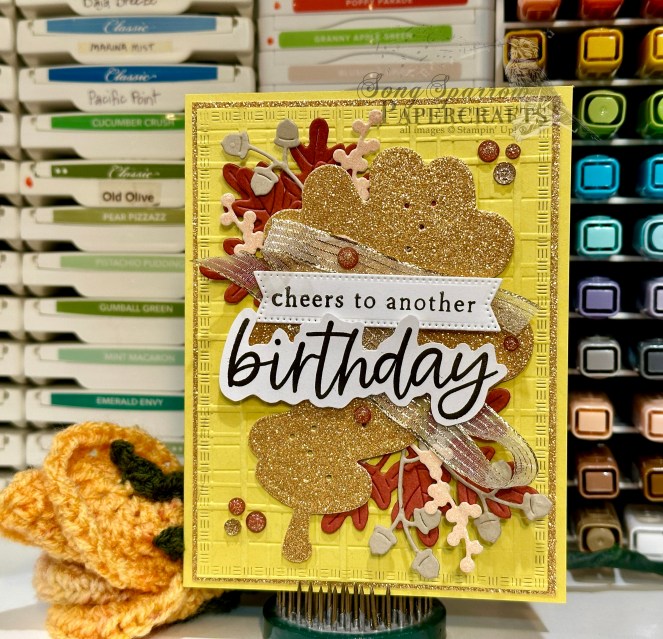
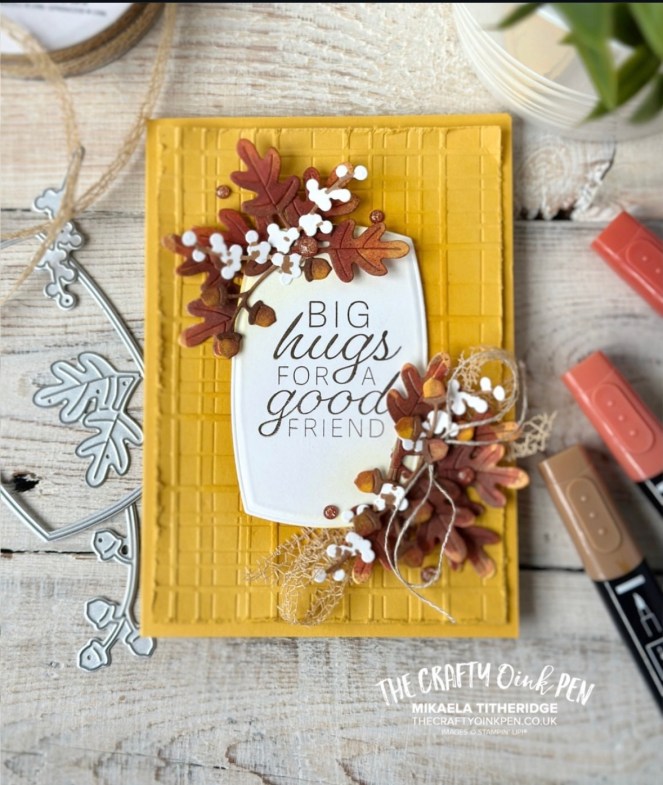
This week, we’re restocking the birthday card stash by using a variety of products in the crafty stash. We’re pairing up the Label Me Grateful and Gathering Moments dies for today’s card. This design is inspired by a card that I saw on The Crafty O ink Pen over on Insta. And I must say that one of my favorite things about using inspiration is seeing how much or how little you can see the inspiration behind the design once it’s finished. And just for funsies, today I’m gonna show the two side-by-side and you tell me. Can you see it?
What drew me to the inspiration design to start with is our Luv 2 Stamp monthly team challenge bingo card – with one square being to design a fall card. And I figured what better way to kill two birds with one stone than to adapt this super beautiful fall inspiration design to fit the birthday design theme for this week. And one of the first obstacles I had to face was the color palette because I was completely out of my preferred base color of Crushed Curry and had to search for a suitable substitute that would work with the vision I had for the end result. I must admit that the new In Color Darling Duckling is NOT a favorite of mine. And if I’m being completely honest, I pretty much hate it because it has too much green and reminds me of … well, I’ll just say that I prefer not to say and let your mind wander. BUT I decided to give it a try here because I figured this would be the best context in which I evercould potentially use the few sheets of Darling Duckling I have in the stash. And from there, I worked to choose colors and elements that tamed the duck and let thoughts of fall shine.
So we get started with a base of Darling Duckling. I cut an extra quarter panel for the focal panel backdrop and cut it down using the largest Textured Notes die and then machine embossed it with the Forever Plaid embossing folder. This panel is matted with Peach Pie glimmer paper from the In Color pack. We move on to cutting our smaller detail elements with the Label Me Grateful dies using a combination of Cajun Craze, Crumb Cake, and the peach end of a sheet of Pastel Ombre glimmer paper. To really hit home with the fall theme, the center sentiment is matted by a large oak leaf cut from Peach Pie glimmer paper using the Gathering Moments die. It’s adhered a little askew in the center of the card and then the smaller fall foliage elements are tucked around on each side in opposing corners and held with strips of tear-n-tape. The sentiment is broken into two distinct but complimentary sections. The first part of the sentiment is from the Scenic Adventure set and is stamped in Early Espresso on white and then cut with the smallest banner die from the Stylish Shapes set. Birthday is stamped on a scrap of white, also in espresso, and then hand cut with paper snips. Both portions are affixed to the center of the card over some gold striped ribbon using several layers of dimensionals. We finish things off with a scattering of Cajun Craze dots and gold drusy embellishments.
This card is one big, fun, fall celebration. I just couldn’t be more pleased with how this morphed into one big sparkly birthday party in an envelope! I hope you’ll drop by tomorrow to see what other fun goodies we can pair together.
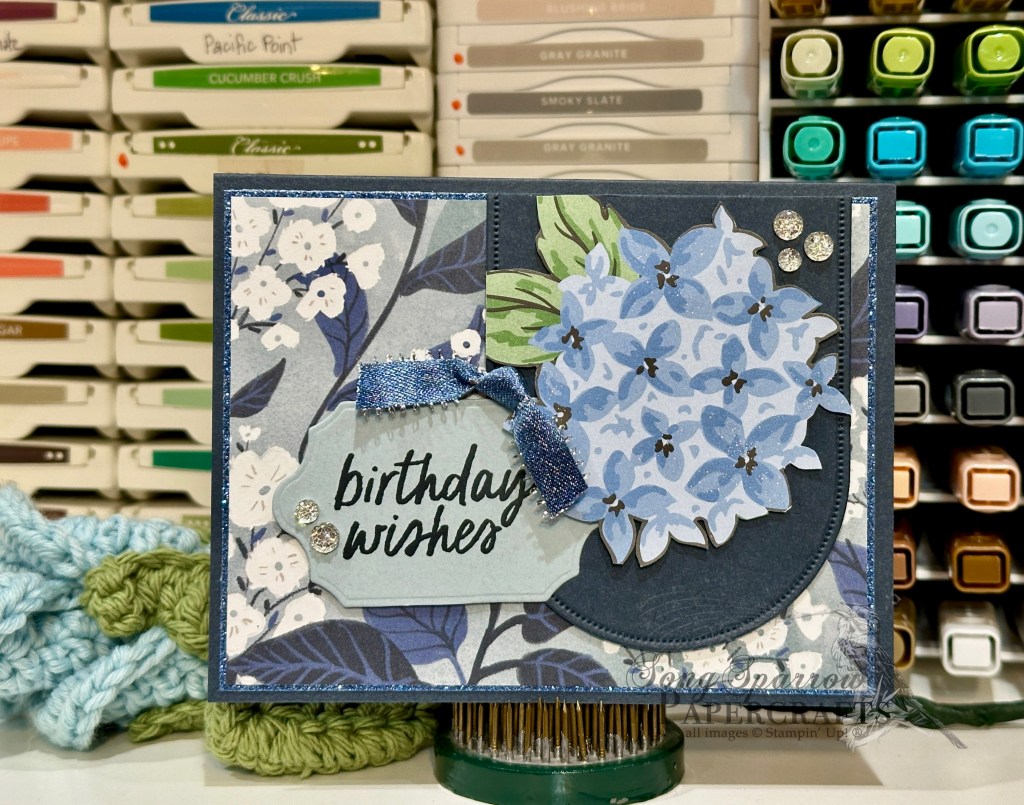
After a day like today, it has never seemed more appropriate to be working with a peaceful product line. This week we’re restocking our birthday card stash using a variety of products in the crafty stash. And today’s design pairs the beautiful Peaceful Garden products with the Simply Said stamp set to create this lovely botanical birthday card. The super classy and versatile layout is inspired by Sweet Stampin’.
We get started with a base of Secret Sea cardstock. The background panel is a floral sheet of the Peaceful Garden patterned paper that is matted with a sheet of Misty Moonlight glimmer paper from the coordinating glimmer pack. Our focal panel is a trio of elements starting with an arched backdrop cut from Secret Sea using the Everyday Arches dies. I fussy cut the hydrangea bloom from a sheet of the Lovely Garden patterned paper and affixed it to the arch panel using dimensionals. The sentiment from Simply Said is stamped in Secret Sea on Cloud Cover cardstock and then cut with the smallest Peace on Earth dies using the reverse-extension method, making it smaller than the standard die size. It’s tucked under the hydrangea bunch. The full panel is adhered to the card front with dimensionals. We add a knot of Misty Moonlight & silver edged ribbon over the sentiment, some Wink of Stella to the hydrangea blooms, and two bunches of silver Drusy embellishments opposite one another on the focal panel.
I feel like this card imparts a lot of warmth with its hues of blues and subtle sparkles. It certainly makes me smile anyway! Pop in tomorrow and see what we can pair together next to create a cheery birthday design.
After a long day at the office, I alllllllmost pulled a skip for today. But I found some inspiration over at The Crafty Carrot that pulled me out of my dog-tired slump and I managed to pull together this super cute variation of the inspo card.
This week, we’re working on restocking the birthday card stash by pulling together goodies from the stash. Today we’re using another combination of new and old with the Gathering Together products and With You in Mind stamp set.
We get started with a base of Mossy Meadow cardstock. Two patterns from the Gathering Together patterned paper pack work together to create our backdrop. I chose the large birthday sentiment from the With You in Mind stamp set and cut a circle from Whisper White cardstock using the Spotlight on Nature dies to create the panel. The largest leaf from the Gathering Moments stamp set is stamped on either side of the sentiment. The panel is adhered in the center of the card with dimensionals. And then a collection of leaves from the stamp set is stamped onto white using a combination of Mossy Meadow and Old Olive inks and then diecut with the coordinating Gathering Moments dies. A few acorns are stamped on Crumb Cake and then diecut with the coordinating die. The leaves and acorns are tucked around the sentiment panel. A festive bow of gold striped mesh ribbon is placed at the top to hug the birthday sentiment. We finish things off with a few Cajun Craze & Gold dots for a pop of eye-catching color.
This design is super easy to replicate and would be great for a guy or gal in your life. I love having neutral designs like this in the stash to make it easy to grab one, write a note, and drop it in the mail on the fly. Tune in tomorrow to see what combination we’ll be using next!
It’s hard to believe that we’re already starting a new week. I feel like we just started Friday! It was a nice weekend around here. The temps were cool and we had some rainy days – perfect for staying in and doing nothing.
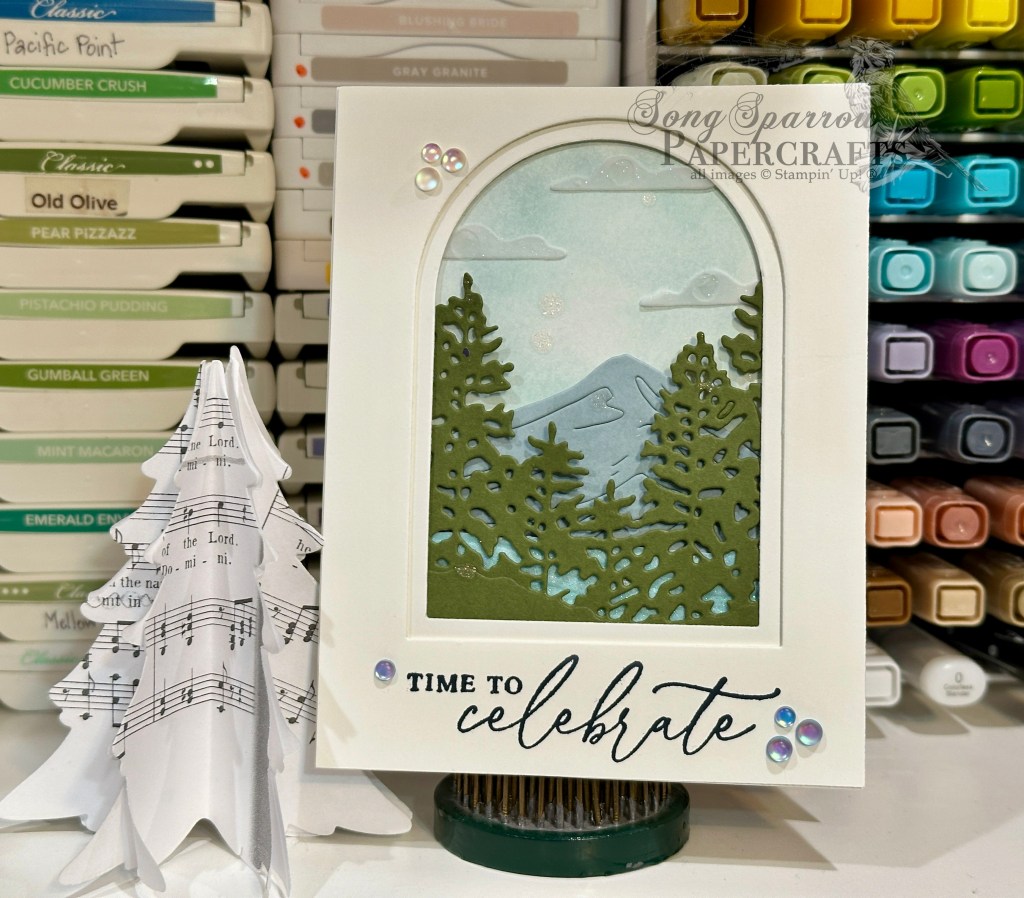
We’re on to a new week and new design theme. For me, September is a very busy birthday month between family and close friends, and so I’m (a little selfishly) in birthday mode for this week’s projects. We’re going to be pulling out old and new sets from the crafty stash to create our designs. First up is this card for the nature lovers in your clan. Inspired by a lovely window scene created by Simple Stamper over in the Instaverse, we’re combining the Scenic Adventure and Light & Wonder die sets to create this beautiful mountain vista in our picture window.
We get started with a base of white cardstock. We build our scene on the front panel of the card base. I started by lightly sketching the smallest arch on the card front to ensure that I covered what would be visible through the picture window. We started by “painting” the sky with Cloud Cover and Pool Party inks blended using the small blending brushes. The mountain is cut from Cloud Cover cardstock using the Scenic Adventure die and then gave the mountain a bit more dimension by shading with Cloud Cover and blending brush. The mountain is adhered using dimensionals. I had a leftover piece of light blue pastel ombre glimmer paper that was embossed using the Soft Waves embossing folder that I adhered at the bottom of the mountain so that it would peek through the line of trees in the front of our scene. The trees are cut from Mossy Meadow cardstock using the large treeline die from the Light & Wonder die set, which is adhered with dimensionals. The clouds are cut from a small scrap of vellum using the Scenic Adventure dies and adhered in the sky using glue dots. They’re colored with Wink of Stella so they sparkle and then the mountain scene is splattered with Wink of Stella for some subtle twinkles across the scene. I cut nesting arches using the Everyday Arches dies from two additional quarter panels of white to create the window frame. The sentiment from Beautiful Butterflies is stamped in Secret Sea under the window of the outside panel. The window pane look is create by adhering the two arched panels together with dimensionals. A scattering of frosted iridescent dots add some additional ethereal sparkle across the card front.
We’re continuing our birthday theme tomorrow. I hope you’ll drop in and see what pairing we have tomorrow.
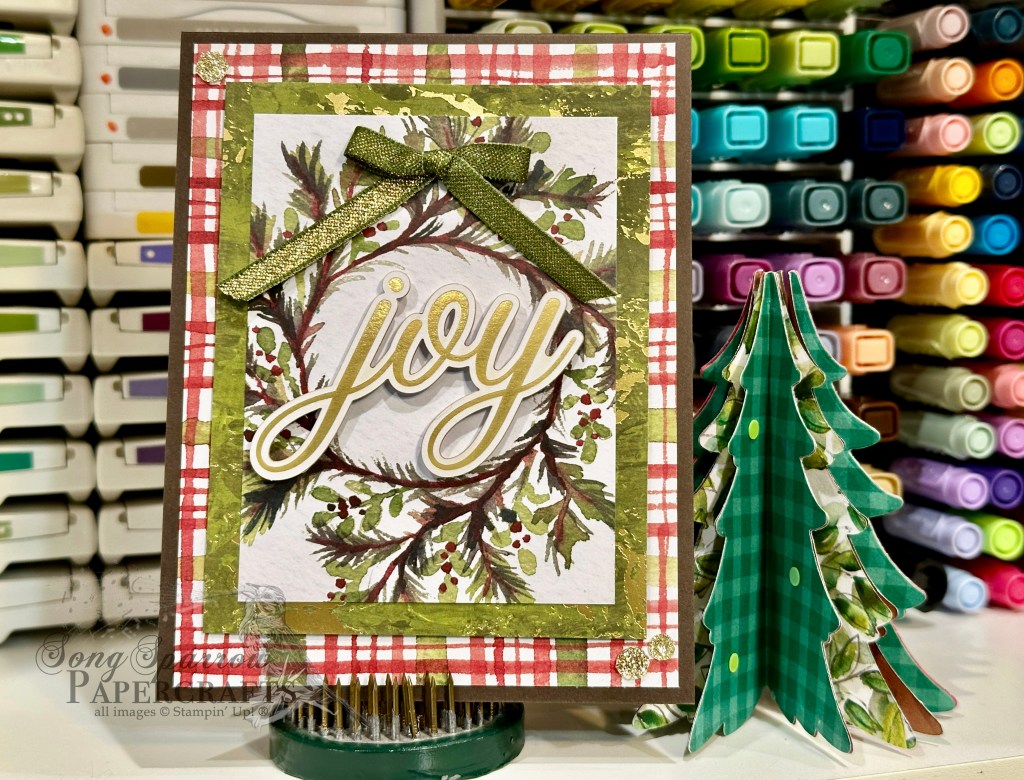
This week we’ve been making clean & simple holiday card designs using some of the new Stampin’ Up! holiday products that just launched this week. Today we’re pairing up the Joyful Days Memories & More cards with the Greetings for You ephemera to create this lovely wreath of joy.
We get started with a base of Early Espresso cardstock. I love how it pulls out the wood stem of the evergreen in the wreath. Our backdrop is one of the larger cards of Christmas plaid from the Joyful Days pack. This really makes things festive. Our focal panel consists of two panels – the wreath card from the Joyful Days pack and the mat of Old Olive Season of Elegance paper. I love how this gives the perfect amount of sparkle that really helps bring our sentiment front and center. The full panel is adhered to the card backdrop using dimensionals. The sentiment JOY is from the Greetings for You ephemera pack and is adhered on multiple layers of dimensionals to ensure it stands tall above the rest of the design. We finish things off with a bow of Mossy Meadow & Gold ribbon at the top-center of our wreath and then some gold sparkly sequins from the Traditional Sparkling Sequins pack in opposing corners to tie the gold elements together.
I hope you’ve gotten some good ideas from this week’s designs to get you started on your holiday card stash. Next week is all about birthdays. I hope you’ll come along as we tour through the crafty stash to make some fun birthday cards.
Howdy, friends! Have this week’s card designs gotten you into the holiday spirit? Well, today’s card will have you smelling evergreens. *wink*
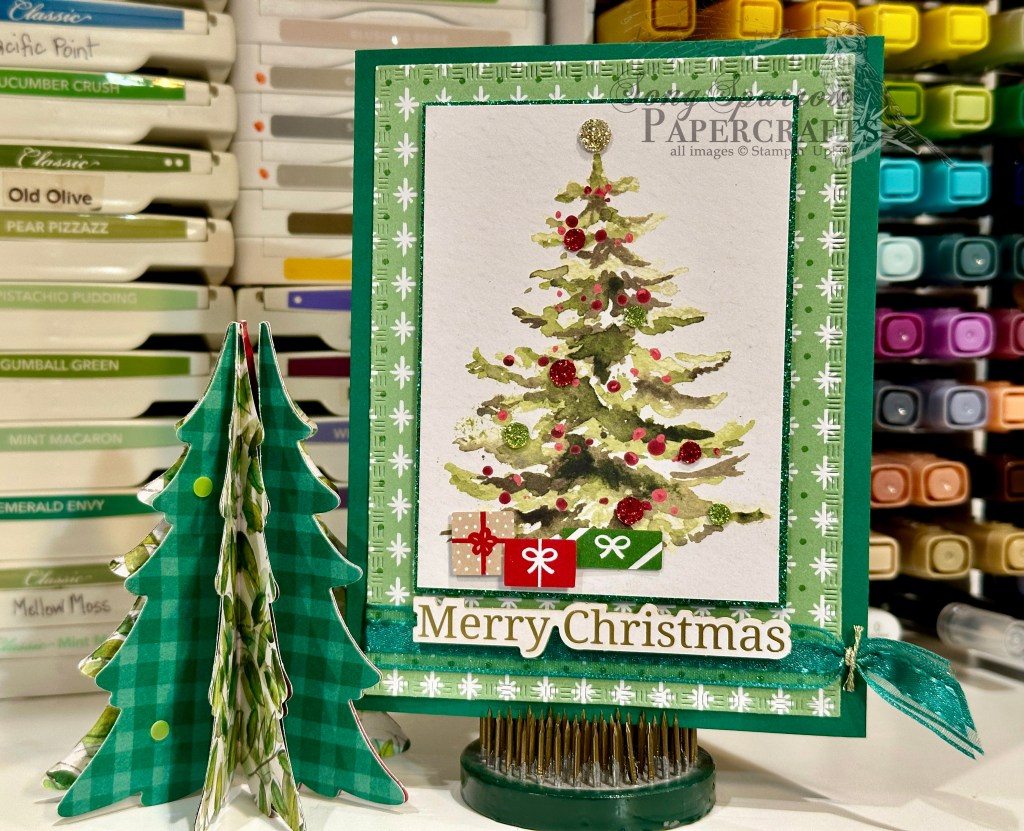
We’re using some of the new Stampin’ Up! holiday release products to create our clean & simple holiday card designs this week. And today, we’re pairing up the Joyful Days Memories & More card pack with the Christmas Tags & More paper pack with coordinating ephemera sheets and the Greetings for You ephemera pack. And what kind of card would it be if I didn’t include some sparkle? *grin*
We get started with this card with a base of Shaded Spruce cardstock. The background panel is a sheet of snowflake pattern Christmas Tags & More paper diecut with the largest Textured Notes die. The bottom of the panel is wrapped with Shaded Spruce sheer ribbon that is tied off with some gold thread (both now retired). Our focal panel is the smaller evergreen card from the Joyful Days card pack that is matted with some (retired) Shaded Spruce festive glimmer paper and mounted on dimensionals. I added some of the packages from the ephemera sheet included in the Christmas Tags & More pack and mounted them on varying levels of dimensionals for some realistic depth of scene. The tree baubles are some of the traditional sparkling sequins. We finish things off with a holiday sentiment from the Greetings for You ephemera pack and mount it with enough dimensionals to stand above the center focal point.
This is such a super simple design – so fun & so easy to put together. And don’t you think it’s just a lovely way to send some holiday cheer? Tomorrow we’re going to close out this week’s design series with a traditional evergreen wreath. I hope you’ll pop in and check it out.
![Very Vanilla 8 1/2" X 11" Cardstock [ 166784 ]](https://assets1.tamsnetwork.com/images/EC042017NF/166784s.jpg "Very Vanilla 8 1/2\" X 11\" Cardstock [ 166784 ]")
![Gathering Together 12" X 12" (30.5 X 30.5 Cm) Specialty Designer Series Paper [ 165969 ]](https://assets1.tamsnetwork.com/images/EC042017NF/165969s.jpg "Gathering Together 12\" X 12\" (30.5 X 30.5 Cm) Specialty Designer Series Paper [ 165969 ]")
![Textured Metallic 12" X 12" (30.5 X 30.5 Cm) Specialty Paper [ 163772 ]](https://assets1.tamsnetwork.com/images/EC042017NF/163772s.jpg "Textured Metallic 12\" X 12\" (30.5 X 30.5 Cm) Specialty Paper [ 163772 ]")
![Gathering Moments Dies [ 165979 ]](https://assets1.tamsnetwork.com/images/EC042017NF/165979s.jpg "Gathering Moments Dies [ 165979 ]")
![Stylish Shapes Dies [ 159183 ]](https://assets1.tamsnetwork.com/images/EC042017NF/159183s.jpg "Stylish Shapes Dies [ 159183 ]")
![Sentimental Framing Photopolymer Stamp Set (English) [ 165475 ]](https://assets1.tamsnetwork.com/images/EC042017NF/165475s.jpg "Sentimental Framing Photopolymer Stamp Set (English) [ 165475 ]")
![Early Espresso Classic Stampin' Pad [ 147114 ]](https://assets1.tamsnetwork.com/images/EC042017NF/147114s.jpg "Early Espresso Classic Stampin' Pad [ 147114 ]")
![Mossy Meadow & Gold 1/4" (6.4 Mm) [ 166158 ]](https://assets1.tamsnetwork.com/images/EC042017NF/166158s.jpg "Mossy Meadow & Gold 1/4\" (6.4 Mm) [ 166158 ]")
![Traditional Sparkling Sequins [ 165875 ]](https://assets1.tamsnetwork.com/images/EC042017NF/165875s.jpg "Traditional Sparkling Sequins [ 165875 ]")
![Stampin' Dimensionals [ 104430 ]](https://assets1.tamsnetwork.com/images/EC042017NF/104430s.jpg "Stampin' Dimensionals [ 104430 ]")
![Cloud Cover 8 1/2" X 11" Cardstock [ 165621 ]](https://assets1.tamsnetwork.com/images/EC042017NF/165621s.jpg "Cloud Cover 8 1/2\" X 11\" Cardstock [ 165621 ]")
![Traditions Of Christmas 12" X 12" (30.5 X 30.5 Cm) Specialty Designer Series Paper [ 165853 ]](https://assets1.tamsnetwork.com/images/EC042017NF/165853s.jpg "Traditions Of Christmas 12\" X 12\" (30.5 X 30.5 Cm) Specialty Designer Series Paper [ 165853 ]")
![Nature's Sweetness 12" X 12" (30.5 X 30.5 Cm) Specialty Designer Series Paper [ 162616 ]](https://assets1.tamsnetwork.com/images/EC042017NF/162616s.jpg "Nature's Sweetness 12\" X 12\" (30.5 X 30.5 Cm) Specialty Designer Series Paper [ 162616 ]")
![Peaceful Garden 12" X 12" (30.5 X 30.5 Cm) Glimmer Paper [ 165929 ]](https://assets1.tamsnetwork.com/images/EC042017NF/165929s.jpg "Peaceful Garden 12\" X 12\" (30.5 X 30.5 Cm) Glimmer Paper [ 165929 ]")
![Gold Foil Sheets [ 132622 ]](https://assets1.tamsnetwork.com/images/EC042017NF/132622s.jpg "Gold Foil Sheets [ 132622 ]")
![Christmas Greenery Dies [ 165872 ]](https://assets1.tamsnetwork.com/images/EC042017NF/165872s.jpg "Christmas Greenery Dies [ 165872 ]")
![Sentimental Framing Dies [ 165476 ]](https://assets1.tamsnetwork.com/images/EC042017NF/165476s.jpg "Sentimental Framing Dies [ 165476 ]")
![The Right Words Cling Stamp Set (English) [ 165316 ]](https://assets1.tamsnetwork.com/images/EC042017NF/165316s.jpg "The Right Words Cling Stamp Set (English) [ 165316 ]")
![Secret Sea Classic Stampin' Pad [ 165285 ]](https://assets1.tamsnetwork.com/images/EC042017NF/165285s.jpg "Secret Sea Classic Stampin' Pad [ 165285 ]")

![Cherry Cobbler 8-1/2" X 11" Cardstock [ 119685 ]](https://assets1.tamsnetwork.com/images/EC042017NF/119685s.jpg "Cherry Cobbler 8-1/2\" X 11\" Cardstock [ 119685 ]")
![Regal Distressed Patterns 12" X 12" (30.5 X 30.5 Cm) Specialty Designer Series Paper [ 164037 ]](https://assets1.tamsnetwork.com/images/EC042017NF/164037s.jpg "Regal Distressed Patterns 12\" X 12\" (30.5 X 30.5 Cm) Specialty Designer Series Paper [ 164037 ]")
![Perennial Postage Dies [ 162607 ]](https://assets1.tamsnetwork.com/images/EC042017NF/162607s.jpg "Perennial Postage Dies [ 162607 ]")
![Textured Notes Dies [ 165555 ]](https://assets1.tamsnetwork.com/images/EC042017NF/165555s.jpg "Textured Notes Dies [ 165555 ]")
![Words For The Season Dies (English) [ 165797 ]](https://assets1.tamsnetwork.com/images/EC042017NF/165797s.jpg "Words For The Season Dies (English) [ 165797 ]")
![Real Red 1/2" (1.3 Cm) Shiny Ribbon [ 165876 ]](https://assets1.tamsnetwork.com/images/EC042017NF/165876s.jpg "Real Red 1/2\" (1.3 Cm) Shiny Ribbon [ 165876 ]")
![Fine-Tip Glue Pen [ 138309 ]](https://assets1.tamsnetwork.com/images/EC042017NF/138309s.jpg "Fine-Tip Glue Pen [ 138309 ]")
![Tear & Tape Adhesive [ 154031 ]](https://assets1.tamsnetwork.com/images/EC042017NF/154031s.jpg "Tear & Tape Adhesive [ 154031 ]")
![Cajun Craze 8-1/2" X 11" Cardstock [ 119684 ]](https://assets1.tamsnetwork.com/images/EC042017NF/119684s.jpg "Cajun Craze 8-1/2\" X 11\" Cardstock [ 119684 ]")
![Basic White 8 1/2" X 11" Cardstock [ 166780 ]](https://assets1.tamsnetwork.com/images/EC042017NF/166780s.jpg "Basic White 8 1/2\" X 11\" Cardstock [ 166780 ]")
![Splendid Autumn 6" X 6" (15.2 X 15.2 Cm) Designer Series Paper [ 164173 ]](https://assets1.tamsnetwork.com/images/EC042017NF/164173s.jpg "Splendid Autumn 6\" X 6\" (15.2 X 15.2 Cm) Designer Series Paper [ 164173 ]")
![Season Of Elegance 12" X 12" (30.5 X 30.5 Cm) Specialty Designer Series Paper [ 164144 ]](https://assets1.tamsnetwork.com/images/EC042017NF/164144s.jpg "Season Of Elegance 12\" X 12\" (30.5 X 30.5 Cm) Specialty Designer Series Paper [ 164144 ]")
![Layered Thoughts Photopolymer Stamp Set (English) [ 165346 ]](https://assets1.tamsnetwork.com/images/EC042017NF/165346s.jpg "Layered Thoughts Photopolymer Stamp Set (English) [ 165346 ]")
![Versamark Pad [ 102283 ]](https://assets1.tamsnetwork.com/images/EC042017NF/102283s.jpg "Versamark Pad [ 102283 ]")
![Metallics Wow! Embossing Powder [ 165678 ]](https://assets1.tamsnetwork.com/images/EC042017NF/165678s.jpg "Metallics Wow! Embossing Powder [ 165678 ]")
![Everyday Arches Dies [ 164629 ]](https://assets1.tamsnetwork.com/images/EC042017NF/164629s.jpg "Everyday Arches Dies [ 164629 ]")
![Mixed Florals Dies [ 164641 ]](https://assets1.tamsnetwork.com/images/EC042017NF/164641s.jpg "Mixed Florals Dies [ 164641 ]")
![Gold & Silver 1/8" (3.2 Mm) Trim Combo Pack [ 161633 ]](https://assets1.tamsnetwork.com/images/EC042017NF/161633s.jpg "Gold & Silver 1/8\" (3.2 Mm) Trim Combo Pack [ 161633 ]")
![Drusy Adhesive Backed Embellishments [ 164223 ]](https://assets1.tamsnetwork.com/images/EC042017NF/164223s.jpg "Drusy Adhesive Backed Embellishments [ 164223 ]")
![Darling Duckling 8 1/2" X 11" Cardstock [ 165622 ]](https://assets1.tamsnetwork.com/images/EC042017NF/165622s.jpg "Darling Duckling 8 1/2\" X 11\" Cardstock [ 165622 ]")
![Crumb Cake 8-1/2" X 11" Cardstock [ 120953 ]](https://assets1.tamsnetwork.com/images/EC042017NF/120953s.jpg "Crumb Cake 8-1/2\" X 11\" Cardstock [ 120953 ]")
![Pastel Ombre Glimmer 12" X 12" (30.5 X 30.5 Cm) Specialty Paper [ 164851 ]](https://assets1.tamsnetwork.com/images/EC042017NF/164851s.jpg "Pastel Ombre Glimmer 12\" X 12\" (30.5 X 30.5 Cm) Specialty Paper [ 164851 ]")
![2024–2026 In Color™ Glimmer 12" X 12" (30.5 X 30.5 Cm) Specialty Paper [ 163771 ]](https://assets1.tamsnetwork.com/images/EC042017NF/163771s.jpg "2024–2026 In Color™ Glimmer 12\" X 12\" (30.5 X 30.5 Cm) Specialty Paper [ 163771 ]")
![Label Me Grateful Dies [ 166111 ]](https://assets1.tamsnetwork.com/images/EC042017NF/166111s.jpg "Label Me Grateful Dies [ 166111 ]")
![Scenic Adventure Photopolymer Stamp Set (English) [ 165466 ]](https://assets1.tamsnetwork.com/images/EC042017NF/165466s.jpg "Scenic Adventure Photopolymer Stamp Set (English) [ 165466 ]")
![With You In Mind Photopolymer Stamp Set (English) [ 164747 ]](https://assets1.tamsnetwork.com/images/EC042017NF/164747s.jpg "With You In Mind Photopolymer Stamp Set (English) [ 164747 ]")
![Gold Striped 3/8" (1 Cm) Mesh Ribbon [ 165599 ]](https://assets1.tamsnetwork.com/images/EC042017NF/165599s.jpg "Gold Striped 3/8\" (1 Cm) Mesh Ribbon [ 165599 ]")
![Cajun Craze & Gold Dots [ 165984 ]](https://assets1.tamsnetwork.com/images/EC042017NF/165984s.jpg "Cajun Craze & Gold Dots [ 165984 ]")
![Secret Sea 8 1/2" X 11" Cardstock [ 165624 ]](https://assets1.tamsnetwork.com/images/EC042017NF/165624s.jpg "Secret Sea 8 1/2\" X 11\" Cardstock [ 165624 ]")
![Peaceful Garden 12" X 12" (30.5 X 30.5 Cm) Designer Series Paper [ 165917 ]](https://assets1.tamsnetwork.com/images/EC042017NF/165917s.jpg "Peaceful Garden 12\" X 12\" (30.5 X 30.5 Cm) Designer Series Paper [ 165917 ]")
![Lovely Garden 12" X 12" (30.5 X 30.5 Cm) Designer Series Paper [ 165524 ]](https://assets1.tamsnetwork.com/images/EC042017NF/165524s.jpg "Lovely Garden 12\" X 12\" (30.5 X 30.5 Cm) Designer Series Paper [ 165524 ]")
![Simply Said Mix & Match Photopolymer Stamp Set (English) [ 163756 ]](https://assets1.tamsnetwork.com/images/EC042017NF/163756s.jpg "Simply Said Mix & Match Photopolymer Stamp Set (English) [ 163756 ]")
![Peace On Earth Dies [ 165924 ]](https://assets1.tamsnetwork.com/images/EC042017NF/165924s.jpg "Peace On Earth Dies [ 165924 ]")
![Misty Moonlight & Silver Edged 1/2" (1.3 Cm) Ribbon [ 165931 ]](https://assets1.tamsnetwork.com/images/EC042017NF/165931s.jpg "Misty Moonlight & Silver Edged 1/2\" (1.3 Cm) Ribbon [ 165931 ]")
![Clear Wink Of Stella Glitter Brush [ 141897 ]](https://assets1.tamsnetwork.com/images/EC042017NF/141897s.jpg "Clear Wink Of Stella Glitter Brush [ 141897 ]")
![Mini Glue Dots [ 103683 ]](https://assets1.tamsnetwork.com/images/EC042017NF/103683s.jpg "Mini Glue Dots [ 103683 ]")
![Mossy Meadow 8-1/2" X 11" Cardstock [ 133676 ]](https://assets1.tamsnetwork.com/images/EC042017NF/133676s.jpg "Mossy Meadow 8-1/2\" X 11\" Cardstock [ 133676 ]")
![Whisper White 8-1/2" X 11" Cardstock [ 100730 ]](https://assets1.tamsnetwork.com/images/EC042017NF/100730s.jpg "Whisper White 8-1/2\" X 11\" Cardstock [ 100730 ]")
![Spotlight On Nature Dies [ 163580 ]](https://assets1.tamsnetwork.com/images/EC042017NF/163580s.jpg "Spotlight On Nature Dies [ 163580 ]")
![Gathering Moments Bundle (English) [ 165980 ]](https://assets1.tamsnetwork.com/images/EC042017NF/165980s.jpg "Gathering Moments Bundle (English) [ 165980 ]")
![Mossy Meadow Classic Stampin' Pad [ 147111 ]](https://assets1.tamsnetwork.com/images/EC042017NF/147111s.jpg "Mossy Meadow Classic Stampin' Pad [ 147111 ]")
![Old Olive Classic Stampin' Pad [ 147090 ]](https://assets1.tamsnetwork.com/images/EC042017NF/147090s.jpg "Old Olive Classic Stampin' Pad [ 147090 ]")
![Crumb Cake Classic Stampin' Pad [ 147116 ]](https://assets1.tamsnetwork.com/images/EC042017NF/147116s.jpg "Crumb Cake Classic Stampin' Pad [ 147116 ]")
![Vellum 8-1/2" X 11" Cardstock [ 101856 ]](https://assets1.tamsnetwork.com/images/EC042017NF/101856s.jpg "Vellum 8-1/2\" X 11\" Cardstock [ 101856 ]")
![Scenic Adventure Dies [ 165467 ]](https://assets1.tamsnetwork.com/images/EC042017NF/165467s.jpg "Scenic Adventure Dies [ 165467 ]")
![Light & Wonder Dies [ 165762 ]](https://assets1.tamsnetwork.com/images/EC042017NF/165762s.jpg "Light & Wonder Dies [ 165762 ]")
![Beautiful Butterflies Photopolymer Stamp Set (English) [ 164608 ]](https://assets1.tamsnetwork.com/images/EC042017NF/164608s.jpg "Beautiful Butterflies Photopolymer Stamp Set (English) [ 164608 ]")
![Cloud Cover Classic Stampin' Ink Refill [ 165279 ]](https://assets1.tamsnetwork.com/images/EC042017NF/165279s.jpg "Cloud Cover Classic Stampin' Ink Refill [ 165279 ]")
![Pool Party Classic Stampin' Pad [ 147107 ]](https://assets1.tamsnetwork.com/images/EC042017NF/147107s.jpg "Pool Party Classic Stampin' Pad [ 147107 ]")
![Small Blending Brushes [ 160518 ]](https://assets1.tamsnetwork.com/images/EC042017NF/160518s.jpg "Small Blending Brushes [ 160518 ]")
![Frosted Iridescent Dots [ 165766 ]](https://assets1.tamsnetwork.com/images/EC042017NF/165766s.jpg "Frosted Iridescent Dots [ 165766 ]")
![Early Espresso 8-1/2" X 11" Cardstock [ 119686 ]](https://assets1.tamsnetwork.com/images/EC042017NF/119686s.jpg "Early Espresso 8-1/2\" X 11\" Cardstock [ 119686 ]")
![Joyful Days Memories & More Card Pack [ 165822 ]](https://assets1.tamsnetwork.com/images/EC042017NF/165822s.jpg "Joyful Days Memories & More Card Pack [ 165822 ]")
![Greetings For You Mix & Match Ephemera Pack (English) [ 166208 ]](https://assets1.tamsnetwork.com/images/EC042017NF/166208s.jpg "Greetings For You Mix & Match Ephemera Pack (English) [ 166208 ]")
![Mini Stampin' Dimensionals [ 144108 ]](https://assets1.tamsnetwork.com/images/EC042017NF/144108s.jpg "Mini Stampin' Dimensionals [ 144108 ]")
![Shaded Spruce 8-1/2" X 11" Cardstock [ 146981 ]](https://assets1.tamsnetwork.com/images/EC042017NF/146981s.jpg "Shaded Spruce 8-1/2\" X 11\" Cardstock [ 146981 ]")
![Christmas Tags & More 6" X 6" (15.2 X 15.2 Cm) Mix & Match Specialty Designer Series Paper [ 165907 ]](https://assets1.tamsnetwork.com/images/EC042017NF/165907s.jpg "Christmas Tags & More 6\" X 6\" (15.2 X 15.2 Cm) Mix & Match Specialty Designer Series Paper [ 165907 ]")
![Festive 12" X 12" (30.5 X 30.5 Cm) Glimmer Paper [ 164106 ]](https://assets1.tamsnetwork.com/images/EC042017NF/164106s.jpg "Festive 12\" X 12\" (30.5 X 30.5 Cm) Glimmer Paper [ 164106 ]")
![Shaded Spruce 1/2" (1.3 Cm) Satin & Sheer Ribbon [ 164224 ]](https://assets1.tamsnetwork.com/images/EC042017NF/164224s.jpg "Shaded Spruce 1/2\" (1.3 Cm) Satin & Sheer Ribbon [ 164224 ]")
![Gold Twisted Thread [ 164603 ]](https://assets1.tamsnetwork.com/images/EC042017NF/164603s.jpg "Gold Twisted Thread [ 164603 ]")
